
Leaderboard


Popular Content
Showing content with the highest reputation on 28/05/15 in all areas
-
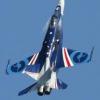
Here's a health and safety warning .... "This thread contains images some viewers may find disturbing" Ignore this warning at your peril if you want to reach the end of this thread without feeling the need to vent your anger in any way, shape or form, particularly if you are an ardent Wingnut Wings fan or a rivet counter. This is an RFI of the WNW kit that is much sought after yet is no longer in production, but ... * It is by a distinctly average model builder of WW1 aircraft - in fact any type of model * It does not incorporate the use of turnbuckles - sacrilege to many for a kit of this scale - but it has been rigged - inside and out * It is brush painted (in a mixture of enamels and acrylics) and never been anywhere near an airbrush * It bears some resemblance to the aircraft it depicts - the person I built it for, SWMBO, is not concerned with historical accuracy * It has not been weathered to near death and destruction in the interests of "realism" * It was built for the pleasure of building a kit (I know, a bit odd these days) and not the masochism that accompanies the need to be 100% accurate to the last stitch and the desperate need for approval and inclusion. End of health warnings. So why have I posted this then? Well, it's because despite all of the above, it's a model, it's my hobby and I can. And there may be some of you who like it and it might bring a smile to your day. Okay, for those of you still with me, this is my version of N500, the prototype Sopwith Triplane - the aircraft that is replicated in the Great War Display Team and based at White Waltham airfield. Should you wish to replicate, or avoid replicating, the CDL effect is Precision Paints' Mid-Sandstone enamel, the wood-effect is Humbrol Wood base layer with artist acrylic browns of various shades layered over the top, metal is Humbrol rattle can aluminium, rigging is Albion Alloys silver-nickel wire for support struts and knit-in elastic thread coloured by felt pen for the control wires. Decals are from the kit. Vallejo matt varnish finish, but wing undersides were left with a glossy Klear finish to mimic the reflective dope finish it wore in real life (okay so I did look something up). Oh yes, the spots on the engine cowling were applied by a "Pilot Super Color" pemanent (silver) ink pen (which dries without the need for a protective varnish finish). So how did it turn out ... Comments welcome as ever. Viewers who have been affected by the images shown in this thread may wish to see more at here.24 points
-
All, I hope you don't mind another large scale Hurricane on display ............ This Airfix kit was given to me by a friend (together with the BF l09E) and both these kits date from the early 1970's. I just had to order replacement decal sets (direct from Airfix) for these as the originals had really dried out and discoloured badly. As these date from the 70's the quality of the molding is excellent with no flash or seams on the parts. The only problem with this particular kit was that is was stored in a loft for years and the box was crushed flat so some parts were badly distorted. I therefore had some fit problems with the fuselage and upper wing panel on starboard side. Other than that a great kit resulting in a very enjoyable build. Model built strictly OOB and has been entirely brush painted including the sublte weathering. Hope the brush painted finish does not look too bad. Series of pictures in different locations experimenting with natural and artificial light. Regards Dave Regards Dave14 points
-
Hi Everyone, Here`s another addition to my `Flying Dragons` South Vietnam Air Force collection and an aircraft I never envisaged building as regards Vietnam Tamiyas 1/48 Storch kit Converted to an MS 500 Criquet as used by the fledgling South Vietnamese Air Force in the early 1950`s Firstly as a Flight Trainer and later as a Forward Air Controller (FAC) Most of the parts to do it were in the box luckily, the only additions being a couple of power bulges on the engine cowling and some after market decals from Hannants. I had to sand off the fabric effect from the wings as these had aluminium skinned ones. Hope you enjoy, Thanks for looking Cheers Russ13 points
-
Hello friends Long time since my last post here. This time with an AFV, this was an under commission build. The kit its not what we can find today, but its not that bad so in the end it looks like a Panzer II to me I hope you like it, for me was a pleasure, my first work with German Desert Units and i love it! thank you for looking Best regards Vitor Costa12 points
-
Hi all, I'm back from uni now and I have had the opportunity to take a few pictures of the last model I built at uni. Airfix's 1/72 Mk I; the Mk I obviously being by far the prettiest Spitfire ever built. Built OOB with the addition of Tamiya tape seatbelts a fishing line aerial and tin foil rear view mirror. WIP Built wheels up, pilot in, as the great RJ Mitchell had planned, the Spitfire looks so much better in flight than she does with the undercarriage out. No more explanation needed. IMGP1028_zpsfqquv3t5 by Ben Standen, on Flickr IMGP1029_zpsgdhrh9ui by Ben Standen, on Flickr IMGP1030_zpshxgjdfsq by Ben Standen, on Flickr IMGP1031_zpssqhts9cd by Ben Standen, on Flickr IMGP1032_zpshor6fuhx by Ben Standen, on Flickr IMGP1033_zps9jal1snp by Ben Standen, on Flickr IMGP1035_zps4fvledzp by Ben Standen, on Flickr IMGP1037_zpsexujgwq7 by Ben Standen, on Flickr Cheers, Ben11 points
-
Hiya Folks, A change is as good as a rest and here is another shelf of doom `save' which started off as a good idea at the time but then ran out of enthusiasm towards the end due to other projects taking over! These are both from the very nice Hasegawa 1/48th kit and are; P-47C-2, 41-6271 `Rat Racer' of the 61st FS, 56FGth usually flown by Lt. Frank McAuley, Halesworth in 1943; The kit was converted to a P-47C by altering the engine cooling gills as best as I could and leaving off the under wing pylons. The decals came from Skys Decals; [/url] P-47D-1, 42-7938`Hewlett- Woodmere Long Island flown by Major David Schilling, Deputy Commander of the 56th FG, Halesworth, October 1943; Built straight from the box using the kit decals. Both were brush painted using Humbrol enamel Olive Drab and Neutral Grey. The early P-47`s of the 56th FG had some amazing nose art and they do become addictive once you start delving into them, even to a dyed in the wool British RAF/FAA modeller like myself! Cheers Tony11 points
-
Hello All, My first ship in a lo-o-ong time. It's the Airfix Mary Rose, picked up for silly cheap in an Airfix sale to take my paints order over the free shipping threshold. The kit and its decals are really nice, in sharp contrast to the nigh-on 60 year old moulds in the rest of this series. It looked too toy-like without any rigging, so I did some basic rigging, much simplified! The rigging is brown sewing thread de-fuzzed by running it through PVA glue and squeezing out the excess between my fingers. I constructed the ladders by winding thread around a notched rectangular frame made from one of the sprues, gluing the thread together with brushed-on dilute PVA and then cutting the ladders out with scissors when everything was dry. I am successfully resisting the urge to find out what the real rigging was like, so this can stay on the finished pile! Thanks for looking, Adrian9 points
-
Hi all,talk about co-incidence,just logged in to post this one and Adrian has just posted his and I,m jealous because I wish I had the patience to do some rigging! This was a stocking filler from my eldest at Christmas and it,s been in and out of it,s box for months till I got her finished today,a lovely little kit which airfix are practically giving away brought back a lot of memories of building their original little sailing ships as a kid.Thanks for looking.9 points
-
Finished this nice little kit tonight and it's a number of firsts for me. This is the first time I've ever used an airbrush (with my £8 Chinese airbrush and home made air supply here), it's the first time I've ever used Klear (well, Astonish but it's the same stuff), it's the first time I've ever used very thin ink to fill panel lines via capillary action and it's the first time I've used pigments (exhaust/gun smoke). No problems with the kit, all OOB with no mods at all. No flash, crisp mouldings and superb fit. Pilot looked kinda modern though. Only minor niggle I had was with the leading edge decals - the yellow strips were a pain and the red gun surrounds wouldn't conform at all (even with lots of MicroSol) so I just painted them on. Airbrushed with Humbrol and Revell Aqua Colour acrylics using Revell Aqua Colour Thinners. Very pleased with the results for a first attempt and will definitely be airbrushing more from now on. Just 3 quick pics taken on my phone. I'm going to knock up a base for it and hopefully get some more pics up at a later date. Finnthedude.8 points
-
I gather there are a few people on BM who appreciate Egg Planes, and some who don't ... this in an RFI for those who do ... First up ... Bell Boeing MV-22 Osprey - 168238 / EG-00, VMM-263 "Thunder Chickens", USMC - Hasegawa Eggplane - OOB with additional home-made decals, brushed acrylics. Lockheed Martin F-16C Block 30 Fighting Falcon. Aircraft flown by Col. Dennis Swanstrom, Wing Commander 185th Fighter Wing, 174th Fighter Squadron "The Bats", #85565, Iowa Air National Guard. Hasegawa Egg Plane, home-made decals, Humbrol acrylic spray. McDonnell Douglas (now Boeing) F/A-18C Hornet - J-5011, 11th Staffel, 13th Fighter Wing, Swiss Air Force. Hasegawa Eggplane - OOB build with home-made / spares decals, brushed acrylics. McDonnell Douglas (now Boeing) F/A-18C Hornet - 164899 “Chippy Ho!”, VFA-195 “Dambusters”, US Navy. Hasegawa Eggplane - OOB build with Tamago decals, brushed acrylics. Curtiss P-40N Warhawk, 2106396, 502nd "Parrot Head" Fighter Sqdn, 337th Fighter Group - U.S. training unit, Napier Field, Alabama 1943. Hasegawa Eggplane. OOB buildwith mix of kit and home-made decals. Comments welcome as ever, including eggscruciating puns if needs be.8 points
-
Well here we are another one I'm calling finished, A nice kit to build with few niggles to deal with along the way. Painted with a mixture of Ak and Vallejo acrylics and weathered up a bit with ak washes and some pastel pencils. the cartograph decals are spot on and settled down nicely with a spot of microsol. Finished under a coat of Vallejo flat varnish. Once again comments and constructive criticism are welcome.8 points
-
- An entirely resin kit. higly detailed as are the product from Neomega. This means that the cyano or epoxy cement are madatory which leave few possibility of mistake. - The paint scheme is said to be an experimental one used by Legion Condor during Spanish civil war8 points
-
Wheres the dislike button when you need one8 points
-
Good day to you all This is my latest impression of one of Her Majesties Fleet Air Arm not so great aircraft. Rejected by the Air Force so the Navy made do and it performed as well as it could but it was Too Big, Too Slow and Too Late! This is the 1:48 Special Hobby kit. It is a nice kit with some fine details, the only over size area was the fuel tanks behind the cockpit. It went together quite well but the wings do need alot of care and attention. Another pain was the engine, an exquisite rendition but to fit the engine to the exhaust ring was a right pain in the butt and caused quite a bit on chuntering and grumbling! Persevering it came out ok. The only problem I really had was when it came to painting. With the engine off there is a nice hole in the front to push a rod into so it can be held on that. However when I took it off again there was a rattle inside. On closer inspection I had shoved the rod up thropugh the cockpit and knocked off the instrument panel! With a bit of careful cutting and jiggery pokery I got the bugger back in but it was a little at times! Painted in Model Master acrylics, the sky was mixed approximately 2:1 with light sea grey to try and get that early sky grey colour. The camouflage was RLM 70 and 71 lightened about 1:1 with white. I think it came out ok and am pleased with the results. I think there has been a bit of criticism about MM RLM 70 and 71 but I find they are not too far off Fleet Air Arm colours! The underside was interior black and white. I did try a bit of preshading but i think i lost the effect. I shall try again though.I did a panel wash with my own mix from soft pastels and then used those for the exhaust staining. Decals from kit and a touch of rigging with elastic thread. Now for the fotos, I started off then as I uploaded I saw I had forgot the front canopy! so then went back and reshot but I have included some of the originals. All in all I like her. And her she is next to her new stable mate Next up is a Fulmar from MPM but due to lack of space I had to chop the wings up, I can feel myself going a little Cheers now Bob8 points
-
After battling with the Combat one for the best part of 7 months, that'll be the story of my life!! Tom8 points
-
Still working on the main undercarriage, there are these sink marks at the top of the legs: I tried filling those with PPP but it was only partially successful, the edges did not feather out very well: To try to get a better feathered edge I applied some Mr Surfacer 500: Several hours later this was dry and after sanding looked like this: Good enough I think and I can still do a bit of finessing after priming. The main wheels without the axles all have these ejector marks which are somewhat visible on the assembled gear and need to be dealt with: I applied Squadron green to those as well as the foot prints of the other wheels: After a bit of sanding all the axle wheels stood up quite nicely: Here are the finished cleaned up wheels and one of the big bombs finished and ready for paint: I actually got both of the big bombs ready for painting: I hope you liked that. Bye for now, Nigel8 points
-
Good afternoon A Metal WIngged Hurricane in 1/72 scale just ready in time for the 75 anniversary of the BOB ... Patrice7 points
-
Years ago im build this CORSAIR 1/72 Smer(Heller) 0835 Chance Vought F4U-1 Corsair mostly from the box adding resin wheels from TRUE DETAIL & Eduard eched seat belts.and engraved panel lines paint Xtracolor by brush . This product is somewhere in the midle years of building kit in ninety of 20 century. P.k7 points
-
Recently completed Frog Beau as a night fighter, wanted it to look well used! A few changes/additions; -nacelles; tried some resin ones, very disappointing, the gills were underscale and ended up shattering the front ring. in the end I wrapped the kit item in plasticard and made the gills from a thin strip. Still under sized but a big improvement. -antenna to wings made from thin wire -landing lights added to wing tips -used the decals supplied even though some broke up but note the serials as they are grey not red and seem to be the wrong number. Will add some when I have enough need to buy a sheet. Quite please with how it turned out considering the age of the kit. Trying to keep one step ahead of Airfix releases so Kinetic Whitley next!7 points
-
This month I have mostly been: sanding! Like, a sickening amount of sanding. Think it sucks having to putty, sand and feather in some ill-fitting, 1/2"2 Landing gear door? How 'bout filling and sanding 671 square inches of long, straight, facets. I think I'm nearly done smoothing out the balloon. I actually came *this* close to binning the scratchbuilt part and just printing out the entire envelope, as I wasn't satisfied with the somewhat wavy seam lines. I wanted something crisp and geometrically perfect, and computers are much better at that than people. But, after many, many applications of putty and careful sanding to try to straighten the creases as much as possible, I'm finally at a point where I'm pretty much satisfied. Still not 100%, but it's pretty close. I'll shoot some pics of the putty-speckled mess ASAP - it's really not pretty at the moment. Hopefully I can get a coat of primer on this weekend, then it'll be ready to have the rib tapes tediously applied (some .7mm pinstriping tape), another coat of primer and then finally, *finally* ready for paint! Oh, and plus scribing the surface detail, and adding the tailplanes, and scratching some sort of brass tail tip so the resin part doesn't keep %$#@ing chipping, and, and, and... Also: jeebus help me, I've just received a copy of the R-Classe Datafile and I'm already starting to goof around in CAD. Maybe my project for 2016? Eep! And just so this post isn't *completely* devoid of pics, here's a quick comparison of the various Zeppelin Classes. Other than the Q Classe (which is the one I'm building), they're just rough sketches, but they're all properly scaled, if the shapes aren't 100%. From top: M Classe, the relatively puny early war Zepp, more reconnaissance oriented than a bomber. Q Classe (subject of this build) R Classe (the first of the Super Zeppelins; bigger balloon for a higher service ceiling in an attempt to skim over British air defences) W Classe (the Afrika Shiff, designed to fly from Germany to Tanzania, to resupply troops) Hindenburg, just to show how truly massive the airships got. The Q Classe is huge in 1/144. I can't even imagine a Hindenburg!7 points
-
Better than nothing, but nowhere near a McSweens. Just a very small update this evening... I have been steaming on with my carriage build and making good headway on that so I didn't want to lose steam (oh wot a pun!). Also, before I could continue with the Wessex, it needed some filling and sanding so I kind of avoided that. I had a ridge just above and below the starboard side window - caused by me in my haste to install the resin insert. While most if it will be hidden by the sliding door, I wanted to try and do something about the upper ridge which appeared quite prominent..... thus, more sanding. I also took the opportunity to lower the profile of the "seal" around the window. One thing I could work on without too much trouble were the oleo's. As mentioned in a previous post, I thinned down the big block the italeri had at the top of the oleo. I then added some filler around the top to try and look like the canvas cover - which worked out not too shabby at all. The steps were fitted and I am glad I made the effort to scratch them. They are probably still a bit over-scale but are still so much better than the kit supplied parts. Next step in the oleo production was to paint on the anti chaffing tape, using dirty grubby black or some-such color. I then cut some very thin strips of the same aluminum tape I used to make the seats, and used that to represent the straps that hold on the steps. And here's how it looks dry fitted. Yes Pete, I know I still have to add the step bracket that's fitted halfway up the oleo - that will come later. (too scared I'll knock it off just now). I still have brake lines and some other bits such as the tie down rings and shackles to add to the oleos. There's also the brackets that are fitted just above the oleo's which the nitesun is attached to. - I think they will have to be fitted after the oleo's are fitted, which will be after painting. It's all starting to get very complicated! Lastly, I got the yellow on the rotor blade tips. It's about time I got working on the rotor head and blades. I have to admit that it's much easier now that I have my spray booth up and running. It was always a right palaver before messing about with stuff - now I just flick a switch, turn up the fan and I'm good to go! At some point in the near future I will have to ask for some assistance - I cut off parts of the rotor head linkages without taking any measurements, so when it's time, I would appreciate it if someone could measure the links on their kit and let me know what the numbers are - but that's a week or two away yet.7 points
-
Several years ago while cruising through 1/48 aircraft kits on ebay I came across several kits by a manufacturer named High Performance depicting the bomber and night fighter versions of the 1950s French jet called Vautour 2. I always thought it was an intriguing airplane and I was very tempted by the thought of having a 1/48 example of the night fighter, the Vautour 2N on my shelf. After losing several auctions over the course of some months, I finally squeezed out a win by one dollar and shortly after paying out $82 for the kit the Vautour arrived in my mailbox in July of 2013. After returning to modeling after a hiatus of about twenty years I had just finished a Meteor NF12 from the Classic Airframes NF11 kit, my first taste of the limited production injection molded kit. The Vautour kit however set new standards of crudeness, making Classic Airframes seem like Hasegawa/Tamiya by comparison. After seeing many WIP threads on this site I thought I would go about building this in the systematic fashion I had seen demonstrated by so many of the experts here - totally organized in proper logical sequence with everything planned out in advance. Ha! Fat chance of that it turned out. It became more like a slow slog through the mud with many reversals and backtracks, but finally about a month ago a Vautour emerged from the chaos. My intent was to depict the aircraft with the speed brakes open, flaps extended, canopies open, the rear of one nacelle removed showing the engine, and the large 1300 litre external tanks and a pair of Matra R511 air-to-air missiles under the wings. None of this detail was of course provided in the kit. So, the Vautour photographed in natural light midmorning under a blazing sun and clear bright blue sky. Being a piano technician and rebuilder I'm quite used to using bronzing powders for mixing the gold lacquers that I use for refinishing the cast iron plates in pianos and I used the same technique here. The bare metal finish is done using fine grained aluminum bronzing powders mixed with clear lacquer. I try to get as much aluminum and as little of the carrier onto the surface, so I mix only a few drops of lacquer and lots of lacquer thinner then add the aluminum powder. I mix several shades - straight aluminum and darker shades by adding a few drops of black lacquer. I suspect that what I'm brewing up at my workbench is very similar to what's in the bottles of Alclad products. I didn't want to make the aircraft depicted in the kit decals (which were very fragile anyway) The serial number 314 and the squadron insignia on the vertical fin and the tactical number 30-OC on the nose I made myself. I scanned a number of photographs and working them in Photoshop I produced a decal sheet that I printed on decal film on my inkjet printer then sprayed with lacquer to waterproof. Ink is cheap so I gave myself margin for error on my decal sheet. It worked splendidly.6 points
-
Thanks Rob, I needed that motivation! Thanks again John for the link to Suddensky's thread for tips on painting the exhausts. He points to a thread here. I'll try to do that 1/72 with the exhausts fitted! I don't know whether you ever get this feeling, but sanding is one of those jobs where I think "I can't be bothered to do that" for a while and then all of a sudden the urge comes over me and off I go! And then I do the sanding*. So this afternoon I sanded the seam. To recap (with photos) despite my multi-stage close up I ended up with a small step in the seam. To correct this and to avoid a flattened profile I filled the lower part of the seam with Vallejo plastic putty and sanded it. This gave me a discolouration problem which I tried to correct with brushed paint ending up with this: Initial sanding exposed the white putty, of course, so I angled the (wet) sanding stick to the higher edge of the seam and sanded until the feathered white putty vanished: I then went over the brushed paint with a fine belt sander to polish it off (thanks Jon!). Here she is now, drying and waiting to be re-scribed: I don't know whether you ever get this feeling but re-scribing is one of those jobs... you know the rest - I now need to wait for the urge to take me. After that I'll airbrush the bottom* with some of the decanted spray paint. Does anyone have any idea why the jar of Tamiya 'Neutral Grey' XF-53 is darker when brushed than the spray AS-7? It's going to be a pain. * Dbl-E, score 1, fnaar fnaar6 points
-
Please excuse the poor photos: Mrs. P has had a panic attack because the $700 crib that my mother bought for her is not what she wanted, a side of her I've never seen before. Contemplating cancelling the return portion of my ticket from the UK.6 points
-
"There had never been an armada like it. The destroyer Harvester, built to fulfill a foreign contract, with all its gun-laying instructions in Brazilian; the Count Dracula, launch of the German Admiral Ludwig von Reuter, scuttled at Scapa Flow in 1919 but salvaged years later; the armed yacht Grive, where the captain, the Hon. Lionel Lambert, took his own personal chef; the Canterbury, the bejeweled ferry-boat of the cross-Channel run, with memories of Princess Paul of Yugoslavia and Delysia; Arthur Dench's Letitia, the little green cockle-boat from the Essex mudflats, breasting the waves like a seagull. "And still the streamed across the waters: the Thames hopper barge Galleon's Reach, built to pack not men but the muddy spoil of dredgers; Tom Sopwith's yacht Endeavour; the Fleetwood fishing trawler Jacinta, reeking of cod; the Yangtse gun-boat Mosquito bristling with armament to ward off Chinese river-pirates; Reiger, a Dutch schuit, redolent of onions, still hung with geranium pots, with mighty bunks for mighty men; the Deal beach-boat Dumpling, built in Napoleon's time, with a skipper seventy years young. "As the cockle-shell armada fanned out towards Dunkirk, even seasoned naval officers felt a lump rise in their throats: absurd yet magnificent, it was without precedent in all the world's naval history. On the bridge of the destroyer Malcolm, the navigating officer, Lieutenant Ian Cox, was moved almost to tears to see the oncoming fleet lead by, of all craft, the Wooten, the old Isle of Wright car-ferry, wallowing like a sawn-off landing stage through the water. His voice shaken by emotion, Cox burst out to the seaman beside him with the classic lines of Shakespeare's Henry V before another assault on the coast of France: "'And gentlemen in England now a-bed "'Shall think themselves accursed they were not here, "'And hold their manhoods cheap whiles any speaks "'That fought with us upon Saint Crispin's day.'" -- Richard Collier, The Sands of Dunkirk6 points
-
At long last I have finished the Airfix "Shaun the Sheep" Tractor kit A50019 I really enjoyed this build, especially when it came to weathering it! Here are some pictures. "Where has that pesky Timmy gone?" thinks Bitzer Shaun hiding Timmy: A rather muddy tractor5 points
-
Douglas DC-8-62 1/144 Minicraft (converted), Lima November decals. After the VC-10, the next best looking airliner is the Douglas DC-8, and the best looking of those are the shorter fuselage versions. The Minicraft DC-8 series of kits are amongst the very best airliner kits you can get, they are beautifully moulded, accurate, and have flawless fit. It's a funny thing about the Minicraft range, all the Douglas aircraft are really good, and all the Boeing ones are... well, I don't buy them. This is the 'Hawiian Air' DC-8-63 boxing, with the fuselage cut down to convert it to the shorter -62. Very helpfully the kit has engraved cut lines inside the fuselage to show you where to cut. Other than that, the construction is pretty much straight out of the box. The wings and tailplanes are such a good fit I haven't even bothered to glue them in. They just fit nice and snug on their own. I've used multiple shades of Alclad on the metal areas, and Halfords appliance white on the fuselage top. The Lima November decals come in the Longboat scheme for the versions of the DC-8 that SAS used, the 55, 62, 63, and Freighters. A huge number of fleet names & reg's are provided, along with enough cheat line for the longest, that you may need to cut down for your chosen version. That's what came out of the fuselage fore and aft of the wing; And finally, the 'With something esle' shot. This time the Airfix Caravelle generously given to me when I couldn't find one, by that true gent, Martin Hale, and finished in 26 deacls SAS scheme. Thanks for looking, John [EDIT] 11/08/2014 Wow, thanks for all the kind comments folks, it is very much appreciated. I thought airliners were very much a minority interest Thanks, Gary I can do one of those. The DC-9 & decals are in the stash waiting its turn, and the Viscount is planned, but I have this one; And then it's predecessor, the DC-7C [/EDIT] Thanks again everyone.5 points
-
SAAB JAS-39D Gripen, Hungarian Air Force, no 42, Kecskemet AB 2013 (this aircraft crashed last week in Caslav AB, Czech Republic!). Made from Bilek`s kit (ex-Italeri) with some modifications. Used additionals: pitots by Master, PE sets by Bilek and Eduard, seats by Pavla.5 points
-
Thanks Sean and please don't worry about the paint - it was a good idea and who knew about the Tamiya colours? Not me. If we don't try things we don't learn... Thanks Rob. You prompted me to have another look and found this: All rights recognised So hardish. Blu Tak saved! It's weird that I can't just look at a photo like that now - I have to 'reference check' all the details!!5 points
-
Give me your tired, your poor, Your huddled masses yearning to breathe free, The spouses of those who have been bought the wrong kind of crib. Send these, the homeless, tempest-tost to me, I lift my lamp beside the golden door! Unfortunately PC this policy was not that adopted by UK Immigration Services so you may be out of luck Cheers, Stew5 points
-
OK, the decals are on the camo 'stang.5 points
-
"Eine sorgfältige Eigentümer" Char Mitrailleur FT31-RPM 1/72 Brush painted with Humbrol Enamels, Klear and Humbrol Matte varnish Weathered with chalk pastels.5 points
-
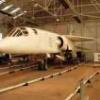
From the IWM website: "The American Air Museum (one of our eight exhibition buildings) is closed until Spring 2016 for an exciting redevelopment. From late May you can get up close to most of the iconic US aircraft from the exhibition in new locations across the museum." Thanks for looking.4 points
-
Focke Wulf Fw-190F8 Revell 1:32 The Focke-Wulf Fw 190 Würger (English: Shrike) is a German single-seat, single-engine fighter aircraft designed by Kurt Tank in the late 1930s and widely used during World War II. Along with its well-known counterpart, the Messerschmitt Bf 109, the Fw 190 became the backbone of the Luftwaffe's Jagdwaffe (Fighter Force). The twin-row BMW 801 radial engine that powered most operational versions enabled the Fw 190 to lift larger loads than the Bf 109, allowing its use as a day fighter, fighter-bomber, ground-attack aircraft and, to a lesser degree, night fighter. The Fw 190A started flying operationally over France in August 1941, and quickly proved superior in all but turn radius to the Royal Air Force's main front-line fighter, the Spitfire Mk. V, especially at low and medium altitudes. The 190 maintained superiority over Allied fighters until the introduction of the improved Spitfire Mk. IX in July 1942. In November/December 1942, the Fw 190 made its air combat debut on the Eastern Front, finding much success in the specialised ground attack units called Schlachtgeschwader (Battle Wings or Strike Wings) from October 1943 onwards, following the redesignation of all former Sturzkampfgeschwader dive-bomber wings at that time. Though Soviet pilots considered the Bf 109 the greater threat, the Fw 190 and its pilots proved just as capable as the "lean" (to VVS pilots) inverted V-12 inline-powered Messerschmitt in aerial combat. In the opinion of German pilots who flew both, the Fw 190 provided increased firepower and manoeuvrability at low to medium altitude. Still, it never entirely replaced the Bf 109. The Fw 190A series' performance decreased at high altitudes (usually 6,000 m (20,000 ft) and above), which reduced its effectiveness as a high-altitude interceptor, but this problem was mostly rectified in later models, particularly in the Junkers Jumo 213 inline-engine Focke-Wulf Fw 190D series, which was introduced in September 1944 and restored relative parity with Allied opponents. The subject of this kit is that of the F8 variant which was basically an A-8 model re-designated, having a slightly modified injector on the compressor which allowed for increased performance at lower altitudes for several minutes. Armament of the Fw 190 F-8 was two 20 mm MG 151/20 cannon in the wing roots and two 13 mm (.51 in) MG 131 machine guns above the engine. Fw 190 F-8/U1 - long range JaBo, fitted with underwing V.Mtt-Schloß shackles to hold two 300 L (80 US gal) fuel tanks. ETC 503 bomb racks were also fitted, allowing the Fw 190 F-8/U1 to carry one SC 250 bomb under each wing and one SC 250 bomb on the centreline. Fw 190 F-8/U2 - torpedo bomber was fitted with an ETC 503 bomb rack under each wing and a centre-line mounted ETC 504. The U2 was also equipped with the TSA 2 A weapons sighting system that improved the U2's ability to attack seaborne targets with a 700 kg (1,500 lb) BT 700. Fw 190 F-8/U3 - heavy torpedo bomber was outfitted with an ETC 502, which allowed it to carry one BT-1400 heavy torpedo (1,400 kg (3,100 lb)). Owing to the size of the torpedo, the U3's tail gear needed to be lengthened. The U3 also was fitted with the 2,000 PS BMW 801S engine, and the tail from the Ta 152. Fw 190 F-8/U4 - created as a night fighter, was equipped with flame dampers on the exhaust and various electrical systems such as the FuG 101 radio altimeter, the PKS 12 automatic pilot, and the TSA 2 A sighting system. Weapons fitted ranged from torpedoes to bombs, however, the U4 was fitted with only two MG 151/20 cannon as fixed armament. The Model This completely new moulding came as bit of a surprise, but very welcome none the less. The quite large, and unfortunately end opening box is pretty much full of styrene. Each of the eight blue-grey sprues are very nicely moulded, with little or no sign of flash and not too many moulding pips, although some of the them and the sprue gates are quite large. There are quite a few flow marks visible on a lot of the parts, but these shouldn’t cause too many problems under a coat of primer. Details are finely produced with neat panel lines and other fixtures and fittings. Throughout the kit there are lots of details, particularly the engine and cockpit, which means it can be made pretty much out of the box with perhaps the exception of some replacement seatbelts. Construction starts with the modeller having to decide which version of the two provided that they wish to make. Since each version requires having different hole opened up from the inside of the lower wing depending on whether the single SC500 centreline bomb and two wing drop tanks or the single SC250 on the centreline and the two pairs of SC50s are going to be fitted. There are also two larger holes that require to be opened up should you wish to use the large stand that is provided in the kit. Actual assembly begins in the single piece cockpit tub with the fitting of the joystick, rudder bar and footplates. These are followed by the lower instrument panel, seat, with separate squab, plus the decal lap and shoulder straps. The main instrument panel is then fitted with the revi gunsight and its two clear screens the gunsight is then carefully slid thought the gap in the coaming and the panel glued into place. For the instruments on the upper and lower panels Revell have provided a some nicely printed decals, but in this scale it may be better to use some separate instruments and bezels from the likes of Airscale. At this point, several sub-assemblies are constructed. These include the forward upper gun mounting deck consisting of two parts, the tailwheel is made up of two halves for the tyres plus the inner and outer hubs, which is then slid onto the axle of the oleo and enclosed with the port side of the mounting yoke. Once the insides of the fuselage have been painted there are a couple of parts fitted to the fuselage sides, before the instrument panel/coaming are glued to one half, as is the tail wheel, (in either retracted or extended position), before the fuselage can be closed up. The completed cockpit assembly is then fitted from beneath and the forward gun mount fitted just in front of the coaming. Moving onto the wings the two inboard cannon barrels are attached tot eh main wing spar along with the centre section of the main undercarriage bay. The assembly is then glued into position, with the spar aft of the main wheel bays. Behind the main spar there is another plate which moulded with the two rear spars, whilst the main wheel bays are fitted ahead of the main spar, covering the openings. The two ammunition canisters for the upper machine guns are then fitted to the main spar panel, along with the engine bearers and the engine mounting ring before the whole assembly is attached to the underside of the fuselage. The two part ailerons are then assembled and fitted to the upper wing panels, which are then attached to the lower panel. The optionally positioned flaps are then fitted. Each of the horizontal stabilisers, elevators and rudder are made up of two halves, which when all assembled are glued into position. Probably the most complex assembly of the kit has to be the engine. Each of the two banks of cylinders is made up of two parts, but where the moulding differs here is that the cylinder heads are moulded complete and the rest of the cylinders are on a smaller inner section, thus elevating any awkward seams to worry about. With the banks assembled the two sets of push rods are attached and the banks joined together via a spacer ring. The inlet manifold is then fitted from the rear, followed the exhaust manifolds, the prop shaft and the auxiliary gear box. The completed engine is then attached to the previously assembled engine mount, followed by the two small lower panels and the front cowling ring. The main undercarriage units each consist of the main oleo, with separate scissor link, five part wheels, (two tyre halves, inner and outer hubs and outer cap), and the undercarriage door. The undercarriage assemblies are then glued into position, followed by the retraction jacks. If the undercarriage is to be posed retracted then there are separate wheel parts to be used. With the undercarriage attached, the kit is turned over and the windscreen is fitted followed by the upper and lower cowling covers, again with optional parts for them to be posed open or closed. On the upper decking the machine gun breeches and barrels are fitted and the area is finished off with the cowling side panels and the large machine gun panel. The kit comes with optional canopies, early and late, (flat and bulged), with slightly different parts for the interiors. With these fitted then the turn of the multitude of aerials access step and pitot probe to be fitted. Depending on which type the modeller is building there are variations on the pylons and weapons fit to be attached. Each drop tank and weapon comes in two halves, with the bombs having extra struts for around the tail fins. Each pylon is fitted with separate sway braces and attached to the holes that were opened up at the beginning. Finally the propeller consists of a single piece three bladed prop, back plate, spinner and cooling fan. If the stand is to be used, this is assembled from four parts which are then inserted into the large circular base. Decals The decal sheet appears to have been designed by Revell and printed in Italy so presumably by Cartograph, although they feel quite thick and not up to their usual standard. They are well printed though, in good register and nicely opaque with very little carrier film except in each of the outline crosses. The decals are quite matt in appearance but should settle down well with the appropriate solutions. A full set of stencils are provide which will make a lot of modellers happy, but as is the ruling over in Germany there are no swastikas included. There two marking options provided:- Fw-190F-8/R1 ,”Black 6”, St.SG.10, Czech Territory. 1945 Fw-190F-8 “Black 2”, St.SG.10. Czech Territory 1945 Conclusion As with their 1:32 Me-109s, Revell should be very proud of this kit. Not only is it highly detailed, but the mouldings are superb as well. From what I’ve seen the price has increased quite a bit, but it is still worth it as there is a lot modelling to had from the box. Of course, Eduard have already started releasing add-on sets for this kit so if you want to guild the lily then you can. Very highly recommended. Revell model kits are available from all good toy and model retailers. For further information visit4 points
-
They were the times of the Swinging London... the Fab Four played all around, George Best ran and dribbled, miniskirts everywhere... and on the HMS Victorious deck the Sea Vixen stood proudly. Excuse my horrible "verses".... Sea Vixen 1/48 from Airfix, A kit that all of you, British friends, know very well. I found it a real pleasure to built. Even the decals (and those red lines on the fuselage worried me a lot because of potential silvering) were perfect. I love this beast.. so asymmetrical, so odd looking yet powerful... So British! With the engines intakes embedded into the wings leading edges... The "coal hole" where that poor navigator had to dwell....4 points
-
Hello all For my latest offering, here is my finished SWS - short for Schwerer Wehrmachtschlepper (Heavy Military Tractor), as I just found out on Wikipedia - with Flak 43, courtesy of Italeri's 1/35 kit. A very nice kit it is too, with the more complex sub-assemblies for the flak gun going together with no trouble at all, and Italeri being kind enough to offer options to pose the back end closed up or open in the firing position. The only odd thing is the way the front wheels sit clearly off the ground by a good few millimetres (most noticeable in the last pic I've posted) - hoping that's a kit error rather than one of mine... It was built OOB and airbrushed with Tamiya acrylics. I kept the weathering light, limiting it to a bit of muck on the tracks and tyres, an oil-based wash and a bit of drybrushing to help bring out some of the raised details. Pretty happy with how this has turned out, especially as I managed to keep my usual quota of self inflicted errors to a record low! Thanks for looking. Adam4 points
-
Hi folks,as a diversion from a couple of other larger builds over the last week or two I have built another little 1/72 scale Airfix Spitfire one of a few flown by Kiwi flyer Al Deere over the period of Operation Dynamo seventy five years ago this week.As usual with any build of a specific aircraft of a well known flyer a large can of worms needs to be opened as far as colours and markings are concerned and the discussion leading to this scheme can be found here, http://www.britmodeller.com/forums/index.php?/topic/234981609-dunkirk-spitfires/ So from the best information suggested I have settled on this scheme,the decals were let down by the codes which were from an ancient mk1 Hasegawa boxing so many apologies,but I hope you like this tribute to those flyer,s trying to stem the tide of the Luftwaffe,s advances in those desperate day,s seventy five year,s ago.4 points
-
It's crazy, isn't it? I remember when I didn't feel a need to see a photo of the aircraft I was modelling.4 points
-
Here's the rest! And my favourite Ben4 points
-
Bringing back the Humbrol Authentic enamels? Trevor4 points
-
Thank you for your support Guys! Right the rest of the crew signed on today From left to right. Two parts Airfix + Millicast head. Middle two are from Al Gunthwaite http://www.gunthwaite.co.uk/Right hand figure is from millicast. Now for a bit of self indulgence. I've been sticking more bits and pieces on and I wanted to try out my new camera. Pocket job, Panasonic DMC-TZ60 Good of you to stop by Cheers Kev4 points
-
filled and filed . Intakes levelled off and I have insert to put on back to make it look like fan intakes.. Ill prime it when this is dry and check seems and gaps4 points
-
Thanks Gremlin - I looked up Rif Raf's Spitsfire; looks fun! Thanks uilleann and Houston, very kind! Not quite as much fun as I'd hoped but getting there now Hey Bristol Boy! Local heroes aren't they? Have you seen the 'Shaun in the City' trail? Bit of a trip for you but the pictures are good. I might have a rest from Gromit today (apart from another skin coat) to make sure that the Vallejo has time to go off properly before handling and to get on with my Memphis Belle. Here's a 'teaser shot' to keep you going: As Rob said recently, you can watch the paint dry!4 points
-
Speaking of Spitfires, here is young master 06/24 with the two Spitfire books a certainly kindly hedgehog owner sent him. Made a small boys day! A big thank you to PC from both of us. I think Kieran rather likes his new books! by jongwinnett, on Flickr4 points
-
Here is the latest update,.......the camouflage has been finished off and touched up with gloss varnish applied ready for the decals and the propeller from the old Airfix Hurricane is ready for painting. Rather than fitting a new windscreen I`ve sanded the kit item to flatten the side panels and also removed the panel detail from the top of the armoured section. After adding the gloss varnish it became apparent that there was still a curved seam showing from the kits windscreen so more filler was applied to cover this; and here it is with the standard fabric winged Hurricane; Cheers for now, Tony4 points
-
A few shots in different lighting. On the concrete floor of my shop at night lit with a strobe flash. The first with the light directly on the model, the other two with the light bounced off the ceiling down onto it. And once again outside with a friend.4 points
-
As a brief aside, I ordered an Admiral boxing of the AZ spitfire Vb, and was really pleasantly surprised by it. I've build an AZ boxingbefore, but the Admiral boxing seems to be of much nicer plastic quality: Might pick up another one of these, as it's the only accurate modern Vb on the market.3 points
-
Good to hear, Kirk! I'd be delighted to see another one of these tackled - you don't see too many so it'd be interesting to see how your 'kit' compares to mine... I wondered if I'd got a dud with this one, but every one I've seen looks the same. Combat in name, combat in nature But you're right in what you say - there's no master-builder skills required for these kits, just good old fashioned modeling methods, and a lot of trial and error along the way. And regarding its weight - it's not heavy, bearing in mind how thin the plastic is. Most of it's weight comprises filler! Today's task has been rather mundane - painting 14 wheels... S1030347 by Thomas Probert, on Flickr I've had to get get a little 'creative' with the tyre flats to get them sitting correctly, but let's just say this one's fully loaded... Tom3 points
-
Thanks everyone, I shall follow Al's suggestion, footsteps of giants and all that!, and Stew, I've sanded a little off the hump and a test fit suggests the open hood fits, even allowing for some paint. Now I need to find a trolley acc, the only source a know is the soapy plastic one in the Airfix RAF personnel set, the figures tend to the small size, and the trolley looks a bit blobby, but I might have to make do? Or a dimensioned drawing would do, then I could scratch build one? (Applying Ced's WWND philosophy).3 points
-
Too kind sirs. The downside is the bend is a little too radiused for my liking, but i have to keep reminding myself that the wire is about 10thou in diameter, or 0.25mm, so any image is necessarily overly enlarged. anyway, here is my hidden effort. Not the easiest thing to see, or photograph by jongwinnett, on Flickr3 points

.thumb.jpg.d17ff607fc7e89ed057e63fcb6f2a888.jpg)


This leaderboard is set to London/GMT+01:00