
Leaderboard


Popular Content
Showing content with the highest reputation on 18/05/15 in Posts
-
My first completed model in a quingigillion months... The transparencies lack transparency, but that's quite a common problem with me, I can't seem to succeed in keeping them clean. Major pain in the nether regions, but I'll have a) to live with it and to improve. Here go the pictures: Cheers, S.25 points
-
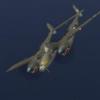
Here is may rendition of Airfix's 1/72 Lightning F6. Nearly out-the-box. I replaced the nose wheel/leg and main wheels with the Baracuda set. The redtops are the Sword versions with the airfix clear nose added. Decals are a mix of Airfix, modeldecal and Xtradecal. As you can tell from the photos, the wing tanks are not fixed in place yet. So thats the F1 and F6 done, just need to fill the gap with the 2/2a/3/4/5................ Tim12 points
-
Hello guys, finaly i have finished my next kit - this time i did build Eduard´s new tool Spitfire Mk.VIII (overtrees edition - only plastic sprues, no decals, no PE, no resin, ... ) I have to say it is realy great kit, it goes together realy well!! Aftermarket used here - Eduard Bras-in gun bay, Rob Taurus vacu canopy, fabric seat belts, Bras-in wheels and mainly Montex set of masks for SEAC Spitfire Mk.VIII. WIP for anyone interested http://www.britmodeller.com/forums/index.php?/topic/234980544-spitfire-mkviii-seac-148-eduard-montex/ And here are the final shots Enjoy and thanks for watching guys EDIT: i forgot to add shots of the underside, so here we go Once again, thanks for watching guys12 points
-
Hi everybody, Finished this earlier in the week. Revell 1/32 Bf 109 G-6, Eagle Cal decals, Barracuda intake, exhausts, cooling scoops and oil cooler housing, AlleyCat cowl bulges, spinner and prop, Maketar masks for national markings, Brassin gun pods, Eduard fabric harness. Paints are Gunze, Tamiya, Vallejo and Citadel, I also used the AMMO PLW for the panel lines and some weathering. Final flat coat with AK ultra matte. Thanks for looking, all comments are welcome, Cheers...10 points
-
Just a quick pic taken with my phone, OOB apart from decals which are Xtradecal10 points
-
Hi, Just finished this easy kit from Tamiya. It's OOB, i just add Eduard Harness. Painted in XF-76. The WIP (in french ) can be found here: http://www.master194.com/forum/viewtopic.php?f=4&t=87746 Any comments welcome. Joel9 points
-
Built out of the box, finished and then realised the serial is incorrect...! Just read an article that says that these started at 895, not 885...! Too late now though! Not my best, but a bit of fun...9 points
-
Hello BM'ers... After a bit of wrangling with myself as to the worth of this post, I thought I'd take the plunge and put this up as RFI... This is my very first 1/48th scale completed since the days of yore, and if I'm honest it's the first model I've finished (8 and counting) that I'm actually genuinely happy with. Despite the 'Fisher Price "My First Focke Wulf"' sound of things, it marks a few other firsts too - first attempt at mottling, first attempt at free-hand camo, first attempt at a spiral spinner (there was some swearing involved, but patience is a virtue) and first bird that when I look at it I don't think I've massively overdone everything about it...although I'm certain that many of you won't necessarily agree with the last point! I don't really think there's much to be said about the kit, other than despite it's known failings (the gear bay being the most glaring one, even to a accuracy-optional hobbyist like me) it's a joy to build, falling together with only the tiniest amount of putty at the wing roots. It's OOB, other than the Eduard cockpit Zoom set, which fitted utterly terribly and EagleCals decals which behaved impeccably and QuickBoost wheels... If, like me, you're looking to broaden your scale experience outside 1/72 this would be a wonderful place to start - it's a thoroughly enjoyable build experience! I tried to get the ariel line to sag properly, and whilst it's not quite right I'm pretty pleased with it for a first go at that kind of thing. As for this particular aircraft, since I was a nipper I've been a fan of the FW190 design, and as I've grown older I really think the D9 reached a peak of rakish elegance - there's no escaping the regime it was used by, but nonetheless it's a beautiful aeroplane. The pilot, Hans Dortenmann was a true ace in this aircraft, claiming 18 victories. More about him http://en.wikipedia.org/wiki/Hans_Dortenmann here. Anyway, enough babbling, here are some pics:8 points
-
My latest completed build for 2015. This is the old Airfix Mossie "upgraded" with radome nose and the option to build the Swedish J20 version with the 4 blade prop. I wanted an RAF type so the radome is the only different part from the nice early seventies moldings most of you may be familiar with. For an old tool kit it builds up very well. As is the norm with old school airfix there is nowt in the cockpit other than the seats, a flat cockpit floor, and an instrument panel. I added some boxes to replicate the radar equipment to fill out the void and blanked off the rear area so you don't see way into the fuselage. The decals with this set have invasion stripes printed with the roundels on but as i can never get these to work i opted for leaving them off and put on wing roundels from the spares box. Still a nice kit when its built up, and way cheaper than the Tamiya version. Thats one less in the stash.... room for some more! Comments please, hope you like.8 points
-
OOB build, cursing all the way the lack of clear mounting-points or positive attachments for almost anything... I am proud to say that there is not a drop of unmixed black anywhere on this 'black' nightfighter. The weathering takes inspiration from the box-art, combining the fading of tropical sun and the grime of tropical rain... This is also a bit of a tribute to my Dad, Robert, who passed away after a short illness last week. He got me into Airfix and Matchbox kits when I was a kid, giving me a hobby to return to in middle age. All the other things he did for me I won't trouble you with, but he was a great Dad, and I hope I'm doing as well as he did... Anyway, the plane: Thanks for looking!8 points
-
To-day I shall be strong, No more shall yield to wrong, Shall squander life no more; Days lost, I know not how, I shall retrieve them now; Now I shall keep the vow I never kept before. -- A E Housman, A Shropshire Lad, XVI Both the victor and the vanquished are but drops of dew, but bolts of lightning - thus should we view the world. -- Death Haiku of Ōuchi Yoshitaka King am I, whatsoever be their cry; And one last act of kinghood shalt thou see Yet, ere I pass.’ And uttering this the King Made at the man: then Modred smote his liege Hard on that helm which many a heathen sword Had beaten thin; while Arthur at one blow, Striking the last stroke with Excalibur, Slew him, and all but slain himself, he fell. -- Lord Alfred, First Baron Tennyson, The Idylls of the King, "XII. The Passing of Arthur" I'm going to be doing a joint build with fellow forumite -Neu-, a man who has achieved everything in life that I once dreamed of doing myself, from postgraduate work to living in a Commonwealth country. When I first joined Britmodeller, I recall I saw a Spitfire XIV he'd built, and I thought to myself "I hope I can build to that standard some day". And so it was a great privilege for me to have him ask if I'd be interested in doing a build thread with him. I don't want to steal his thunder, so I'll let him describe his part of the build. For my own part, I'm build two AZ Spitfire VIIIs, both in anticipation of the new Eduard kit -- I need to be able to straight-facedly tell Mrs. P that I haven't any Spitfires "like that", and she doesn't know about retractable tailwheels or additional fuel tankage -- and because I felt they made a natural follow-up to my Spitfire Vcs that I've just finished. The Spitfire Vs were stopgap Spitfires, the tropical variants arguably the least lovely and the least competitive with their potential foes out of all of the marks to see combat in the Second World War. The two-stage Merlin fighters -- VII, VIII, IX, and XVI -- represent to me the swing of the pendulum to the Allies' favour, like the magic sword that hero receives at the end of the second act. "Its name is Excalibur, which is as much to say as 'cut-steel'." I've built the AZ VIII once before, and their IX -- which is a subtly different animal -- thrice. The kit's wings are a bit thick, and the prop needs some work for the spinner to close properly. Here's one I did earlier, with some friends:7 points
-
Dear Fellow Modellers Not sure if I posted this one before? I used the 3" howitzer barrel in the Tamiya kit to do the Close Support version. Round about late 1941 to 1942 the preferred Infantry tank was the Valentine with photos showing Matildas hanging in there as CS tanks. As most of you know the standard 2 pdr gun on British tanks was a one trick pony only firing AP rounds. The odd 3" howitzer gun was supposed to do the other roles of HE and smoke. So these Matildas were fairly common sites around the UK as these armoured regiments did their training So this is the Tamiya tank with Bronco tracks. Hope you like it? Andrew7 points
-
Finally got this off the workbench. It's the Academy kit with additional Eduard etch gracing the cockpit and exterior. The most noticeable improvements are the engine gills and supercharger ducts on the upper nacelles. I also the used resin (Radial & Engine Wheels) wheel replacement set. The flap interiors were scratch built using reference pictures from the internet and lots of reference pictures that Tony OT sent across from his amazing archives (cheers mate) On the whole, a fairly straight forwards build until it came to applying Alclad and that where my skills met their match. We battled to and fro for several days, mainly home goals, but in the end perseverance overcame plastic...well paint! If you're thinking of building one of these, stock up on weights for the front end. You can see the build HERE. Many thanks for all the contributions along the way I've represented WF499 of 15 Sqn with the more unusual but interesting black underside. Looking at the demarcation lines between this and WF497, each aircraft is unique in many minor respects. These aircraft were prone to engine failures as can be seen in several photo's, so I modelled it having had one using pictures sent by Tony to get an idea of what the oil leaks may look like. Enough waffling! Thanks for looking Neil6 points
-
This is the companion conversion to the Flyglobespan 736 which I posted a short time ago. Engines and winglets are modified from the kit parts and I shortened the main landing gear to improve the sit which I think is important with the long fuselage of the -900. It looks wrong, at least to me, with its tail in the air. The fuselage colour is Tamiya TS-76 Mica Silver oversprayed with TS-65 Pearl Clear. The blue is from an ancient tin of Humbrol 190 Blue Angels Blue. Like the 736 the decals are by Drawdecal. Thanks for looking (again!) and as always constructive criticism is welcome. Dave http://SAM_0038 by David Griffiths, on Flickr http://SAM_0041 by David Griffiths, on Flickr http://SAM_0040 by David Griffiths, on Flickr http://SAM_0039 by David Griffiths, on Flickr http://SAM_0042 by David Griffiths, on Flickr6 points
-
Wow, that's quite a nice post from Proc... hopefully I can live up to the hype. Certainly I know that I always appreciate his posts and discussions, both in public and private. I'm immensely excited that we can actually build something together... though I'm going to need to work hard to keep up with his pace. https://www.youtube.com/watch?v=2CyqOhImtKw (A compilation of various NHK news reels on the Ki-43... thanks to http://arawasi-wildeagles.blogspot.com) So my builds will be two, Ki-43s, which roughly represent the opposing aircraft to the Spitfires. My interest in the SEAC theatre was kindled by reading Christopher Bayly and Tim Harper's Phenomenal Forgotten volumes. I read them with abandon about four years ago, while on a trip to Japan: Yes, I take vacations to go read books. If you've never read of Forgotten Armies or Forgotten Wars, I'd highly recommend them. Its a phenomenal retelling of the political dimensions of the British Collapse in South East Asia from 1939 to 1962. Forgotten Armies covers the Japanese Challenge to British Rule during the Second World War; it provides a unbelievably rich portrait of a the waning days of the Empire in the region. It strikes you just how precarious their position was, which the Japanese would exploit in 1941 and 42. This was in stark contrast to the resurgent power of Imperial Japan, which threatened the entire South East Asia theatre. They practiced a heady abandon that almost seemed more appropriate for Imperial Germany. Japan's successes were immense from December 1941 to June 1942; they planned a massive offensive that went nearly flawlessly. They took over the Dutch East Indies, Philippines, Malaysia and Burma in a matter of months, an area as large as western Europe. It would take the allies nearly four years to claw back those gains. After 1940, the mainstay of the IJAAF was the Nakajima Ki-43, Hayabusa. It was a reasonably fast, extremely maneuverable fighter. It perhaps reflected all of the wrong lessons of fighting against the rag-tag Nationalist forces over China. Its lack of a self sealing fuel tank and other modern features would become the aircraft's major liabilities come the pivotal conflicts over the pacific. Nevertheless, it formed a critical part of the IJAAF's combat power throughout the war. The first is a straightforward Fujimi -43-I from Fujimi, I'm going to use the OOB scheme of the 64th Sentai over Burma. The second will be a Special Hobby Ki-43-III Ko from the Morotai area in 1944. This kit has got a bit of a reputation of being a bear to build, like their other kits. I hope it doesn't prove to be a problem for me. I'll post photos and the like tomorrow, when I have some time. We have guests over, and all of my stuff is in the spare room they are residing in. Thanks again for coming to watch, this should be fun.6 points
-
Working on paring down one of my “stash” storage boxes, so I decided to knock off a duo of this venerable kit, one the original Hawk issue, the other a still-quite-ancient Testors re-release. I added scratchbuilt cockpit detail with seats from the “spares” box, instrument panels printed out on cardstock from (reduced) online images, and one set of windscreens made from shirt-packing acetate since the originals had long ago gone missing. First up was a landplane version in the markings of the RAAF. Australia purchased 34 of these surviving aircraft from the Netherlands after the NEI fell to the Japanese in 1942. The RAAF used them mainly for refresher training at a number of aircrew training units, and some were flown on transport missions with communications units or used as utility hacks. This particular well-photographed a/c, A50-12, served in a variety of roles before crashing in 1944, after which it was written off for component parts. Markings are not 100% correct as to size and proportion, since they’re scavenged from spares in my decal stash, but it’s pretty close. The second version is in an attractive “what-if” scheme modified from a gameskin illustration I found online, a float trainer as operated by the Norwegian AF training school in the immediate pre-war period. Markings were made up on my PC and printed out on my trusty HP inkjet. The kit offers the option of dolly wheels or a quite-decent molded ocean base, so I couldn’t resist doing both. I used Tamiya acrylics throughout for painting. The kit didn’t contain the distinctive rollover pylon forward of the front cockpit, so I added these from a section of strut stock. The flying/bracing wires are quite prominent in photos of the real thing, so I added these from .010 styrene rod in lieu of my usual stretched sprue. It’s a great old kit, quite accurate for its age, and great fun to build. I hope you enjoy the photos.5 points
-
Hey again folks, Here is my latest WiP, one of the Heroes of the Soviet Union trio by MMM. It is a fantastic sculpt by Pavol Ovecka (Offo) and has been a pleasure to paint so far. He is painted in water mixable oils over acrylic base coat. Metals are done with printers ink. The red star on the base is a cheapie from ebay but, after polishing, I think it came up ok (there was a much more authentic looking WW2 era star on there but I didn't fancy paying £55 for it). Comments and critique are most welcome, as always. Thanks for tuning in5 points
-
Hi All, Well my build rate of late has not dropped in pace, This one took a little longer than the Airfix Hurricane, to see number 7 of the year complete. Built OOB for review so only a few pics here, look out for a more in depth account in a future issue of SAM. Thanks for looking as always comments welcome, Rick G.5 points
-
This is the Hasegawa 1/48 scale Sabre Mk4. I built this when it was first released in 2004. Built straight out of the box, including decals with just the seat belts added. Aeromaster acrylic paint was used for the camouflage colours. Markings are for No 112 Squadron RAF. Thank you for looking, Joe.5 points
-
Building a C-2 Greyhound has been a strange obsession for years, and having mostly finished (always more to do) I admit I'm feeling a bit lost. I suppose it's the modeller's equivalent of "empty nest syndrome." Having built her from the ground up, I don't know what to do next! In any case, the fuselage is Falcon's 1/72 scale vacuform conversion kit, with donor undercarriage, and modified tail surfaces from a Fujimi E-2C. The wing-fold and wheel-bays are Goffy resin sets, while the interior is all scratch-built. A few of the high points made it into the build thread. The decals are a combination of E-2C stencilling and national insignia, with UNITED STATES NAVY titles from an LC-130 Hercules sheet. The VRC-30 unit insignia are from Kinetic's 1/48 scale C-2, because oddly enough, Kinetic's unit badges are much closer to 1/72 scale than the intended 1/48th (in my opinion.) When I get round to the 1/48 scale C-2, I'll be using Carcal's beautiful new decals for that bird. She's not perfect, but I was fairly satisfied with the result after a bit of fettling with the undercarriage and such. As always, critique and input is always welcome. I hope you like her...5 points
-
I decided to go ahead and mask and spray the Dark green. Unmasking revealed a lot of little spots that need to be cleaned up, but it's entering the home stretch now.5 points
-
fin. Procopius will return, in Empires at Sunset!5 points
-
Well, I've been able to get quite bit done on this since my last update. The cockpit tub has been completed and added to the fuselage, this was then glued together. I've added a small peice of resin to the fin and blended this in it just needs a final clean up to smooth everything out. I also glued in a small piece of aquarium plant weight just behind the cockpit tub before adding the wing, hopefully this will be enough to keep the model on its nosewheel. Cockpit tub completed and added to fuselage. Fin after the addition of a small piece of resin and an initial clean up. One piece wing assembly added after inserting aquarium plant weight behind the cockpit. Finally a few shots of the front and rear wing joints Next up is the addition of the splitter plates and intakes before checking the nose fit and cleaning the wing joins up.5 points
-
with added figures, bomb racks, electric motors and base, Revell's 1/32 JU88 posing for the camera DSCF0003 by triumphspeedtriple, on Flickr DSCF0006 by triumphspeedtriple, on Flickr DSCF0015 by triumphspeedtriple, on Flickr DSCF000 by triumphspeedtriple, on Flickr DSCF001 by triumphspeedtriple, on Flickr DSCF002 by triumphspeedtriple, on Flickr DSCF004 by triumphspeedtriple, on Flickr4 points
-
Hi, here's my Eduard 1/48 kit (Profipack) built for the French Fancy GB (please see the GB section for more). SFTB finished with Gunze for the camo and a mix of Tamiya and Xtracrlix shades for the blue. Represents an a/c of EC 03/010 Vexin, Armee de l'Air in Djibouti 1984. Build was quite tricky in places, like most Eduard kits I've built, but looks alright once built. I do hope they try and simplifying things though for future releases. i also managed to crack the windscreen, but Eduard's customer service came to the rescue with a new sprue free of charge, so kudos to them Anyway I hope it's worth your time taking a look. Thanks. FF4 points
-
Hello everybody, here you are news from France,my latest build! I hope you will like it.... cheers Thierry4 points
-
In 50 years of modelling this is only the second Tiger I I have ever built. It's the Tamiya "Mid-Production" version with their own indy link tracks. I got it in a raffle so I splurged on Tamiy's zimmerit set and a RB barrel. Cables are picture wire using the kit's cable ends. Everything else is scratchbuilt or from a leftover PE set. She's going into primer as we speak. G4 points
-
To complete a trio of recent builds here is something a bit different. I saw my first An-72 many years ago, from a train passing the end of the runway at Edinburgh Airport. At that time I didn’t know much about Soviet aircraft and I had no idea what the strange apparition was. A phone call to a friend who worked at the airport established that it was an An-72 doing a Royal Mail charter on behalf of Channel Express. I promised myself that one day I would build a model and about 13 years later here it is. My first attempt was with the Amodel kit, a memory which still makes me shudder. Eventually I did what I should have done all along and used the superb PAS resin kit, a delightfully easy and straightforward build despite the weird shape of the real thing. Apart from the windscreen (by PAS) decals are by Two Six, an early-ish sheet and perhaps not one of Ray’s best efforts. It was presumably designed for the Amodel kit and needed quite a bit of nipping and tucking to fit the PAS version. This led in turn to a fair amount of retouching, the light blue in particular being very difficult to match. The dark blue also had a nasty tendency to flake off which caused further problems. Never mind, I’m reasonably happy with the final result and looking forward to my next PAS build which will probably be the rather more conventional Boeing 717. As always thanks for looking and I promise this is the last one for the time being! Dave http://SAM_0025 by David Griffiths, on Flickr http://SAM_0030 by David Griffiths, on Flickr http://SAM_0029 by David Griffiths, on Flickr http://SAM_0033 by David Griffiths, on Flickr http://SAM_0032 by David Griffiths, on Flickr4 points
-
Somehow all I've managed for the past couple of days are the ejector seats. But i love how they've turned out! Still need a wash and tidy up, but considering these were the kit seats, I'm happy! Al4 points
-
Hasegawa 1/72 F-4e in Lizard scheme. Build here http://www.britmodeller.com/forums/index.php?/topic/234980505-tims-hasegawa-lizard/4 points
-
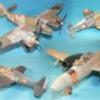
Airfix Lockheed P-38G Lightning 37th Fighter Squadron, 14th Fighter Group, North Africa, Spring 1943 Built from the old Airfix 1.72 scale Lockheed P-38F kit4 points
-
This is Backwoods Miniatures Tank Truck that I finished in RNAS scheme. Not sure these were ever used but the RNAS must have had some sort of fuel trucks...! And here she is on site with a Bristol Scout.. The kit went together like a dream, the resin is some of the best I have ever used..4 points
-
Thanks Christer. OOB and no oxygen bottles in there. Did the 'F' have them? There's a bit in the film where they're carrying bottles but hey, that's Hollywood! Thanks Cookie! A cheap version of Bill's idea - don't look too closely! Finished the radio shack bits and stuck 'em in. Remember this part (now prodded with pens and scratched with the pencil)? Well don't forget to turn it over! Then you can complete steps 24-28: Happy with that. Now I have to decide whether to fit the waist guns or shut the windows. Then the ball turret (da da dah!) Wine o'clock! Thanks for looking.4 points
-
Here are some internal shots of the gunners swivel plate (for want of a better word!!) Now that the rear is complete I am going forward again to attach the front nose perspex and scratch build all the MG barrels (6 of them) and fix in place. ...but first I'm off on a little break tomorrow and driving to Istanbul for a few days and so the next post will be a little while coming !.............but I'll be back! Only a few more posts to go and that's it!! Cheers as always for looking in guys Fozzy4 points
-
Well I've gone and done it, I bought the shieldmaiden, Along with the Berserk and a couple of other figures. I think this is the lesser of the evils as it's only got 8 parts to the kit, but the sculpt is incredible, I hope my paint job does it justice. As always, anyhoo, opening the box you first come across the shield, it's a biggie, then under the foam are the main torso,and arms, under the next layer of foam are the hands, one holding the axe and the other holding the shield handle, sword hilt, shield strap. The torso it'self is lovely, the detail is amazing and almost a dead ringer for Katheryn Winnick who plays Lagertha Lothbrok in the tv series Vikings, draw your own comparisons. The seams are minimal but some are quite awkward to get to, especially between the folds of the leather sleeves, I had to use a mix of scraping with a number 10 scalpel blade, sanding sticks, sanding needles and my old faithful of a half round needle file. The results of this afternoons labours are the torso cleaned up, removing the casting blocks are no real hardship, the resin is quite soft, only a few strokes of the razor saw removed them, cleaning up for me involves a coarse sanding stick, then a finer one (thank you Ultimate Products, they're excellent), scraping with a No.10 then 1200 wet and dry, I then drilled out the locating blocks and fitted brass pins to reinforce, the fit is such that the arms and hands can be painted separately then assembled, the joints are incredible.3 points
-
Hi folks, You all know the beautiful Monogram kit built by Mr Shepherd Paine back in the days. Off course that one sets the standard and is a true beauty, inspiring me to make my own P-61A Black Widow fitted into a small Pasific Vignette. The idea is an engine overhaul after bad weather sand blasting the plane leaving a lot of chipped paint. I used the GWH kit L4802, a kit that has been debated with accuracy issues. Nevertheless it was a great kit with an over all very good fit. I really enjoyed buildning her even I if do find the trend with fitting the landing gears before closing the fuselage(es) very annoying. I added Eduards interior, wheels and engine. The fixed turret and the controls are from Lone Star. Painted with Gunze and Ammo paints using various Ammo products for weathering and chipping (hairspray technique, my very first try). There are some scratch built items such as the crane, the prop gear and the table. The prop blades are from True Details and decals from Zots. The truck is a Tamiya 2,5 ton 6x6 with Aber PE and an Vector engine fitted to the flat bed. The jeep is Hasegawa with leftovers from the Aber PE. The figures are mostly Aires from their new range. Various ground equipment from Brengun and Tamiya is spread around. Thanks for looking /Fred3 points
-
This is my model of Lt. Col. John. D. Landers, P-51D, Big Beautiful Doll. It's the Tamiya North American P-51D Mustang in 1/48th scale which came with Cartograph decals. The model is painted with various shades of Alclad 11 & Aeromaster Acrylics & was built straight out of the box. Thank you for looking.3 points
-
Hi All I’ve done some work on the wings of the CL-44. I cut open the landing gear doors and installed some wheel wells. I also replace the engine exhaust with some tube, it make a big difference and looks some mush better. Tonight I’m going to start on the cargo doors. I’ll put up some before and after photos. Ken This is the work on the wheel wells. This is the way engine exhaust looked before I done any work on it. And this is it after.3 points
-
Cooken: I'm trying to find my copy of Burindo Ki-43 guide. I'm pretty sure that's a -IIB you've seen (enlarge cowling, three bladed prop, large exhaust manifold), but I'm not the best at identifying these sort of things. I find the Ki-43 interesting because its such a quintessential japanese aircraft from WWII: an absolute focus on skill and maneuvering and the romantic aspects of air to air combat, rather than the reality. There are some great accounts of Japanese pilots winning battles vs Allied pilots by exploiting the pure maneuverability of the aircraft, but it was still a death trap for inexperienced crews. Anyways, I'm going to amend my build a bit: I'll try to build the three major kits available right now: Fujimi Ki-43-I 48th Sentai <- Burma 1942 Hasegawa Ki-43-II 248th Sentai <- Wewak, New Guinea, 1944 Special Hobby Ki-43-III-Ko 64th Sentai <-Burma 1945. Doing three will be one of the dumber moves on my part, but I'd like to try nonetheless: I'm going to add a few different parts. The Fujimi Kit will use an Eduard detail set. I'm going to graft a Resin Ki-44 cockpit into the hasegawa kit. It might not be accurate, but with the cockpit buttoned up and a few little modifications, its very hard to tell the difference. Finally I've got a Rob Taurus Canopy for the III-Ko. As you may note, I've already started a bit on some of the kits. Back in the day I used to mix my Aotoke primer from a bunch of paints and make too much of it. So I applied the excess to fill in applicable areas on other aircraft. On the Ki-43s that meant wheel wells and the interior fuselage. Then I went to Gunze, and just used their proper paint instead. I also took the 248's decals and started sunning them to get the tail markings perfectly white. I'm experimenting a bit: I found that in previous sunning efforts there was a bit of condensation on the inside of the ziploc bag. So I added some rice to see if that helps remove the condensation and have some sort of effect on the decal. Its Victoria day here in Canada, so I'll need to do some work, but I'll try to get started tonight on the kits.3 points
-
Thanks Rob - I enjoy doing the posts as much as the modelling so you're welcome! Thanks Andy. I haven't really looked much at the outside yet but missing small details won't worry me too much (ceiling again) and at least they won't get knocked off! Don't worry about 'highjacking' Jaime - sharing views is part of the fun! Regarding the masks, it's the first time I've used a set of these - I quite enjoy masking using Tamiya tape and a sharp, curved blade (explained in Paul Budzik's video here) but I'm not a masochist - there's a lot to mask on the B-17 and the frames aren't that well defined so I paid my money happily. I used the first couple on the inside of the waist windows which I had cut off the sprue with my JLC microsaw (to avoid crazing). After giving them a couple of brushed coats of VMA IG it was obvious I needed to get the airbrush out so I did some other bits too: Having started the masking I thought I'd mask some other bits and that's where I slowed down. It's a very fiddly job, not just because the parts are so small but also because the mask material is not the same as Tamiya tape - once you've placed it if you try to push it about it tends to move back where it was, sort of elastic, so you need to pull it off and place it again. It's also not helped by the thickness of the plastic and the 'frames' - this means that a well placed mask from one angle looks crooked from another - these two shots of the same mask show what I mean: I think this upside down 'V' shape on the left of the nose is placed well when viewing at 90o to the part, but then turn it a bit (photo on the left) and it looks to be off the line (gap top right). See those two lines just to the right of it? Rotate it a bit more without moving the mask and it seems to be on top of the lines now. Nightmare. This probably isn't the fault of the masks as much as the plastic, but it's still a pain. I'll have another look at it when my patience is restored! I'm going back to the waist guns (lots of bits to paint up) and then I need to wait for those windows to dry. Thanks for looking.3 points
-
Thank everybody! PC - I mainly used drafting tape for the camo. It was a recommendation from Tom Hall in the P-40 STGB, and it works great; a little less stretchy and tacky than hardware store masking tape. I also invested in 0.5, 1, 4 and 5 mm Jammy Dog masking tape (I already had 2 and 3 mm tape, and 6 mm is the standard Tamiya tape width). I used the 5 mm Jammy Dog tape for the wing stripes, and 4 mm for the fuselage stripes. In retrospect, the outer white stripes on the wings should have each been a mm or two wider than the inner strips according to references, but I didn't realize it until it was too late. Thanks Ced and Giemme - I do like replacing transfers (CAWTS!) with paint whenever my skills allow. Eventually, it would be great to be able to do roundels and squadron markings with masks as I've seen a few Britmodeller's do with wonderful results. That being said, the invasion stripes still need some Giemme approved de-saturation, they're still too stark.3 points
-
And here it is!3 points
-
on the subject of PE for the interior - I reckon Revell have got the level of detail just right, It's hardly going to be visible from the outside, but with a photographic record & an excellent job of it as with CED's build here, the model maker can be proud of what he has achieved. As outstanding as the level of detail is on the inside - they have gone, in my opinion, in the other direction with the outside. The front looks more like a boat than a plane & there are no little fiddly bits to fit, like pitot tubes etc, So if you were to spend additional dosh on PE, I would have a look at the exterior detailing.3 points
-
Unfortunately not a huge much to show at the moment, wedding stuff has been getting in the way and I've not had much time at the desk. But, I have managed to get the stores and drop tanks done to a point I can put them to one side for the moment. After seeing loads of reference photos with mix-match tanks I thought I'd give it a go for some visual interest. They all still need weathering as they use to get really filthy but I'm happy with how they are coming together. Should be a bit more of a normal build fro now on with the cockpit up next.3 points
-
I'm glad the masking worked PC - and, uh, sorry about the decal. The lesson, as always, is beware Cookie's advice. Mike, my fluid mechanics prof was from Australia, and we dared ask him about toilets and sink drains. He said that the Coriolis effect is a weak force and every other variable we could think of would have more impact. I think the solution is to bring a toilet that you have flushed in the northern hemisphere with you on your next trip to South Africa. Then all variables are accounted for. Untold riches await!3 points
-
Finished! After I gave the camouflage a coat of Humbrol glosscote I added a mixture of Revell and Hasegawa P-38 decals plus squadron code numbers from my spares box. The code numbers while a little small were the best I had and while not the number shown in the picture are at least correct to the squadron. Over the decals went a coat of Humbrol mattcote and on top of that went a coat of weathering powders suspended in decalfix. I am not as happy as I would like with the weathering around the superchargers but it will have to do. The canopy was the original from the kit which I first of all treated with klear and then ever so slightly weathered with the same solution used on the rest of the model. Apart from the decals, rescribing and a pair of Revell 1000lb bombs in place of drop tanks the model is straight out the box. I enjoyed building this kit once again and plan to do another, only some time later though. The whole kit was doddle and fitted together well with very little filler, but it did take a while to build mostly thanks to the sanding and scribing. I am quite satisfied with the finished model but can not 100% guarantee the authenticity of the camouflage scheme which is an educated guess based on a few morsels of pictures, drawings and written info. The crate is to keep the model on three wheels, I don't like using weights as I have found weighting can brake the undercarriage legs. [/url] [/url] hosting images">http:// hosting images3 points
-
Almost nothing to add, thought I'd better do something before I forgot what I was doing How about some underwing tanks? I need five for the three aircraft, one will have a single underbelly tank instead with the fins removed, as per... These are my best half dozen I have to say I'm not keen on Flickr's latest intrusive persona, gettoutavit Flickr These tanks are as follows, one from Airfix, one from Matchbox improved with Perfect Plastic Putty and two from Pavla All have been cleaned up and the resin cast one I made is in there somewhere invisible under Tamiya White Primer, ready for some fins As you will have seen "up there" I did finally get the finstripes close enough and have unwrapped the cockpitss ready for seats and canopies Guess which canopy is doing me 'ead in? Yup the front seater for the T Bird, several unhappy goes at getting MDC in before I followed Garth and used the Klear to add it in No pics of that for some reason, still there'll be some soon when the peripheral strip goes on. At the mo' it only has its zigzag run across the roof of the canopy I decided to make six identical jetpipes using the walkaround pictures to decide which is closest to the real Mckoy seen here with the finstripe I have decided on for the GR3 Here's the opened cockpit after the masking came away, not too bad I reckon, GR3 The darkened area beneath the decal film of the real thing looks OK to me Here's the Modeldecals on the Airfix kit, not as good as I hoped they'd be and I had to remove lots of out of register white from the slide areas Might as well have painted them by hand Another chance to see the hot gases emblem I drew for the power unit exhaust, when the airbrakes are aboard that will be a vanished area Yes I am a bit chuffed with it After slamming Modeldecals about the register on some very ancient decals, how about this Xtradecals sheet? The ET (for the 6Sqn trainer's scheme) was as much out of register as the Modeldecs had been I had to slice some of the white 'shadow' off the letters after fitting Frankly that is disgraceful these days in my opinion And as a lighter end to the round up/down I gave myself a few days off the Jags with the JB models kit of the Bedford MK Tactical Refueller From my poor old memory I recall RAF vehicles as being a kind of eaudenil inside so I mixed up something to bring the old colours I recalled to mind No building pics just a few of the outside now its done Not pretty but did get me working plastic again this week, I have been feeling really 'off it' lately Not a lot done to it (Oi who shouted out at the back?) Leave it out guv'ner, but the wing mirrors were added from wire and very shiny metal Headlights, indicators and tail lights are from Little Cars and the extra roof beacons were made up to accurise it a bit I intend getting the Jags up on their own legs very soon Sitthee, thanks for looking b3 points
-
So in the end I decided to make some masks for the unit markings and national insignia. I mean where better to try something for the very first time than after six months work on the most expensive kit I could find? What could possibly go wrong... Well surprisingly, not too much it seems. I photocopied the transfer sheets and measured the copies against the originals to check the sizes, under the copy I then put a piece of tracedown paper (like carbon paper) and beneath that a sheet of Tamiya masking tape which is printed like graph paper. Starting with the letters and triangles (nice straight edges) using a metal ruler and very sharp pencil I traced the outline on the photocopy which then gave a perfect impression through the tracedown paper on to the tape. This could then be cut out in to the required masks. The group markings were a bit more complex, requiring the outer mask to be applied and a coat of white laid down, then the 'C' was put back in place and the black sprayed on. Prior to the painting I had dabbed a bit of maskol on with a sponge for the paint chipping. I found it useful to keep the insert whole before re-applying it to ensure that I got things lined up correctly, see below with the stars and stripes: The separate parts are just held together by the tiniest threads of tape and can be taken apart easily once fixed in place back in the hole: You can see that I've actually masked over the final edges, this will be removed after I put on the white paint, it just ensures that even if the insert does not go back in precisely, that there will be no white visible outside the blue. To be honest I'm pretty happy with how it's going so far: Tomorrow will see the painting of the stars and stripes... this could go either way... stay tuned. Oh, and BTW making these masks and putting them on has taken absolutely AGES... Thanks for looking, Regards, Peter3 points
-
More done, and she's ready for masking and primer! Once all the filler was cleaned up (filler needed was my fault, not the models!) i added the True Details pylons along with the launchers for the AGM-65's and the MER for the MK82's. The muzzle break for the M61 was added and the kit was given a tiny up: I'm pleased to say the mess around the windshield cleaned up nicely. The coaming has been painted, detailed and the windshield itself has been added and masked off. Kit will be primed tonight and i'm hoping to start painting tomorrow. A few sub assemblies are also ready: More soon. Dave3 points
-
Ah thank you for the very kind comments! Makes it worth toiling over Top wings on! ;D the fit is amazing - NO glue or Jig was needed for the wings and struts - all clicked together. Just requires a bit of thought re the rigging, this should hold the whole thing together as on the real aircraft. It's an incredible kit.. Guy3 points


This leaderboard is set to London/GMT+01:00