
Leaderboard


Popular Content
Showing content with the highest reputation on 10/03/15 in Posts
-
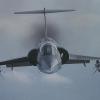
Hi all, it's been a while since I've posted anything aviation wise so here are a couple that were finished a short while ago, (only just got around to snapping them), both built as part of the Bomber Command sig's alternative future theme. The AVRO 730 is S&M's resin kit, very nicely moulded, no distortion and quite easy to work with. Not cheap but I feel you get what you pay for and who else is going to produce these monsters ! Something of the Gerry Anderson about the AVRO design, just love the periscope idea. The TSR 2 is Pit Roads little gem. The kit is so well engineered that it actually snaps together perfectly with no need of filler. Both finished in the RAF's white anti flash low viz scheme of the early sixties airbrushed using decanted Halfords appliance white plus leveller with panels finished in four different shades of white from Vallejo and Mr Hobby, decals from the spares box......the 730 is XM755 of 'A' flight, 57 squadron, RAF Honington and the TSR 2 XS990 of 9 squadron RAF Scampton. In a similar vein I'm hoping to scratchbuild a resin Handley-Page HP.100, Vickers R.156T and Saunder-Roe P.188/2 to go with them at some point, (unless of course Mel comes up with the goodies in the meanwhile, and preferably in 1/72nd scale !)..... Thanks for looking, Cheers, Melchie... The 730 was a monster at nearly 160 feet long and weighing in at 146 tons. Eight powerful P.176 reheated turbojets rated at a total of 112,000 lbs thrust were to power it to Mach 2.5+ at 70,000 feet. Designed to serve as both strategic bomber and reconnaissance platform it was sadly cancelled in 1957. A highly advanced design, possibly too advanced in retrospect and way before the SR-71, (which had broadly similar performance) it would have proved a powerful asset. The two together awaiting orders to reduce some large part of the Soviet Union to its component parts... F.A.B....21 points
-
Hi folks, this is the new Airfix kit built as I./KG2 machine from Greece, 1941. The kit is OOB except home made seat belts, Quickboost mg's barrels and Peewit canopy masks. The decals are combination of Superscale and Techmod sheets. In my opinion this the kit is a bit overengineered with odd instruction building sequences and only average surface details, but still worth bulding. The full build report will appear in coming Valint Wings Airframe/Detail No.2 book. Cheers Libor21 points
-
Hello lads! I have finished another project of which I would like to share the end result with you guys. It was an unfinished project which I picked up again during the build of the KA-50 Hokum by Italeri which is waiting for me to apply about 100 stencils, hence the delay.. This little Trumpeter kits went together so incredibly well and really was a joy to build. Fitment was excellent and details are staggeringly good. Such a pity that there is no Aires pit available, I like those. I decided to use the Dreammodel detailset instead. I also knew that the ngine in this plane is the same engine as the one fitted in the Mig-29 so I dropped in an Aires Mig exhaust. This fits like a glove! But enough said, here are the pics. Hope you like her :-). Have a nice day! Jeroen18 points
-
this t-2 was the first piece of my aerobatic collection and it was also the hardest to build and paint. This japanese f1 has its whole scheme painted with enamels, no decals were used, but roundels & stencils and it was totally rescribed. Orlando.15 points
-
Hi all,Academy,s little Storch just finished.It was a cracking kit to build a bit fiddly and wing issues which needed fixing but it was cheap,fell into my interest in building some Luftwaffe types and I had never built one before! Hope you like and background story here http://www.britmodeller.com/forums/index.php?/topic/234977389-academy-172-fiesler-storch/15 points
-
Hello again, Was making pictures of the JF-17 Thunder which I posted just now. I thought I might as well post my previous project also. Here is my Hasegawa J-35 Draken in 1/48th scale. For extra's I used Two Bobs decals for this one, an Aires pit (which actually fits very well!!) and an Aires exhaust. Here come the picca's: Hope you like her! Have a nice day! Reg. Jeroen14 points
-
Hi all, with just over 8 weeks gone I am calling this project complete, It has been a real challenge to say the least and has pushed me in all sorts of directions but I think the end result is well worth it. The remaining work for this week was final assembly and the addition of all the various minor details. There are a number of antennae missing in the kit and these have all been checked and replaced using the Eduard etch set. The static discharge wips on the vertical tails have been replaced and one additional wip has been added to the wing tips. The stencil decals have all be over coated with a very light filter to dull the new look of the stencils in line with the weathering of the airframe. FOD Guards have been made using some foam with the etch parts on top, it would be very tough to cut a part to fit inside the intake exactly so this is a simple but effective option. Not much more to say, picture heavy as usual, thanks to those who have been following on the work in progress forum. (spot the mistake with the front gear doors, I have amended now see last image dowtt!!!!) Gear doors turned around, it happens Thanks for looking. Danny14 points
-
Hello, Here's my 1/48 Roden UV-20A, in US Army Berlin Brigade markings. The US Army bought a pair of the Pilatus PC-6 in 1979 and named them UV-20, and used them for patrol and light transport duties in West Berlin, much like the RAF used the Chipmunk. Once Germany was reunited, they were transferred to US Army parajump display team, the Golden Knights, where one of them is still in use (the other one collided with a Cessna and crashed). Its OOB, with only an extra antenna added on the nose. I wish there are aftermarket decals for it, though, as the Roden ones are not very good. The yellow ones like on the tail are way too transluscent, many of them are not in register, and they don't like to confirm to the surface very much. I opted to paint the cheatline instead of using the decals for it. The antennas are from steel wire. I used Italeri white and Tamiya Olive Drab paint mostly. Thanks for looking.12 points
-
Hello my friends! This is my last work, I hope will enjoy the pics!11 points
-
Mil Mi-4 Hound Hobby Boss 1/72 Finally managed to get a build finished this year. It was a nice little kit with reasonably good fit and detail but for some reason I decided to make it incredibly fiddly and fragile with the addition of Eduard's exterior etch set. It does add some nice details though. Hope you enjoy the shots Thanks for looking Andy9 points
-
Hi. Waiting to offer some new realizations, I'll show you somthing that I did 'few' yers ago. This model was complictly engraved and the shades of alluminium color was obteined by mixing Alclad II colors tryng to get closer as possible at titanium alloy as the original plane were made of. I studied many pictures and I noted meny differens of shadows between panels. The plack panels with a shadow of brown and bray where gived by using Gunze Mr.Color.8 points
-
Friends, thank you very much for the positive response and the joy of our models. Otherwise, P-36, Fiat G-50 and Airacobra family not canceled. Currently our production capacity is fully utilized, and these models are so 50% ready. Again on them will work this year and it will be news for 2016 along with the new Me-262, Spitfire Mk.XIV and Bf-109B / C / D. There are also considerations about the new RE-2000 and Spitfire Mk.Vb / VC. Of course, all models will be HQT quality or 3D-CAD-CAM. Our short-run technology will be used in a very limited way, and (with apologies) less important types. Otherwise, my friends, who was diagnosed with a long wait, please contact our company and they will send you the appropriate medication (anti-depressants, hallucinogens, a letter of apology ...)8 points
-
GMC CCKW 750 Gallon Tanker Model: HobbyBoss 83830 Born into battle during World War 2 this warrior fought it's way across Europe with the 3rd Army and kept the Army Air Corps fighters fueled. But, as with all old warriors and with the wars end it was put out to pasture. It's now 1949 and along comes Army Mechanic PFC Alvin King, demobbed from occupation duties and now an ex-GI looking to use his GI Bill to start a business. So, he looks for a truck to keep the locals back home supplied with fuel oil. On going to a surplus sale in Memphis he picks up this old tired tanker. She needs a little work, but it's a start! Using his old contacts at home he gets some contracts to deliver heating oil and starts to earn a steady income for himself and his new wife Milly. King Gas is born! Alvin gets some surplus blue and white paint, mixes it together and paints the truck to cover up the now faded Army Olive Drab. It's now 1951 and the fuel tanks have had their day, they're starting to leak and that's costing Alvin money. So, it was off to another sale at a scrap yard where he found a wreck of a truck but it had 2 good fuel tanks. He bought the tanks and had his own replaced. They were a hideous red colour but once he had them installed he had every intention of repainting them into 'his' distinctive blue colour – no more blue left! Milly had taken it for the house porch. While he was at the yard, Alvin also replaced the drivers side door and wing mirror damaged the year before. His fuel truck was now a mishmash of parts but he could still go about his work. He needs the work, he and Milly are looking to start a family but times are hard in the mountains. Another year passes and the bodywork on the truck is now starting to really show it's age although the engine and chassis are still OK, and spares are becoming short at the yards. It'll soon be time to get another truck but not right now, need to earn a few more bucks and get some savings. Milly is expecting their first baby and cash is tight right now! Alvin is doing 14 hours a day and just keeping his head above water but his customers are loyal and he keeps soldiering on ….......... This model build was an exercise in weathering and distress but over the time of this build a story was born. I used this story to place the model in context and with it came the amount of weathering needed. The story of Alvin is fictional but cannot be so far removed from the times that some of it must have a ring of truth to it. I hope you have enjoyed following this build and may join me again on a future project. Constructive Comments Appreciated Build shown in Work in Progress Also featured on our website at Leicester Modellers7 points
-
My rendition of Revell's new tool Corsair. Painted with Gunze Sangyo acrylics and weathered with a variety of products. I didn't weather the drop tanks as I assumed that they would have been new on the original plane. ...and I broke and lost the antenna... Hope you like her.7 points
-
Hi Guys this is my Challenger, nice kit with a few bits from an upgrade kit.6 points
-
New guy alert! I've started a build in the Sci Fi Group Build but thought I would share one of my builds from last year with you guys. Story behind this kit is I bought a recast of this model off ebay about 6-7 years ago, this was way before I knew about recasts and how evil they are! It was horrendous quality and thats when I started researching the original kit and looking into getting one. I got lucky and managed to pick this kit up for a reasonable amount of money a few years back, it was on the shelf for a year before I finally got around to doing it, and it was a really fun build. I know the kit is based on the War Robot in the Stallone Judge Dredd movie, but I wanted to make it more like the comic book ABC Warrior Hammerstein, whom the design was blatantly based on. Only main difference between movie and comic is Hammerstein is so called because he has a hammer hand, so I decided to mod one for him & add some extra cabling, and scratch built the base which I stenciled on the ABC Warriors comic book title artwork. Its a big model at just over 13" tall, and I'm super happy with the results, enough talk here's the pics. TsukudaHobbyABCWarRobot_zpsef2b8128 by Nick Frost, on Flickr ABCWarriors1_zps49c150bd by Nick Frost, on Flickr ABCwarriors-13_zps51339263 by Nick Frost, on Flickr ABCwarriors-14_zpsf672fe6a by Nick Frost, on Flickr ABCwarriors-9_zpsc743751c by Nick Frost, on Flickr ABCwarriors-21_zpsd63108a6 by Nick Frost, on Flickr ABCwarriors-22_zpsaee0fef6 by Nick Frost, on Flickr ABCwarriors-19 by Nick Frost, on Flickr ABCwarriors-20 by Nick Frost, on Flickr ABCwarriors-18 by Nick Frost, on Flickr ABCwarriors-17 by Nick Frost, on Flickr ABCwarriors-16 by Nick Frost, on Flickr ABCwarriors-15 by Nick Frost, on Flickr ABCwarriors-14 by Nick Frost, on Flickr ABCwarriors-12 by Nick Frost, on Flickr ABCwarriors-11 by Nick Frost, on Flickr ABCwarriors-10 by Nick Frost, on Flickr ABCwarriors-8 by Nick Frost, on Flickr ABCwarriors-7 by Nick Frost, on Flickr ABCwarriors-5 by Nick Frost, on Flickr ABCwarriors-4 by Nick Frost, on Flickr ABCwarriors-2 by Nick Frost, on Flickr Thanks for looking, questions and comments welcome6 points
-
my latest finished it's the older mold Hamp,a pretty good kit still,it is out of box except for the sprue pushrods on the motor and tape seatbelts,happy with the end result. i'm still practicing with weathering,but i think this looks ok.6 points
-
Hello All I would like to show you all my new finished model no 2 this year. this is Boulton Paul Defiant mk.1 another one on this forum but 1st mine. This model represent machine from No. 307 (City of Lwów) Polish Night Fighter Squadron .Exeter late april 1940 and flown by sgt Franciszek Jankowiak sgt Jerzy Karais. Bulding this model was a pure joy It went together very well. For painting I have use vallejo paints and for weathering humbrol pigments. On this one I want to try chipping so i have bought chipping medium from vallejo and alclad 2 airframe aluminium paint. As this technique was new for me chipping went a bit to much but I'am still like end look.The plan was to make worn and tired machine . For panel line wasch I have use a Florymodel wasch. I have also use 2 different filters and Galeria matt Varnish I hope you going to like it as much as I. Any comments and critic welcome don't be afraid Ps I would like to thanks Stew Dapple for big help with this one for Sending Polish decals and a great paint cheers IOU one ok pic time Thanks for looking6 points
-
Hi mates, The meds seem to be working today, so I can post a couple of pictures. I mentioned earlier that I mounted the resin air scoops from Quickboost. The air scoops are such a prominent feature of the Crusader that I would say these are a required purchase. The kit scoops don't even try to offer a cut-out area up front, but the resin set looks just right to me. Next, I've started the dreaded "flap cutting out" session. Believe it or not, when I was young and, well, stupid, I used to cut out flaps with the little circular saw blade on my Dremel tool (and I didn't have variable speed). Talk about stitches waiting to happen - yikes! I don't know if I do it properly now, but I use an assortment of scribers, guided by Dymo tape. Here is the upper wing with the port flaps cut out, and the starboard flaps as they come with the kit. Thanks to Academy the leading edge flaps are already separate. Why they didn't also do separate flaps is a mystery - it seems that most photos show if the leading edge is lowered, then the flaps and ailerons are too. Cheers for now, Bill PS. Another question for Tailspin Turtle: Did the Crusader have Corogard on the leading edges of the flying surfaces? I have to say that it's not real clear from photos. Sometimes I think I can see a very thin strip on the wing leading edges, but not on the intake, stabilators, or vertical tail. Could just be my eyes, too...6 points
-
Some more progress. Managed to get all of the decals on (from Fox One) using Gunze Mr Setter - first time for me for both. Decals are superb. Need to mask off and re=spray with Klear Semi-matt for a scale finish and then get to work on glueing sub assemblies etc. I am hoping that by the end of March this is complete and I can then move on to finish the 1/32nd Hornet that has now been on the go for around 7 years!6 points
-
thanks all - I am thrilled to hear you like what you see Lee - I cheated on those - they are model car parts from RB Motion - expensive if you need lots of them but perfect for the job ..so, not much of an update as I have been busy, but I guess this is about building a Tigercat even if it is one piece at a time! The part in question is a canopy winding handle, this is what the pilot uses to crank it backwards & forwards.. I assembled the PE parts I had made by laminating them to make thicker parts... ..the re-stock of scale hardware nuts & bolts included these - they even have threads - unbelievable given they are less than half a millimetre in diameter.. ..shot silver on another side console part that is up next... ..the winding crank actually has a wooden handle so I turned a cocktail stick in my dremel - i figure nothing looks more like wood than wood itself.. ..painted it and did a bit of chipping - my new favourite way of weathering.. ..so to make up for my rather weak efforts at progress on the bench, I have also been spending some late nights trying to get the engines up to scratch - Tim has been really helpful (thanks Tim) - I still have loads to do but in the long run I hope it saves me a few months scratchbuilding them (twice)... ..also gave the fuselage another primer coat and am still trying to get rid of some rather persistant seams around the nose join which I really hope isn't caused by flexing between the very heavy resin/lead nose and the card structure.. more soon hopefully... TTFN Peter6 points
-
This thread is the building of two Airfix starter set Folland Gnats by Frederik aged 10 who is my son and Dylan aged 9 who is Pats (Jockney's) son. They are, thanks to Britmodeller going to be penpals, this gives each of them a chance to learn a new language, Frederik English / Scots and Dylan Danish as well as share the fun building kits together. Pat and I will both post the progress of each, with the understanding that it's the lads doing the building so their dads will need to try and resist the temptation to get involved. We have a third Gnat as a contingency plan in case we have a c*ck up of serious proportions. So ladies and gentlemen, sit back and watch the fun cheers Henrik & Pat PS. Having a little trouble getting photo's transfered from my wifes phone. will post some pictures later5 points
-
Other way round Keith, an uncontrolled compression. there'd be bits of pink rubber everywhere! Mould came out good and casts nice shiny resin and made a few wax casts of it. Have a pyrex jug I keep my wax in for casing that I got during experiments in trying lost wax casting of white metal a while back. jug and wax is put in the oven at 125c until all the wax was melted then the temp reduced to 100c and the mould warmed up in the oven with the wax. this is so the wax doesn't get shock cooled when it is poured and more readily takes on the detail of the mould. Wax takes a good while to cool and once set it comes out of the mould like a resin cast, but one has to be more careful as it is much softer than resin and easily damaged. It also doesn't want to take on the shine that I hoped it would, not to worry! Plan now is to push acupuncture needles into the cast at strategic points, these will become the vent holes when the epoxy resin vacuum mould is poured over the top. The idea of using wax came when reading an article on making female vacuum moulds where the master was coated in wax (shoe polish) to aid release. Why not make the master from wax instead........bear in mind I hav'nt actually tested this idea before..... so it could all turn to...well you know. But the good thing about wax is if you mess it up you can melt it down again and start over. CT5 points
-
Doug's Tamiya 1/35 Cromwell MkIV [/url]5 points
-
TIE Interceptor Finemolds 1/72 Hi everyone This was built in Febuary 2014. It was the first Finemolds SW kit I'd built and it was very nice, though a little undersized for 1/72. The base was made from various bits and bobs built up on the supplied kit base. I added a few LEDS to the base to add a bit of interest. Enjoy the shots Thanks for looking Andy4 points
-
Hi Chaps - I thought I'd document this build a little. You can find look at whats in the box here: http://www.britmodeller.com/forums/index.php?/topic/234977944-airfixs-new-spitfire-mk1-148th-scale-a-quick-in-box-look/ Mine will me a Mk 1 as flown by Adolf "Sailor" Malan ZP-A K9953 74 Sqn. There's nowt wrong with decals or marking sin the box, but for personal reasons I wanted to build Malan's aircraft, and a quick check in the decal banks shows I have the necessary transfers. Phew! So far the interior has had an airbrushed coat of Tamiya interior grey-green, and the wings have been assembled - with the only thing to note here is that the underside wing piece seems to need its flat 'wing tip" ends sanding back very slightly to get everything to line up with the top wing pieces. Also - watch the fit of the prop blades to the spinner base plates on both the DH & Rotol props. You need to orient the prop blades correctly to ensure the spinner cap fits onto small alignment grooves, and as the prop blade mounts onto a square peg it's easy to get it wrong. You soon find out as the spinner cap wont fit!! ( yes, guilty....though fortunately it was a dry fit that threw this up) Pics to come. Jonners4 points
-
Rattling through the ship builds so far this year - here's the fourth! Trumpeter kit of the USS Hopper with many Veteran Models accessories. All the PE was in the box. Rigged with copper wire, painted in WEM enamels Haze Gray and Modern US Navy Deck Gray. One of the most enjoyable and effortless kits I've ever had the pleasure of building. Would recommend these to anyone from beginners up. Nice one Trumpeter. The second Decatur I've made in succession, now moving from tin cans to battlewagons for the rest of this year Alan4 points
-
Hi folks: A chance dialogue with the nephew of James Nicolson, VC revealed that 'Nick' used to fly the Gladiator covered on the box art of this reissue of the original Airfix release, so I picked up the old kit and was pleasantly surprised at the quality and scope of the decal sheet - 'Nick's' aircraft, plus three of the Malta Gladiators 'Faith', 'Hope' and 'Charity'. The nephew, Jim Nicolson, gives illustrated talks about 'Nick' and I have his consent to do one at my youngest boy's air cadets squadron. Thought I'd do the new Airfix tooling of the Gladiator, in 'Nick's' markings as a gift for Jim on conclusion of his talk. This one's being worked on in 'down time' that happens by on my bruv's Liberator. I'm always interested in monkeying with build instructions and this one's no exception. It seemed obvious that the heavily framed hood, clear as it is, won't reveal much of the cockpit. This meant the fuselage and lower wing, along with the stabs and rudder, could all be assembled and the seams tidied, before any paint makes an appearance. The fuselage top wing supports have been fettled and will be added to the top wing before being dropped onto the fuselage, once the holes for Bob's Buckles have been run in and the buckles CA'd. The undercart struts will be added and smoothed in, then grey primer hosed on. With the top wing and fuselage struts / fuselage sub-assemblies still separate and independently primered, the Interior Grey Green will be misted in and Eduard pre-painted RAF belts dropped on the seat (I have another kit, so they'll be pre-formed off piste). This is a lovely kit. Like all Airfix stuff, the parts need a bit of love but ditching the alignment pins and sorting things to this stage was just a couple of hours. A top wing tidy up, then primer... Steve4 points
-
Actually we're probably all sorry about it now too. If you took the trouble to simply read my original and subsequent posts (or get someone to read them to you), you would see that I have been at pains NOT to 'slag' the item in question, merely compare it to others in the same field, allowing for its price. Also, my 'limitations' do not extend to using a punch and die set, as you seem to imply. I cannot see where hypocrisy enters into any of this thread; since it now appears to have served its purpose and will probably be locked shortly, you will have to take your obvious personal issues elsewhere; no further apology necessary.4 points
-
Garth, As I've been twiddling my thumbs before starting a Hawk build - and knowing you were thinking of vac forming a canopy if need be - I thought I'd have a play with something similar using milliput inside the Hawk canopy and see how it went. I plan to vac form new canopies so I knew the practise wouldn't be wasted. I've got one the chinese dental vac machines identical to the one Bill posted above. I have to say it makes the job much easier. The heating element really does take the hassle away from the process. I used a home built vac box for my chipmunk canopy and the chinese dental model for the JP5. I used the sylmaster silicone mould release agent from my resin casting kit rather than vaseline - it's thinner so no risk of ridges. Seeing as it was practice I did the canopies from both the revell and airfoil new and old boxings (the new boxing has the canopy as one piece): It was easy to cut and sand the milliput to size and the silicone agent worked well in making it easy to release the master from the canopy. However I didn't find that the surface of the milliput masters were very good. Each of them had little crease lines and pits of various shapes and sizes. I think it's because the milliput is quite dense and firm when mixed and resisted being pushed and squeezed into perfect contact with the canopy. I'm not sure what the answer to that is. Ignore the raised MDC in this photo and look closely at the side of the master - you can see the imperfections: Just polishing the milliput master wasn't going to do the trick - and the surface is just a little too soft for comfort. So I brushed cyano all over it and let it dry for a bit but not fully harden: That polished up reasonably easily and left a harder finish. I produced a reasonable test canopy from the master - but not perfect as I couldn't get the cyano surface perfectly polished - and every minute imperfection gets transferred to the vac form. So I thought I'd try giving the masters a coat of Mr Surfacer 500 from a rattle can and see if that was durable enough to withstand the heat of vac forming. Of course it polished up a treat: Oh - and I stuck some 1mm plastic strips on the bottom of the masters - just to hold them slightly above the deck of the vac machine and ensure the bottom of the canopy was moulded crisply. I put some blue tack at either end of the main canopy master to make it easier to release from the mould. Here they are on the machine after some 0.75mm PETg has been heated and pulled. The heating element makes it perfectly predictable. I know that if I set up the machine - raise the carriage with the 0.75mm PETg, turn on the heating element and monitor it until the PETg sags just to the bottom of the carriage frame - it's perfect for moulding. Removing the blue tack then lets the master just drop out: It's only practice - but doing two pulls on the trot produced some pretty bloomin good results: And the Mr Surfacer did not deteriorate at all - which is excellent news: 0.75 PETg produces a pretty robust canopy - but if the original kit canopy was quite thick then the resulting vac form will be a bit slim such that I think you'd have to add the framing with plastic strip rather than paint. Thicker PETg may be a better solution in those cases and I tried using some old 1mm PETg of indeterminate make - but for some reason it was very temperamental when heating - going quickly from sagging to bubbling before I could catch it: Maybe a poor sheet of PETg or maybe poor techniques. Dunno yet. Anyway - sorry for the large post/thread drift but hope it's useful. Steve4 points
-
Some days BM drives me barmy I think I'd better lay off posting in the afternoon I just posted, then lost the lot as the site went hiccup Again, I will try again Crisp does fog at sea look like that? Wow I'm amazing arent I? not Wheezing ten ton, that sounds more like me I have been working the harnesses for two of the seats Head box straps, persoomably these actually work the parachute and attach to the body straps behind the back panel And these are the upper body attaching thingys (which I will be clipping to the headbox as per pictures I have seen) There is an exciting array of fashion colours available, I shall be mostly using browny green and greeny brown for mine So Paint for this I retired to the paint technology department and took up position on the MG workbench £12 airbrush, paints various and copious array of useful toothpicks with a tube for pippettery poipoises I wasn't convinced that Dark Sea Grey was going to look right on the Jag, it looked horrendously dark in the Humbrol pot I take it back, here the starboard side is DSG from the pot, unlightened Port side has a 10% of white added, it hardly shows though I know it is there This really looks quite like the grey scheme in my picture bank so I then got the Dark Camouflage Grey ready to spray, this looked even darker in the pot than DSG I made a massive mistake with the airbrush, rather than clean the twelve quid one I broke out the fifteen quid one to spray the DCG, the void behind the nozzle must have retained some old dry paint when I cleaned it out Then when I sprayed it decided not to keep hold of it any more Gercha have some of that, all over the sides So ignoring the bits of pebble dash 'cos this is only about the paint colours the starboard side is again, colour straight from the pot, really not so far from a fresh painted Jag again it seems On the starboard side I whitened the paint again The flash has lightened it even more but the colour isn't bad at all, after all What do you think? Because this is a colour test I sprayed a line of whitened DCG across the upper surface DSG Visible but not an actual huge contrast And now I am sure the colours will tie nicely together when I shade and aftershade the random panels of the aircraft in service So confident of the greys I tried the Humbrol 163 Dark Green as part of the upper surface camouflage suite starboard wing again I don't like the look of this so much but maybe waiting 'til the grey was hard would improve things a tad I will try again another day but today I also tried the new (ish) Tamiya Dark Green RAF XF-81 on the port wing with the spray head diffuser on it to be fair this was another unconvincing performance, wait again til later is my thought of the day The colour I 'think' I'm looking for has more brown (even red) in it Anyway, Mr Muscle awaits the 'mule' now, maybe some more work for Eeyore soon b4 points
-
The sun has returned! It hit a scorching 10 C today, and the world went mad. I may or may not have laughed insanely and cavorted and possibly even gamboled about. This is the first time in five months that I have not had to wear a fleece under my winter coat. For once I didn't want to slowly roll over every other pedestrian (and in Chicago, pedestrians are only barely better than cabbies, or, most hated of all, cyclists, who, after Caligula, I wish had but one neck) in a bobcat with some sort of rototiller attachment at the bow. Unfortunately, Mrs. P, deep in the grip of pregnancy/madness decided she wanted chicken pot pie for dinner, a meal I'm ambivalent about at the best of times, but whatever, I get that I'm not calling the shots on meals right now, but she decided that she wanted to make it from scratch at 6 PM this evening, and as a result, we didn't eat until almost nine, and since it's generally accepted that I must cool my heels aboveground until we eat, much precious time was wasted on something we could have ordered in a restaurant for half the time and price. Oh heavens no, not in America. I've stripped asbestos floor tiling up with a shovel, and my own father sneered at me for wearing one of those Breaking Bad bunny suits. I'll be amazed if I live to see sixty-five. Some progress on this Legato intake: If anyone looks at it too closely, I'll fell them with a single blow to the temple. Did some filling on the Tomahawk II: And put the wings on the Special Hobby short-tail: All of the other P-40s, save the Hasegawa kit, require you to laboriously box in the wheel wells. Legato has easch box as a single piece, but those [adjectives] at Sword have it in four ill-fitting pieces per well. I didn't have the heart to even attempt it tonight. God I hate P-40s. I'm glad I'm building all of my kits of them (save one) right now, because I never will ever touch one again after this.4 points
-
Sword 1/72 P-40K deputized by RCAF 111 Sqn for use in the Aleutians, Summer 1942. Build thread is here.4 points
-
HT, I really like the Mr. Super Metallics. On my next NMF build, I'm planning on using Uschi pigments. If that goes well, I want to try a NMF Mustang with wings painted in Super Metallics, and the fuselage in Uschi pigments in order to differentiate between the aluminum lacquer and bare aluminum portions. We'll see how it goes. As an aside, the silver P-40 was apparently aluminum lacquer rather than NMF. At first I was disappointed at learning this, but then realized that Mr. Super Metallics is an aluminum lacquer itself. So even more realistic than intended then! Well the first Sword is complete: I weathered it some with pastel chalks, and added the antennas.4 points
-
KLM New Colors F-100's 1:144 Draw decal Derived from the F28 Fellowship, the Fokker 100 features a stretched fuselage, new wing and Rolls-Royce Tay engines. First flying in 1986, 283 were built before Fokker went into bankruptcy in 1997. A shorter version was developed by removing 4.7 metres from the fuselage, as the Fokker 70. Both versions have been operated by KLM Cityhopper, although the 100's have now all been retired from the fleet. The Revell kit is the only injection moulded model of the aircraft and is getting hard to find now. Fortunately Bradley on this forum kindly sent me an example. It build easily, but would suggest modifying the wing fit. There are 2 pegs on each wing that fit into holes in the root profile on the fuselage. Unforunately they knock the whole wing incidence down too low, and leave a step on the leading edge underside. I cut the forward pegs off my wings and simply aligned them with the root profile, which solved the problem. Decals are from Draw Decal reviewed here, representing the final scheme worn by the KLM Cityhopper fleet,and fit very nicely. There are options for 2 different window & door layouts, and a variety of registrations. Follow Draw Decals instructions and use the hot towel method of pressing the dcals on to the model, it works very well. One more addition to my airliner fleet; And finally with something else', my Revell Boeing 737-900 conversion, also using a Draw Decals KLM set Thanks for looking, John3 points
-
Haven't posted anything here in RFI for a couple of years but have been building away army usual snails pace, although 2015 might see me hit double figures! This is the new tool Airfix A-4 out the box with the exception of some Hasegawa Mk.82's and an MER. All comments good or bad most welcome. I do need to have a play about to try and improve the pics a bit. Rgds, Eng3 points
-
Hi Everyone As promised here are a few pics off a dio i did a few months ago . i saw a pic of a similar dio by Michael Mandau which i thought was excellent so off i went . i had the leopard already and it seemed as good a kit to use as any . its all scratch built with the exception of the tank the figures and the oil drums . hope you like any comments welcome .3 points
-
This model has been repainted at least 3 times now, i'm finally happy with the waterline markings which are painted on (a first for me). Also used halfords rattle cans after reading what other modellers use, i like the primer its a great finish. Alex3 points
-
Hi all, well I've finally finished this, my latest model. Its taken about 2 months on & off. Finding the time is always interesting, being split between the kids activities & trying to keep the house tidy, as we're trying to sell! Anyway, this is a Tamiya kit of the Newman Porsche 956 team that won the Le mans 24hrs. I decided to model the team mate (number 8), rather than the winning car (number 7), as I liked the decal colours better & thought it would be a little different. The more observant among you will notice that the wheels are different to the kit. Having taken advice from a fellow member & doing a bit of research on Google, I noticed that the kit was indeed wrong to the actual cars. Tamiya specify using the speed discs front & back, as per all their other 956 kits. Obviously this is for ease of production etc. The actual car had, as I have depicted, speed discs on the front, but plain BBS alloys on the rear. However. Tamiya have produced this kit with the wheels the other way round. The main issue is that the rear wheels are wider than the front, so a straight swap is not possible. To remedy this, I cut both pairs of wheels in half, then glued the opposite halves together. This made the rims wider at the rear. I had to use a small centre lathe at work to turn off the bosses around the axles that Tamiya put on to make the wheels stick out further on the back. This enabled me to use them at the front. With a small amount of filler & a bit of sanding I am more than happy with the result. Next up is a Tamiya kit of Nigel Mansell's Newman Haas indy car. Wish me luck!3 points
-
Hi I have recently been using to me what is a new brand of metallic acrylic paint and a very good one. It's acrylic, brush able from the bottle which is the Vallejo style with a BB in too !, Very fine pigmentation and buffable in 21 shades !, Good in the AB too apparently. I highly suggest you check out DarkStar Molten Metal paints they're really useful to have in your arsenal of paints. http://www.darkstarmini.co.uk/paints.html Cheers Rob3 points
-
Rather than allude to the ineptitude of the poster, maybe you could have offered some helpful advice, as you obviously know what he's doing wrong. That would have been the gentlemanly thing to do.3 points
-
YAY At long last after nearly 12 months since this build started I have the first copies of my intakes installed. I used some unibond 2 part epoxy resin run thick on to the inside walls of the fuselage/wing walls then slid the intakes in to where I had marked off with a pencil. Adjusted the angle by shoving a brush handle in the rear or it and inside the intakes to push then toward the wall. Then when set I ran some super glue around the front lips bottoms and sides first then then pressed them down from the inside of the intakes using a flat lollipop wooden stick till set, Then the same for the top so the intakes flush with the lip edges. Now I can start blending these In with wet milliput and using the lolly stick to press it against to try and achieve a good transition on the inside and then shape them later. Now I can build the thing, Well finish it, I need to sort the port hole windows, Fill in the engraved roundels numbers etc. Correct the radome and fin cap lines, Build the intake fences, extend the tail spine, Fit the exhausts and then there might be time left to fit the wing pitos and paint the thing. So now the build can continue. In the mean time I need to decide which Vulcan to do, Likely will be an XA serial number Cheers Rob3 points
-
I should have pointed out that the sticky-uppy pole thing at the front end of the 730 is the periscope in its deployed position. It's height was determined by the angle of vision at a certain range and fully adjustable. Funny you should mention that !3 points
-
Hi guys, just the exhaust left to fit, turret built up & chipped, added stowage to the rear deck ...3 points
-
Thank you Bernd. Maybe it's because I brush painted them but the paint seemed to go on these pretty well. I didn't manage to get a lot of time on this project today but I did get both sides and the top of the turret glued together. Once set I attached the stowage bin and a few other smaller parts: There are a couple of places where I need to add some filler and do a bit of tidying up. Then, obviously, I had to do a test fit of the turret with the hull: The upper and lower hull parts are not yet glued together. Comments and suggestions welcome. Kind regards, Stix3 points
-
There is a project management quote; “The nice thing about not planning is that failure comes as a complete surprise rather than being preceded by a period of worry and depression” It is supposed to be a warning to say if you don’t plan a project it will always end in failure. As I am neither constrained by schedule or budget and I enjoy surprises it is advice that I wilfully ignore when it comes to making models. However there are the odd occasions when I have to apply a little more thought and planning in advance of implementing a solution. Rigging the Main Roof HF wire aerial is one of those occasions. I have produced a schematic of the wire aerial in the picture below. This shows the connection points and the lay out of the aerial. I decided that the best way to deal with this manufacture the aerial on a jig prior to fitting it to the main model. The starting point for construction is to cut the spreader bar to size and to attach three lengths of super fine Uschi line from one side to the centre. The Antenna Tuning Unit was manufactured with a small loop on the top. The Antenna Tuning Unit was attached to centre line at a distance of 7mm from the spreader bar. The two outer lines were threaded through the loop on top of the Antenna Tuning Unit and glued to their corresponding positions on the other side of the spreader bar. Maintaining tension throughout is important and the loose ends from the spreader bar are glued to a length of plastic rod which will form one side of the jig. It is important that the jig and spreader bar remain parallel and the lines have the same spacing as the spreader bar. Having fitted the Aerial Tuning Unit it is necessary to fit the after stays. Firstly the Aerial Tuning Unit needs to be carefully folded out of the way under the spreader bar. Two short lengths of Uschi line were carefully superglued to the spreader bar between the outer two lines. The aft stays were then superglued to the centre of these two loops and gently tensioned. The two aft stays were then glued another length of plastic rod located approximately 40mm and parallel to the first plastic rod. Two supporting side frames were added to the jig. and excess Uschi line was removed. The Aerial on the jig was brought to the main model and glued in place. Lessons learnt is the one feature of project management that I do adhere to on all my models. The frame of the jig needed to be a lot wider and longer so as not to foul with the yard arms and fittings on the masts. Also it would have been easier to leave the central thread loose so the frame dropped easily over upper part of the fore mast structure. However despite that the objective was achieved although it could have been a lot easier and with better results.3 points
-
I rather like Gerty, there's a bit of character development in the movie such that he feels like a corporate tool at the start, and ends up being something else. All without stopping being a completely emotionless robot - it's pretty clever. So... fourth coat of primer today which I haven't rubbed down yet. I found the missing bit for my proper camera so I've taken some close-ups. I'm sure that most of what I'm doing it improving things, but it still looks pretty bloody awful and I'm not having much luck with the pinholes and divots on sharp features - half the time the filler chips off when I sand it, or I round something off. Maybe I need to try Miliput sculpted wet? I'm also wondering if a Miliput wash would help clean up the grot in the panel lines. This round bit is so annoying - I cleaned up the scribe lines on the top to get an even depth (without making them any wider) and then realised that the verticals don't remotely match. I would have been better off filling them, and may still end up doing that. Sob. This is probably the best bit, although the RHS of the recess is pretty rough since there's not a good way to sand it. It's tempting to switch to a plastic model, but I know if I do that I'll probably never summon up courage to work on it again I think my main issue is that if it was 1/12 scale or something I'd be happy for it to look like this (apart from the pinholes) but in 1/6 scale it should be better, crisper etc. I scratchbuilt a tiny 1/48th scale railway engine which looked cleaner than this robot! Cheers, and sorry for grumbling Will3 points
-
A few notes I wrote a few years ago. Tech notes on Canberra’s There seems to be some confusion over the differences between Canberra versions, perhaps this will help. Although the overall lengths may differ and canopies change, the basic nose profiles do not change in plan and side views. B.Mk.2 This was the first production Canberra, powered by the Avon 101 which had the single breech cartridge starter. Three crew ,Pilot, Nav and Observer / Bomb aimer, all in ejection seats, one at the front slightly offset under the goldfish “bubble top” and two in the back. There is also a folding Rumbold seat for a forth crew member with a chest parachute. The nose is glazed with an offset clear vis panel . this is the most common base for all later “funnies” like the T.11, T.17. TT.18 etc. It has radial spoked main wheels. B57A This is an Americanised B.2 built by Martin and was powered by licence built British, Armstrong Siddeley Saphire engines (J65) There were also local airframe production changes. The later 57’s are a totally different beast based on the Canberra airframe. PR.3 A Photo /recce development of the B.2 but with a 14.5 inch extension for cameras inserted in front of the bomb bay which was smaller because of extra tankage and now termed a flare bay. It had a plain glazed nose. T.4 This is the Trainer derivative of the B.2 and is recognised by an unglazed metal nose cap and the three EJ seats are re-arranged with two seats under the” bubble top” ( a pantomime to get into) and one at the back. It also has two DV windows in the “bubble”. The nose swings to one side for equipment access at frame One (which is not the first frame). A version for export called the T.13 of which early examples did not have ejection seats for the pilots. At rest the T.4's elevators are depressed because of the locking bar fitted to keep the stick forwards to allow the swing seat operation. Conversely the bomber versions elevators are up when no tail locks are fitted. The seats in the T.4 are 3CT's and are similar in layout to the Mk.2 in the navs position but don't have thigh guards. (Note They are not the same as a Mk.3 fitted in for instance, a Hunter) If you use this info anywhere I would appreciate it if you would credit me as this is my authorship. B.Mk.6 The B.6 introduced the Avon 109 with a new triple breech starter this has a larger pointed centre body in the intake (the early 3 shot type is quite bulbous) also extra tankage in the wing leading edges. This made it heavier and called for larger stronger four spoke wheels . Variations of the B.6 are the B.I.6 B.15 and B.16. PR.Mk.7 This is the photo development of the B.6 and is a PR.3 layout with the Avon 109 and the B.6 tank wing. Two Crew. RN TT.22’s are converted PR.7s. B.I.8 The “8” introduced the offset fighter canopy and at first glance appears radically different but is really a “boy racer” B.6 with a belly gun pack and wing pylons. The pilot has an EJ seat but the poor Nav does not. Instead he was given a chest type parachute and take off seat at the back and a sidewards facing sliding seat in the nose which had extra windows. Both crew enter by the side door as on all previous Mk’s of Canberra. The canopy does not open. The pilots EJ seat is mounted on the pressure bulkhead on an extension of the standard navs EJ rail so he is further aft and higher than in all previous Mk’s. PR.9 This is the GT version fitted with Avon 200 series engines which have a fickle Avpin liquid starter. The wings have extended tips and the chord is extended inboard of the engines on both leading and trailing edges. The pilot has 3CS EJ seat under a B.I.8 style canopy which does open (clam shell style) and the Nav has an EJ seat (type 4 QS) which is buried in the nose. Access to the Nav’s station is via a swinging nose (at frame One) and the Nav has two tiny windows, a periscope, also a forked stick (to stick notes in to pass them back) to communicate with the pilot. The nose profile shape of all basic Canberras are the same regardless of which hole the pilot looks out of despite what some drawings suggest. Hope this helps John Crew access to the T.4. A pantomime in several acts. The ground crewman unlocks the base of the second pilots seat and swings it forwards so, with no-one in the seat, it locks against the panel. (The top of the seat is hinged from a tubular beam so it swings in an arc). The normal first pilots seat is also attached to this beam on the port (Left) side but it has been moved further over to port The Nav crawls past into the back and straps in. The second seat is then swung completely further aft and locked at a steep angle so the way is clear for access to the port seat from the entrance door. The first pilot climbs in past the stbd seat and straps in. The second pilot now climbs in and straps into the aft angled seat, with his feet braced against the rudder bar plinth. At a signal from him, the ground crewman now moves the seat back to it’s central base locking position, and all three crew are now in position and the crew side door can be closed. At this point the Nav decides he does need a pee after all…….. Canberra brakes. B.1 Wheel brake lever fitted to column centre boss. Steering on ground by rudder bar differential. B.2 Wheel brake lever fitted to column centre boss PR.3 Wheel brake lever fitted to column centre boss T.4 Wheel brake lever fitted to each column centre boss. B(I).6 Maxarets fitted PR.7 Wheel brake lever fitted to column centre boss B(I).8 No wheel brakes on column. Maxarets with toe brakes instead PR.9 No wheel brakes on column. Maxarets with toe brakes instead B(I).12 No wheel brakes on column. Maxarets with toe brakes instead T.13 Wheel brake lever fitted to each column centre boss E.15 Wheel brake lever fitted to column centre boss T.17 Wheel brake lever fitted to column centre boss TT.18 Wheel brake lever fitted to column centre boss Brake details via Ross restorer of Canberra PR.9 XH175 Matchbox PR.9 Putting it simply the Matchbox PR.9 kit is quite wrong. The engine nacelles are the wrong shape, especially near the main spar. Also the fuselage is B(I)8 length (too short) and the Frog "8" is PR.9 length for good measure. The tailplane chord on the Matchbox kit is wrong, but it is an error made in good faith. I found only a couple of years ago that the PR.9 AP Vol One has the wrong chord length given on the leading particulars page and this was taken as gospel by the late Maurice Landi, but someone at some time had messed up the AP dimensions. The RAF never noticed and no-one ever checked it ,simply because the Canberra tail chord is always given as a projection to the a/c centreline and this is impossible to measure and it is a dimension which the RAF servicing types would never need to know. so it went unnoticed, until I got suspicious as I used to work on "9"s and started to project lines on photos. This convinced me of the error and it was confirmed by the Eng WO of 39 Sqn who kindly had some guys measure the chord at the root for me. This confirmed that the tailplane was the same as all other Marks. As the "9" has an un-tabbed powered rudder, unlike all the other Mk's. There is a slight rudder chord difference but not enough to worry about. I provided the basic outline shape drawings to Sword, who did the Hannants one, as they were going to use Czech copies of the Aerodata 34 drawings which though beautifully drawn are inaccurate. That’s it in a nutshell. Regards John3 points
-
P]3 points
-
8/3 update: Base coat added to fuselage. Some slightly lighter and darker tints added to dark blue. Center section flaps secured, Rudder dry fitted. Rather chuffed with the result so far. Weathering still to come of course........................3 points


This leaderboard is set to London/GMT+01:00