
Leaderboard


Popular Content
Showing content with the highest reputation on 27/12/14 in all areas
-
Finished yesterday, definitely not one of my better ones but fun none the less. The Freightdog resin fits really well and corrects some of the flaws, but it's still a fun kit to build. The white was a real pain but it's a cracking scheme so worth the effort. Also a nice timely reminder as to why I rarely work in 1/72nd, the masking was a royal pain. Peter18 points
-
This posting is the result of too much good wine over Christmas and my son Dylan's enthusiasm. The aircraft was built OOB, or should that be OOC (Out of the Cracker) It is moulded in 2 colours just like the matchbox kits of old, complete with spinning prop and wheels that turn, what more could you want, photos as built ready for its maiden flight across the dining room table. Disaster struck on the maiden flight crashing into the cheesecake, fortunately it came down within paddling distance of a mandarin orange segment so the crew survived. Happy Christmas everyone Cheers Pat18 points
-
Hi, folks... Hope you've all had a great Chrsitmas and also looking forward to a happy and peaceful New Year. By way of ending the old year, a new model... a few images of Airfix's new Do17Z-2 kit. This is a nice offering and I'm now looking forward to their release of the Ju87B-1 and He111P, due July and December 2015 respectively, and apparently able to be pre-ordered now... nothing like being organised... The kit has been finished in the markings of Gruppenstab, III./KG3 based at Heiligenbeil/East Prussia in September 1939. Full build details can be found over on Hyperscale54 under the heading 'Airfix's elegant Pencil'. Enjoy, and thanks for looking in. Regards, Paul17 points
-
Hello Folks, Here we go again,...more Ventura`s! 34 OTU at Pennfield Ridge in Canada was the main Ventura OTU for crews destined for British Commonwealth Ventura units based in Europe. It was originally set up to train crews destined for the Ventura units which formed 2 Group of Bomber Command in the UK and was therefore equipped with Ventura Mk.I`s & II`s but as the type was phased out of bomber service the Ventura GR.V (US Navy PV-1) gradually replaced them in 34 OTU which also trained RCAF crews bound for Home Service coastal patrol units. Here are the 1/48th scale Revell Ventura Mk.II & PV-1 kits with Aviaeology Decals replicating two of these aircraft starting with; Ventura Mk.II, AE934/B2- Wearing the original style codes and roundels and with the A2Zee resin replacement canopy which provided the bubbles missing from the base kit. The engine cooling gills have been opened up and sun screens have been fitted over the flight deck while inside a new radio operators position has been added from scratch and the resin wheels with covered hubs came from Resicast ; Ventura GR.Mk.V, FN974/K2- Wearing the early US Navy Blue Grey and Light Grey scheme. To get the kit decals to fit properly the rear right hand window which is incorrectly placed on the kit was filled in and re opened up slightly lower down so that it appeared within the lower stroke of the number 2 as per a reference photo of the real aircraft.The engine cooling gills have been opened up and sun screens have been fitted over the flight deck while inside a new radio operators position has been added from scratch and the resin paddle bladed propellers came from Quickboost; Both Models in a suitably Canadian looking environment (actually Lancashire, UK!); As usual both models were brush painted using various acrylics and I hope that you like them. My thanks go to Terry at Aviaeology and Ali at A2Zee for having the foresight to go ahead and bring their various wares to the market so that the Commonwealth Ventura story can be told in model form! Cheers Tony14 points
-
This is the Classic Airframes 1/48 kit which fought me all the way. Although I have to say, I'm really pleased with how it turned out. The build thread is here: http://www.britmodeller.com/forums/index.php?/topic/234959135-classic-airframes-148-westland-whirlwind-diorama/ Comments and criticism welcome as always. Sean12 points
-
Hi, holding fast and fun assumptions, Draken was built from the cockpit and the wheel of Aires.11 points
-
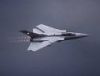
"It was winter 1962, the worst of the Cuban Missile Crisis was just past, but everyone was still on edge. I was standing near the runway at RAF Scampton, home to the Vulcans of 617 Squadron amongst others, and I heard the unmistakeable howl of four Olympus engines at full power. A Vulcan had just taken off in a hurry, and as it passed I could see that it was carrying a Blue Steel nuclear missile - the training rounds were light blue, but this one was white, so I could tell it was live: It was taking off west, but as soon as it was airborne it began to swing around, trailing smoke from those massive engines: It banked around hard, and I could practically see into the cockpit, it was so low: It skimmed along low, and then suddenly pulled up into a steep climb which it continued until it was lost in the overcast: I realised it was now heading East, and my first thought was that the balloon had gone up and it was heading for Russia. I was a worried man until I saw it return later that day from what turned out to be a training flight. They were tense times..." This is the CyberHobby 1/200 Vulcan B2 with the Blue Steel missile underneath. It was supposed to be a relaxing and quick build, but this one fought me all the way! Firstly work commitments took away most of my modelling time which meant it took me four months to finish this. The intakes were a right pain to eliminate the seams from, and it was putty sand repeat ad infinitum. Then there was a terrible gap between top and bottom halves which refused to disappear no matter what I did with it.The primer I was using was Halford's white primer, and for some reason it went on so thick that it obscured most of the detail on the underside, meaning that copious amounts of rescribing were needed to restore it. And then when I thought it was all over, the decals were on and the final satin coat was drying, it took a nose dive from it's stand and snapped the IFR probe off and fed it to the carpet monster, so I had to replace it with a scratchbuilt one. All in all, it didn't want to be built, but as I've never scrapped a model yet, I was determined and won out in the end. Yay me. I put it on a stand with a picture of RAF Scampton on it, as this aircraft was based there in 1962. Hope you like it: Tiny little things, aren't they? Right, what's next...? Dean10 points
-
i heard tamiya's gekko are great kit, plus i love this beautiful plane. so i collected around 10 kits but never got chance to start one. this time, i decided that i must finish one of them. it took around 5 business days to build this model. everyday i worked around 6 hours plus few nights after work. it consumed around twice much time as a single piston engine fighter. but all worth when you finished your work i believe. well, great kits, great details and fitting, i tried to make her look like has been survivied in battlefield for a long time, plus i picked up the one had two shot down which should consider great since not that much shot down for japanese airforce against american heavy bomber like B 29. Merry Christmas everyone, enjoy pictures and comments are welcome.10 points
-
I bought this a few weeks ago and I think I'm getting to where I want to be know with aircraft This is brush painted with acrylics and oil paints, decided to do the spinner in a faded red look and I don't think I'm too far away from that9 points
-
Hello Everyone, here is my last effort,this is the 1/32 scale Zoukei-Mura Ta152H-0,great kit,decals from Eagles Editions,painted with Gunze. I hope that will like it,cheers Franck7 points
-
Decals are done! It took me almost 3 afternoons to place them...Combination of Italeri and Xtradecals. With htelp of microset/micosol combination they performed ok. Unfortunatelly there are no aftermarket stencils available, so kit ones should do the trick.. They are too big, I'm not sure about the font either, but what's done is done. I will let it set for a couple of days and tackle some other bits...7 points
-
Mjello and good evening fellow builders! I have finally finished my Kinetic F-16 reboxed by Eduard. A build that had been ongoing for over a year, but took speed during the course of the week, due to my immense amount of time during my christmas school break. Here goes: Robin6 points
-
This is a game you have to play slowly, and only do little bits at a time - ruler, tiny pencil marks, and a lot of patience. Not sure I am ever going to complain about masking a canopy ever again...6 points
-
This is my Airfix 1/72 Harrier GR3, built mainly OOB but I did use the Freightdog correct height fin and the serials and code letters came from Xtradecal. The kit itself is quite a nice build and the corrected fin fitted with no problems, I have noticed that the vane in front of the windscreen has gone AWOL and I lost the top indicator light to the carpet monster, I'll have to rectify these problem sometime in the future. Anyway enjoy Willy5 points
-
Right then chaps, my first RFI. Accurate Miniatures P 51C in the colours of 311th Fighter Group based in China in 1944/45. The model was built OTB but i did cut and lower the flaps and use Ultracast wheels and exhausts. The model is a pretty pain free build. My only chritisisms would be the thick transparencies, the flaps being moulded in the up position and a bit of filling at the wing routes. I also filled the panel lines on the wings as per the real thing. The NMF was achieved by priming with Tamiya light grey primer, some panels on the fuselage were then masked and painted gloss black. The wings were then masked and the fuselage painted using Alclad Aluminium, I then unmasked the wings and masked the fuselage and painted the wings with Duraluminium to try get the painted aluminium effect. The darker panel around the exhausts commonly seen on P 51s was painted using dark aluminium. The national markings were painted using miracle masks, I didnt' get a great finish on these due to my own over excitement! Entirely my own fault. The spinner, tail and wing tips were painted using Tamiya XF 3 yellow mixed with some XF 4 yellow green to try to add some depth. I also tried some oil dot weathering on the wing tips with mixed results The anti glare panel on the nose was painted using Tamiya olive drad lightened and darkened again to add some depth. For weathering I bought Mig Productions weathering set for NMF aircraft which performed well and then applied a random over spray of a very thin mix of Tamiya matt black and red brown. Some fuel mstains were added using AK Iteractive fuel stains mix. The whole model was then varnished with Vallejo matt varnish. Pigments were used on the wheels and exhausts. Brass tubeing was used for the gun barrels. I'm fairly pleased with how the model turned out, it was really a test bed for trying a whole load of new stuff. Any comments and questions welcome. James And finally a shot with Accurate Miniatures P 51A built a few years ago.5 points
-
So- followed the Mrs Fritag inspired new tradition of no modelling on christmas/boxing day but back at it today Have addressed the matter of the textured outboard leading edges of the wings. Using thinned Mr Surfacer 500: Stippled on between and around masking tape: Turned out that it was also just about the perfect colour and so needed no painting: Another job ticked orf.....5 points
-
Hello My friends, This is the 10th and last of the 2014. Kinetic Kit, with Ammo Weathering Products... Hope you enjoy... A Happy New Year to all of you... Cheers...4 points
-
Hello, Hobby boss 1/48 Mirage IIICJ wit AML Tzniut nose: Italeri 1/48 Apache: Hasegawa 1/48 F-16I Sufa: Academy 1/48 F-4B Phantom: Italeri 1/48 spitfire Vc: Hasegawa 1/48 Aichi B7A2: Revell 1/72 P-47D thunderbolt: Thanks for looking.4 points
-
Both tanks are from Plastic Soldier Companies 1/72 scale range, figures are from Valiant 1/72(?) range, all painted in Acrylics from Tamiya, Revell or Games Workshop, while some random tank stowage came with the kits the ammo boxes, sand bags and tarps were made by me from scratch and Greenstuff, plus some extra kit, pouches and leather jerkins made from Greenstuff were added to the figures. Despite making models for nearly 40 years now this is my very first attempt at a diorama, so I hope you like it. ATB Sean4 points
-
Should change my username to RevellAndy !! Total of 19 builds this year , nearly double what I managed last year Here are my 2014 builds ..... Revell 1/144 747 SCA and Shuttle Revell 1/48 Arado Ar234 C-3 and Tamiya 1/48 Kettenkrad Revell 1/72 Arado Ar234 and E.381 Revell 1/72 X-15 Airfix 1/48 Me Bf109 E4/E1 Revell 1/144 Tu-144D Revell 1/48 F/A-18C Hornet Revell 1/72 Type XXVIIB "Seehund" Revell 1/28 Sopwith F1 Camel Revell 1/35 Artilleriewagen Revell 1/48 Tornado IDS Airfix 1/72 D.H 82A Tiger Moth Revell 1/144 Launch Tower and Shuttle Academy 1/48 F4U-1D Corsair Academy 1/48 F4U-4B Corsair Revell 1/76 Monty's Caravan Revell 1/32 D.H Mosquito Mk.IV Tamiya 1/35 Kettenkraftrad Andy4 points
-
Hello everyone, So I finally got around to building my spitfire! Total time it took is under a week including drying, sleeping etc. This is my first build ever, I am now going to start on the Airfix 737. Let me know what you think I used the paints provided in the kit except for Revell Aqua aluminium for bits of the landing gear. I used UHU for to glue the canopy to the body. There's a pilot inside. Also, I used decalfix for the decals, decalfix worked amazingly well I'd say. Lastly sealed everything in with two thin coats of Revell Aqua Gloss. [Thanks to everyone who helped me out with this build over at another thread ] See below the pictures of the final product : That's it. Let me know what you think! I'm going to be building the Airfix 737-200 soon, so let me know what I can improve on. I'll start a new build thread tomorrow or something for the 737 in the airliners section . Cheers, Hamdhan4 points
-
Today has seen a little more progress. Here's the finished (I think) cape after a flat cote. The purple colours are done and the base for the red/brown, there's more work to be done here. The gold trim was hand painted with Tamiya TS-21 Gold that I had left over decanted in a jar since the Golden Arrow build. It brushed surprisingly smooth and easy. There's a lot of black washing work left to do as well. The hair is just a base colour so far, it will need shadows introduced next. The skirt and the plumage for the helmet are pretty much done, waiting for a satin (I think) clear coat.4 points
-
Thanks guys. I had a little fun with Tamyia tape: It could be worse.4 points
-
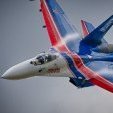
All 1/48 scale from the Russian Knight done in January to Rafale B finished yesterday in 2014. Have posted a majority of these before. Thanks for looking. New year resolution is flankers and more flankers! J-10B prototype4 points
-
Thanks for the encouragement guys. I managed to pull the same trick yesterday as Christmas Day, but what I saw wasn't encouraging, bit too much speed at the expense of quality. Fortunately I brought the putty through with me but for goodness sake how could I not have see it wasn't fitting by that much. On a positive not the Pilot has had his paint job, not sure if the colours are kosher but beggars can't be choosers ! Cheers Pat4 points
-
My latest one, AFV club's quarter scale RF-5E Tigereye in RoC AF livery. Built mostly OOB with only a bang seat replacement from QB. Pianted with MM LGG, with patches in Tamiya XF-66 which were subsequnetly covered with a mist of MM LGG to get that - there not there effect of the camo. OOB decals, which were a bit on the thick side , but boiling water and micro set / sol took care of them. Well enough rambling, here we go [/url Thanks for looking and Holiday Greetings,4 points
-
And because I've got (gulp) a week to get this built. So, it's going to be a Mach 1.5 (not Mach 2 because she's an old girl) race to the finish. It's also 34C here, and steamy, so there'll be no hanging about on the threshold while I wait for clearance. Obligatory box and sprue shots, then full afterburner and a vertical climb... Box etc. Sprues. I'm probably going to run with the 11 Sqn variant, in gray and Nat metal. But we'll see what we see... Rob.3 points
-
http://366th-tfw.net/bruce-hill_photos2.htm Selwyn3 points
-
Hi This is a model from past times (2004), when the only one Auster was that from Airfix - Mk VI. I made a conversion to Mk III in RAAF markings - I followed the Sword 1/48 markings, so it is 16 or 17 AOP Flight RAAF, Pacific Area (New Guinea?) 1944-45. Marry Christmas (in my country we celebrate it today also) and regards Jerzy-Wojtek3 points
-
Hi, This is my GWH F-15B/D Eagle finished as an F-15DJ of the J.S.D.A.F. Hiko Kyodotai Agressor Squadron using DXM's excellent decals. I am truly impressed by the 'like a glove' fit on this GWH kit. I have not used any putty at all, only careful gluing and some Mr.Surfacer. It only let me down installing the engines as they for unknown reasons were simply 1 mm to long. Probably due to me not dry fitting them... The gap on the canopy is simply because it is not glued. After some masking...finished with Gunze acrylics and Aclad2, weathered with Ammo and AK. It is an OOB build with just a few scratch build details on the nose, in the cockpit and on the bang-seats, some wires on the landing gears and drilling and plastic card on the weapon pylons. Weapons and ALQ-131 togheter with the slightly modified pilots are Haswgawa. Thanks for looking //Fred3 points
-
Hi all,just got an hour at the table after the Christmas break so got a cover of gray on the US Phantom,it needs another light coat to finish.after after a few scary moments I got the RN titles on the British one and had to gloss under and over them but all seems well.I was at my son,s house yesterday and scrounged a couple of large belly tanks from the frog and Hasegawa kit,s he built and did,nt use so I will add them to these two in due course.3 points
-
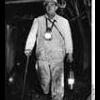
Howdy Fans Here are the progress shots, which are rubbish photos as usual. Sorry. Taken Boxing Day morning so a bit of a time capsule. The basic cockpit assembled and front assembly super-glued together and the fit isn't too shabby at all. Britain's first manned spacecraft The right side is a little shorter as I trimmed the front to deal with some bubbles in the resin. The masking tape is to contain the P38 filler that is next. It's once used Tamiya masking tape making a final contribution. Once the filler is on it's peeled straight off making sanding much simpler. As soon as the filler narrows I know I'm there! While that is all happening I'll be attending to the vents, inlets and pipes on the rear fuselage. Oh and sanding down the wing root fillets.3 points
-
Hi Pat There's mostly nothing major in the way of flash, just those little daggy bits that a mould gets when it's high mileage. But they all need cleaning up... And if I'd known, you could've had the decals from this one. Oh well. And yes, I'm sure that it's 34 (or was... at 2030hrs it was still 28C and 74%), no fires needed.3 points
-
I'd like to post a double work of mine. I already posted it on Facebook... so, excuse me this is not new to someone. Fiat CR-42 and Gloster Gladiator represent the peak of biplane technical development and I find them both and equally extremely interesting. Just like a confrontation of two different schools and styles, British and Italian. Such as Ferrari vs Aston Martin... Epic battles between the two contendants over the Mediterranean as well as Africa... (Sea Gladiator is a Roden kit, CR-42 Classic Airframes. Both 1/48)3 points
-
Thanks guys. It was the only option; do it again and do it right. G-usa; try one, it's very rewarding to do different things. I didn't have any figure painting skills when I started, I just knew I wanted to paint these figures and it just goes from there. Here we are now, much more like it. A bit more bright than what I aimed for, but on the other hand very much like I thought about it when I first bought the kit. Now I can continue in better mood.3 points
-
Setting out my stall with this recent Airfix Tomahawk II kit. As yet unopened. This will be an OOB build - unless other decals come my way2 points
-
Kit - Italeri 1:72 Paint - All Xtracolour enamels Decals - Hi-Decal Line 72-029 Extras - Droptanks from Fujimi A-4 kit, AGM-62 'Walleye' from Hasegawa weapons set. Grumman A-6E(TRAM) Intruder VA-85 'Black Falcons' USS America, 1993 And before it got all 'messy' it looked like this: As ever any and all criticism, questions and comments are welcome. Thanks for taking the time to look and/or comment. AFN Ian.2 points
-
Hi everyone, another one from my british desert collection. Now, this is a Wespe Models, code 35026, 1/35, resin kit, with some changes, additions and improvements . The decals were made by me...SAS, North Africa, late, 1941.2 points
-
Nautilus build OOB Painted with Vallejo and Humbrol. Weathered with Kremer and Renesans oils. Hope you'll like it2 points
-
For Christmas, I gave myself a present. It was walk into the stash, pick out a random kit and just build it. I will have some modeling time over the Christmas holiday and I just want to enjoy it with a no frills, out of the box, no particular reason build. Afterwards, it is group builds and back to clearing the shelves of doom. Now what I ended up choosing was the Heller 1/24 Fw190 A-5. I will be doing the box art version. I think this is a reboxing of the Airfix kit. I am not sure when I bought this kit, but it must have been a used kit either through my local modeling shop or at a trade stand. The sprues are not in plastic bags and many of the parts are loose and it looks like they have been cut from the sprue. I just hope it is all intact. I picked it as the fun build because it looked fun, the box was really beginning to deteriorate and it would create some space in the stash. First up, the cockpit. Looks a bit sparse, but the IP detail looks like it will do. The parts are put together, painted and then weathered a tiny bit. I did add a couple of placards, but everything else is just out of the box. I was really impressed with the instruments as they came up quite nice and are just the kit plastic highlighted with metallic silver rather than white. Next up the engine. And did I mention the kit parts do have a bit of flash evident? The engine is assembled. I didn’t paint it or try to tackle the many gaps and mold seams as this kit will be buttoned up. I have some Eduard kits, Trumpeter and ZM kits that will be open with more detail. But, I had to assemble the engine as it is the mounting system for the propeller. What is missing from the kit are some seatbelts. I did plan to have the canopy open and a kit this big really needs some seatbelts. I had a choice between Eduard and RB seat belts, but decided to go with the Eduard ones as I will use the RB ones on a Trumpeter 109 I have in the planning stages (Gunter Rall’s plane). These look marvelous on the sprue; I hope my fat fingers can get them together. The side seatbelts are started first. Man the detail on these are nice! But the design, I wonder about. In the picture above, the instructions have you place the small belt portion over that lovely white manufacturing label and it will be hidden from view forever. Why bother with that detail? Oh well, it is done along with the rest of this side belt parts. The other side belt is started Then the first shoulder belt is built And the second is built Now, they have to be bent and manipulated to fit into the seat and cockpit. Before the fuselage can be buttoned up, the rudder and tail wheel assembly has to be tackled. I started with the rudder; and that is where one of the problems with this kit and its age reared its ugly head. In addition to the flash that is present on a lot of parts, the plastic for this kit is very brittle. Not just a little cantankerous, but if you look at it wrong and sneeze in its vicinity, parts break. Removing them from the sprue is a chore. When I went to remove the rudder parts, one of the halves was already broken. Given its size, you wouldn’t think it would be so fragile. So the pieces are put together and the broken part is not too evident and some filler will take care of it. Now, with the tail wheel parts, that was another matter where the kit plastic was not my friend. Here are the plastic parts; absent is the vinyl tire. Did I mention there was a bit of flash? And when cleaning the flash, the main tail wheel strut broke. Now the instructions would have you carefully bend the u shaped piece to straddle the main strut and fit in some holes. Due to how brittle the rest of the parts are, I fully expected this part to snap in two when I was putting it on the main tail wheel. It did not. Surprise, though, what did happen was the pressure the u shaped piece put on the main tail wheel strut caused it to break apart where the holes lined up as I was giving the parts their base silver paint. So now, I have to piece together the tail wheel strut in 3 different places. I have very low expectations the undercarriage will last holding this kit upright for any extended period of time. The construction process to redo the tail wheel starts. And finally, I got everything to line up and it has some semblance of strength. However, most of the strength is probably coming from the copious amounts of superglue that now make up the tail wheel strut! With the cockpit, engine, rudder and tail wheel sub-assemblies done, each is put in its place in the starboard fuselage half and the the two fuselage halves are buttoned up. I am glad I spent so much time working on the IP panel as with its position in the recesses of the cockpit coupled with the dark grey interior paint, it is so visible. While I let the fuselage halves harden, I move on to the wing. It consists of a one piece lower wing to which the two upper wings are attached. Some items need to be placed in the lower wing before the upper wing halves are attached. The wing spars used to block off the wheel wells also act as the base for the main undercarriage to be attached. Also, there is a provision for the wing cannons to be displayed. Since this kit will be built with only the canopy left open, I only have to worry about the inner cannons that will show in the wheel well. However, the outer cannons will have to be redone as the brittle plastic struck again. As I was removing the outer cannon barrels from the sprue, one broke in two. I will now replace these with metal tubing. As for the inner wing cannon, I give me no chance in trying to drill out the barrels, so they are cut off. I then very carefully, saying a silent prayer, drill out the cannon body parts so metal tubing can be insert later. This actually goes quite well and I am surprised. To make sure the cannon bodies line up correctly I temporarily insert the metal tubing. Next up, the main undercarriage has to be attached to the wing spar. Did I mention there was flash on the parts? The first strut went in fine and there were no problems. The second strut, as I was pushing the attachment peg through the main wing spar, I must have breathed incorrectly and it broke off. Did I also mention how brittle the plastic is? The broken stub was removed and a hole drilled in the strut so some metal rod could be used. This went well, but the support piece broke off and that had to be lined up and a new metal attachment point for that made as well. After some finagling, chanting and a couple of small curses, I got the broken strut to line up at the same angles as the other strut. I know the 190 gear doesn’t extend perpendicular to the ground, but I think the angle the kit has for the main undercarriage is a tad overdone. I will wait to see how it lines up after the wheels are put on but I think some adjustments will have to be made to the angle of the main strut to the wing. The wing flaps have a “working” feature, so this is needed to be done prior to the upper wing halves being placed on the lower wing. Before I join the wings to the fuselage, I notice the exhausts area molded into the lower wing. In a kit this size, they look funny if not opened up and these are portrayed in the kit pieces as solid. I break out the drill set again and will attempt to drill the exhausts out on the lower wing. This goes relatively okay with only a small piece breaking off due to the plastic’s brittleness. I get curious and decide to see how the side exhausts will be portrayed. Yeah, this is not good. I guess I will create some sort of metal piping that is a little better looking than the kit part. The wings are now put together and set aside to dry. This is where I think I will stop for a while. Next up, I get to see how well the wing to fuselage joint is. I hoping for the best. As always, all comments are welcome.2 points
-
Not as many as usual this year -- I normally reckon on one build per month, but moving house mid year meant quite a long hiatus before the workbench was up and running again. So, with no more excuses, on with the (rather brief) show... Avro 720 Mirage, Polar Lights, 1/25 Fokker E.V, Eduard, 1/48 Toyota 2000GT, Hasegawa, 1/24 Datsun 240ZG, Hasegawa, 1/24 Lexus LFA, Tamiya, 1/24 BMW 507, John Surtees, Revell, 1/24 Alfa Romeo Giulia Sprint GTA, Tamiya, 1/24 Jaguar XJ220, Tamiya, 1/24 ...there might be another completion by the end of the year, but I suspect that will be the lot! Happy New Modelling Year 2015, everyone! all the best, M.2 points
-
Cliff, part of me wants to fritter away a load of time finding out the significance of each, and deciding based on that. But I might just toss a coin!2 points
-
You know ... bally ten-penny ones dropping in the custard ... Something up with my banter, chaps? looks like a Trumpeter Magister2 points
-
...how Mrs JOCKNEY laughed as the light aircraft nosedived into her cheesecake....2 points
-
Count me in with probably a Myasishchev M-55 Mystic. Dave2 points
-
OK, that sounds good. I have four Buffalo kits - the Hasegawa B-239 Finnish version, and three Special Hobby kits, the B-339 B/E RAF Mk.I, the F2A-2 USN Yellow Wing, and the F2A-3 USN/USMC Defender of Midway. Any preference? I didn't think I could do those antennae either, but they were much easier than I thought they would be. Drilling the holes was a bit scary, especially after the paintwork had been done. The template helped a lot, and I made sure to poke a little indentation with a pin prior to starting the drilling. That way the drill didn't wander and make a scratch. Once the holes were done, you just need a steady hand. I used a medium cure superglue which gave me some time to align each antenna. They stood up on their own, though, I was surprised by that. I suppose the pooled glue in the hole and the little "nub" that I left on the bottom of each antenna helped with that. Anyway, now I just have to make sure I don't knock them off! Welcome aboard! We've missed you. Pay attention next time! Cheers, Bill2 points
-
Hi guys,I'd like to join in on this one too Andy2 points
-
First update - it's been a busy and rewarding afternoon. The first serious modelling I have done in quite a few years. And it's been a real retro trip - an old kit, basic tools and 80s internet radio Just like I'm a kid all over again. :weneedanappyemoticon: My first task was to make sure the airbrakes were going to align, because that's a well known problem with most kits - to that end, a test fit revealed that a couple of bits of Evergreen were needed in the airbrake wells, to be used as spacers (visible in the photo). An initial test fit also showed that the airbrakes themselves are somewhat variably undersize, so some thin Evergreen was glued along the edges so as make them fit a little squarer into the wells. They're still not perfect, and if I was doing this seriously I'd make new ones, but ain't nobody got time fo' dat, as the cool kids say. The fuselage halves and airbrakes were put aside to cure, and I moved on to the wings. Wings were very little problem - a quick run around the outside of the top to remove a bit of flash, and the same for the lower section, and they were glued together. Of course, it was only later, as I was test fitting them to the fuse halves that I realised I had forgotten to fill the pin marks inside the wheel wells... While the main components were drying, I made a start on the overwing tanks - I'm going to add them, I think, because they look so right on F.6s, as well as so wrong to the eye - stuff is supposed to hang under wings, innit? Again, a bit of flash removal, glue together, put aside. Next task, make sure the fuselage halves aligned. Thankfully, a bit of a sanding to remove flash (see a pattern??) and all was ticketty-boo. One of the nicest fits I have ever seen on a kit. A bit of thought resulted in smoke from the ears, and also the adding of the cockpit floor to one half, as that's going to want to set up really well. Fuse halves were taped together while that dried, then I started on fettling the wing to make a good fit. A little bit of sanding and filing here and there and I called it close enough. I took the liberty of removing a small sliver from the inside end of the flaps, at the wing/fuse joint, to give a visual separation. In between times, small components were removed from sprues and cleaned up, ditto the dried bits of glued stuff (apologies for the technical term, but this is serious stuff!). Main bits, progress so far. Filler in the wings will be a PITA to remove, but oh well, and the added bits of styrene are visible in the airbrake wells. [post='Hasegawa Lightning prep 1 by RobG67, on Flickr'][/post] More tomorrow, I hope.2 points
-
Looks like this was an epic flight, to an exotic faraway land with odd customs. Was this the discovery of The Islands of Orange, rising from The Cheesecake Sea ?? If so, it appears the intrepid pilot had to traverse a rocky beach to reach the mainland. The question is- was this a good place to be marooned? Are there daring souls who have gone before and can speak of sampling the odd combination of oranges and sweetened cheese ??!2 points
-
Mixed bag for me, 1/25 Monogram Ford T Roadster, Revell 1/25 Impala Police Car and an Airfix 1/24 Honda RC211V (Rossi).2 points


.thumb.jpg.3c5b41eb004e624ff9bdf837868ecbb6.jpg)


This leaderboard is set to London/GMT+01:00