
Leaderboard


Popular Content
Showing content with the highest reputation on 19/12/14 in Posts
-
17 points
-
My latest is a 1/72 Italeri Ju.52, finished as a Bolivian aircraft from the Chaco War, 1934. The model has a couple of inaccuracies: 1) The window and door arrangements do not exactly match those of Huanuni 2) The camouflage should probably be more blotchy. Having said this, no-one actually knows what colours these birds were, and the only B&W photos give contradictary impressions as to the camo pattern. Overall though, I am personally happy that the model captures the feel of the aircraft pretty well and it is a welcome addition to my Chaco War collection. Finally, here is Huanuni with one of her sister ships, Chorolque, wearing the original aluminium/black scheme that was more typical of these aircrafts' war time service. Thanks for looking Cliff14 points
-
Hi all, here I want to show you my 1/72 Mistel 2. Kit: A complete kit of the Mistel 2 1/72 was not available, when i built this model. I use a Revell Fw 190 A-8 as upper and a Hasegawa Ju 88 G-1 as lower component. The Kampfkopf (warhead) comes from an Amtech Ju 88 H-3 Mistel-Kit. Original aircraft: Mistel 2 were manufactured from old Ju 88. Arming, radio measurement systems and the cockpit were removed. Instead of the cockpit a 3.5T hollow charge warhead was placed. Depending on the version (different detonators length) it could penetrate up to 17 meters (!) of reinforced concrete. The aircraft should - controlled by an attached Fw 190 - attack exposed targets (ships, bridges, fortifications). The Ju 88 was aligned and unlatched from the Fw 190 in 1 - 1.5 km away from the target, then the "cruise missle" flew the rest of its way by automatic control with an accuracy of +/- 10 m. The problem was that the targets were well defended and the cumbersome aircraft was hardly accurately align in practice and so there was little success. This model: My model was the guide plane of 6. / KG 200. In early 1945 some Mistel 2 should attack the British naval base Scapa Flow. Fortunetly due to the lack of fuel, it did not come to this use. Construction: The biggest challenge was the connection of the warhead with the fuselage. Everthing else was just to finish the two separate kits. Scratch were built: - some Kampfkopf details - removed Fw 190 guns - carrying structure - some cables and hydraulc lines - landing light and pitot tube and other tiny parts. The kit was as painted with Gunze colors. Weathering in brief: Preshading, lightened base colour, Gunze mud on exposed areas with airbrush, Tamiya Smoke for traces of oil and gas plume, various oil colors for dirt and wear. Walkaround: The Fw 190: Some details: Hope you like this. Best regards. Kai11 points
-
Picked this up at a local model show for $10. So I figured I'd do quick build to add a 190 to my collection of losers planes (which now has 2, 1 109 and this 190). After 2 weeks work it was done, not perfect but a fun build to keep the mojo up. It's straight from the box, except for a True details seat (which was in the box) , but including decals which performed as good as any Cartograf decals I've used. There were True details wheels in the box but they had awfully flat tyres so I ditched them9 points
-
My older project for my grandfather, in this type ended his aviation career. It typically Trumpeter, so it a lot of work.8 points
-
Hello, built this in parallel with my son's Airfix red arrow Hawk... but we accidentally swapped clear sprues and didn't notice till it was too late! Hence my canopy didn't fit closed and has the moulded on det cords which I think are a bit o.t.t but hey! I did the 80's 2-tone camo as that was all over the RAF careers literature I had when I was a boy. Wish the kit came with sneb pods instead of sidewinders though.7 points
-
Hello, Here is my 2014 production line: Bearcat Trumpeter 1/32 1/48 Mirage 2000D Serval - Italeri 1/48 Mirage IIIB du CEV - Eduard/Heller/FM 1/144 Uboot U212 - Revell "Neige" comics figure 1/48 Kfir C7 - AMK 1/72 Mirage G8 - Anigrand 1/72 Mirage 4000 - Anigrand Et voilà! Romain7 points
-
Another model built few years ago. This 1/48 kit was a resin one by AlphaFlight, almost perfect but really expensive (Alpha Flight guy had also a superb Short Sunderland 1/48 scale, even more expensive but a fantastic kit indeed, now it is almost impossible to find it). Probably this is the longest work ever for me. It took about three months of work (I am not a patient modeller and I have an "endurance" of about 10 days before getting bored and the desire of starting a new plane overwhelms me). Main issue in this work was painting this livery called "Policiclica", that was typical of these bombers. Curl by curl... Photos are not the best. I used flash but it was not a good idea.7 points
-
I suppose if Airfix had upset North Korea, we'd all know what's in the 2015 range by now... and probably the 2016 range too!7 points
-
Hi all, I've been away from modelling and BM for a while due to work and other trivia... but just managed to finish(ish) this one before the year's end. It's the Revell Spit, a nice little kit but showing it's age I think- the canopy was the worst part about it, a misty blob that had a sprue gate in the middle of the hood, and doesn't fit anyhow... Still, I had fun building this. Happy Christmas and Happy Modelling to all BM'ers. cheers, Dave. snapped the antenna by this point...oh well t thanks for watching... c & c always welcome. D6 points
-
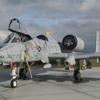
Hi Folks Second one finished this month,this is Classic Airframes version of the Hornet.This is one aircraft my father really wanted to fly but never got the chance,as he often said stuck on Mosquitos for years. Painted with my old favourite Xtracolor HSS and dressed in Xtradecals to depict a 64 Squadron aircraft based at Linton -on Ouse. Ian6 points
-
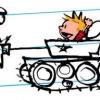
Any gamers on here? World of Tanks has a lot to answer for... This should be pretty recognisable. It's a Christmas pressie for my 'toon mate, who's rather handy with one of these wee beasties. The build was a bit rushed. I had the devils own job sourcing the kit- I think there are only two on the market? I could have done with another week to tone down the weathering and source some proper decals. Still, it is what it is. It's my first large scale tank, (only my second tank this century!) so although it's too late for this one, I could do with some pointers for the next one. If you've got any advice or tips, they'd be much appreciated, peeps. The business end: Top down: The WoT look:5 points
-
Hi, This is a kit, which I made for the first time as young teenager, perhaps when I was 13, so about 42 years ago. It was then made from the old mould of Fw-200 C3 by Revell. About year 2000 I was not able to tolerate any longer on my shelf its awful look.... So I dismounted it into pieces, washed with NaOH removing all paints and I made it againg. I decided to meke it a bit more attractive by converting model into C-2 variant with no turret on front top of fuselage. The another difference is in exhausts. This was a scratch work. The markings are from I/KG40, Bordeaux 1940-41, RLM 72/73/65. I hope you can tolerate it now.... Comments welcomed Regards Jerzy-Wojtek4 points
-
Hello, Before posting a WIP here I'd like to some of my work Here is a scatchbuild and kitbashed model of PZL-230F Skorpion-polish attack plane. There were obout five design versions of Skorpion -none was build. Only mock-up is preserved in Military Technical Academy in Warsaw. Some wind-tunnel models are also existing. There is only one 1/72 model of Skorpion, made of resin by Accura. It shows a middle version of this airplane. I wanted to do a last version in 1/48. And here it is... It's made of: fuselage from F-16, A-10 engines and F-22 tailplanes. armament is from A-10 along with landing gear. Model is painted with Vallejo paints. Hope ypu'll like it4 points
-
You are flattering me, guys, with all these compliments. Ok then, I will post some Italian stuff I have built in the past years. Here's to you the probably most famous Italian plane that took part in WW2: Savoia Marchetti S-79, dubbed "The Damned Hunchback". The kit was Trumpeter one but it was built with heavy modifications in order to correct some inaccuracies. You know, living in Italy, we have many modellers that know every rivet of this plane, thus it was necessary to spend some extra hours on it. There is still some arguing about this livery. The kit and some old colored pictures show that the mottles were green and brown. With the two tones of green it is more "maritime" and historically accurate anyway. I referred to the "Bible" for Italian AF colors a rare book titles "COLORI & SCHEMI MIMETICI REGIA AERONAUTICA". In Italy modellers would sell their own mother to have a copy of it....4 points
-
Here for your view is the classic airfix Islander, built OOB using the Milford Sightseeing kit decals. The only bits I added were the aerials and some exhausts to improve the kit items. I should really have used a darker background because it looks very white! Thanks for looking! Cheers now Bob4 points
-
Being a sucker for kits of unusual aircraft, I bought this in Revell boxing at a show for A$5 a couple of years back. Turned out to be a repop of the old Lindberg kit from the mid-'60s! As such the panel lines and rivets looked like they came out of a shipyard. Having had one attempt at fully rescribing a model and deciding "never again!" I left those, but did a few things to improve it: - the radiator bath was too far to the rear, being moulded integrally with the wing! I removed the old one, filled in the resulting gap, then made up a new one from plastic card and located it further forward. - the carby intake on the port wing root was missing - fabricated same - sanded down the main undercarriage doors to decent thickness (they looked like armour plate!), and made new inner and tailwheel doors from plastic card. Finally, added retraction links to the main undercarriage - drilled holes for the wing-mounted guns, and added pitot tube and radio mast - the big one... The windows behind the canopy were modelled as raised outlines in the fuselage plastic! I cut this section of the fuselage away and replaced it with a piece of clear sheet bent to shape after running under hot water, then masked out the windows. Painting was mostly Italeri acrylics - RLM 71 over 65. Rigging was EZ-line.4 points
-
Dear friends. Follow some pictures of my Dragon PzIV with full of P.E.´s...hope you like it... Best regards for all! Luiz.3 points
-
Some nice pictures from the north. RNoAF meeting Russian colleagues.3 points
-
Hello mates! Another models from my collection....a Jeep SAS from Dragon and a Young Bust (1/10 scale)...hope you like them! Best regards for all! Luiz. ...see you in the next Project!3 points
-
My original intention was to build a single engine Lightning combining the wings/undercarriage/cockpit using the Airfix 1/48 F6 & the fuselage/tail of the 1/48 KP Sukhoi SU-7. Unfortunately, a broken arm has imposed serious curtailment of my recent modelling activities .Back in business now but time constraints have forced me to come up with plan B - The Lightning F6 SHB (Should Have Been!). Features much improved & more powerful AI radar with longer range. Full width radome. Retaining 2 x 30mm cannons & armed with 2 Radar guided BFMs (Big F****** Missiles) and 2 x Red Top heat seekers. I'm going to mount the BFMs on the over wing pylons. As carrying the larger Red Top missiles required a larger tailfin in the F3/F6, I'm going to fit my Lightning with a larger fin to compensate for the even bigger missiles The general ease with which the Airfix kit assembles is a great help. The wings and undercarriage are already built & put aside. Most of the work is on the fuselage. Hope to get this all put together over the next couple of days. I'll be using a pair of redundant 1/32 Sparrow missiles as the basis for the main armament. Tail fin is from the Revell 1/32 F-16. The intake was made out of an unidentified piece of fuselage I found in my bits box. I have moved the nose wheel bay back . The nose wheel will be located at the front end of the bay Allan3 points
-
Space:1999 Eagle 1 Transporter MPC by Round2 The Eagle was the spacecraft star of this live-action Gerry Anderson trippy space opera, and was the crew's main mode of transport to and from Moonbase Alpha, as well as defence from incoming threats that had an uncanny knack of appearing out of nowhere each week. The sleek nose and crew cab is straight out of Thunderbirds, while the geometric framework body sends a nod to both the film 2001:Space Odyssey (as does the colon in the title), and real space designs that were coming through at the time. After writing that last part, I found that it was even built by the same model-maker, Brian Johnston. The ships were modular, and being made on the Moonbase, they were easily replaced, which was a good job really, as they were always breaking the things! The central pod could be swapped for other equipment in the same manner as Thunderbird 2, which is fair enough – why waste a good idea? Powered by pyrotechnics nuclear fusion rockets (just ignore the science), they were capable of 15% the speed of light, and had an endurance of 2 days with extra fuel. A booster pack was also able to be fitted when the need arose. They were armed with lasers and rockets on occasion, and even had a retractable laser fitted to a palette on the backbone, and could fire all around it. After the second series, the show was cancelled due to falling ratings, and went on to become somewhat of a legend with fans that weren't even born when it was first aired. The Kit Very few British lads of the right generation won't have heard of the Eagle Transporters, and if you were a modeller in the 70s and 80s, you probably built this kit, as that's how old it is. I built one as a teenage with a bad hangover one weekend, and I still think I did quite a good job of it, despite my banging head and griping stomach. The kit has been marketed by Airfix, MPC from memory, and possibly another that I can't remember at time of writing. It is a product of the time, and not quite as accurate as it needs to be for serious fans, but for the causal modeller, it should tick all the boxes and lead to a fun replica of this interesting and believable Sci-Fi spacecraft. The box is still a rather odd shape, which hasn't changed over the years, but this is a special edition with Alan Carter on the boxtop, and a collectible card on the inside with a montage of the actor Nick Tate playing the part of its chief pilot overlaid on a combined shot of Nick in his suit, next to an Eagle flying over Moonbase Alpha. The styrene seems identical to the original, being a white colour, with the slightest hint of translucency on thinner parts. There are seven small sprues, plus four separate parts already clipped from their sprues at the factory, the largest being the tubular ladder that forms the backbone of the ship. It has just occurred to me that this must have been made using a multi-part mould, which was a big deal back then, but it's a shame that this technique couldn't have been used to create the lattice framework that surrounds the front and rear pods, which instead have been moulded in relief with no internal detail visible. The decal sheet it quite large, and adds extra detail by using shading to imply depth to areas that are flat. I don't recall any of that in the original kit. The instruction booklet has changed format from the original Airfix issue that I built, but the diagrams are all familiar, and it appears they've been re-used. Construction starts with the rear pod, which is a four-part assembly onto which the four engines and their spherical fuel tanks are added to pegs on the rear wall. These are split vertically between front and aft, and the cruciform bracing framework fits to the rea, and the exhaust bells glue onto them to complete the assembly. The vertical landing nozzles are single parts that fit onto pegs on the bottom of the pod, with two on the rear pod and another two on the front pod, which builds up in the same way, but with the two-part cockpit section attaching to the front. The backbone part will need plenty of clean-up to remove the various seams, after which it is used to connect the front and rear sections of the ship together by locating a pair of lugs in a depression in the top of each pod. The landing gear sponsons are next, made up from two parts, plus a reaction jet on the outer side, and a single part gear leg on the box-shaped bottom section. Repeat three more times and you're ready to build the crew module, which is made up from two upper halves, a flat bottom part with more lattice-work moulded in, and a snap-on clip that allows you to attach and remove the pod at will – presumably to play with! That's the build completed, but of course there will be lots of painting and decaling going on during the process, so it sounds a lot quicker than it will be in actuality. Markings There is only really one scheme for the Eagle, and that's mostly white, with the spaces between the relief lattice-work painted black or dark grey, some red stripes on the crew pod, and more red on the engines and fuel tanks if you believe the box art. The engine bells and reaction jets are silver, and the rest is made up of decals, which are quit comprehensive. You get decals for the black surrounds to the pilot windows, as well as a tiny decal that actually has the crews' heads in their orange helmets on it! That's a super touch that made me smile when I noticed it. There is no decal placement guide in the box, but some of the pseudo-relief decals are pointed out during construction, as are the blast panels around the small puffer-jets on the landing gear sponsons. Black panels are provided for the windows in the crew compartment, for the landing gear leg "blocks", but when I said there wasn't a decal placement guide, I wasn't being entirely truthful. The guide is actually printed ON the box, around the sides of the lower tray, based on pictures of a completed model. This is also helpful as a painting guide, and shows a few optional colour schemes for the various pods that share the same outer structure, such as the VIP and rescue pods. Conclusion You can't be too harsh on a kit that has such long teeth as this one, especially as it's the only affordable mainstream injection moulded option out there. Sure there are other kits in different scales, but they have price-tags that could buy a whole fleet of these kits. As to the scale? It's about 12" long, which some folks believe scales out to around the 1:100 scale, and who am I to agrue? I like the addition of the relief decals to give the impression of more detail, but this kit could well be improved upon either by scratch-building, or adding the delightful Paragrafix PE set the review for which can be found here. Recommended for a bit of nostalgia. Review sample courtesy of UK distributors for3 points
-
Evening all, With the 75th Anniversary of the Battle of Britain next year, I've devised a cunning plan to build as many RAF and Luftwaffe types from the conflict as I can. A couple of decals sheets arrived today, and I've already made a decent start on the first kit, Airfix's lovely little Spitfire I. The interior is pretty much there now, nothing too special going on, just the addition of some Eduard seat belts to tart it up a little. There's a variety of Spitfire to choose from, though I'm a bit of a sucker for black and white undersides, so may well go for that option. Decision time is still a little way off, though she should come together pretty quickly. More soon, thanks for looking, Shaun3 points
-
Hi all, Been away for a while as I've been busy with work, but I'm on hols for xmas now and I've knocked this together over the last few days. It's a 1:1 scale Smith and Wesson Model 19 .357 Magnum revolver with a four inch barrel, identical to the one I used to own when such a thing was still allowed. It's a plastic kit painted with Alclad Gun Metal and a coat of Johnson's over the top to give it that gloss shine of blued metal, and the sights and sight rail are matt black as per the original. The trigger and hammer on the real thing are case hardened, which leaves a lovely blue/red/brown staining effect on the surface. I tried to replicate this with various Alclads and Tamiya clear blue and red. You be the judge of whether it looks like metal. The rounds in the photos are real but inert, and the walnut grips are the originals from my old gun. Happy days... Here's the main views then: Needs some ammo: Swing out the cylinder on its crane: And slot in the rounds: JSP's...mmm... Personally, I'm quite pleased with the effect: Here's the case hardening on the hammer: And the trigger: As they used to say at the gun club - "It'd get you shot...": Now, what's next...? Cheers, Dean3 points
-
This is Trumpeter’s 1/24 Nakajima A6M2-N “Rufe” Floatplane. This has been on my shelf of doom for about 5 years for a very pitiful reason; I needed to get some weights to put in the main float and I didn’t have any. I put this aside meaning to get some weights, a couple of weeks went by and then I forgot about it. Sheesh, what a dunderhead am I! My goal is to clear out my shelf/shelves of doom by May 2015; a daunting task if you only knew how large a shelf it is. This is one off of the list. It is mainly an OOB build; the build thread is here http://www.britmodeller.com/forums/index.php?/topic/234970811-zero-floatplane;-a-big-rufe-rufe-finished;-well-almost/. There were a couple of modifications to the kit. I added Eduard seatbelts and I got stumped about a hole in the main float that just looked stupid. Kind people on this site who know a whole lot more about the Rufe than I told me the hole was for an oil cooler. I half-heartedly scratched an oil cooler inlet/vent. The major modifications to this kit were done on the beaching trolley. It was rebuilt to look like some photos as the kit version was somewhat simplified. This was an enjoyable build. The parts fit well, the kit is well engineered, and the detail is really good. I understand there is some shape issues regarding the fuselage aft of the cockpit, but I am not skillful enough or knowledgeable enough to correct it. The kit decals were used and they went down without a fault and behaved perfectly with the Micro Sol setting solutions. I would recommend this kit in a heartbeat if what you are interested in is an enjoyable build. It is, however really big once completed so have some room. Here is the beaching trolley by itself. And, last but not least, the infamous oil cooler that is difficult to see and probably no one but me will ever notice. So the Rufe gets its own little shelf due to its size. So far it is playing well with its shelf mates As always, all comments are welcome.3 points
-
Managed more than I realised this year, despite taking 3 months on the Typhoon and another couple on the DH2. Most made it onto here during the year but there's a couple included here that didn't:- All the best for the new year, Regards J A3 points
-
Here's my finished RAF Sabre. Built from the Academy kit, I used a replacement seat from Quickboost and Eagle Strike decals. The camo has been sprayed freehand using Tamiya acrylics. WIP topic here. Thanks for looking, comments welcome! Matt3 points
-
After two days of bench inactivity, which is quite unusual for me, I am able to post a modest build update. This is how the front undercarriage doors looked after removal of the clamps: I could see no reason why this part could not be glued on with a combination of Revell Contacta and liquid poly: I finished masking the fuselage edges ready for some primer in the morning: All these parts are also now ready for some primer application: I hope to crack on quite well tomorrow but there are still Christmas and other domestic tasks which are competing for my time. Please bear with. Bye for now, Nigel3 points
-
I’ve just finished this, completely OOB and am quite pleased with the result ... it was finished to represent as closely as I could the F2.A at East Fortune, which was once flown by Squadron Leader Roger Chick, my former Flying Instructor who sadly passed away a few years ago. It was done for a challenge at work - all the members of the team currently redeveloping two of the hangars at East Fortune were challenged to built a model of one of the aircraft to be displayed in the hangars once they're complete - we have around 12 people taking part, most of whom are complete novices, so it should be interesting when they're revealed tomorrow! Apologies for the photos, done with an iphone in less than ideal lighting. Martin3 points
-
Hi guys, I'm chuffed to bits that you've enjoyed the build. Yes, it was a challenge and if I were to build another (never say never right?) I'd do some things differently. In the back of my mind is a cock-eyed plan to redo one of these and ask an aftermarket resin company to pop some kits out. If I do, that will guarantee a mainstream IM kit.... Anhyoo, just idle day-dreaming for now. Here's another final shot in the sunshine. Thanks again.3 points
-
Thanks for the comments and encouragement... I think I'm going to be hard pushed to get this finished for 04 Jan, but hey, we can try..!! She's painted with Alclad and Tamiya.. tried to vary the finish, doesn't show so well in the photo's but looks ok to me...!3 points
-
Depending on the point of view not much has happened... except several layers of gloss clear with sanding in between and at the end using Abralon and Alclads polishing set (up to 12000). Yesterday night I called it a day (though there are still plenty of areas which are most likely not polished enough) and plan to spray the Alclad colours tonight at last... As I have 2 weeks off now I hope I can still finish it in time. Rene3 points
-
One other point is worth making: Mr. Sprey is NOT a co-designer of the F-16 ! He had no input in the design of the General Dynamics fighter. He was not even an aircraft designer actually but was an analyst part of the group that laid down the LWF concept for the USAF.3 points
-
Oh yes. Nine - unarmed - aircraft were purchased by Egypt and they wore serials 1801-1809. At least three were shown on a parade in 1955: shortly after they were replaced by Il-28s (the first squadron of which became operational just in October 1956). And with this we're at another type that participated in that war: Ilyushin 28. Egyptian Il-28s flew at least two combat sorties against Israel, by night; one crashed on return to base (aparently came back right in the middle of a RAF air strike), the crew of the other reported that the runway lights at Tel Nov were on when they attacked the place. Note: at those times EAF Il-28s wore big, single-letter codes on their front fuselage: serials were introduced only much latter. BTW, theoretically, one could add Syrian MiG-15bis and MiG-15UTIs to the list of 'involved aircraft'. 24 of these were delivered by Czechoslovaks to Egypt (though with full SyAAF markings), and their pilots were in Egypt for conversion training too (see 'Operation 104'; Czechoslovak deliveries of MiGs and other stuff to Egypt went as 'Operation 105'). The problem was that Egyptians were slow to provide necessary fuel for them, so they didn't work up: all 20 MiG-15bis were destroyed on the ground in AdA/RAF/FAA air strikes, four MiG-15UTIs were evacuated to Syria (via Saudi Arabia).3 points
-
Its not a matter of stepping on anyone's toes - everyone builds what they want to build.3 points
-
Not your iPhone Houston My crappy picture, sorry Been pottering away slowly (that's my fastest pace these days) at this Edgar gave me some great rear wall pictures and Airfix didn't give me a great rear wall So Interpretations #1 I couldn't get everything that was there here so I put in most of it leaving space for the two canopy rams to go on too, later when there is a canopy to hold open. Thisis how it looks after I chamfered the hole and angled the backplate, glued them together and added a modicum of XF-69, Nato Black to set the plate home As you know I decided to eliminate the moulded on seatbelt detail because I just couldn't get a decent look to the straps Which gave me a bit of a job to do... bare resin seat destrapped and parachute pack exposed After discussion here I find I need the early headbox and no headbox strap configuration, show you in a minute but for now the bare seat This weird looking shot shows the drogue strap (I think) coming from behind the head rest cushions prior to fitting to the chute in the headbox, (flyaway Peter) [ Not much of this stays the course but I decided 3D was better than a dot of paint (Now I think I could have done the dot of p...) Oh well, heres the lower end of the strap coming down to go behind the back chute panel, later It all makes sense later honest guv, down here it stops at the chute pack Here is what it should look like, I hope this is OK but it's a shot of my compooter screen not an image grab The first set of etchystraps from the Airwaves kit needed fitting this way, they eventually come over the rear panel on to the front strap assembly Just realised I'm wasting bandwidth here so I'll pop on a bit further. Green webbing type panel on and the metal harness assembly frame bar added at the top over the drogue strap front strap assembly added to the other one and side straps added too ' And here with the leg restraining straps, green top canvas cover (just moved the cover sideways a bit for symmetry, no pic) and the banging handle made from yellow and black thread twisted together and glued That was a brilliant tip I picked up here in BM last week, wish I could remember whose idea it was. Serious credit due there. Sorry Now I have to apologise for taking so much time over the seat, never be as good as Steve's but it is as good as I can do As you see other things have been happening too And I have been keeping the postie busy too, last week I had my £8 Hasegawa GR1 and this week he bought me this. not quite as immaculate as Hasegawa's but I'm sure I can get a job done with her, 'specially as she only cost me £8 too Hope I haven't bored you rigid, you can't see it but I have put a few bits of shiny silver wire on the bangseat just to look a bit better as do the little red bits of transfer on the head box And apologies to those to whom the terminology of MB9 seats is second nature, folks the names I called stuff is just guesswork mostly. Please don't shoot any real users for my mistakes I have established the time-line for this GR1, she was at Finningley for the 1977 Queen's Jubilee and came from Bruggen to join the party, hence needing the early type headbox b3 points
-
Thanks for the encouragement guys. After last night's painting session I allowed everything to dry for a hour before carefully removing the masking. Overall not to bad, with just a couple of Ares requiring a re-touch, hence the bits of tape on the pics below. I've started on the re-touches, doing the RLM 71 first. I'll let that harden off before masking the 71 tomorrow night. Karl3 points
-
Good job on this Skyhawk, I can understand your reluctance to post. The background was great, after watching several videos and reading accounts of the conflict I had no idea there was a collision. It can be perceived as unpatriotic by some to post "the enemy" but there are plenty of HE-111 and JU-88 models posted which by far did more to destroy lives and materials during WW2. I understand that most of these men fighting against the UK were conscripts and didn't really want to be there. So a tip of the hat to their bravery is certainly honourable.3 points
-
Hello, this is my first take on vessels in a scale. These are 1/700 from Hobby Boss. I'm about to apply clear gloss varnish and put the decals on. I'm welcoming any hints for weathering2 points
-
Latest one off the bench- Pirate 01, "CO" 100 Squadron RAF Leeming The model was fitted with a "Raven Models" lighting set, which works really well with this kit. The decals are by Xtradecal. The plan was to use the RAF logo markings behind the cockpit, but these were way underscale! The build thread is here listing mods I've done to the kit-http://www.britmodeller.com/forums/index.php?/topic/234957825-something-ive-been-working-on-in-132ndin-flight-hawk-with-aircrew/?hl=%2Bhawk+%2Bflight Lights on!2 points
-
Hi, Second day at Chitose - weather was variable until the afternoon, so we had an hour or so at Okadama, I hope you enjoy the pics and thanks for looking in, cheers2 points
-
http://www.arcforums.com/forums/air/index.php?showtopic=280818&pid=2672598&st=0entry2672598 http://store.vagabonddecals.com/index.php?route=common/home Price is currently $10 per sheet. Stephen2 points
-
Framlington Court, 1924 tramp steamer. 32’=1” (1:384) This model was completed in 44 hours, spread over 23 days. Just a typical tramp steamer of the 1920s. Hull – obeche wood. Accommodation - obeche faced with white plastcard. Wood decks - scored 1/32nd marine plywood. Deck machinery, funnel, masts, rigging all brass and copper. Rails - tinned copper wire, soldered. Bob2 points
-
I'm game, if we could make it work. I've only ever built warships so would be interested in building cargo ships or something. Rick2 points
-
I haven't done much on le'Merlin, just added the final bits of piping. I'm about to give it a black oil paint wash and then blend in varying shades of staining. The pics don't show much difference, but I think this is about as much plumbing as I can fit on this and still leave place for all the coolant pipes that need to go on once in the mounts and once the fuselage is closed up. There are a few 'voids' that will be filled with coolant piping. I'm going to make a start now on the cockpit and fuselage. I have just under 3000 drawings from Supermarine across all marks as well as accurate CAD work of most of the aircraft, so will be going mad on this bit with added fuselage formers, stringers and and and! I'm more than likely going to dio this thing, but the 'what' of it is still undecided due to lack of skills here. So off to find some dio threads here I also made this little thing as little reminder to keep the mojo going, it was a bit tricky to get the timber through the printer though2 points
-
Even a more encompassing general Shipping GB? One subject I've never made is a model ship.2 points
-
I do enjoy the big reveal that is removing the masking, and I do struggle to wait long enough to not get finger prints in the paint! I haven't always managed it though! Hopefully I'll get the 70 retouched today, then it's a coat of glss and decals tomorrow. Karl2 points
-
Managed to find the time to add a bit more to the messdeck ( ) Electric heaters added for crew comfort and the provision of storage behind the seat backs/ mattresses. Addition of table and benches plus my interpretation of a pipe cot. There should of course be supports (wire/rope ?) to the deckhead from the outer edge. All this is only visible through ahole 10mm square in the deck Thanks for looking in Kev PS Noticed the aft corner of the cot had come adrift, now repaired2 points
-
Maybe the Luftwaffe thought the crew could hold hands at times of stress2 points
-
Ahh - but It's for the young tho' innit. Glad I did it - but I've been at the Bar now a lot longer than I did that - I wasn't cut from the right cloth to be a career officer - and I'm not sure I'd have got any more satisfaction out of being an airline pilot than a Barrister. I ain't complaining (not really )Happy with the internal painting: In goes the rear bulkhead: And a sneaky preview. Still got the external framing to paint. From the rear bulkhead back the canopy is opaque. So - make or break with the external masking & painting Steve2 points


This leaderboard is set to London/GMT+01:00