
Leaderboard


Popular Content
Showing content with the highest reputation on 17/11/14 in all areas
-
Completed this Sanger Bristol Bombay a few Months ag and got around to some photos this weekend. It's my first vacform and last for a while until my stress levels come down. Not sure of the percentage of filler compared to plastic but it's quite high! The model represents a Bombay in use in 1942 as an Air Ambulance in North Africa and Sicily, based on photographic evidence and research, I am grateful to all those on the Key Publishing Historic Aircraft Forum that contributed to my plea for information. Like all vacforms the kit is basic so most of the details are sratchbuilt additions, as is the interior and all the landing gear, struts etc. All comments welcome.13 points
-
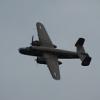
Another one to tick off the bucket list. As a kid I became facinated by it when i saw it at Duxford in the 70s (when it was a bit weather beaten) with its weird folded wings and contra props. In fact I've still got the photos. But this little b*gger has been the kit from hell and it's taken me 18 months to get here . Canopies, tail hook, cockpit, bomb bay and the nose have all conspired aganst me, don't get too close or you'll spot the errors. And apparently the Revell kit isn't that accurate at the rear end either but I can live with that. The decals were from Xtradecal although the spinner may be the wrong colour. The (now fully) restored Gannet '277' at Duxford has a red, yellow, red spinner but the Xtradecal sheet says red, yellow, black. Of course they may both be right but hey, I've finally got a Gannet so I don't care. And thanks to the BMer who sent me the Xtradecals, I thought I had your name somewhere but I've lost it Neil12 points
-
Finished this one over the weekend. Revell's re-pop of the old Matchbox Supermarine Stranraer. I rarely do biplanes. All that rigging does my head in! OOB, hand brushed with Humbrol enamels and Revell Aquacolors. Finished of with a spray of Humbrol Mattcote11 points
-
I so wanted to build a Beau for the Telford contest and started the Hasegawa kit towards the end of October. After an evening's painting and assembly I realised I was way too busy to finish anything - and put it aside. Well, last monday I found out I just haaad to bring something new to Telford and picked up the kit again. Got it primed in the morning then in a couple of hours through the day I got the paint on. Mostly Xtracrylic paint in several layers. NV175 was most likely a converted thimble nose Beau and therefore it would have had distinctly darker fin fillet, strike camera fairing and thimble nose. In addition to the various blotches of fresh paint so common on Coastal Command aircraft. Tuesday evening was spent decaling with some decals from the kits, some from various sheets and the lettering from a 1:48 Phantasy Printshop 30 inch sheet. The letters were too wide so they were pinched by cutting them vertically in two and then I slid the two halves closer to one another once on the model. No measuring, just Eyeball Mk I. The I suffix was used by 489 Sqn to denote thimble nose machines. Wednesday I only got a few things done while my wife opened a bottle of red wine, so the Thursday evening was spent getting the wheels and various fixtures in place. Friday I was off for Telford with the model packed up with blue tac in a sallad bowl. Forgot the instructions on the kitchen bench so I had to get an SK-class approval by Martin the Secretary. Pleased to say I got a Commended for my efforts. 10 hours work I'd say. And the third 1:72 Beaufighter finished for the collection.10 points
-
I wanted to build the latest Seafire from Airfix for a while but it hadn't quite made it to the top of the stash. I found the old boxing of the FR.47 in the loft stash and managed to acquire a set of decals from the recent release, this gave me the idea to do a duo build. Makes sense as the colour schemes are almost identical. I found myself torn between the scheme for the 46 and 47 on the decal sheet so decided to purchase another kit and do both I did think 'what the heck are you doing' when I was juggling 3 builds on the bench (especially whilst drilling out 36 exhaust stubs) but it turned out to be very enjoyable in the end and I am pleased with all the builds. Pretty much out of the box for all 3 builds apart from etch belts in the FR.46 and Quickboost seats in the other 2, the 46 and 47 have Taurus vac canopies as the Airfix parts don't look right to me. Painted with Xtracolour enamels. Thanks for looking in. Steve.10 points
-
Hi, So here is my last model built. It builds very easily and can quickly blow past painting. The building is located in French here: http://www.master194.com/forum/viewtopic.php?f=4&t=84594 unfortunately my English is too bad to write a whole post mounting Hope you like and all comments are welcome.10 points
-
Hi there, this time it's a bit off base, (no nuclear bombs, jet engines or camouflage) but hopefully suitably wacky. This is my scratch built Ader Eole, (also known as avion), a steam powered flying contraption designed and flown by French aviation pioneer Clement Ader in Paris, 1890. It's generally recognized as being the first true aeroplane in that it was able to fly under it's own power and carry a person from point A to point B..... OK it only flew 50 metres at a height of 8 inches, but hey it was a start, (I think the hoped for service ceiling was 2 feet and the range 100 metres in any case so it was well on it's way to satisfying operational requirements !) In September of 1891 it supposedly flew a second time over a distance of 100 metres, at 10 inches, (he was hoping to get to London in time for Guy Fawkes night, not sure which year !!) but this is unsubstantiated sadly.. The wing shape being based very obviously on the Egyptian fruit bat, Ader decided that rather than than risk highly complex multiple flapping wings and the inherent rapid disintegration of said wings into their component parts he would go for the really wild and far fetched idea of using a monoplane layout with fixed wing and forward airspeed to generate lift........who'da thought !!... It was powered by a small 20 hp twin stroke steam engine (alcohol burning, I dare say the fuel served a dual purpose !!), driving a flexible four blade prop..... however it had one little problem that caused no little concern to Ader and all those anywhere near him when he attempted to fly it....there was no directional control, the only thing it could do was dip wings left and right when Ader yanked back or forward on either of the two control sticks, much like a tank, but no rudder, so with this in mind and the fact that steam powered aircraft weren't really going to ever be in vogue the project was quietly dropped. A replica was built in 1990 with high hopes to prove the concept but it promptly crashed on 'take off' nearly killing the pilot in the process...hmm, maybe not then !). A larger twin 30 hp engined version was mooted for service with the French Air Force, (I can just see the pilot holding the control sticks between his knees, politely opening the door, toasting the gallant enemy before lobbing the bombs out)........but much to everyone's relief the idea was scrapped along with the part built airframe.... The model began life as a 1/30th printed paper project but after starting it as such I decided that the only way to go was via plastic as the frame work and rigging needed to be constructed separately not just printed on 2D flat card and then to scale it down to 1/72nd. Firstly I built the frame skeleton from archive photos of the real thing using various diameter plastic rod and stretched sprue then added a thin plasticard skin to the frame onto which sections of textured, printed paper were carefully glued, (this allowed everything to be easily pushed into rounded shapes rather than just be dead flat). The prop was made up from micro rod and lead wire and the blades painted using wood effect techniques as was the huge radiator stack.It wasn't heavily weathered as the real thing only had a very short service life and spent most of its time in a barn..(probably safest place for it !). The main wheels came from a Roman Chariot kit I had and the smaller from a spare PE bicycle set.Inside I included Ader himself...the interior is fully detailed but I really don't know why as none of it can be seen !....oh well. I've always had a soft spot for these early machines, this one in particular as I thought it looked very advanced for its time,(plenty of Steampunk whiffs material with this one !) and I remember seeing a photo etch of it as a kid in the London Science museum and wanting to build a model of one there and then. The only model I know of is the now very rare 1/70th Brifaut kit which includes the skeleton with a lot of fabric and rigging wire to cover it...not an easy build apparently ! I also built a small dio base using WM Langley Victorian figures to lend a bit of atmosphere to the scene... Hope you like it, Cheers, Melchie......an unmagnificent man in his dodgy flying machine... (Oh, as an aside it should appear in Finescale Modeler at some point).. In its display case with a bottle of paint to give it a bit of scale.......it's a bit of a tiddler really...9 points
-
As a (former) woman in science, I am ashamed and offended by the rag writers who chose to focus on the shirt, probably because the rest of the announcement and its significance flew right over their pint-sized heads. "I don't care that you landed a spacecraft on a comet"? Well, I don't care that you can pick a handbag to match your shoes, let's see you do something that will be remembered next week. But in the meanwhile, please feel free to ruin the excitement and joy over the successful conclusion to several years of planning, over a matter of fashion. Some people are but a fart in the universe.8 points
-
Here's a few shots of USMC aircraft past and present captured during my recent visit to the South Western USA. The shape of things to come, an F-35B Lightning II from VMFA-121, the first USMC sqn to work up on the JSF, seen landing at it's home base at Yuma MCAS. Seen departing against the rugged backdrop of Palm Springs IAP is KC-130J 166765/QB of VMGR-352. F/A-18B Hornet of VMFAT-101 while temporarily detached from Miramar MCAS to Long Beach IAP Ca. Ex USMC AV-8A preserved at China Lake NAWS Ca. AH-1J 155784 in the markings of HMA-775, one of the many USMC exhibits superbly displayed at the Flying Leathernecks Museum at Miramar MCAS. Thanks for looking, c&c always appreciated. Mark7 points
-
ANother of my older builds. This one dates back a fair few years and is the MPM kit. So if you know when this kit came out, then thats about the time I built it. I opted for this French aircraft just for a change. But is one destined as part of my cull of built models to be moved on to a new owner.7 points
-
This is the first one I've done in a while- building it has kept my mind busy in a very difficult time in my life, it's been a huge help to me! It's my first attempt with a decent airbrush (I went for the H&S evolution silverline 2 in 1). Cheers for looking. Jason7 points
-
Hello, I have a thing for trainer aircraft lately. Especially the tandem seating arrangement ones. Probably MiG-25U will be at the top of this list for me.. So, grabbed the 1/72 Condor kit together with a good friend of mine from ebay. Decided to build it in the IAF Sqn 102 "The Trisonics" . India took delivery of MiG-25RBK and MiG-29RU reconnaissance trainer back in 1981. Over the course of this beast of an aircraft's service it wore tow different grey shades .Earlier it wore light grey with a landing eagle logo on the sides near the roundel. I chose to build my kit in this scheme. Another good friend of mine made the decals for me many years ago. So I was all set with everything I needed for this build. MiG-25RU is a different aircraft from 25PU in some aspects. It did not carry the hard point pylons, and also the wing tip pod's shape was differen which I ignored to modify. Build: The build was very quick as there were very only minimal number of parts to put together. But there were some gaps between the fuselage and wing junction that needed lots of putty and sanding. After sanding came the priming and wheel well painting , which in this case was silver. Also I sprayed the dielectric portion of the ventral fins , tail plane and the NMF sections both dorsal and ventral. These areas were carefully masked and. Panel lines were pre-shaded with black colour and then several coats of light grey (Model master acrylics) was sprayed. The landing gear wheels hubs and the inside can of the exhaust were painted in NATO Green. The exhaust vanes were painted metallizer exhaust. Once everything was dried, I wanted to try the chipping effect with hair spray technique near the anti-glare black areas in front of the cockpits. So sealed everything with future and let it dry for a day. Then came a shot of hairspray in the area of interest and after masking the shape black paint was sprayed for the anit-glare area. Once dry, i wet the area with a soft brush and let it sit for 30 sec. Then started to scrape with an old stiff brush. The paint chipping effect started to appear. Then the last part was to simulate the colorization of the NMF area due to high exhaust temp .This was done with oil paint dry brushing. I used blue and burnt umber colors. The whole model got an oil wash of burnt umber and wiped in the direction of the airflow. Finally the most patience testing part of the build is attaching the landing gears. It took me a while , but I got there, Decals were applied and once more sealed with future. The end result ,looks like this. Hope you like the end result. Regards Vivek6 points
-
Well here she is. Finished. Base Kit - Revell 1/32 Westland Lynx Mk88A Paints - Mr Hobby grey primer Grey - Tamiya grey primer Green - Mixture of Vallejo Air - 094, 096 (35%/35%), 010 (15%), 016 (15%) Blades - Tamiya AS06 spray Tamiya gloss and flat varnishes. Flory black and dart dirt washes. Figure - base figure from ADV/Azimut-Modell, head from Hornet. Modyfied to represent British Army Air Corps. Scratched helmet, nav bag and 'go-pack bergen' (milliput). Scratch built (predominantly moulded and resin cast using Sylmasta products): Nose, Skids, Exhausts, Interior (seats, instrument panel, rear 6 man seat, rear bulk head, harnesses plus all the other gubbins inside), GPMG mount, Fast rope Frame and mount, mesh intake guards, various antennas. Enhanced detail on IRJ, main and tail rotors, cockpit and cabin doors and a few other bits and bobs. And not forgetting the thousands of Archer rivets I applied! Build thread here. Without further ado; Yep, that is a scale map of South Armagh! Main head detail including 'Bonk', bonding leads (yellow), spectacles on lower blade root and bonding strips on blade roots. (All these bits are on the upcoming Eduard PE sheet release thankfully) Fast Rope Frame made from bits of alloy tube and plastic strips. Rope is a scale tow rope copper thing. Perfect scale and nice and flexible. I think my weathing of the nose panel lines is a bit too heavy so may wipe some of it away to reduce. BriteStar IR lamp and footstep fitted to right skid. Made using plastic strips and bits of PE. Enhanced tail rotor detail with teeny tiny little bolts fitted to the root of each blade and bonding straps at the blade roots made from tiny bits of wire. Intermediate gearbox area drilled out, gearbox scratch built and placed inside then mesh covers applied. Cant really see the gearbox but I know its there.... I made my own decal sheet as some of the markings weren't on the main Revell sheet. I'm quite happy with how the 655 Sqn crest has come out. Scratch built the ice accretion meter (black prongs just under cockpit door) then realised the Revell kit actually has it. Having looked at them, I'm glad I made my own. Scratch built armoured seats and weapons on the side of the seats. Incorrect for the period this model is set. Late 90s NI 655 Sqn aircraft in 'Role 1' for duty down South Armagh. At that time we actually carried HK53's and not the SA80 Carbines as I've fitted here. I made the seats and weapons for my InAccurate Armour Lynx before I lost interest in that bag of crap. I drilled out the hydraulic reservoir inspection windows and build little reservoirs inside then right at the end of the build, used Humbrol clearfix to create windows over the holes. Excellent GPMG from Live Resin Yep, they really are that dirty. If Lynx aren't leaking, there is something wrong and the fluids are empty... Get your bloody beret off on dispersal!!! "Yep, 1, 2, 3, 4 blades, good to go......." The full gambit of scales. L to R: Fujimi 1/144 (WiP), Corgi 1/72, Airfix 1/48, Revell conversion 1/32. Now, whos going to release a 1/24? This is my second Revell Lynx and it really is a very nice kit with very few vices. My dream kit has always been a good large scale Lynx. AA failed drastically at that but it was the only player in town until Revell released their kit. This conversion was quite straight forward once I'd overcome making the various masters for nose and skids etc. You may be pleased to know that I'm in discussion with a renowned company who wish to make this conversion set. Lets hope we can get something out in the near future. As I mentioned a bit earlier on, Eduard are about to release a whole host of PE sheets for the interior and exterior. Quite a lot of common detail can be used on most versions of Lynx and I'm looking forward to receiving it. Thanks for looking Tony5 points
-
Have just finished this as I wanted to take something to Telford.... also, shamelessly (considering the time I've been on BM), my first RFI on the forum too. Now, I just need more time to finish my other projects..... Finished He-111 1/72 Hasegawa by Totallyrad.co.uk, on Flickr Finished He-111 1/72 Hasegawa by Totallyrad.co.uk, on Flickr Finished He-111 1/72 Hasegawa by Totallyrad.co.uk, on Flickr Thanks for looking, any comments good or bad welcome5 points
-
Hi all! It's been ages since I've put anything up on BM, the stresses of moving house and starting a PhD have limited my modelling to the bare essentials of getting builds done. Anyway, here's my most recent effort, a commission build for my mum's 60th birthday. She's not much of an aircraft fan, but has always had a soft spot for the DC-3, so when she asked me to make her a model someday, I chose this: a DC-3 in civil marks as operated by Dan-Air London in the 1950s-1960s. The kit is the new Airfix: irritatingly the civil boxing wasn't even due to come out until after mum's birthday, so I had to convert the military C-47 kit. This entailed filling all the moulded metal detail on bulkheads etc, covering the ribs and stringers inside the fuselage with plasticard (fun to cut around the windows!) and scratchbuild 16 pairs of airline seats, complete with seatbelts, from plasticard and foil. I also added throttle and mixture levers to the instrument panel, and represented the quilted soundproofing so often seen in 1950s cockpits with scored foil. Decals are S&M decals modified to represent my chosen subject, G-AMSU. The number of windows on the fuselage stripe decals was wrong for G-AMSU (an ex-C-47 with cargo doors retained) and the spacing wasn't quite right either, so I painted the stripes instead, and just used the tail decals, serials and fuselage stripes. The interior colour scheme is largely guesswork: I only had one very tiny B&W photo to go on! I ended up copying the seat colour from a very poor quality colour shot of a Dan-Air Airspeed Ambassador. Hope you like her. Mum certainly did!5 points
-
This is one ship I thought I would never build,An Airfix Leander 1/600,last one was 1974! Also as Airfix not producing this kit any more.They can still be found on E... and other sites,don't pay any more than £10! They do pop up regularly. ,Then along came 3D printing and HMS Leander now can look the part,I will get round to building more of the class in the future. The model was waterlined with added items from WEM and spares box .more details are on work in progress. http://www.britmodeller.com/forums/index.php?/topic/234963951-hms-leander-frigate-1600-airfix-ikara-upgrade/ There were 26 ships in the class,if you want to read more about the class here is a link,there is lots to read. http://en.wikipedia....r-class_frigate Now on to to shapeways this is link to this site for the upgrades for 1/600 https://www.shapeway...shops/bogeysbit5 points
-
Hello fellow modellers, Here is the second part of my century fighter series - some F-104 Starfighters. I built a lot of C-versions, one G-version and still have a two seater TF-104G from Hasegawa in the stash. Good opportunity to show at least one german topic after all this USAF stuff I presented here in the past. To start with the C-models: I like the Revell kit very much and remember very well when it came out in the nineties. I think it´s a cooperation kit with Hasegawa and the best kit around with very nice decal option. I made one in 1997, 2001 and the last one about two years ago. I wanted to test other metalizers and a “whiter white” (Tamiya acrylic gloss over Revell basic enamel primer) for this one. The decals needed a lot of Micro Sol even when the kit was new and when finished the third one, the decals didn´t work any more. Had to find out an alternative and decided to turn it into a less colorful Tactical Air Command Starfighter by using national insignias from Microscale sheet and print the rest by myself. The patch is from an Italeri Phantom and the lighningbolt brushpainted. The Starfighter had only a short service life within the USAF and was transfered very fast to National Guard units. During the Cuban Missle Crisis, F-104s were sent to Key West, as there was a need for a fast interceptor with good acceleration capabilities. USAF Starfighters were also used in Vietnam with limited success in the combat air patrol and light bombing role. My G-model Starfighter was made from the Esci/AMT/Italeri kit, which is not as great as the Revell one, but also not too bad. I wanted a German Starfighter from fighterbomber wing 31 “Boelcke” in Nörvenich as I spend some time in their Wing Operations Center as a draftee. I took the decal sheet from an Airfix Starfighter, some stencils from the spare box and brushpainted the refueling points. It took several attempts to get a proper “Norm 72” camo with selfmixed Revell enamels. The application of the orange took also two attempts, as a fading with yellow reduced the dayglow effect too strong. A light weathering was applied as always with black oil paint, pastel chalk and a silver pencil. The model was mainly out of the box with some homemade modifications and detailing, mainly in the cockpit regarding ejection seat and pilot figure. Most important change was the backward shifting of the tip-tanks, taking the Revell model and some books as references. Flaps and slats were also cut out and glued in angled position. I relied mostly on Squadron´s Starfighter in action and different issues of Aircraft and Aeroplane magazines. Next week I will present some Voodoos and Super Sabres. Best regards, Mario5 points
-
Hi there, here are my 2 latest build. Two resin models from Anigrand. I am not used to this kind of build, it was not very easy I must admit. Please forget the many flaws.. Thanks for watching ;^) Romain5 points
-
Hi folks, this is the new 1/72 scale Special Hobby kit built as post-war Czechoslovak C-2 (ex Arado 96). Overall nice kit with lot of good details and easy assembly (considering its short-run nature). Painted with Gunze SM01 mixed with matte varnish to simulate aluminium powder paint of the real thing. More should appear in MAI at a later date. Cheers Libor5 points
-
OK, the decals are on: I've still got to do anther round of micro sol, varnish, paint the radome tan portion of the spine, and add the pitot and missile rails. Looks like Flt Lt BL Ightning is flying the CO's jet today - be careful 'Blight', try not to live up to your nickname! Speaking of blight, zooming this far in does no favors to the finish. Oh well, worth it for the joke.5 points
-
Hi all,here,s the latest update,the airframe has had a nice coat of satin white and the major decals are on,the panel lines on the kit cry out for a wash as they are beautifully rendered but I am leaving her as she is apart from a little weathering on the wheels and U/C legs as these aircraft never made it beyond the test phases.many thanks for looking.5 points
-
Sorry Dave but I think that's nonsense. All it says it that this guy has questionable taste in clothes. The only "negative" attitude belongs to those that choose to be offended because it suits their agenda to do so. You don't know what he thinks about his female colleagues any more than I do. Your comment is mere supposition. This is political correctness gone daft. I wonder if anyone would have made a fuss if a female scientist had worn a "sexist" shirt featuring semi nude /nude men? I have a couple of t-shirts with a Saltire design on them. I was wearing one in a Carlisle pub recently. I was told to my face by a couple of people that they found it "offensive". Once I had stopped choking on my beer and laughing at them, I sought an explanation for their comment. None was forthcoming. They just found it "offensive" . Was it insulting to the English?? People will be offended by anything if it suits their personal agenda. This is a complete non story. What next? An male aid worker tending to the injured in a war zone is lambasted by the PC brigade for an "inappropriate and sexist" t shirt rather than being commended for his efforts? Allan5 points
-
It was wrong, it was unprofessional; it sends a very negative message to women working in science about what their male colleagues really think about them behind their backs. The fact he was so upset when he realised what he had done shows, at least, that he could step up & recognise he HAD been wrong. The real problem is that nobody thought to say to him "lose the shirt" before being broadcast to the world. Ten seconds of switched-on brain, & none of this happens.5 points
-
This is the "olde" Airfix kit from the late 60s. Decals from my spres and partly handpainted. I built this many years ago by the way so is quite old!! I think this one could be ripe for a new tool from Airfix once they have been through their back catalogue and done all the British types!??4 points
-
Just finished my 1/48 Revell MiG-21 FL OOB in indian airforce Sqn#30 charging Rhinos squadron Scheme. NMF achieved by Model master metalizers . Let me know how you like it. Thanks Vivek4 points
-
Just finished these. Both 1/48 Revell. First is the ex-Hasegawa Arado 234 2B/N Nachtengal. Second is the ex-Dragon Fw190/Ta154 Mistel combo. Arado was a nice build, but by no means basic. Some areas I would have done differently (read "better") Mistel was strange in that the Fw190 is an awful kit that hardly wants to go together but the Ta154 is a dream....4 points
-
Hello Here is another Airfix Javelin built by Steve Bowe a few weeks ago for me from the Alley Cat conversion (just as well). And here she is with XH754 Dave4 points
-
Finished today - OOB except Friulmetal tracks and Apoxie Sculp Zimmeritt. Painted with Ammo paints, and weathered with just about anything to hand. Definately one of the better Dragon kit's i've built only real pain was the Zimmeritt, and thats more repetitive than difficult. Peter4 points
-
I did not buy any new kits at Telford but I did stock up on essential modelling materials including a good lot of Mr Color paints, mainly the lacquer type but also a few acrylic pots (with the green label) which I have not tried yet: Oh, bother I have just revealed Duncan's birthday present and will now miss out on his little face lighting up.4 points
-
hello here is one of my Favorite models. F-4G WILDWEASEL 1/48 Hasegawa. Spangdahlem Air Base. In your comment. Ejection seats, wheel and jet exhaust by AIRES didier3 points
-
Hi folks,with the TSR2 well on the road to completion I thought another entry would be Revell,s new tool Spitfire.I rushed to get this kit back in the summer and made a Start then lost interest as I was in the middle of my 1/24 Hurricane,here,s the kit parts and the basic cockpit built,so to give myself a break from my ongoing USS Fletcher build every now and then I hope to get this one finished as despite the well documented issues it is a superb kit.3 points
-
Just finished my Airfix 1/72 Hurricane at the second attempt! ( screwed up the landing lights on the first) Completed as L1581 of 111 squadron inspired by the famous photograph Lots of help from all the excellent info regarding this subject on the Britmodeller forums concerning identifying the varous configurations of the codes and underwing colours. The blue 111 code and serial no. both came from the Sky Models Hurricane sheet, the rest from the two Airfix decals sheets. Weathering kept to a minimum and gun tapes in camo colours as per contemporary photos.3 points
-
Hi all, Here is the first restoration for Flying Past Aviation. She is an Antonov AN-2 and she was rescued from a scrapyard in Prague back in 2005. The restoration process has taken this long due to the corrosion and engine damage but now, here she is in all her glory. Engine tests should begin fairly soon and hopefully her first flight will happen before xmas. Registered as G-ANTY and based here at Strathallan Airfield in Scotland, she becomes the flagship of the company. The pictures show the owner of the company (Freddie) looking on at his latest charge. In reality, the model is a 1:72 Italeri kit. Build wise, it was a great joy and this is only the 3rd model i've built this year (following on from the spitfire 22 and bulldog). Bits that were fiddly included the cockpit glass (it's actually 5 seperate parts) and the horns that attach the ailerons to the wing (each one is individually attached). I was going to try rigging but I've no idea how to do it and didn't want to ruin something that i'm really proud of. Anyway, here's a couple of pics.3 points
-
Hello All, Built this Indian Airforce C-17 mostly OOB over the last couple of weeks. Kit is Revell 1/144. The only scratch built parts are the three antennas on the top of the fuselage which the kit does not provide. IAF Decals were printed by a friend of mine. Wanted to pose this inflight , so used a brass tube and a wooden base. Hope you like it. Hope you like it. Any feedbcak, comments welcome. I fixed the decal silvering issue since I took these pictures with future. Thanks Vivek3 points
-
Hello all, Here is my recently refurbished 1/48 Hasegawa F-4E Kurnass. Build thread is here Kit has an Airdoc refuelling probe, Airdoc forward sidewinder launch rail, Quickboost seats, Airwaves etch, True Details pylons, Steel Beach intake covers and Hi-decal decals. All ordnance is from the spares. The tail number is wrong as the one specific to this jet broke apart upon application. And with my F-16D and F-15l: Thanks for looking. Dave3 points
-
Another OOB Build3 points
-
Probably a daft idea so please feel free to ignore me. .. What about using 'flip' paint? There's one that goes from gold to purple that may give that 'full of energy' look.3 points
-
Hi everyone, Here is my latest model for your inspection . . . It's the Airfix / Heller 1/48 Jaguar GR1, which I've built as a "Commission " for a friend of mine. The model was built OOB, apart from a Master Models metal pitot probe to replace the "Drainpipe " that was the kit part ! Decals were a mix of Xtradecal & kit stencils, which worked really well, considering how old the kit was ( I bought it c. 1990 ) but it was only when my friend asked me to build a Jaguar for him that I recovered the model from my stash ! Anyway, I hope you like it, and any comments ( good or bad ) are welcome.3 points
-
Built this 1/700 Trumpeter Slava Class-Moskva OOB. Attaching some pictures.. Water created with water color on styrofoam and caulking Silicone Hope you all like it. Vivek3 points
-
Hi everybody, here's my usual WE update: more work on the IPs - front seat back seat (crappy pic - sorry ) More painting done on the cockpit and tub; trying to match the color of Eduard's PE, I got a grey which is a bit too blue-ish. I'll try to correct it later All these parts need tidying up, of course. Central tank, I'm trying a "double pre-shading" - probably will end up in rubbish, but it's just and idea I wanted to try ... Seats assembled, primed and with a black base coat, here's one Finally, more done on the stabilizers: airbrushed Model Master Steel Metalizer Without the masking I'll let it cure a few days before masking and painting burnt metal Metalizer on the black areas. Ciao3 points
-
A simple out of the box build, that somehow managed to hang around semi finished for 12 months. Brush painted with Tamiya acrylics. Thanks for looking.3 points
-
Dang it!! I followed the instructions - honest!! So now you have to click on the links to view the photos - best I try again :-(3 points
-
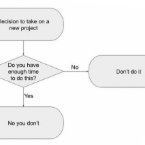
Excellent work, always nice to see the decals on, I wish you keen eyesight and a steady hand for all those stencils... Am I alone in finding the picture of someone being forced to build a kit at gunpoint amusing? Cheers, Stew3 points
-
It has been a productive weekend for us! I'm now looking forward to a nice couple of days off and spending some time fettling my Lightning, happy in the knowledge that the mean streets of Aberdeen were a little less meaner on our watch. Mark.3 points
-
Can't get a moment's bloody peace around here!3 points
-
I got on with the decalling - how were they? Not too bad but they were a little brittle, this one started to break up but I managed to cobble it back together: I got most of the big ones on: As well as these stencils on the bomb bay doors: This is as far as I think I will get tonight: There are still lots of stencils to do as you can see but I think I will call it a night for now. Bye, Nigel3 points
-
Some updates.. Not a lot been done as been busy doing work etc but here we are.. Here it has been undercoated with alclad primer, rubbed down with fine micromesh and sprayed with a black gloss base coat. Note the preshading on the spine and fin. White autoprimer has been sprayed on the fin and spine, drying quickly so allowing for recoats quite soon When dry, the White was given a couple of coats of Klear, then masked up. First coat of alclad, polished aluminium And here we are adding about ten other shades of Alclad to the whole airframe3 points
-
I wouldn't worry about the women in science, they're doing just fine and are far too busy to be worrying about a shirt a chap wears. I know, I work with quite a few of them.3 points
-
Absolutely ridiculous, and to quote Stephen Fry... “It's now very common to hear people say, 'I'm rather offended by that.' As if that gives them certain rights. It's actually nothing more... than a whine. 'I find that offensive.' It has no meaning; it has no purpose; it has no reason to be respected as a phrase. 'I am offended by that.' Well, so f---ing what."There does seem to be a niche that exists purely to try and make people feel bad about themselves, the fellows shirt was worth a few jokes and good amount of mockery but thats it. Very sorry state of affairs.3 points
-
Don't worry! I will! Sadly, it wasn't the first time it happened to me and I have been subject to some fairly unpleasant verbal abuse in recent years because of my nationality. Although I refuse to be bothered, that sort of behaviour in our own country is surely far more serious issue than a scientist wearing what was actually a truly crap shirt that not even I would be seen dead in!! Allan2 points


.thumb.JPG.3498f40362ff13ebfc4b2e45abbd545e.JPG)


This leaderboard is set to London/GMT+01:00