
Leaderboard


Popular Content
Showing content with the highest reputation on 26/08/14 in all areas
-
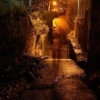
Hello everybody! Today I would like to present you my Revell F-101 B in 1/72 scale. It is a very nice kit that has been re-released by Revell last year. Mine is from the early nineties with other decal options. Bought a second one recently as it comes with beautiful decals for the Texas Air National Guard. The model went together very well. I only added some cockpit detail, pilot figures from a Monogram F-105 D kit and position and landing lights from clear styrene and 5min epoxy. The only major problem that occured during the built were the wrong walkways. I scanned the one of an old Matchbox Voodoo decal sheet and printed them on clear decal paper. I brushed a thin layer of the proper grey on the decals and applied them onto the model. That turned out o.k. for me. With the new release the problem is solved. The ADC-grey is a mix of Humbrol and Revell enamels. For the metal parts, decanted automotive paints and Humbrol polished aluminium mixed with more or less black paint was used. I applied only a light weathering with pastel chalks as the Voodoo usually apeared very clean. My main references were the Squadron Signal Publication and an issue of the "Aircraft" magazine. The background airfield was made from three pieces of cardboard. After painting and weathering, grass from the model railroad accessory was applied with a hommade static loading device. Finally six blue 3mm LEDs powered by a 9V battery were installed. Best regards Mario11 points
-
Here's one I've made a while ago. Great Tamiya kit with full Aires detail set and Aeromaster decals.11 points
-
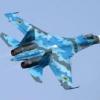
Hi guys! Let me present you my latest work. Set of the Academy is pretty good - much better than the usual their products. Except "oak" decals as always. Consuming almost all detailsa from set of photo-etched "Eduard."11 points
-
The second of 2 Spitfires that I've managed to get over the finish line today is the Tamiya Mk.1. Having read the book 'Spitfire' by Brian Lane and already having the Montex mask set for his Spitfire, it was an easy decision on how it was going to be finished. It's a commonly built Spitfire but I wanted to add it to my collection too. Eduard etch and HGW belts were added to the cockpit and, as usual Xtracrylix and Gunze paints were used to add the colour. I also added the Ultracast exhausts to the build. So here it is, Flt. Lt. B.J.E Lane's Spitfire from 19 Sqn, Fowlmere in 1940. As always comments and critique welcome. Pete11 points
-
Hi Finished this last week. As mentioned it's a Tamiya kit, it had a fracture at the point where the front cockpit section joined the fuselage but the repair can't be seen so it wasn't too bad. I finished it as an a/c of 141 Squadron when part of 100 group on Serrate operations in support of Bomber ops. I bought some Quickboost exhausts and used decals from various sources but other than that it's out of the box. This a/c is described in Martin Streetleys book on 100 Group and will join the other models of this group that the Bomber Command SIG have built. Regards Paul10 points
-
I have finished this model..... Thanks!!!8 points
-
Here for your inspection is my Eduard F-6F-3 I chose the aircraft of lt. Richard E. Stambrook of vf-27 USS Princeton in October 1944 I have left the build number off of this aircraft as it is not truly known as all F-6F-3's of the USS Princeton were lost when a japanese bomb went off and caused a catastrophic fire leading to the loss of all aircraft onboard and the USS Princeton herself in late October 1944 so here she is............my Hellcat8 points
-
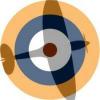
hello all. So i have finally finished this.Airfix did great job with this one This model representing Belgian Hurricane from 1940. On this one i doesen't want to do to much weathering.Just normal wear and tear marks. I had some problems with making photos so i hope you like it. As always all comments are welcome Ps This one was fun to build now i have to start next one. Cheers7 points
-
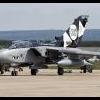
I started this mighty bird a few years ago, but got tired of all the shortcomings of this model. This summer I decided to finish it, and to my own surprise I made it! I know there are lots of corrections that should be made to create a perfect Nimrod. And if I had done that, the model would have been finished about 2020. So most of it is OOB, with some additions. I added some extra detailing on the rear part of the body, I made proper intakes between the engine air intakes, I drilled a number of holes on the poorly detailed engine underside. I also replaced most of the kit antennas and added a number of antennas that was not included in the kit. I painted it with Gunze acrylics and used the stencils from the decal sheet in the box. This was the worst decal sheet I have ever worked with. Besides the bad printing and silvering problems, the whole sheet had a thin decal film that meant that every single decal had to be cut out. And there are plenty of them! Apart from that, the decal placement guide is difficult to read, which meant that a few decals were placed wrong. For the national insignias and numbers, I used Xtradecals Nimrod sheet. I wish they had included the stencils. Apart from the problems of the kit, it is difficult to work with such a huge kit! I am impressed of all model builders that regularly build large aircraft. My paint box was too small, and I managed to broke the refueling probe six(!) times. Three of them when the kit was painted, which meant filling, sanding and painting once again. But still, this is an impressive kit. I am proud that I managed to finish it, and it looks really good in my collection. And this is really a great aircraft! And for those of you that hade not seen it completed: It is really huge! Compare to the Canberra not a small aircraft. And the tiny Harrier, that probably could have landed on the Nimrod wing. Thats it. Next time I will build something smaller, I think. Like a 1/72 Spitfire or something.7 points
-
Hiya Folks, Here is one that I`ve been meaning to build for years and I`ve finally finished it off! It is the MPM/Special Hobby Stinson L-1 Vigilant wearing the markings of the RAF`s Desert Air Force Communications Squadron based in Italy during 1944-45. This unit also operated at least one captured Fiesler Storch! The markings came from the spares box and it was brush painted using Polly Scale acrylic Dark Earth and Dark Green with Finnish Light Blue representing the light coloured undersides. Here it is,...hope you like it; [/url] I`ve added some more pics here after the model was weathered; Cheers for now, Tony7 points
-
Revell 1:144 C17A Globemaster III (04674) ZZ174/00-0204 No. 99 Squadron, RAF Brize Norton, Oxforfdshire 2010 Revell 1:144 C17A Globemaster III (04674) A7-MAB/08-0201 Qatar Emiri Air Force, Al Udied Air Base, Qatar 2010 And finally, the possible scene in Qatar in 2022 for "Operation Sunstroke" the emergency repatriation of professional footballers who succumbed whilst attempting to play football at 47C (117F) Found them to be really nice kits, undercarrage a bit problematical being built early in the construction. 1:144 is not my normal scale as I find the pieces on the small size for my clumsy hands and poor eyesight. Both were brush painted normal. Quite happy with the finished results.7 points
-
I finally managed to get something built after a mini lull in production. It's the Tamiya Spitfire Mk.Vb Trop, a vice free relaxing kit to build. I always thought that I'd never build a Spitfire in anything other than RAF markings but this one drew me in. It's a USAAF Spitfire flown by Major Robert Levine of the 4th FS, 52nd FG based at Ls Sebala, Tunisia in 1943. I added the Eduard etch set and some HGW belts to spruce the cockpit up. Markings came from a Montex mask set and painting was achieved using Xtracrylix and Gunze paints. A set of Quickboost exhausts completed the build. All in all a pretty pleasing build and ready to join it's brothers in the cabinet. As usual comments and critique welcome. Pete6 points
-
Well chaps, this is my first ever airbrushed kit now completed. A massive thanks goes to LazyEagle for the inspiration. Seeing his awesome A-7 give me the courage to fire up the compressor and airbrush. The kit is built pretty much OOB (added decals for cockpit instrumentation, pilot added). Xtracrylix for paint. Flory wash for weathering. Vallejo matt varnish for sealing it all in. The model is shown heavily weathered to try and replicate the harsh conditions the aircraft were operating in SEA. Thanks for looking. Phil6 points
-
Hello again, this is my latest one, a Me262 A-2a in 1/72 from the Hobby Boss range. First Hobby Boss kit I've built. I was impressed by the quality of the moulding, although I couldn't comment on accuracy. The nose looked a bit too sharp so I sanded it a bit... the 'easy assembly' generally amounts to a simplified airframe - fuselage and wings with a cockpit trapped in between - but the rest of an HB is quite sophisticated. I particularly liked the undercarriage. I wasn't sure about the rather stunted interior although it was a fair representation for what it was! I added a stick and belts, and some paint touches. The 'top and bottom' approach to assembly means you have a few less joints to fill, but fill them you must! The fuselage was a bit narrow on one side so I had to do a bit of filing as well to bring the bottom part of the fuselage into line. Filling and sanding was also needed around the nacelles. I use a combination of Humbrol putty and Deluxe Materials water-soluble putty, depending on the job. The top two gun ports need filling on this variant as well. I had no RLM colours so had to mix my own from Humbrol (using a text guide I found here...) - not a great success at first. I also tried airbrushing the squiggly lines, which looked terrible to start with. For some reason I tried wiping down the paint with alcohol pre-injection swabs - this had the effect of smoothing out the grainy paint surface without actually removing it. From here I was able to respray the thing, and paint the squigglies by brush using something like RLM 02. I should have done the same swabbing to get rid of the graininess before decalling it, because as you can see, even after a brush coat of Klear I still had problems with silvering! The HB decals are ok but too glossy. (I retrospect I think using Microsol on decals has the effect of dissolving the adhesive, causing silvering when they dry out.). I used swastikas from an Xtradecal sheet instead of the "two halves" ones on the HB sheet. I brush painted the intake lips, nose and fin tip markings - no way were the decals going to work on those... While finishing this I got a set of the new Humbrol RLM enamels - I have yet to try them although I used them for retouching on this model. I imagined the squiggly camo was applied in the field, so overpainted the RLM 02 on some of the otherwise rather bright stencils, leaving the codes etc. clear. The characteristic '262 loop aerial is missing from the kit so I made one from brass wire. Before flat varnishing the model I noticed the decals had silvered badly so tried scoring them with a sharp blade and applying Humbrol Decalfix - bought along with the RLM's - this worked to a certain extent. I have used Decalfix in the past and found it more effective than anything else I must admit. Well, there you go, one grainy Me262 mit der bombs! Kettenkrad is the old Hasegawa one by the way.6 points
-
Well, a little late, but I did finish it. Many thanks to Forlornhope for the decals. I'll probably put it up in RFI this weekend, if the weather can stop vacillating between murderously humid heat and torrential rain. EDIT: AND I PUT THE EJECTION TRIANGLES ON THE WRONG SIDES. GOD D---arn it.5 points
-
Tupolev Tu-134. Aeroflot. 1:144 Zvezda. The Tupolev 134 is said to the Russian response to the Sud Aviation Caravelle, and has an obvious similarity of layout. Unlike the Caravelle though, it has a very wide track undercarriage suited to rough field operation, and a glazed nose typical of Russian aircraft of this era. I understand that it was used to aid in navigation over the vast areas of the Soviet union where modern electronic navigation aids were not yet available. It was a reliable and efficient aircraft, in service from the mid 1960's until the present day, although no longer seen in European skies due to noise regulations. It is an attractive aircraft, tough, rugged, and yet delicate all at once. The Zvezda kit is beautiful, with fine and detailed mouldings that fit together like a dream. It is one of the best kits of any type that I have built, a real pleasure to work on. The only slight area for improvement is the decals. Mine had smudged main wing reg letters, but was no problem as I have a few of these kits stashed, so nicked the decals out of another kit, although these had a slightly yellow tinge on the carrier film. Having said that, they are good in every other respect and fit beautifully, just like the rest of the kit. The cabin windows are all 'cut out' with silver surrounds and line up perfectly over the glazing. For the next ones to emerge from my stash, I have aftermarket decals for Interflug, CSA Czech, and LOT Poland to put on. And the 'with something else' final shot. To give an idea of its small size, thais is an Airfix 727-100 alongside. The narrow, skinny Tu-134 makes the 727 look fat. Thanks for looking, John4 points
-
Hello, Here's the finished build of the above Mosquito, unfortunately when applying the Mask for the canopy the lhs window fell onto the floor and so far it hasn't been found. Couple of shots of it prior to completion: Finished Version: Thanks for Looking!4 points
-
Hi, Another big WWII "Britt" - Avro York C MkI . This is Czech Master Resin conversion set (fuselage, cabin, wheels, wertical stabilizars, propellers) and a bit shaped other parts from previous 8 series Airfix Lancaster (I did it before release of Revell but after Hasegawa). CMR suggets to use Hasegawa, as I remember, but I did other way - I had one Airfix in my storage...I made some small improvments mainly on the shape or rather just details of egines and on the the surface. The wings have to be cut, each about 3 mm, near fuselage, due to wider fuselage. The model shows MW140 used in Far East just after the war for evacuation of prisons of war from camps in Philipinis or Malaya. I think it came to the service in last weeks of war. The markings are RAF, not RAAF - the light part of the roundels at photos seems to me white, not light blue even if it is a SEAC airplane. If anybody can give me some proove that it must be light blue I will change it... My second doubt - on one photo (and the only one where it is visible) I found, that York have dinghy on left wing, not right one, as Lancaster have. I am not sure if this is not just mirror mistake of the photo - there are no any charactes visible - this is a direct backward shot... So again - any comments from York expert welcomed! Regards Jerzy-Wojtek4 points
-
Found it! Here's the stand socketey thing: and here's the view from the inside. I've now sanded, filled, primed and sanded the hull so hopefully I can think more about the details and less about the shape from hereon in. I also did a bit more on the engine mount - first of all it got a backing plate so I can get it glued nicely onto that, and then have a nice easy job to fit it to the hull later. Then I added various AFV bits including some track links as mounting points for the engine bell. and some grab-handles inside as mentioned earlier: I boxed in the recess at the bottom where the gun would've been, in future it would be easier to do this before fitting all the details rather than afterward, oh well Total number of different AFVs which have donated parts to this build so far: 4 (or maybe 5?) Cheers, Will4 points
-
Thanks a lot for you praise guys. I thought it was a good time to prepare the resin exhausts that came with the kit for some paint. When I took them out again they didn't look as good as I remembered them. This would not just be some cleaning up, nor are they round, at least not to me, as they should be. Instead of going to work on that I sat down searching for better parts online. Surely there must be round Griffon exhausts for late mark Spitfires in good resin somewhere. After a little while I had ordered some sets from Quickboost and SBS that Hannants had in stock. I hope something will be better than this and can be tweaked to fit. As I was packing this one up to do something else I realised I wasn't done with painting at all. There were two more things to do, the flat black anti glare strip in front of the canopy and the wing leading edges which are supposed to be some "polished graphite" in colour. Not sure what to use for that right now, so I masked up the anti glare panel. This was quickly sprayed with Lifecolor and masked off. So far so good, now need to find something for the leading edges.4 points
-
Hello, Next model of Spanish Civil War - Czech fighter Letov S-231. Only 35 were constructed and out of them (I think) 10 or 9 served in Spain. This is rather OOB model (Kovozavody Prostejov, 1/72) with very small modification like decals for example. This particular machine was used by Esquadrilla 2(Sq. 2) of Gruppo 71 in Cartagena, 1937 Regards Jerzy-Wojtek3 points
-
This is Airfix's T11 Vampire with Pavla seats, after market decals and home made Telstar markings. Thanks for looking.3 points
-
Hello, this bird was built 1,5 year ago or so. No aftermarket (except of masks) has been used. Hope you enjoy it.3 points
-
Just finished this one for the crew chief of the time on VF-31 for this jet in 2005. Hoping he likes it as much as i enjoyed the build! Paint finish was Xtracrylix and flattened with Alclad flat. Flory dark dirt was used for the panelline wash and weathering was kept to an absolute minimum as this jet was kept pretty clean. As usual thanks for looking. Next up is a pair of Spit v's3 points
-
I don't suppose many of these get built nowadays, but there was a time when the various Aeroclub kits were the best available if you wanted to do any member of the Hawker Hart lineage. Recently John from Aeroclub was kind enough to hunt up a couple of his old decal sheets for me, which was a tremendous help in a scratch-build project, and so I thought I would dig out of store and build one of the old Aeroclub kits I have, by way of a small tribute to all he has contributed to our hobby. I got a good many of these Demon kits years ago secondhand from a gentleman in Australia, shortly after taking up the hobby again. One I converted to a Nisr and one to a Hardy, and one I did up as a 'Malta Demon' in a scheme I now know to have been wildly inaccurate. I still have two, more or less, un-built, as well as an Audax and an Osprey. Even today, stacked up against the newer limited-run offerings from A-Model and AZ Models, they still have points to recommend them. I approached this build in an 'out of the bag' spirit, and since the instructions include direction to 'detail to choice' (as well as to make some of the struts), I think a bit of fiddling and some little extras stays well within that. The white metal parts supplied include a fair start towards a detailed cockpit, but I decided to recruit a couple of likely lads in Sidcots to save time and keep me concentrating on the over-all finish. I used the kit decals, which went down without any fuss at all. The subject of the Aeroclub kit, K2905 of 41 Sqdn., flown by C Flight leader, was chosen by the Corgi people as one of their 1/72 die-cast subjects not long ago. The aluminum dope finish is craft acrylic silver mixed with some white and cut with Future, brushed on over white primer. The metal panels of the nose are done with aluminum foil, boiled a while with egg-shells to take off the shine and darken it a bit, with MicroScale foil adhesive applied. Rigging is done with EZ-Line elastic for the long lines, and 0.004" brass wire for the short lengths. Wife tried a new technique in these pictures. Not long ago a picture was accidentally taken without the flash of another model, and in processing she removed the shadow and did a couple of other tweaks, and we both liked the result. So these are done without flash in indoor sunlight, and treated as she did the earlier picture.3 points
-
Here's the latest kit to roll of my workbench: Gavia's 1/48 Lavochkin La-7. Kit decals and Tamiya paints. Only additions are pitot made from Albion Alloys tubing and seatbelts from Tamiya tape and Reheat buckles. Full build story is at http://jonbryon.com/La7.html. Thanks for looking Jon3 points
-
D-Day GB: Build 2, Day 4 Well, the boiler service went well - as did the subsequent cash reduction in my wallet! Here are the kit BESA MG's with associated PE guards - I decided to keep the kit parts rather than replace them with the RB ones (the barrel length was the issue) The other PE parts are the restraining straps for the P.O.W. Flimsies to be attached later. Here are the P.O.W. Flimsies with the other half of the restraining mechanism. However, as there are some moulding issues with the front and rear curved mudguards (certainly in this kit) some teasing of the parts is needed to encourage a slight change of shape more in keeping with the original intent of the builders. I shall not be attaching the front mudguards as this enhances the overall effect of the desired finish! The vehicle is pretty much complete now (other than that previously mentioned), Aerials have been fitted (Accurate Armour AO094 Carbon Fibre Aerials) dimensions as per kit instructions. I have taped down the track guards to ensure their true fit to the vehicle and have also glued together the front and centre sections and the rearmost with the rear mudguard You can see the vehicle layout from this overhead plan view with particular notice to the rear left mudguard which is still out of alignment, somewhat! None of the crew hatches are glued in as I may still yet add a crew (not sure if now or later?) Summary Exhaust arrays (as sub-assemblies) - Next Time Build the BESA Mg's and PE to fit kit (as sub-assemblies until painted) - Completed Tools, Fuel Flimsies and Tow-Ropes - prep for painting prior to installation - Almost Completed Track guards (as sub-assemblies) - finish off and prep for painting - Completed Possible Undercoat - Day 5 - Menu Exhaust arrays (as sub-assemblies) - gotta do them this time! Tools and Tow-Ropes - prep for painting prior to installation Sort out that flippin' mudguard! PAINT! the track black and metal PAINT! the BESA MG's blue/metallic Disassemble and PAINT! the undercoat on the tank Mix the SCC15 top coat from Vallejo ingredients 70.888 & 70.924 (equal parts)3 points
-
I really want to get the spinner painted just to see it against the painted bird for the first time. There is however some preparation to be done first. I laid up the prop and spinner base diameters with three blade locations spread 120° in AutoCAD and printed. I also jigged a pen and drew the planes for the front and rear blades on the spinner. I'm trying to get a feeling for the spread I want between the front and rear blades when using the prop blurs. Or how to make things more complicated... I think I'll go with this, approx 30°. I added the front blade locations 30° off and the two diameters where the blades attach and printed a new template. I will need the two attachment diameters when I cut down the blades later. Then I drew the blade locations onto the spinner. Just need to keep track which is front and rear and not mix up the holes to be drilled. As I suspected the first coat of primer gave a good deal of ghost marks in my heavily reworked spinner. Given some patience to cure, sanding and repeating the process should bring it home and ready for a black base coat. I hope.3 points
-
Had this in the cupboard and seeing as it was raining Monday I thought I would get it together.3 points
-
Thank E folks, 'nice one Kev :winkgrin:'. Well been out and about so a little slowdown, managed a couple of hours, 'or was it more, don't time fly when your enjoying your self. Well had a go at the wardroom and made table and chairs. The round table is for the admirals quarters. Cheers foxy3 points
-
Front wheel complete and on the forks3 points
-
Thanks a lot guys, glad you like her. Polished graphite, in all pictures I have seen when she was in air the leading edges look black. Many on the ground too, while some look more like metal. I don't know. I did another masking package. Something more towards black felt right, so I used Lifecolor gloss black and mixed in some gloss gun metal that altered the black colour to a slight metal dark greyish tone. I sprayed a thin coat of gloss varnish on top of it. The difference from black is quite subtle and it looks mostly black, especially in photos, so I think I leave it like this. The tail antenna still survives...3 points
-
Hello One of my builds that dragged over from last year, this was supposed to be start of the FAA GB, but I didn't even start it until after that finished For some reason I struggled with this more than my other Dynavector kits, despite the fact this is supposed to be one of the easier ones. Again, I forgot how translucent the roundels are, so they don't look to good on the grey/white join. Thanks for looking Ian3 points
-
Hi all Having started this topic, I am really pleased to see all the input and responses you have made - so thank you all. I totally empathise with all who have to smuggle their kits and decals past Mrs Management - I too encountered the same problem recently with my Mrs who came down on me like a ton of bricks when she saw how many inbuilt kits I have in my man cave - and that didn't even include those that were carefully hidden!! She counted 42 - having missed another 15 which were carefully camouflaged elsewhere in the "cave"3 points
-
these are my latest models to get to the finished stage. i tend to have numerous kits on the go at once and jump back and forth as the mood takes me. on a bit of a break from the big RC spitfire i manged to finish these ones... first up is the old Airfix 1/24 Mk1. built out the box, im not one of these builders that go all out on detail of accuracy, i just build for the pleasure of it and like to aim for a generally all-round good impression of the plane... next up is my attempt at the prototype. built from the newish Airfix 1/48 Mk1 kit. again not 100% accurate but a good likeness... and then a night-fighter. this started out as something completely different but then something just made me spray it black !!! the codes are completely wrong but then I'm claiming artistic license on this one, and my first go at a spinner. not really such a good looking model but then its something i just had to try. hope you like, all comments welcome3 points
-
Another update Camo on, plus gloss coat and the main decals Since these snaps I've added the stencils from the kit and sealed the decals with a gloss coat. Panel lines next3 points
-
Hi DH 89 is a very beautiful, classic airplane of Golden Wing era. Surprisingly to me this passanger airplane had quite wide military use. I have made model of DH 89 M - bomber version armed with 3 machine guns and some bomb load. The particular markings are for airplane no. 6311 of Republican Airforces, squadron "Alas Rojas" based in August 1938 in Sarinena . The conversion is "free hand" (scratch). Model was a Heller 1/72 kit, now it is also available from Airfix. Here it is: This book, which served as main source for works (inc. profile, drawind, photos): https://www.amazon.com/Aviones-guerra-civil-espanola-1936-1939/dp/8486629403 I hope you like it. I made it about 10 yeras ago. Cheers Jerzy-Wojtek2 points
-
My latest build, OOB for a summer break, I focused more on the painting as the build was nice and easy! Hope you like it, more photos here: http://www.modellingnews.gr/el/%CE%BC%CE%BF%CE%BD%CF%84%CE%B5%CE%BB%CE%B9%CF%83%CE%BC%CF%8C%CF%82-%CE%BA%CE%B1%CF%84%CE%B1%CF%83%CE%BA%CE%B5%CF%85%CE%AD%CF%82/vought-f4u-5n-corsair-hasegawa-1482 points
-
Slow progress with this one. I'm still building the cockpit on mine - added some extra detail as I have an aspiration to open up the cockpit side panel - however it requires quite a bit of planning and thought... Work so far (much easier to manipulate without a front spar): Fuel pipes in red Air Bottle for Hydraulics and pneumatics Currently finishing off instrument panel and seat and started on the Sabre.. One question for any other constructors. Part D18 seems to be odd in that the front upper side seems to do nothing. Does anyone think Airfix missed something off the rear of the engine? And does anyone have any photos of inside the flap housing on the fuselage side, the bit that sits under the trailing edge fairing, please? Peter2 points
-
Hi I am posting these pictures at the request of HOUSTON. I apologise for the picture quality, but it was a very dull, rainy afternoon! The CP-140 Aurora displaying at Little Gransden in 2011 was from 405 Squadron, which was a Lancaster Pathfinder unit based at RAF Gransden Lodge in WWII. After the display, the air and ground crew visited Great Gransden Church for a Service of Remembrance. There is a stained-glass window in the church to commemorate the 801 members of 405 Squadron who lost their lives in WWII. After the Lancaster display yesterday at Little Gransden, the formation overflew the site of the former RAF Gransden Lodge in tribute.2 points
-
I built this for a friend, his uncle was a member of the crew of DS813 JI-N and sadly died when this aircraft was lost over France on the 29-07-1944 returning from a bombing mission over Germany. I just hope he will be happy with it when I give it to him. Willy.2 points
-
F-104S “Veltro 1” 246 Italian versions were produced by FIAT (one aircraft crashed prior to delivery and is often not included in the total number built). Forty aircraft were delivered to the Turkish Air Force and the rest to the Italian Air Force (Aeronautica Militare Italiana).[74] The F-104S was upgraded for the interception role having NASARR R-21G/H radar with moving-target indicator and continuous-wave illuminator for SARH missiles (initially AIM-7 Sparrow), two additional wing and two underbelly hard points (increasing the total to nine), more powerful J79-GE-19 engine with 11,870 lbf (53 kN) and 17,900 lbf (80 kN) thrust, and two additional ventral fins to increase stability. The M61 cannon was sacrificed to make room for the missile avionics in the interceptor version but retained for the fighter-bomber variants. Up to two Sparrow; and two, theoretically four or six Sidewinder missiles were carried on all the hard points except the central (underbelly), or seven 750 lb (340 kg) bombs (normally two–four 500–750 lb/227–340 kg). The F-104S was cleared for a higher maximum takeoff weight, allowing it to carry up to 7,500 lb (3,400 kg) of stores; other Starfighters had a maximum external load of 4,000 lb (1,814 kg). Range was up to 780 mi (1,250 km) with four tanks. This is the Hasegawa 1/48 kit built useing the Aires resin cockpit, and painted using tamyia paints, hope you enjoy2 points
-
Kinetic's Lion with Aires exhausts nozzle. I used also smal PE from Eduard. Markings for US Marines.2 points
-
That file, Maybe you were thinking of Tricorn hats from your Navy days? There was interest in the German steam engine builds on here, So I think your carriage build would generate a following too. Start with scale bottles in the bar & build the coach around them.2 points
-
Hi guys Here is one of my works, one of my favorites too... Its not new but i think that you are going to like to see it During the painting process the kit fall and... at the end everything went ok!!!! Thank you for watching. Best Regards. Vitor Costa2 points
-
Thanks a lot for the encouragement Val much appreciated......... Anyways ...moving along .... Just before masking Masked, primed and preshaded.....hope to start the camo soon..... happy modeling folks and best regards mr b2 points
-
Cheers chaps Scale? not a bad idea, next time around OK but... I am a poor old pensioner you know so I'll see if I can scare up a 50p coin instead I have been working on the bigger bulgey canopy today, if you remember yesterday's pictures I put a layer of Milliput OVER the Airfix canopy and shaped the new bulgey bit Polished it all up this morning and shoved it onto my home brewed vac former Fired up the gas lamp and shoved 240 AC into Henry, the garage vacuum I have been trying to get to like PETg, like Mark and Steve but I am not over keen, a search for acetate commences tomorrow at my local Artists Supplier Vesey Arts centre who say they have it (on their website) PETg seems to be very hard and quite unforgiving to the old fingernail for extra detailing method I use but I did manage to get a decent pull off the mould Which is good because the buck mould just kinda exploded when I tried to pull it out of the cooling down workpiece The extra Milliput pieces stuck into the workpiece and the Airfix canopy leapt out of the Milliput strengthener body Might have been a disaster, but the one piece it gave me seems OK I have cleaned out the Milliput and its odd residue, washed the piece and carved the PETg to shape, removing the un-needed bits I have sanded the surface ripples that the faulty moulding left on the flat piiece, polished it with my nail buiffing kit and then dipped it all in some of my old school Johnson's Klear I don't have much of it left but I'm still not entirely sure of the Humbrol substitute, so it had to be Seen here against the monitor screen picture of a real Scout for comparison What do we think? I like it because its not as flat as the kit part and the domed area looks about right The upper portion has fogged a little in the picture, for some reason it doesn't look fogged in real life As the upper bit is due a coat or two of transparent blue when I have been to the LMS tomorrow I don't think it will hurt Here's the front view, the clear screens look OK to me and the domed shape shows well The nail buffing pad from the 99p shop is here supporting nobly, the model. Four of these for 99p, great bargain Also been trimming the rotor head details so they will miss the engine under power The engine will be slightly higher at the rear when it's all ready to go but generally looks OK I think . Tonight I have been mostly plotting the fitment of the JPT probes and the unit they will be fitted to that hangs between the jet pipes, practically in mid air night all .2 points
-
Well I think thats all the paint done Thank`s for looking2 points
-
Fantastic, it's given me some inspiration to finally finish my bridge, it's been sat gathering dust for to long.2 points
-
Wing spar update. I have decided on the method to glue the cockpit/engine/wing spar assembly to the wing bottom. I have not checked the wing spars in my other kits to see if they are somewhat warped like these, but usually long thin expanses of plastic do not tend to hold their shape without some sort of persuasion. The chin radiator must line up correctly with the wing so the body work around it will fit correctly later. I think rather than glue everything at once and try to get it all lines up at the same time (a dangerous proposition my gut tells me), I will do it piece meal and over time. So, I have glued the cockpit/engine assembly to the lower wing section and left the wing spars loose in the breeze. There are some positive location holes for the cockpit/engine assembly in the lower wing and it looks like the chin radiator assembly is sitting where it should be in relation to the lower wing. I used just regular plastic model cement for this step as the location tabs are very positive. This I left for about 2 hours before I tackled one of the wing spars. There are 4 of the spar sections (2 per wing) that need to be put in place. I started with the forward port wing spar first. I layered on some thick superglue slow acting gel so I would have time to maneuver it into position. Once it was absolutely positive it was in the correct position, I hit the spar with some accelerator and left to dry for a couple of hours just to make sure. Each spar is being done in turn; with the starboard forward spar next. By the end of the day all the spars should be tucked in their proper place. This method is a bit time consuming, but I think if this step is messed up and the cockpit/engine assembly to bottom wing and/or the wing spars are not positioned correctly, alignment problems throughout the rest of the build will occur. When everything is in place I will do more pictures. As always, all comments are welcome.2 points


This leaderboard is set to London/GMT+01:00