
Leaderboard


Popular Content
Showing content with the highest reputation on 26/07/14 in all areas
-
Hi, everybody! Let me present you my next model.11 points
-
Finished this last night, the Special Hobby Blackburn Roc: I enjoyed building this very much, though it was not without its problems - mostly caused by me, I had a disaster with the turret which was at least 50% my fault and resulted in my having to replace it with the turret from the MPM Defiant, which fortunately fitted perfectly (as it should do, of course). I replaced the gun barrels with Master brass ones, they are very beautiful and I think they were worth the expense. The aerial wire is lycra thread, apart from that it is OOB and went together surprisingly easily and well - I was expecting more grief from a short-run kit but I suppose there is a lot less difference between a mainstream kit and a short-run kit than there once was. There are several very interesting and varied colour schemes with this kit, any one of which I would have been happy with but I chose one from 806 RNAS based at HMS Sparrowhawk at Hatston in the Orkneys in early 1940. I used Precision Paints Sky Grey, Dark Slate Grey and Extra Dark Sea Grey for the camouflage, the black underwing was a mix of Humbrol 67 and Revell 8 and the white underwing was a mix of the sky grey and Humbrol 130 Satin White. Varnish was a mix of Xtracolor Flat and Satin varnishes at about 3:1. Sorry about the quality of the pictures, that's my fault. I'd like to give 'Navy Bird' a thank-you for his well-written and illustrated Skua build here which was a mine of valuable information as well as a good read and provided some useful pointers and warnings - thank you Bill Cheers, Stew11 points
-
This SHAR was ready more or less 6 months ago and was kept in a box all this time, hasn't been my best year in scale model production because I am almost done with college (finally), and i haven't found the time. Good kit, some errors in the instructions, the only thing I could complain about is the trench-style paneling, this model belongs to the first batch of airfix new molds. OOB with addition of an AVM Seat MB Mk10 and a needle for the pitot tube, Scratch in cockpit and landing gear. Tactical markings for 700A Fleet Air Arm, stationed in the RNAS Yeovilton circa 1979, before the Falklands conflict. Hope you like it!. Best regards from Chile.10 points
-
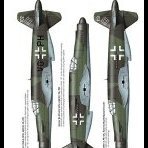
I've had an urge to build one of these for many years after seeing one built up in the Malta War Museum as a kid. Finally took the plunge and here it is. Initially, it was a little daunting with it's industrial qualities as I'm sure you understand if you've built one of these, but despite getting RSI from all the sanding and filling, I'm quite pleased with it! I purposely used the external armoured windscreen as I wasn't too happy with the shape of the correct part, but I never noticed the reversed camo scheme on a picture of the real aircraft as I followed the Airfix instructions which are wrong (Thanks for TonyOT for pointing this out, but I decided to leave it as it is). I also made a boo boo on the alignment of the wing roundel, but Theanorak73 has kindly offered to help me out with a replacement as it is too obvious to leave as it is. The only real issue I came across was the fitting of the tropical intake as rather than replacing the original part, its designed to fit over the top of it. Much filling was necessary to tidy this area up. Paint was Gunze Dark Earth & Mid Stone with Xtracylic Azure underneath. Weathering is a combination of a panel wash, oils and pastels. No aftermarket was used, any extras were scratch built. You can see the build HERE. The aircraft: ER120 / VF-D was an aircraft operating with the 5th GS / 52FG over Tunisia. It suffered flak damage on the 9th april 1943 whilst in combat over Kairouan, Tunisia with Eugene Steinbrenner at the controls, and force landed. Fortunately it was recovered and repaired Hope you like the old beast! Edit - fin flash overpaint and new decal applied to the upper wing, thanks to Crag (theanorak73) Thanks for looking Neil8 points
-
Allright..... Finnished my Diorama completely....the sign is in place...this one got number 12.1 (twelve finnished build and one first dio).... made couple of vintage pics on this one...well im not the gratest photographer...but still learning....had to go automatic...and it were ove 30c outside..... enough talking and over to the pics...8 points
-
Hi, Ok build number 9 of 2014 is my take on the new F-16 from Tamiya, Anyone who has built either the 48th or 32nd scale kits will be familiar with the kit, It just a simpler version in 72nd.still it took longer than expected to finish! Built out of the box with nothing added what you see is what you get, no drop tanks etc included in this one! The model depicts the jet that was on display at RIAT in 2011 from the 52nd fighter wing Spangdahlem Germany. Kit decals were used. As always comments welcome Enjoy the pics, Thanks for looking, Rick G7 points
-
Zvezda kit with Small-stuff conversion. IMHO, the kit is brilliant and the conversion has everything you need in it Build log (if you can call it that) can be found here : http://www.britmodeller.com/forums/index.php?/topic/234962975-1144-tu-134ubl-and-another-dc-8/#entry1663980 Regards mike7 points
-
Contents no longer available6 points
-
Hi everyone, thought I`d show you some pic`s of my just completed Hasegawa 1/48 Corsair II Finished in the 2nd decal option in the box, to represent an aircraft of: US Navy `Stingers` VA-113, USS Ranger, circa 1974 The first option being the same aircraft in Bicentennial markings 1976 Mostly OOB as usual, just added some seat belts and... some weapons from the stash. Hope you enjoy, Thanks for looking, Cheers Russ6 points
-
Hello All, My interpretation of 79 Sqn RAAF Spitfire VIII (yes I know the kit is really a Mk IXe). Fun to build and fun to paint -- happy days! Thanks for looking and thanks for commenting. Good Modelling all Ian5 points
-
The Fin is also a nickname for the Tornado, I believe, on account of its small and unobtrusive vertical stabilizer.5 points
-
Accurate Minatures kit OOB, using the supplied masks and decals to do "Dora". "Dirty Dora" was apparently named after a woman met on leave by the pilot who had a 'colourful' sense of language. The woman in question did get to see the aircraft after the scheme was applied, and was singly unimpressed. Painted with Gunze Acrylic for the Olive Drab / Neutral Grey, weathered with Mig Oils, True Details acrylic resins and pastels. Fun kit - only closing the fuselage and the dorsal turret causing any real problems Built thread is available here Peter4 points
-
As a slight distraction from normal modelling I picked up on of RetrokiTs latest Minion kits whilst at Smallspace3. In a bit of a mash up between Despicable Me and Star Wars the first of a small series is Darth "Bannana". A 3 piece resin kit that stands about 2 inch tall, the only parts you need to supply are the light sabre blades and Domi helpfully suggests using stretched sprue. I had a bit of plastic rod that I used for the light sabre and gave it a base of silver then a couple of coats of clear red. Normal minions are yellow but I am reliably informed by my daughters that the evil ones are purple! RetrokiTs are developing a nice range of movie Minions and soon to come are Arnie, Freddy, Scream and Jason as well as R2 and a Dalek!! Thanks for looking. Cheers, Warren4 points
-
Hello my friends, this is my second Me-262 build, first one has a associated build with one of my students that build a Hobbyboss 1/48 Recce variant. This second one is the awesome Tamiya kit, Paint work with K4 Acrylics, Weathering with Mig Jimenez and Refrences from Mushroom Model Publications (MMPBooks) andOsprey Publishing. The kit represents the "White 3" an Me-262A1a Wk-Nr. 500071 from the 9/JG7 flown by Fähnrich Hans-Guido Mütke and home based at Bradenburg-Briest in April 1945. The "white 3" gained notoriety when it forced-landing in Dubendorf on Neutral Switzerland on 25 April 1945 when Guido Mütke fly a intercept mission against US Medium Bombers in Southern Germany Area. The aircraft has unassembled and Switzerland technics make deep studies specially about the Jumo 004 engines. The "white 3" come back to Germany in 1957 where has displayed on the Deutsche Museun in Munich. (From the book: JG7 of the Osprey Publishing Elite Series). Hope you enjoy... Cheers, Vini Pompeo.4 points
-
An early RAAF 75 Sqn machine sporting a trial scheme that increased the size of the protective coatings on the leading edge of the wings and fin. My research suggests only this and perhaps one other aircraft trailed this approach. Minor mods included drooping the elevons and the addition of brake lines and a resin seat. Model finished in a combination of Tamiya's AS-12 straight from the can for the aluminum, Alclad II Chrome Silver for the rear portion of the nose cone and Gunze for the remainder. Decals are a combination of the kit, Southern Sky Decals and PJ Productions french boxing of this kit that provides the basis for the red spine and intake scallops, in addition to the Cyrano II nose cone markings. The intake decals had to be modified to provide the correct shape on the undersides as they were different to the French application. Primary reference was the masterpiece work by Mason and Mottram - Mirage IIIO Colours and Markings. Trust you like it... AGW..4 points
-
Got up this morning and I wasn't as happy . . . so further touches The white foam has beeen picked out in pure white The aerated water from props has been picked out in paler/greener blue I've used acrylic structure gel to give more bulk to the foam and tiny wavlets over the sea. Tried it before and it acted like self levelling compound, I guess because of the heat so base and gel went in fridge ;o) Happier now until tomorrow morning lol Brian, details to follow Thanks for looking, hope its looking better Cheers Kev4 points
-
Canopy fitted and framed - Airfix offer a much better Mk IX.4 points
-
Hi all Finally got my first 1/48 Frightening finished today. It's been a decent build tho I struggled big time with the canopy. It didn't seem to fit, so I filed it "a bit" then it definitely didn't fit so had to build it up again, a new experience! Also tried Revell Contacta Clear to secure the canopy, didn't work for me......tried plastic cement (runny) not much better, gave in and used superglue, worked great and then misted the canopy DOH! WHAT IS the best adhesive for canopies??? Lots of stencils which I actually quite enjoyed doing tho it took some time. They give a great effect I think. Tried some new techniques too. Pre shaded panel lines.......and then put too much top colour on and nearly obscured the shading! Drilled out the port and starboard nav lights and then painted the inside with Tamiya Clear colours, I'm really pleased with this. I tried Bare Metal Chrome foil for the first time on the intake ring and was happy with the very shiny result, certainly better than any paint, tho I did get a couple of small creases in it trying to fold it around the complex shape. I sorry to say that a couple of very tiny aerials got lost to the carpet muncher........ The colour scheme is not exactly as per the instructions, Barley Grey/ Light Aircraft Grey demarcation is low on the fuse at the wiring trunking, gun pack is silver with black lines. This came from pics of this aircraft in "Lightning" Ian Black, Airlife Publishing". I think this scheme was just prior to the airframes retirement? It's taken me a while to complete and isn't relevant to my theme of US Navy jets from the Cold War, but the Lightning is my all time fave aircraft and brings back very happy memories of Mildenhall in it's heyday. Hope you enjoy. Criticism is very welcome, please be gentle! There's still a 1/48 Airfix F1/F3 in the stash which I salted away years ago, saving that for a gorgeous 56 Squadron Firebirds build at some point in the future :-) Next Up Monogram 1/48 F9F-5 Panther kit..... circa 1989........? Less bits than the lightning! TonyS3 points
-
With a lot of talk in the forums lately about 1/72nd Lincoln conversions, it inspired me to dig out this Contrail kit of this 'woefully under-represented in kit form' aircraft. I love vacforms (and challenges!) so thought I'd give this old classic a whirl. There's lots of scratch-building ahead, as I have no interior etc. but I have bought a few goodies such as Freightdog's wheels, SAC's landing gear, replacement resin engines and have sourced some transparencies from Airfix. Should be fun! What you get in the box (or bag - depends which way you look at it!) Basic kit parts - moulding is fairly crisp with some panel detail present: Landing gear (which will be replaced) propellers (which will need some work but are a good starting point) and some replacement resin engines: Plans and instructions - fairly basic but enough to get the job done: I'm looking forward to getting stuck into this one! Tom3 points
-
Hi... I decided to repaint an 'old' Hasegawa Ju88 recently, if for no other reason to try out Humbrol's new Luftwaffe range of colours for land-based aircraft - RLM70/71, having already tried the maritime RLM72/73 already. I've also noticed a few people saying the new paints are a little difficult to work with, so here's my efforts at trying something new. I should also add that my comments are in relation to applying these paints using a paintbrush rather than an airbrush, although I have read that they apparently spray well. The model was given an undercoat of the the standard Humbrol light grey 64, and when dry a first coat of RLM71 (Humbrol 242) was applied. Several threads I've read recently mention the paint is a rather 'gloopy' coming out of the tin, and it is. It really needs thinning out quite a bit. On this occasion, I used a standard brush but previously when trying the maritime colours on a larger aircraft kit, I used a broad, flat brush. Not sure there's much difference as both will do the job; perhaps the slight advantage of the broader brush is it will spread the thin coat of paint a little wider and therefore may cut down the amount of brushwork. A standard brush will require you to go over your initial application a couple of times to ensure it is properly spread thin. I actually quite like the initial result; admittedly there are obvious brush marks but this doesn't bother me as further coats to come will provide a lot more uniformity. Strangely, however, I quite like the streaked effect and even when built upon with successive coats, it has a slight tendency to linger. The first two images below show the initial application to the model and the following two show the kit after about four coats - bear in mind these are very thin layers and time must be left between applications. I gave it a couple of hours between each. Despite this, you will have to be careful as over thinning will produce areas of poor visual appearance; the beauty however of having an accurate shade straight from the tin is that any additional painting needing done does not require the guesswork of a compound shade to try and remedy the situation. Also, there shouldn't be any compromise on the detail of the model's surfaces - because the paint layers are ideally very thin, they don't tend to clog up the engraved detail but I suppose this will be dictated by how may coats you may wish to apply. In the next image, the darker RLM70 shade (Humbrol 241) has now been applied to create the splinter pattern. Again, being a thin coat, it too will leave some brush marks only this time it will be the lighter of the two dark greens showing through. Depending on your preference, you could apply several coats but I elected to paint only one coat of dark green - in hindsight, two may have been better but I don't think it unduly detracts from the end result. In the following image, the depth of each shade is apparent, indeed perhaps brightened somewhat due to the camera flash. On the lower left wing and in the area immediately behind the cockpit, my exuberance with the outlining of the splinter area has resulted in these outlines being more visible than the infilled area, and in the other fuselage area and the right engine nacelle, the dangers of over application are apparent. Neither of these should be overly problematic. If you suffer the same problems, then wait until the area is dry then recoat with the same shade in an almost 'drybrushing' manner, with next to nothing on the brush but enough to build up the uniformity. The undersides were completed with Standard Humbrol enamels of yellow and a compound mix for the pale blue; weapons stores come from the kit but the dive brakes were replaced with items from the Italeri kit as I feel they are slightly better represented. In these last two photos, the completed model can be seen. It was sprayed with gloss varnish ahead of applying the markings; the rudder kill markings should be on both sides of the rudder but I ran out of transfers for this so at present, the model only sports kill markings on the right side. Thereafter, the model was coated with Humbrol's matt varnish a couple of times to produce the finish you see here. Close inspection will show some continued streaking in the final result, but to my mind it is more a case of 'weathering by default' and I am very happy with the end outcome. The canopies had become very dust-encrusted over the years but I have at last found a combination to rectify this - using a cotton bud, apply a coat of Revell's Aqua Colour Clean fluid, which will give instant clarity but this will fade quickly as the liquid dries. However, it will remove the dust. Once completely dry, this taking only a few minutes, a careful application of floor polish with a small paint brush will give you gleaming results. So, in the last image above, a large degree of uniformity of finish has been achieved. The original markings were all replaced from the spares box. An addition machine-gun was added to the forward nose transparency and flame-thrower... yes, flame-throwers :-)... were attached to the rear fuselage under the horizontal tailplanes. This colour scheme appears in the 'Luftwaffe im Focus' edition 19 publication, with good photos of the aircraft and an excellent colour profile of this machine by Claes Sundin. One word of caution, however, is that the profile shows the cowling ring as being yellow. As this area of the engine cowling was coloured to reflect the Gruppe status within this unit, and due to the aircraft being operational with the I.Gruppe, I believe the cowling rings should be presented as white, the I/D colour for I.Gruppe. This was the only modification I made to the colour scheme. The aircraft is shown in the markings of Gruppenstab, I./KG51 while operating on the Eastern Front and although an A-4 subtype, it is clearly shown in photos with the earlier A-1/A-5 straight hinge line at the top of the rudder. Hope you like the images and perhaps the info on the new Humbrol colours will be helpful too. Regards, Paul3 points
-
G'day Rob I tend to agree, I will see what i can manage. If I had seen the replacement 20mm Phalanx resin items that Veteran Models produce before I started I would have used them instead but I will stick with the kit items on this build. G'day folks, I have managed to finish the 5" guns with the addition of the access doors. I realised that I had painted the barrels the wrong colour and fixed that up as well. The aft exhaust stack is almost done, it just needs the antenna attached. I will add these small details at the end to avoid breakages. The hangar bay door s are now done Plenty of fun masking off the vertical stripes! I also added a little more interest to the SPG-62 missile director antennas. The feed horn and receiver were just a thick finger of plastic. Working from pics, I made a new receiver arm using some laminated strips of plastic. The receiver was built up using PVA wood glue and some copper wire added for interest. And now with paint, cheers, Pappy3 points
-
How dare they do that to a model AND its a Spitfire !!! ( i love Spitfires ) Its an outrage !!! Those unsold copies should be removed from distribution and burnt forthwith !!! how dare THEY MAKE A MISTAKE !!!!!! good grief how can this be allowed to stand !! everyone connected with the magazine should be scolded harshly and have their bottoms spanked i say !!!!!! My goodness me we are all experts on this site when we choose to be and our criticism and pomp reaches legendary status nearly every day lately !!! , just as well we don't take ourselves or the hobby too seriously isn't it eh ? because its a hobby and is for our enjoyment eh? and we NEVER get carried away EVER......???? Cheers3 points
-
3 points
-
1:72 Avro Lincoln (with long nose option). What I'd ROOLY like is an updated F.27, but there's as much chance of that as there is of St Kilda taking the flag this year ...3 points
-
Not far to go now. Got the detail bits to do and some paint chipping here and there3 points
-
To be (maybe) a little bit even-handed... if things are still like they were when I last reviewed for SAMI, reviewers don't get their kits whisked off by courier to a professional photographer: you take your own images and email them in. So a scenario in which Mr Hatcher is under time pressure to get the Eduard Spit review in this issue (a couple of months ago, when it was being put together), and the contributor is under the deadline cosh to get the kit finished and photographed seems entirely possible. He rushes to get it done, picks the wrong leg up at crucial moment ("Spitfire wheels are on the OUTSIDE") whacks it in, photographs it and emails his article off to GH. Then Mr Hatcher sees it in his inbox, breathes a sigh of relief that he's got it, takes quick glance at the first front-quarter picture, on which the undercarriage isn't clearly visible just to check it's OK and mails it off to the designer (an external freelance, no doubt, who may or may not know anything about aircraft) and the page (s) is/are designed. At some point a little later, I expect, the reviewer has a face -blanching "Oh Bother!" moment looking at his model, and gets on to GH, who says "Uh-oh -- I'm sorry, it's too late. We don't have the time before deadline/budget to pay for a re-layout/the pages are already at the printers..." and they just have to go with it, knowing full well that they'll both look like numpties and a bunch of people on forums like this will go on and on about it for some time to come... Back when I was a magazine editor, any article layout, and especially the cover, would be looked at by the Editor, the Deputy Editor, the Chief Sub, the Art Director and the Picture Editor, and often be faxed to the author to look over as well, before it was finally signed off. There were a lot of people to catch errors. I very much doubt that GH has the luxury of a big team to support him (in fact I know he doesn't). The only way that modelling mazines continue to exist at all these days is if they are done cheaply, if they effectively "outsource" a lot of work to cheap resources -- like us reviewers who will build a model and photograph it and write 600-1200 words about it in return for nothing but a free kit to add to our already bulging stashes that we have to build right away. So maybe the editor "should" catch mistakes, and maybe most of the time he does -- I can easily see circumstances in which he might not. Perhaps, Jon, you'd like to give it a try and let us know "How hard is that?" when you've done it for a few months -- me, I wouldn't touch that job with a barge pole... Oh, and Paul: "Do your ruddy job" for a magazine editor means "Get the magazine to the distributors on the date you've given them a up to a year in advance and make sure the magazine is put together at or under the budget you've agreed with your publisher and has the right number of editorial pages to fit around the advertising pages that your ad execs have sold, which may grow or shrink anytime up to the print deadline." That's the _job_. (oh, and "don't get sued" is the #1 priority, but I doubt it's such a big problem on a plastic aircraft modelling magazine.) Having nicely written, entertaining text, a good balance of subject matter, and no typos on the cover, mistakes in picture captions or bodge-ups by the contributors is just the icing on the cake; and that icing matters not one jot to YOUR bosses if you mess up your _real_ job... bestest, M.3 points
-
Thanks fellas, A little bit more progress today. The two masts have received a coat of paint, The masts have been put aside for now, so I started doing the fun bits - the stuff that goes whoosh bang! First up, the two Vertical Launcher Systems (VLS) I didn't realise until afterwards that the two systems are slightly different, the forward unit is inclined up at the rear. I assume this was done so that it sits level on the up swept foredeck? Close In Weapon Systems (CIWIS) I added two tiny ammo feed chutes (one to the front and back of each unit) using some scrap plastic and lead foil. The Harpoon ant-ship launchers I have also worked on the 5"/54 Cal gun turrets. I decided I wanted to have an access door open on each one so I cut out the door and scratched up an interior. I did use a couple of reference pics as a guide, but in this scale adding details is closer to microsurgery than modelling so the gun interiors are more 'representative' than factual! I still need to add the access doors. I made these up from some scrap brass, but i need to add a little detail to the inner doors before they can be painted. cheers, Pappy3 points
-
Great little kit of a beautiful aircraft. Just out of interest some while back I built the 1/72nd AMT kit as an in service SAC version for Model Aircraft International and FineScale Modeller magazines, what a beast ! And alongside a YF-12A for size comparison.... Cheers, Melchie...3 points
-
Finished it yesterday and I hope you like it.2 points
-
Almost OOB model with RB-Model metal barrel only.2 points
-
Another kit that i bought dirty cheap, super cheap. I got resin exhaust and weapons barrels from Ultracast and i tackled the joy of a very poor fitting. Otakis have great surface detail but toyish interiors and bad fitting. Thers's a big step were the wing meet the fuselage on the bottom,i ended up filling it with plasticard ans some sanding.I made the antenna mast and seems to be little to big, dont you think. Since the canopy is one piece i didnt put much effort on the cockpit, just instruments decals and tape made seat belts. The decals were sourced from Super Scale Int. and depicted "Dragon Flight" flown by the Squadron Leader Joe Kruzel from the the 9th Squadron, 49ty Fighter Group. Finished with Model Master enamels Anyways here goes, and thanks a lot for stopping by. Cheers2 points
-
Hello, it seems that some Ukrainians modelers came here in these latter days. Think i should join them ) Let me show you my recent project - 1/48 Hasegawa P-40E.2 points
-
ok update for today..... lots of progress on fuselage as both have now had them put together and glues.... insides of wings nearly fully complete lot of detail to add to underaccariage bays....started tro work on cowls as mine will be given the option to place with or without and have begun to add hinges to the gun bay covers for added fun when viewing the model just gotta work out the first hinge on the wing.....hopeing to get to a first painting stage tomorrow although all this added detail might delay myself but my father may have his initially painted...gun bays covers are only sat in place for effect enjoy photos below2 points
-
So not much of an update other than to say ive decided to stick with the Trumpeter kit since a) i really cba to go and Buy a whole new kit for the GB (I have enough in the stash as it is and really cant start doubling up! lol) and having just brought a Metal Replica PKD Blade Runner Blaster AND Proton Pack kit i really don't have the money to be throwing around, So I've ordered a Wood deck from HLJ and Ill be ordering some Brass Barrels and White Ensign generic PE and hope to make a start this week on the Hull, ill be water-lining her and setting in a seascape like i did with KGV. Fortunately since Im representing her at D-Day the 6inch guns had been plated over so wont need to source them, and the Walrus had been removed and Catapult plated over hah, so a bit less to worry about. And Yes Prowler, I paid £29.99 for the kit in the Wonderland Models sale, I also got the Dreadnought for £19 Till next time2 points
-
Hello together, above each ladder on the boxes, there are still these additional 4 rungs here, making a total of 16. And these rungs I'll still need to install before mounting the ladders, as long as I can lay down the boxes on the balsa block. Because if they are then attached only once, nothing more is with touch or lay down. Source: NASA Also for these rungs I made myself a little template for puncturing the holes, because as from the cupped hand is nothing at 2 mm sprouts width and 2 mm spacing. And then I have bent the 16 rungs from 0.2 mm brass wire. Then came the tricky application of the template and puncturing the holes, but this time all in the smallest space. As you come quite nicely into trouble with the needles, as you can see. And here are the first four rungs are trial basis inserted. Dealing with these tiny rungs in the tweezers is somewhat arduous, and before you know it, a rung is sometimes disappeared never to be seen again, but with the necessary calm and patience that's still doable. As far as short for today, then all a great weekend!2 points
-
1:72 Supermarine Attacker, please. Cheers, Bill2 points
-
O ye of little faith... I have even done the proper propiciatory sacrifice to the plastic deity (Saint Hornby the Polymerous) in order to assure the 1/72 Bomber-canopy Canberra being the prime new kit next year: This improved Canberra B.6 (from 1973) languished partly built in the Box of Doom between 1989 and the present - Saint Hornby will surely announce the new-mold (w/o trenches) Canberra B.2/6 before I quite complete it this coming autumn! Cheers, Moggy the crazy bomber2 points
-
Started work on some of the smaller items. The Machine guns: image posting The kit provides two sets of MGs. One all moulded in plastic and a set which can be fitted with etched cooling jackets, the even include a plastic former to shape the jackets around. Next up was the prop: 20mb image hosting In the meantime, I've been applying the lozenge decals. Here's the top wing: upload images And here is the lower wing, tail plane, and fuselage all decaled up and brought together: free image uploading Its getting closer to the dreaded time where I will have to fit the upper wing!2 points
-
I forgot in my original post, some B(I)8's had light aircraft grey undersides, later in their career...2 points
-
ok update for today... engine assembly on both aircraft finished and fully weathered 2 slightly different shades of paint used mine is the slightly darker model.....excellent builds with some very tricky detail to add after fitting engine. I recommend skipping on a few stages to install extra wiring and plumbing to make ease for later as it will drive you crazy although very accurate.. bottom section of wings on and lower undercarriag bays are assembled along with the gun bays again fully weathered and ready to take weaponary see photos below.2 points
-
Hi to all. This is the latest update on the project. After detailed the carriages and canopy, I applied the decals and I made a wash with graphite and this is the final result: and now I've applied my scratched frames: here is a preview of the photo gallery: For more info & pics :http://www.adventurephotomodels.com Thank you for watching this work. George2 points
-
To avoid the work of adding rivets to the wings I decided to add some figures and vehicles. The bomber crew are resin figures from The Armory (very nice). The officer is from the old Airfix set and the ground crew man is from Revell. I hardly ever paint figures but I think I'm getting better at it, if I do say so myself :-) The Bedford truck and the Austin Tilly are from the Airfix bomber re-supply set. Now back to riveting...2 points
-
You were doing so well until you got that bit about not being able to make models. We've seen your Chippie and your JPs, so we just know that's a lie!2 points
-
Revell 1/144 Harrier GR.7. Build thread.2 points
-
Westland Whirlwind HAR.10 in 1/72 scale please. Richard2 points
-
1/48 Bristol Bulldog to the same standard as Wingnut. Peter2 points
-
Has anybody mentioned the Avro Vulcan B1/B1A or,new tool Vulcan B2 or, Victor B1/B2....................................!!! Oh, hang it all, that's THREE votes.........................................!!! OK, forget the above. I'll stick my neck out a bit & vote for a 1/72 VC-10!! Actually, scratch my last!! I'll REALLY,REALLY stick my neck out now for the 1/72 Airfix kit of the coolest spaceship EVER!!! - Fireball XL5! (puts whisky bottle down!!) Allan2 points
-
ok quick update...both cockpit on both models have been completed... little tricky fitting the side walls but once together and with the help of some tweezers it all fit very well. the instrument panel is a work of art in itself with more decals than most small airfix kits come with on the whole kit....moving ontoi the engine and already within 5 minutes filer was needed for some areas. see photos below2 points
-
It isnt that bad. It has some issues but if you go in prepared you wont have problems. The good things is you can just build it and correct as I did or use an older Monogram kit etc.. But overall it isnt bad. BTW- I just picked up the KH F9F-8T and some are calling it "unbuildable" again same can be applied to this one. Just be aware of some of the fit issues adn you will alright!. Hope to get this one written up in a dual build articel with the Monogram F-101B that i built at the same time for a side by side! Steve2 points


.thumb.jpg.d17ff607fc7e89ed057e63fcb6f2a888.jpg)


This leaderboard is set to London/GMT+01:00