
Leaderboard


Popular Content
Showing content with the highest reputation on 21/07/14 in all areas
-
Hello modeller, just finished my Ju 87 D equipped for night operations built OOB from the nice Italeri Kit. Just made few additons in the cockpit and cut flaps to put them in the lowered position. This particular one was based in Ravenna (Italy) in 1944. Painting scheme is interesting and funny. It is basically the traditional german splinter sprayed with random lines of sand yellow. Lower surfaces also have the same but instead of complicate lines there are large irregular bands. I used Italeri acrylics with airbrush, they work quite well and especially for german planes there is the full set of paints available. Comments and suggestions are always welcome. Cheers Andy11 points
-
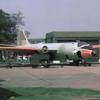
Here is a rather odd Lancaster! Sweden bought one ex-RAF Lanc in 1951 as a testbed for Swedish jet engines planned for Saab Lansen and Draken. This aircraft was designated Tp 80 and flew a great number of test flights 1951-56. However, the engine project was abandoned and instead, it was used for test of afterburners. Sadly, it was lost in a crash in 1956. I used Revell's model (Airfix' was not released when this project started) and a conversion set from Top Gun. I also added some details to the Merlin engine. The Top Gun set was far from good. Poor fitting and lots of small holes in the plastic. I used Tamiya Colours and Vallejo aluminium. Decals came from my own archive. Another oddity is the twin tail wheel, which also is placed behind the location of the original one. The underside of the original had to be strengthened because of the jet engine. The rest is OOB, apart from some invisible extra detailing in the wheel bays... I kept the weathering to a minimum, since this aircraft seemed to have been rather well maintained. A few years after the delivery, it was stripped from colour - but this scheme was more interesting than a simple bare metal finish. A last picture. I hope you like this rare-seen Lanc!10 points
-
It never ceases to amaze me how such ignorance can be perpetuated, sorry Rob I don't mean to be rude but you need to actually do some proper research and reading about the moon landing and the Apollo programme - and I'm not taking stupid conspiracy sites who have no grasp of fundamental scientific principles. As for getting off the Moon they had a large enough engine to lift the ascent stage of the Lunar Excursion Vehicle back into lunar orbit, but most of the vehicle was left behind on the moon so they weren't carrying around excess baggage. The Moon's gravity is something like 1/6th that of Earth and that makes a tremendous difference. Escape velocity from the moon is 2.38 km/s but from Earth it is 11.2 km/s. The moon doesn't have "radiation levels" its not radioactive. There is cosmic background radiation and some from the sun. They did recieve higher dosage levels but they were wearing thick suits that blocked most of it. The levels were higher than in Earth orbit but the moon is still partially inside the Earth's Magnetosphere so that too has a mitigating factor. Check the cynicism in at the door - once upon a time the human race was able to actually achieve amazing things before the Health & Safety, lawyers and accountants crippled innovation.8 points
-
This is the Fine Molds Bf 109 G-6, converted to a photo recon G-8, although some sources list it as a G-6/R2. I believe the weight of evidence favors the latter. The full build post can be seen on this site here: http://www.britmodeller.com/forums/index.php?/topic/234963625-bf-109-g-8-172-fine-molds/ About six years ago, I built the same aircraft in 1/48. Here is the current project with its big brother. Thanks for looking. Comments welcome.7 points
-
I have to say that this kind of discussion saddens me. As Kallisti says, humans have achieved some amazing things, and Apollo was one of them. It requires a particularly cynical level of ignorance to dismiss the enormous level of documentation (film, photos, procedures, designs, tens of thousands of detailed technical reports, actual surviving hardware, etc) and to assert that "it didn't happen". I grew up with Apollo, saw two Saturn launches at the Cape and proceeded to study Aerospace Engineering. Following University, I moved to the USA where I worked on the Shuttle program: there I worked with many who had worked on Saturn and Apollo - much of the Shuttle was adapted Apollo-era technology and it is insulting to those who achieved astonishing results to dismiss their efforts and, in effect, to call them liars. Later I worked the Space Station and other programs and am currently Chief Engineer of a major space company. I say this not to brag, but to indicate that I know what I'm talking about, because I've done it for real. "Sgt Squarehead"'s responses are no more than empty words in a vacuum - every Apollo flight documented the crew EVAs to the maximum extent possible, given that there were only two men there and filming someone entering a suit and exiting the vehicle - something that took over an hour start-to-finish - was an unrealistic impossibility for a continuous take with the cameras of the era and the limited cabin volume. Did the Battle of Britain not happen, Sgt Squarehead, because you haven't seen a continuous single take of Spitfires taking-off, in combat and returning? The point about lunar density ("hollow") is simply ludicrous - the reason the Moon is less dense than the Earth is simply due to the Moon's lack of a nickel-iron core - the same reason it does not have a significant magnetic field. No geologist/selenologist holds the view you quote. If you want to check out all the Apollo video, may I recommend Spacecraft Films, who produce multiple DVD sets of all the available footage, from ground training & building to the flight footage - many hundreds of hours. I can do no more for the wilfully ignorant, except to leave the last word to Wernher von Braun, who responded to such an accusation thusly - "You don't fake a Saturn 5 launch". His expanded point was that it would have been more difficult & costly to fake it all, given that we developed all the flight hardware anyway - and it worked.5 points
-
Hi folks,as the title suggests this machine was apparently based there in 1940,it only exists as a profile I have in an old issue of MAI.an earlier thread I started failed to bring forth anything about it,however our resident team of Hurricane experts did suggest that it,s serial would suggest a fabric winged model.I think it may have been used in calibration flights,I just loved the yellow undersides! Airfix,s lovely new tool kit used.many thanks for looking.4 points
-
This is my only model in 1/48 wich was made couple years ago.4 points
-
Airfix's new(ish) Harrier GR1: Straight from the box using the kit decals, and there are a lot!: Brush painted with Humbrol Enamels, Glosscote for decals, Mattecote for final finish: Nice simple easy build and decals went on no problem, just a touch of Decalfix needed for the roundels on the fuselage: I have the GR3, Sword T4, and a couple of Shars in the stash, hopefully they are as nice to build as this one, Thanks for your interest, Sean3 points
-
Calling it done.3 points
-
Hi Everyone, just managed to finish and photograph my latest build; Eduards weekend edition I-16 Which I finished in the kit markings to represent an aircraft of: Sinkiang Aviation Unit, Dihua airfield, China, 1941-42 Only additions to what came in the box was some seat belts and the undercarriage retraction cables Don`t know a lot about these so probably a few boo-boos but hopefully nothingserious. Hope you enjoy, thanks for looking. Cheers Russ3 points
-
And fuselage stripes using Airfix decals. Various cutouts for the side codes - and they're farther back than for the other option. Just the yellow leading edges to do now.3 points
-
Applied matt varnish, 95% completed. Bye...3 points
-
Sonderkommando Blaich, Libya 1942 Communication and liason hack for He-111 sqn, adapted for desert use. Altho I could have quite rightly weathered the s*** out of this, I decided to be a bit more restrained, just adding wear to the leading edges and wing roots. 100_3712 by devilfish2014, on Flickr 100_3715 by devilfish2014, on Flickr 100_3714 by devilfish2014, on Flickr 100_3711 by devilfish2014, on Flickr2 points
-
This is the old kit from Revell. I think all they did was put some new pieces in their PFM kit to make an MF. Detail is lacking, the cockpit is a mess and inaccurate with the molds and fit are not up to what you'd expect today. Rather than chuck it out I thought I'd just build it as is, for the detail sets would cost more than simply buying the rather nice Trumpeter kit. Mark was nice enough to send me a pilot from the Trumpeter kit and Tony some VPAF markings (thanks guys) and I scrounged some sidewinders from an old Revell F-4E kit to stand in for R3-S missiles as they were pretty much Russian made sidewinder copies anyway. I was meaning to represent red 5040, the MiG 21 nightfighter that allegedly shot down a B-52 during the 1972 Christmas bombings, but I mucked up the masks for the numbers several times and rage quit them, so I'm calling it done. Unfortunantly its a grey old day in Melbourne for taking pictures, as you can see.2 points
-
Boeing 747-200 Thai International Revel 1:144 Been building this on & off for a couple of years now, and finally declared it finished today. It is the Revell E-4B boxing, with decals taken from the 747-200 Thai boxing, supplied by my good mate Mr Stringbag who will be doing the BA version at some point, so kindly let me have the Thai set. I had a problem in that I left the windows open to glaze them with Microscale krystal kleer later as all the windows were cut out on the cheatline decal. The problem was the holes didn't line up very well so progress was slow as I had to section the decal into inch long peices. It could still do with some silver window surrounds, but I haven't been able to locate a set for a 747. One day I will! Here we go; And the obligatoty 'with something else' picture. This time the smallest Boeing in service, the 737-500. Thanks for looking, John2 points
-
When you see the prices those Skeeter kits go for on ebay I'd say I got a pretty good deal Great work on the bubble windows Bill. And I like what you've done with the seats. I've used that airwaves etch set before. It was one of my first experiences with etched metal after market stuff and I found it quite friendly for a novice albeit very fiddly. That was without all the fancy etch bending tools I have since purchased - I'm currently using Eduard's etch set for the Bell 47 - even with all the fancy tools I've found it a real challenge and it has tested my patience some what which is the polite way of saying its an absolute pain in the...2 points
-
Not as often as I used to George, .. not as often as I used to2 points
-
Yes, but the particular accusation about the particular case was incorrect, and if we're complaining about people making sweeping and inaccurate statements, I thought perhaps we shouldn't do the same. For the record, I'm sticking with the Monogram P-61, because I got two for a total of about $20 (not counting the one that's been in my stash forever, now out of reach in a storage unit) and I've always wanted to try swapping parts to make it "symmetrical"- I didn't like the mis-matched engines when I first got one! Based on what I've seen online, I do think Monogram got some shapes better (base of fins, cowling, for example) but while I do have a long history with Monogram kits, I also still remember some of the post-traumatic-stress suffered when it came time to deal with seams. Putty/sand/repeat is still my least favorite part of building! I also seem drawn to kits that people complain about because of "assembly challenges"- I guess I enjoy that aspect of building. But I also appreciate a kit that doesn't require the services of a drywall installer (oops, hyperbole creeping in, just for the fun of it!) At any rate, in this case (2-seat Cougar, remember?!) it's the only game in town, I like the "shape" (of the actual aircraft) and the wild color schemes possible, so I'll certainly give it a go. I don't think "parts fitting together" is too much to ask of modern tooling, though- if Tamiya (etc) can do it, then so can others. I can find enough challenges (I've always been one for modifying/converting) that I don't need extra ones as special bonus features! Ha, true enough for me! (Well, the latter- I don't drive anyone to release.) And if you think about it, if they're just going in the stash, the fit problems are irrelevant! I just hate having stash members made obsolete by newer, actually better kits while they're waiting for me to get on with it... bob2 points
-
Nice joke, George, but that isn't what we're being expected to accept and endorse. The idea is that Hawker's buyer, even though he would have known that biplane production was due to end, still ordered far too much paint of the wrong type; in my stock control days, had I done that, I would have been sacked on the spot. We also have to consider that aircraft were not sent into the paint shop fully assembled, but usually had parts made in various shops (even separate factories,) then assembled, so we are expected to believe that various inspectors, and foremen (who would come equipped with shade cards) missed (or ignored) a succession of wrongly-painted components, plus (presumably sanctioned by management, thereby risking prosecution) several sprayers, confronted with factory drawings, on which the vocabulary numbers of the paint were annotated, totally ignored them and withdrew the wrong paint from the stores. As with all spraying, it depends on the surroundings; several Air Ministry inspections commented on the unsuitability of the buildings, and paint-to-thinners ratios always depend on the ambient temperature. When I was taught how to use an industrial spraygun, the sprayer took less than half a day to pass on his expertise.2 points
-
The paint lifted in several spots. Plus, I do not like the mid green colour at all - way too yellow. I will mix the paints again and respray all yellow areas. The dark green colour is OK. The black green is slightly too black, but acceptable.2 points
-
Thanks fellas, A little bit more progress today. The two masts have received a coat of paint, The masts have been put aside for now, so I started doing the fun bits - the stuff that goes whoosh bang! First up, the two Vertical Launcher Systems (VLS) I didn't realise until afterwards that the two systems are slightly different, the forward unit is inclined up at the rear. I assume this was done so that it sits level on the up swept foredeck? Close In Weapon Systems (CIWIS) I added two tiny ammo feed chutes (one to the front and back of each unit) using some scrap plastic and lead foil. The Harpoon ant-ship launchers I have also worked on the 5"/54 Cal gun turrets. I decided I wanted to have an access door open on each one so I cut out the door and scratched up an interior. I did use a couple of reference pics as a guide, but in this scale adding details is closer to microsurgery than modelling so the gun interiors are more 'representative' than factual! I still need to add the access doors. I made these up from some scrap brass, but i need to add a little detail to the inner doors before they can be painted. cheers, Pappy2 points
-
Thanks KT, here is the rest of tonight's work. I must also thank g-usa for putting me on to the Flory washes, they are great products. I furckled out the bits of damp tissue I had used to mask the underside LEDs: I then installed the lenses using Gator glue: I also did an electrical test and by Jove they still worked!! I removed the liquid masking from the front lights and gave them a bit of the weathering treatment: They need soldering on of course but that is now a job for tomorrow. I glued all the claws and arms together and got them installed: I have realized that they are supposed to act as the landing legs and did look briefly at the option of posing this model on the ground. I think it could be done but would involve quite a bit of work remodelling the legs plus I think this model is best displayed in flying mode. It would be a good project for someone though - it never appeared landed in the films so it would be interesting to see. Finally, here is how the weathered engines look: I am going to selectively brush some areas on those with a semi-matt varnish as that is what I can see on the film prop. There is not much more to do and hopefully I should get this finished tomorrow. Then there is just the base to get sorted out. Bye for now, Nigel2 points
-
Right. The last (I think) of the JP5's aerodynamic 'extras' are done. Slow work but nice to be playing with plastic card rather than PE. The remaining avionics aerials and beacons etc can wait until after its painted. A few flap/aileron/empanage operating levers to add and then construction is more or less done. This evenings aerodynamic extras were the little wotsits at the wing root/engine junction - just little lengths of slightly curved plastic card fixed with dots of cyano and then some plastic weld. Bit fiddly - lots of measuring and marking. And the flat blade type oojemythings under the engine. Again little strips of plastic card. I measurd, marked and scribed location 'trenches' into the bottom of the engine inlets and used plastic weld to glue them in: And the whole set. Not difficult - but satisfying: Oh - and the poor relation JP3 has had its windscreen faired in with Mr S. So far I remain a fan of micromeshing Mr S rather than wiping it off (I promise to practice though Keef ) Steve2 points
-
Well, got the MSG on today using HU165 - some of the pre-shading comes through and I dropped a white drop in and done some tinting for the first time.....not sure if its the fluorescent light, but it looks a bit 'blue'?? Well, next th DSG on bacon slicers, BOL's etc and all the little painting before some Klear: any comments welcome, especially on the colour!!2 points
-
My wife's out of town this week, and I'm finding myself weirdly sentimental. Apparently the third year of marriage is ranked by many couples as the best, and I believe it; mine has been amazing, and I've endured a deadly dull and tiresome job mainly because I know I'll get to come home to Mrs. Procopius and a fat little hedgehog. Suddenly country music has a strange appeal. It's a terrible thing to become middle-aged in the American heartland. At any rate, lots more progress on my sky-hedgies: alcladded the blast deflectors or whatever they are behind the after nozzles, although I'm not very impressed with the results. Got the little nose and amidships clear bits tinted and added on. I'm going to clear coat them soon and then decals, the fun bit! Then the nozzles and landing gear. Also, here's me and Mrs. P; as you can see, I got the better end of the deal:2 points
-
Thanks Iain and Styx for your encoragement. Have got the bird to the "Difficult to handle stage " where everything takes longer and i have to be careful not to put my thumb in the fuselage and dislodge everything. engines now attached . I have used my own blend of zinc chromate made from exotic ingredients found\ in my paint collection . It is maybe a little too much on the yellow side but makes a nice contrast against the greens . A good covering of grey primer has been applied to help prevent any paint lift due to all the masking to be done and some Tamiya white airbrushed on and masked with tamiya tape the reason the air intakes have not been primed is that i forgot to attach them . Lucky i realised at this stage. Now to figure out the rest of the painting sequence.2 points
-
Completed basic painting, we will apply the gloss cote varnish, but before photos ... Bye...2 points
-
G'day Jockster, I will no doubt bog down when I get to the finer details a little later on. Meanwhile, progress continues! I have assembled the bridge superstructure and installed the main decking The fit was surprisingly good. I say surprisingly because a lot of other builds seem to have fit issues at this point. I did need a little filler to fair in the bridge superstructure into the hull sides, but it did not seem excessive. I also added this spacer to the deck. I needed it as it will push out the side of the aft superstructure section which tends to pull in without some form of support. I now turned my attention to the two mast structures. The aft mast in particular had heavy flash and took along time to clean up. I ended up replacing the upper support arms with some plastic rod, mainly because I hate cleaning up mould lines on round sections, but it is also slightly finer than the kit parts. I decided to scratch the support frame for the foremast as I really did not wish to repeat the laborious task of cleaning up all the mould seams again. Apart from seeming to be an easier method, it also afforded an excellent opportunity to clean up the join seam on the triangular structure at the base. cheers, Pappy2 points
-
Hello Please let me share the news on some of the most recent releases from F4Models: 1:72 Royal Navy 1950s-1960s Flight Deck Tractor 1:72 Royal Navy 1940s-1950s Flight Deck Tractor 1:72 USAF 2000s Flight Line Tow Tractor That is in addition to a number of kits released earlier this year: 1:72 Royal Navy 1990s-2010s Flight Deck Tractor 1:72 Royal Navy 1970s Flight Deck Tractor 1:72 USAF 1994-2000s Utility Pickup Truck All kits include resin and photoetched parts. Soon to be available via the big H. More pictures & news here: http://www.f4models.blogspot.com Sincerely yours, Alex1 point
-
Hi folks, returning to BM after a long break, so I thought I'd share my current project……Industria Mechanika’s rendition of Ian McQue's Remora. This is a 1/35 resin and PE sci-fi boat and measures about 260mm in length without all the rigging and jib etc. It is well cast, and required a little work to clean-up before assembly (which is ongoing at ‘slow-time’). Here are some pictiures of the build to date including some cargo items. whats it should look like some accessories and remade some of the masts a scratch build mast/beacon in the background (not sure if this will make it to the diorama I have planed though) some boxes for the cargo, designed up in MS Publisher. some more cargo items (a motor from a burnt out food blender) added a lifting arm (from Bronco's Buffallo kit) at home on a base made by Progressive Engneering. Thanks for looking folks, all the best, Chris.1 point
-
My first attempt at the Airfix F2A. Next up, a Sword T4. Mal1 point
-
I thought that too, but if you look really carefully the nose cone is vented top and bottom and there's a third fan in there - much better for stability Well done on getting to the finish, it looked like hard work but the end result is cool. Looking forward to the RFI shots. Now all you need are piles of tiny skulls for the base... Will1 point
-
Cracking work1 point
-
The doubters should look at this: http://www.amazon.co.uk/Apollo-Springer-Praxis-Books-Exploration/dp/1441971785 or watch this if their attention span doesn't enable them to read a whole book, even with pictures: http://www.amazon.co.uk/Moon-Machines-Region-Import-NTSC/dp/B0026IQTR2 I can only hope that the reason for the lack of further manned missions is that the world has dedicated its limited financial resources to actually building the "B" Ark. May I apply for a position on the selection panel to choose who goes on it, now please?1 point
-
Nice work moggy! John1 point
-
Kent. The new Spitfire will be in a Dogfight Double, but with the recent 109E. The boxing with the 109F contains the old tooling.1 point
-
Looking really nice Nigel! I was the same until I tried them, now I'm addicted. So easy to spray, so shiny, just great! I haven't tried to get a glassy finish on anything, mind, but blending the metallics on hot bits is heaps of fun. Will1 point
-
Nice pic of you and Mrs Pc Harrier is looking good too, can you think of any aircraft that would not immediately look 150% better when decorated with a sharkmouth? Yours is looking stonking... Cheers, Stew1 point
-
Sorry, I got distracted by the clear green paint situation. Hendie, your tail looks magnificent. (I'm wondering how often you hear that compliment?) Anyway, you get the drift.1 point
-
Paint, the modeler's way of taking a perfectly good kit and mucking it up. I have been thinking (always a dangerous proposition!) about paint and airbrushing in general. If you look at the many and various posts on this thread, there a quite a lot of them devoted to problems with paint application and how to fix it. Now these problems vary from bad paint, too much thinner, too little thinner, too much humidity, equipment malfunctions, chemical reactions . . . So here is what I am pondering given the above. You are in a war time situation; your paint crews have been recruited from people with little or no knowledge of painting. Why is it never considered that a particular aircraft, that has a very odd paint job, that is a bit non-standard, isn't just the work of bad airbrushing by the paint crew? If we do it on our little models of aircraft, why is it such a stretch to think paint jobs didn't get messed up at either the factory, maintenance or aerodrome locations? I know it happens occasionally with automobiles as I have seen cars less than a year old with bad factory paint jobs that are splotchy, unevenly faded and/or peeling. (And, with very unhappy owners who are requesting I sue the dealer and manufacturer that sold them their lemon!!) So, if GM, Honda, Toyota, Chevrolet, etc. with trained, professional painting crews, can mess up on a paint job, why is it beyond consideration, untrained or semi-trained war time labor would never mess up? I really don’t think this conversation took place: “Now I know it was Reginald’s first day on the paint line, and I know the boys need this Spitfire as we are in the middle of the Battle of Britain, but this just won’t do as the shades are just wrong. So let’s take this perfectly air worthy aircraft with a slightly off paint job and run it back through the line and get it right!!” Did war time paint suppliers create an idiot proof system of spray painting paint? If so, could they miniaturize it so I can be done with my airbrush woes? Please.1 point
-
Well, I've been left to my own devices tonight, and with the concrete piers for the deck drying peacefully I had a chance to do some work on my Nep': I started shaving/sawing off the various lumps and bumps with my Tamiya photoetch saws and trusty medical scalpels. Then after looking at the fuselage half, I felt like putting in perspective how BIG this airframe is. That is an F6F Hellcat. OK, I also took the opportunity to imagine what it would be like to paint it overall gloss sea blue like Jason had pointed out. I don't think it would look bad, per se, but.... I'm going to really break the rules and go radical with my finish. After the cockpit was set up, I started mounting the fuselage halves together. These lumps still have to go. I might get a little more aggressive than my photoetch saws here. Added some basic gear well detail using evergreen extruded plastic strips in a "C" shape. Like, half an I-beam. And what to do about that nose... Luckily I have had this old Italeri B-25H nose kicking around the spares bin. It will have to get mounted upside-down to avoid looking like something Picasso dreamt up. Please excuse my hasty tape job. After smashed fingers and thumbs man-handling concrete this afternoon I am not the most dextrous modeller... But you get the idea. More trimming to come to get this to line up nicely. That's all for now... Folks.1 point
-
Excellent! It looks amazing.1 point
-
Thanks John, shame the progress is so glacial. Saying that there is some progress. . . . As described I tidied up the carrier deck and gave whole thing a dusting to soften the tie down points. More masking around the UC bays and wing undersides, now vibe found maskol can be cleaned from brushes with water this is a bit easier for small areas (how have I gone on this long without knowing this, what a divvi!!) Anyway I followed Giorgio's advice and used XF-80 lighted about 5-10% with white for the upper surfaces. I recon I looks spot on, thanks Giorgio. Although there are decals for the yellow fin tips I've sprayed them as I can't see them setting on the lumps and bumps. Next job is more masking for the black areas and the red under portions of the slats. Watching the John Sargent lancaster programme on BBC2 whilst spraying the tomcat made me think that my a-model Dambuster lancaster might be next on the build list although the griffin / brengun photo-etch flaps fill me with fear, especially as I've never seen anyone build a set yet.1 point
-
Possibly Sarge, I don't use spray cans a lot, something to watch out for next time, As needs must MM, as needs must Black stripes on, tail stripe and glassy bits painted as well: Now just some touching up to do, and then she'll be put together Sean1 point
-
Brief update - rockets fixed in place: Comments and suggestions welcome. Kind regards, Stix1 point
-
This is what I have to go with. After trying the Eduard PE & Hobby Decal PE MDC, I had no joy. I vacuformed the canopy and used the Flying Leatherneck vinyl MDC. I modified it to look as close as possible to the FRS.1 style, obviously not 100% but I can live with this one. The Flying Leatherneck vinyl is very forgiving and easy to work with, it can be repositioned and it still sticks. There is extra material that can be used to finish framing the canopy too. I wish some one would expand the range of MDC's using this material, PE sucks for this application or I just have no luck with it. John1 point
-
Does that mean we have to take this out of the What-if area?1 point
-
Just for something different, I started with the wings All reviews of this kit agree that the u/c is located too far backward, what they don't agree on is how far to move it forward with opinions ranging from 2-6mm I went for 4 mm I have plugged the original holes with plastic rod, this will later be filled and filed smooth I also attached the intakes at this stage so that I could work on the joint from both sides to ensure there were no steps The intakes were glued and clamped a little at a time, with the result I have no steps, some gaps, but I can work with that Whilst the intakes were drying I glued the nose halves to their respective fuselage halves, again, no steps and no gaps I have no idea what thought process occurred next, but I realised that if someone bent their head at an impossible angle AND used a torch to look backwards into the fuselage, they would see the hollow wing fillet so I added a skin of 10thou plasticard to hide the wing fillet WHY? I have no idea, as I am still not sure if I will have the gunners canopy open or closed. Stay Tuned1 point
-
Hi One-Two, and thank you for the kind words. I use dry Q-tips to remove the paint, and replace them very often during the process. Using thinner removes too much of the oil paint, leaving only stark, too highly defined panel lines. When removing the paint with a dry Q-tip, you can push the paint around onto the surrounding areas. If you build up too much paint in an area that is difficult to access, a pointed brush just moistened with thinner will effectively remove it. The paint dries in about a day, and can be adjusted hours later. Here the flat coat has been applied. This is one of the transformative phases of the build, when the model moves from a glossy toy to a replica. I've used Vallejo Flat/Satin in a 2/1 mix. This was thinned at least 3/1 with Tamiya Acrylic thinner. I am very pleased with these Vallejo overcoats. They spray very effectively and evenly, with no graininess.1 point
-
Instrument panels done.1 point

.thumb.jpg.0b5761b6a47cabdd73ae9d69bbcec86a.jpg)


.thumb.jpg.d17ff607fc7e89ed057e63fcb6f2a888.jpg)


.thumb.jpg.158e2e086d45b8f96b7d93b8bee8dc21.jpg)


This leaderboard is set to London/GMT+01:00