
Leaderboard


Popular Content
Showing content with the highest reputation on 27/06/14 in all areas
-
Mr. Surfacer comes in three "flavors": 500, 1000, and 1200, in order from coarse to fine. They are intended more as primers/surfacers for filling small imperfections prior to painting, not as a general gap filler. See here for a good primer (pun intended) on Mr. Surfacer: http://www.swannysmodels.com/Surfacer.html. There's also Mr. Dissolved Putty, which is an even thicker liquid putty, but again, it's not intended for filling large gaps. It can be brushed on, however, which makes it really useful. For filling large gaps, I'd suggest Milliput, which is an epoxy filler that comes in two parts that have to be mixed thoroughly before applying, and can be smoothed with a wet finger/cotton swab/sculpting tool (Aves Apoxie is a similar product and comes in a variety of colors). Some of the auto body fillers, such as 3M Acryl Spot Putty, make good model putties; these are lacquer based and can be applied (sparingly) with a brush dampened in lacquer thinner. Here in the US, I'd recommend Spies Hecker Permacron Fine Putty and or Evercoat/Eurosoft (also a two-part putty). Both of these are available at auto body repair supply outlets. Tamiya makes some body putties which are said to be quite good as well, although I've not tried them. A relatively new product is Perfect Plastic Putty, a one-part putty which can be smoothed with water, but it is water soluble after it dries so cannot be wet sanded. However, this is reported not to be a problem. Many modelers like to use CA glue as a gap-filler and have had success. But it must be sanded immediately after it initially sets up. I've never had much success with it myself. You can also make your own putty by dissolving sprue in liquid cement or MEK. What's nice about this is that you can control how thin or thick you want your "plastic plastic" to be, you have a variety of colors of sprue to choose from, and once it's set and sanded it takes paint just like styrene plastic, because it is styrene plastic! The best way to avoid large gaps is to carefully test fit parts before assembly. But if you have a very large gap in spite of your best efforts, it's best to try to fill it with styrene plastic rod/strip and liquid cement, allowing it to dry thoroughly before applying any putty. This technique is handy for wing-to-fuselage gaps. Putty, regardless of type or brand, should be used sparingly. The lacquer-based putties can melt through plastic components if applied too generously. You can place masking tape on either side of the gap before applying putty. Once the putty is cured, sand it until you can remove the tape, then sand it flush with the surface. Lacquer-based putties should also be given plenty of time to allow the solvents to evaporate. My rule of thumb is: If I can no longer smell the putty, then it's safe to begin sanding. I'd suggest getting an old kit and a supply of different model putties and body fillers and experiment. Keep notes. You'll soon find a combination of putty and technique that works well for you. Good luck!13 points
-
I finished another model. This time F6F-3, 1/48 Eduard. I hope you enjoy. Regards ajcmac6 points
-
Ok built this some time ago its converted using the Dragon Sherman 3 and the Resicast A.R.V mk1 kit. hope you like.6 points
-
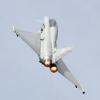
Hello all Just finished the Hobby Boss 1/32 F-84G I've become something of a kit snob lately, building only Tamiya or Wingnut Wings.. But picked up this on the spur of the moment at the Hendon model show for £25 thinking I'd regret it, but.. The kit is a beauty! Excellent fit, beautiful metal undercarriage as an option to the plastic parts, lovely rubber tires (which I know aren't to everyone's taste but they look great to me) & very fine surface detail - an absolute pleasure to build. Minor minus points for the decals which looked a little patchy to my eye, but to be fair I didn't use them & some detail could be added to the interior, but again, easily fixed these days.. Extras: *Eduard Big Ed set - completely transforms the detail levels - well worth it, but not cheap at £37 *Quickboost resin seat - beautiful! *Zotz decal set - nice, but in the end I decided to mask and spray the markings copying from a period colour photograph - but I used the stencil decals and national insignia *Montex masks F-84 set - I just used the USAF & aircraft serial numbers *Alclad finish - various shades *Lots of Tamiya tape! I can honestly say it's been the most enjoyable build I've ever done - and considering I've recently built the Tamiya 1/32 Spit & Mustang, that's surprised me! Not without the usual cock ups though.. Self induced of course.. The primary one was experimenting with the Vallejo black primer - sold as being super tough - but it wasn't - sprayed nicely - looked great - flaked off with masking I was on the verge of binning the whole thing, but I'd spent so long on the interior - I ended up buying another whole kit - which I could now only find for £38! B*#%+*#.... Oh well, you live & learn... Thanks for looking... Cheers Guy5 points
-
My gesture of self-sacrifice for the modelling community - finished just in time Sword and then RS Models released their state-of-the-art Sagittario kits. Well, at least I wasn't then spoilt for choice and yes, I still managed to use a few Pavla parts (however, modified)... Some in-progress pictures:5 points
-
Good day all! Here is my take on the Classic Airframes Westland Wyvern. She is representing 827 NAS on HMS Eagle. Built straight from the box with only a couple of wire aerials added as an extra. I airbrushed with Model Master Acrylics with a matt coating and wash from my own concoction with a bit of pastel weathering. Overall I am quite happy with the effort, no real headaches or disasters. Next up for the bench is to finish the CA Attacker to go with the collection. Apologies for the poor picture quality! I do like the sleek lines of the nose! And here she is nestling into the rest of my growing Fleet Air Arm collection Cheers now Bob5 points
-
I have used this website, and others, for a number of years and have settled down numerous times to follow the progress of another modeller's work on a project that interested me only to find that updates petered out before the model was finished. If the model did, in fact, get finished, there was no evidence of this, and I was left wondering what had happened. Had the project stalled for some reason, or had it been superseded by another kit that had taken the modeller's interest? Then I considered my own modelling projects. Time after time, my project has been abandoned as the results were not up to the standards I had set myself, I had let myself get bogged down with minor detail in the cockpit or elsewhere that my lack of skill did not allow me to recreate or some similar reason. Perhaps too much research had resulted in me deciding that the kit would never be an accurate enough recreation of the real thing. Then I thought how lucky are those model makers who just get on with it and produce finished models without undue worry that every knob or cable has been faithfully recreated or that the paint colours are 100% accurate. I don't suppose for one minute that I am the only model maker who has spent more than the cost of the original kit on after-market products to help make my model that little bit more accurate. Again, I don't suppose I would be the first person to discover that the so-called super detailed after-market part still bore little resemblance to the real thing anyway or was really no better than the original kit part. How many tins of grey(gray) paint does a model maker need in the collection anyway? I have seen some very long and erudite threads on here discussing the merits of various manufacturers' versions of this or that paint colour, even though it has been said more than once that there are so many reasons why paint colours could vary considerably in real life. I think I will join the ranks of those, perhaps more naive modellers who don't really care if their chosen kit is one scale millimetre shorter in wingspan than the real thing, or if parts of the interior that can't be seen on the finished model anyway do not include all the wiring and various lumps and bumps of the original. Instead I will concentrate on just getting the thing completed to a standard that suits me. Then all I need worry about is where to store all the darned things afterwards. Of course I will still follow interesting projects on this forum as I can still admire the skill of others even if I can't recreate it myself. Derek5 points
-
Thanks Les . still along way from the finish ie plenty of time to mess it up . Two quick progress pics first showing the wire that the static lines will be attached to . this is made from some evergreen strip and stretched sprue. took the photo before painting so it could be photographed more easily. It probably comes out more at 1/48 or even 1/32 but i want it to be seen clearly wheen the Airborne are queing to jump so have alowed my self lashings of artistic licence. ler bos The second pic shows the first prop blur attached to the propeller hub . Fidly job og cutting the hub in half and sandwhiching the prop blur between Now to spend some time on painting the cargo5 points
-
Well here it is, a great kit, loved building it and pretty pleased with the end result...4 points
-
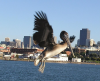
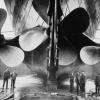
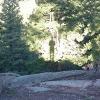
http://www.bbc.co.uk/news/world-us-canada-28065288 Just amazing4 points
-
That's what the wife says about me4 points
-
This is my latest, the 1978 tooling of the Airfix FW "Dora", it's just been reboxed in the newer type red Airfix box and to be honest I was surprised to find 2 and a bit sprues hiding in the corner of the box. So where to start, apart from consigning it to the stash, out came the Airwaves PE saw and Tamiya scriber and set to rescribing the raised panel lines, it's didn't take long because I freehanded the panel lines, using the raised ones as guides. Paint was the same basic camo as my other FW, grey green, grey violet over light blue, using the Humbrol RLM colours, I did some pre shading but gave up as the airbrush is still playing up. I managed to get the mottled cam on, but took ages, constantly cleaning the needle with a cotton bud soaked in thinners, then found out the needle was bent, oh well, much rolling between cutting boards seemed to cure it. Then the OH FFS moment, never try and brush paint Humbrol Clear over paint that hasn't been left to dry properly. Camo on. OH FFS Camo back on, leave well alone I brush painted the Clear on, 3 good coats at the Humbrol matt soaks it up like a hob nob and hot tea, then the decals, I should have had a good look at them first, not one came off the backing paper in one piece, that's a learn, old kits, old decals, coat them in Clear first. Again things went apace, wash was Mig dark wash, only following panel lines. canopy fixed with Humbrol Clear Fix, all gaps filled with paint as I painted the canopy frame, aerial wire is Ez Line added through a hole drilled in the canopy, all fixing done with Asda cheapo superglue, it grabs really well and goes off in seconds. Final bit of weathering done with Humbrol dark earth powder, exhaust stains done with Tamiya master set weathering compact. Hope you like the build, I really didn't think it would turn out as good as this, still scrambling up the learning curve. Regards. Mick.3 points
-
Time for another progress report, In what feels like a massive step forward, I've finished the hull - apart from a few whip aerials, the crane and sea cat gear that'll be added last minute. A few close ups; I'd already painted the flight deck, but I've now added weathering, mid-campaign the photos of the real thing show the flight deck was very stained with markings being barely visible in many places, so I've been quite heavy handed, especially on the landing and parking spots. The in-progress island is visibe in some of the photos, it's surprisingly complex for it's size. Finally, a couple of shots of the ships at sea. Andrew3 points
-
`this chap seems to have managed to get his down in pretty good nick with no wheels at all! bestest, M.3 points
-
Cool! I feel a diorama coming on...... Trevor3 points
-
The World Cup impedes my model making performance significantly. Nevertheless, I made some progress on the armour The gun suffers from significant form offset I decided to replace it with a metal tube from Albion Alloys3 points
-
You don't have to buy anything Allan, the simple answer is to go without . As for throwing money around, it's quite easy, IF you want something that bad, save for it. Sorry if this sounds harsh, but I get fed up with modellers bleating about how expensive this hobby is (generally it isn't) and moaning about smaller manufacturers like Alley Cat for charging for their services (they're not a charity,) As for Airfix producing an early Lightning, well who knows, BUT to do so would mean a brand new tooling for the most part. And do you think Airfix are likely to tell you their plans for next year and beyond.? That's unlikely that's what their Advent calendar is for!3 points
-
I spoke to Airfix customer services a few days ago. At the moment Airfix don't have any Lightning canopies to give anyone. They had a batch of replacement canopies shipped in to send to customers who got defective parts in the kits but the replacements were affected by the same problem so they have stopped shipping them out until the problem is resolved. They are talking about re-tooling the canopy mould to fix the problem but they could not confirm if or when this would be done.3 points
-
HEY ALL, A quick update today. I have started to test fit the Ventilation Fans. I still have a ways to go on the fan section of the build, but to break up the monotony, I have started to test fit the fans. This is the Ventilation Fan that vents the space next to the engine. In this photo, you can see the painted space on the floor. This is where one of the engines is to be placed. This is the test fit of the Diagonal Ventilation Fan. This fan helps to vent the space where the 750 kw DC Engine Generator set is located. Thanks to all who like the build! And all for great comments! I'll post more info later. Thanks!3 points
-
Howdy all. Hopefully you will not mind someone from over the pond joining you in this build. I plan to make one of Eduard's little gems in the form of Mk.IXe, MK329, flown by W/Cdr J. E. Johnson, CO of No. 144 Wing, June, 1944. Yes this is the one from the Eduard Royal Class with the beer kegs, who does not like the idea of inflight beverages! I will be using the Mk.IXe over-trees, with bits from the royal class box as needed. I like this one, and it will be my second spitfire with invasion stripes. The first one was...,not good, so hopefully I am a little more experienced. I have already built one in Czech markings from the Eduard "Boys are Back' edition and it went together wonderfully, so I do not see any problems. I am sure everyone is aware of this kit, as a few others are building them, so forgive me for not posting shots of the sprue trees. More photos of the build to follow. Thanks.2 points
-
To Tamiya's wonderful Jagdpanther I added a metal barrel, some metal tracks, and a set of etched side skirts, I also replaced the kits plastic tow cables with picture wire. The camouflage scheme was done with Tamiya acrylics and weathering was achieved with various filters and washes with chips and scrapes applied. The figure is from the kit, painted with Humbrol enamels and I used Tamiya's uniform badges decals. image hosting 15mb how to screenshot on windows 7 image url upload photos image hosting no sign up upload pics image hosting 30 mb image hosting photo hosting image url img host Thanks for looking2 points
-
This is just a basic, out-of-box build with no lighting as I've yet to venture into the world of electronic wiring! My original plan was to aim for the pearlescent effect seen on the TMP studio model, however I couldn't get my pearlescent medium to airbrush very well, so I hedged my bets and settled for the coat of Tamiya pearl white spray that I'd applied over a white undercoat. The end result is a little on the light side compared to what we see on our screens (and not as beautiful!), but I'm reasonably pleased with the pay-off, and the old gal still looks fine in white! At first I'd considered a panel wash, but thought twice and decided to let the model do the talking due to the scale. Next step was the kit's extensive Aztec decal coverage, which visually I am extremely impressed with; however these were the hardest decals I've ever had to work with. They were very brittle, and I couldn't get them to slide very much, so there's a few mistakes in there. A coat of Revell acrylic matt varnish smartened things up nicely. Next, the clear parts for the nacelles, deflector dish, torpedo launcher and impulse engine were airbrushed with Tamiya clear paints. I installed a paper screen inside the deflector housing to hide the models innards; I painted it in an attempt to mimic a glowing effect, but it can't be seen very well through the shadow and the dish part. Overall the kit was a joy to build and a challenge to finish - the decals are well worth the frustration as they lend a feel of authenticity to the model. Thanks for looking, and as usual any comments etc are most welcome. Regards, Ross.2 points
-
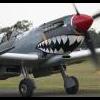
This P-36 is the new Academy re-release of the relatively old Hobbycraft kit. This kit has pretty good moulding and recessed panel lines, but it is pretty rudimental in cockpit and engine/engine cowling area. The plastic is molded in light grey with nice and clear transparent parts. The overall fit of the kit is good considering that this is pretty old mould. Some filler is required here and there. I was very surprised with good fit of wing/fuselage parts. The worst part of the kit is engine/engine cowling/armament area. Details are very bad and some surgery is required to match the references I could find. Engine is easy available - just take a look what Quickboost has to offer, but cowling and armament bulges has to be modified. I added some wires to the engine. Looks good enough for me. I decided to cover most of the cockpit area with pilot figure so I’ve used Eduard zoom set which is great because it contains some crucial exterior parts. Clear parts are tricky to install. They have to be glued with “non fogging” glue. I had Eduard masks, but they are incorrect for these parts. Markings are the main reason why I’ve decided to build this model. I was always fascinated with the story about Phil Rasmussen and attack on Pearl Harbour. When I saw this boxart, I knew this would be my next build. Decals in this box are from Cartograf, and that means that they are great. Colors used are ALCLAD II Figures are from the various Hasegawa sets - heavily modified. I tried to make a scene when Phil is enetering this plane in his pajama, and ground crew is looking for cover after they prepared his plane for the flight. Enjoy2 points
-
Fairchild Aviation Corporation Type 91 mod. A 942-A c/n 9401, NC-14743 "VIRGEN DE CHAMORRO" Spain February 19382 points
-
Here is the very detailed but tricky shortish run Multi media kit from AZ with a wing fold set from Airwaves, and number of correction sets - spinner and prop blades, cannon barrels and main wheel along with a Vac formed Canopy from Barracudacast. Decals were kindly donated to me and were spares from a Grand Phoenix Firefly, and rocket rails came from the spares box courtesy of a Tamiya Mosquito with the blast plates coming from the same place, this time ex Tamiya Beaufighter. I fashioned the clear wingtip nav lights from Super Glue and the leading edge landing light was scratch built with the cover coming courtesy of a spare from a CA Fairey Battle. The wingfold tie rods are from stainless steel pins. The decals came from an original Grand Phoenix boxing of the kit kindly donated to me by a fellow modeller. As usual it is finished in Acrylics, using Xtracrylix for the Sky and Dark Slate Grey, with Gunze providing the Extra Dark Sea Grey. Flory models washes we used along with Tamiya Weathering pigments and Tamiya Smoke for the weathering. Tamiya Xf-86 Flat Clear sealed it all in. And on to the pix, hope you enjoy them. Thanks for looking.2 points
-
As requested by some kind fellow, i have attached some pictures of my Stratocruiser. The bottom two are of the finished model complete with antennae. The legend Cpt.Ron Sears is a small tribute to one of our best modelling friends who is sadly no longer with us.2 points
-
Bit out of my comfort zone here as I normally do aircraft. This is the Tamiya kit straight out of the box with just a touch of wear and tear. I'm getting to like these kits more and more as they really are shake and bake. Anyway on to the pic's. Hope you like what you see. please fell free to comment. Thanks for looking Dick2 points
-
Thanks fellas, Pete I've tried all that !...though I'm a rugger chap I even had her watching the England comedy soccer lot doing their stand up, (fall down, roll around, scream a lot) routine the other night. She got the hang of the England plan quickly and screamed at the telly...'go on my brave lads boot it up the park...some bu**er'll get it' , but she got so depressed that I turned over fairly quickly and watched Coronation Street instead !!.......nuff said..... Well had another long fight with the scrap box and my ever failing eyesight today and I've managed to finish the tail bumper which needed resizing, a new extention piston and detailing, But most of the time was spent on the navs anti blast screen...something that looks fairly simple at first glance turns out to be anything but ! It's actually quite a complex affair. The air con nozzles run through the perspex and the hoses will be fitted later. I had an idea for the glazing a while back...namely a seamless clear plastic bottle that had the correct cross section built in as I needed fairly thick clear plastic and I didn't want to be bending it and creating stress crazing. I duly emptied the Mem's much coverted Focus cleaning product, (held in the same high esteem as our equally beloved original Klear), down the drain and set about utilizing it for it's true purpose. Cutting the stuff was another matter but a sharp scalpel, band saw and stoic determination saw me through...(not a band aid in sight !), Funnily enough I didn't use this bit !! Then it was bashed into one of these, Some beading needs to be run around the top of the glazing, some more wiring and a few red/green lenses and then it's off to the paint shop.... All checked against the cockpit and thankfully it fits perfectly...........more luck than judgement ! Next will be the bracket mechanism that goes between the glazing and the seat..(more small stuff......my poor eyes !)... Melchie...2 points
-
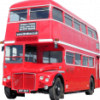
I jigged up the chassis ready for painting like this: I am having a Jerry can overload (three on one side, five on the other and two on the running boards), here they all are ready for paint. The two on the running boards are a slightly different shape to get them to fit so I am keeping them separate: I also threw in an oil drum for extra interest value. So ahead of schedule, everything is now ready for some paint: It all looks quite different with some primer on. I used Alclad grey and white as appropriate: You would think I would learn but no. During clean up I dropped this on the floor and rollered my chair straight over it: I will have to have a think about how to repair it. I dug out all my yellow paints and selected the Humbrol matt 24 as I thought the others were too orangey. I think I will paint the oil drum orange and I might be able to find a nice decal label for it: I got some silver on the lights and rust red on the exhaust: I used four different shades of green on the Jerry cans as they always seem to come in slightly different colours: I used Humbrol 117 (US Light Green) for the cab interior and 105 (Marine Green) for the canvas canopy. I used the same green on the interior of the cabinet as the cab. Note that I left the mounting pins for the door mirrors slightly proud for extra interest value, they could be switches or sumink: I am down to the dregs of my Extracolor Tyre Black and it has gone a bit funny, I still managed to get some on the wheels but my airbrush was not happy: Here is the chassis and the tanks after clean up: With just the lightest of dressing of the tank seams I think these are now good enough for the yellow top coat. I am going out for a curry later with three other Britmodellers (Duncan B, Col. and milktrip) but I still hope to get some more done after that. Bye for now, Nigel2 points
-
I joined the tracks some time ago, but they both either broke or nearly broke at other points, so I glued those together yesterday with superglue. I assembled most of the turret last night. I'll keep it buttoned-up. If I ever do another Chuchill, I may use the AFV Club item and tart up the interior but there's no point opening up a big model if there's nothing to see inside IMHO. Need to respray some dark green, spray and wash tracks and bogies ... It's a lot closer to completion than it presently appears. Progress Pic:2 points
-
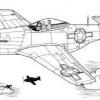
After a dog fight over the English Channel, Squadron Leader Rif Raf finally puts one over on his arch enemy, Luftwaffel Fighter Ace Weiner Moldy. After belly landing in a field, Rif Raf gives a victory fly past & waves his German comrade a gesture of er.............."goodwill" Finally got round to grabbing a few piccy's. Built this pair of Chrissy pressies last year as my "escape build" when I needed to get away from more serious modeling matters. Great little kits that use the same basic fuselage with different tails, wings, props etc.Scratch built the wheels up on the Spit & fitted some dummy blanks under the 109 as its almost impossible to see under the wings, I re-modeled the exhausts etc on the 109 & decided not use the Super charger that comes with kit, drilling some gun ports instead.109 decals are as the kit apart from the swastikas, Spit Roundels were masked & painted on upper wings & fuselage as I didn't have any spares of the size. Got an old school van on my bench to do & I'm after the Barons Funfdecker or Lucky Pierre if I can lay my hands on them unbuilt or otherwise. Anyway on with the pics. Cheers Mac [/url] [/url] [/url] [/url] [/url] [/url] [/url] [/url]2 points
-
I know where the OP is coming from. As someone who has been a long time lurker on many forums and making a stash that's every growing, I now feel I can get on with a kit and not really care if it turns out OK or not. I too set my personal bar to high. But now i have my semi dedicated modelling area set up have just produced my first finished aircraft kit since being a kid...... Technically, I didn't even build this, my daughter did at an Airfix event. I just wanted to finish it of for her (and me) so I can I could get to grips with airbrushing.2 points
-
Hello, very nice kit from Airfix. Easy build for everyone. Camouflage is Spitfire F.22(ex RAF PK355), 1. Squadron, South Rhodesia, Crandborne 1951-52.2 points
-
Well if we get a usable canopy out of this I'll be a happy man with my faith in Airfix restored. Duncan B2 points
-
Like thw liney at Northolt that was told to paint the tractor/tug for AOC's parade - he painted it pink. It looked really .....different.2 points
-
Got it Phil! Thanks, prolly missing a few other scribes. Going to review the drawing in SAM's SHAR book before priming & do what I can. Working small access panels & other glue ons tonight. The fences took an evening to fabricate and and set in place. A little clear colored resin for the nav lights. Here is a little FYI: The Q sprue for the Hasegawa F-111 has a clear window for the Pavetack Pod. If you did not use this part, it has a shape similar to the starboard side camera window. It just needs a little reduction, thinning & polishing.2 points
-
Thanks for the comments chaps. A little more progress made today. Turret just about done now. Had to reinforce the hatches as they had several gaps and the hold wasn't that good. The metal barrel in place. Its since dropped off! Just would not stick! Will sort it later. Lid sat on the hull. Tools to add and then on with some paint. I'm not going to fit the track grousers to the turret due to a lack of patience and fat fingers! BUT.... I'm getting a bit balls'd off with it if i'm honest. Typical AFV Club kit being over engineered and frustrating to the point of wanting to introduce it to the wall It may get shelved for a while and I might have a bash at a nice simple Tamiya Bren Carrier or Churchie VII Regards, Steve2 points
-
Hurricane Mk.I (V7607) coded DT-H of No 257 Sqn RAF Coltishall, November 1940. Quite a few pics of this aircraft over at the IWM. Note the Squadron badge of the Royal Air Force Ensign with the roundel replaced by the Burmese Symbol of Chinthe sejant on the starboard side under the cockpit canopy. Probably most familiar in the following photograph : This is an old 1/48th model from Airfix. The fit was not too bad but the cockpit and detail overall is rather thin. e.g. no shell casing ejector chutes under the wings (these had to be hacked out manually). I replaced the provided Rotol propeller assembly with a Quickboost DH unit, and the canopy with a vacuformed Squadron unit. The landing lights (Little Lenses) are sold by Red Roo models. Paints are a combination of WEM Dark Green over Mr. Hobby Dark Earth, Humbrol Sky and Satin Black on the undersides. Decals are a combination of Airfix and Cartograph (from the Battle of Britain book by Kagero) F/L David Coke scored 1 probable victory over a Dornier Do 17 whle flying this machine on the 8th of December 1940.2 points
-
Thank you gentlemen, Mark, Steve your comments are much appreciated. Steve if your learning from me I'm thrilled as I don't know what the ferk I'm doing.......... Oddball I'm with you on that, how can you not like a Sherman with camo and more mods than any ETO "funny"? Hamden, here's a bit more then. Primered the trunk and fixed some rough spots. First primer coat. G2 points
-
It's not being shot down, it's showing the pilot winning the VC. Squadron Leader Scarf managed to make it home and crash-land his Blenheim at Alor Star, where, in a vain attempt to save him, his wife gave up two pints of blood for a transfusion.2 points
-
HEY ALLTOGETHER, SO, the update for today is more FANS!! Thank you fans. I'd just like to say, I couldn't do this without the fans! The first photo is going into mass production. There are so many parts that it is still going slow but steady. I have like, 28 fans in this photo, and a bunch of fan blades all under construction at the same time. These are the parts for the Diagonal Ventilation Fans. The Diagonal fan under construction. More construction. This is the back side of the fan with the vents that go to the outside. The compleated Diagonal Ventilation Fan back. And the compleated fan front (oops, I forgot the screens). I believe that this fan has sixty seven parts. I have four of these to produce. So I have four large engine room fans and four diagonal vent fans to build. And thats not all, so keep watching fans, thers more to come. Thanks All!!2 points
-
Another update for you. Lots of things going on with the model. The touch up has been done and it's had a good weathering with black water colour paint. The paint work has now got the grubby finish it requires. Ive put the main RSAF decals on to give it some life. The sooty fin will happen later after all the decals have been put on. Could not resist a dry fit of the dangly bits! Loads more to do. Thanks for looking, Jim See you soon.2 points
-
Hi All It has been a while since I built something on here, and having seen some really good builds of vacform kits I have been inspired to build this one. The kit is the ID models vacform released again by Blackbird models.It is not a small kit. It comes with basic shapes, no panel lines at all, so that is the first thing to tackle. I want to do this with the doors open, if my skill levels allow, we shall see. Also, because of work considerations there will be times I will be away so won't be working on it, also I will be doing other things as needed for the Phantom SIG. So basically, this will be a very long project. I will also be on the hunt for references. All I have so far is a single book by Chris Reed, which doesn't offer much detail pictures. I plan on finishing it in the Euro 1 scheme as that is my preferred scheme of the 3 main colours worn by the C-5. Below is some pictures of what is in the box. Fortunately, the undercarriage legs is metal, which will help. I will also be building it with detachable main wings for storage and transportation. Hope you enjoy this. Comments are welcome, as will be any useful hints and tips. Ted1 point
-
You've got to wonder how often this happens if they have built a dedicated piece of kit for this very emergency... Nice landing! bestest, M.1 point
-
Back at last to spend a little time doing what I love best. Sorry about the delay in the build, but my feet literally haven't touched the ground in recent weeks and the workshop has been a bit of a ghost area. Time to change all that! Well I have carried on with the Lynx over the past few days and made some progress. I have added some more scratch detail, managed to sand and prime ( numerous times!!) and eventually got down the panel lines. Today I put down the first coat of brown and prepped the blue tack for the green camo. I have also made a start on the weapons from scratch having almost finished the mini golf bomb and two SNEB pods. Brake lines made from some cable ties. It is quite handy to use the outer sleeve to make the attachment points on to the undercarriage leg and then trim and tidy up after the glue has set. The MG belt feed housing ... fabricated from 1mm plastic card Wing fences also cut from plastic card and fixed with CA. Once tacked, used a thick CA to gap fill and strengthen. 37 mm SNEB tubes and 'mini' Golf Bomb made from card, polystyrene scraps and miliput. The 'mini' Golf slowly taking shape! At last panel lines are down and starting to feel some progress. I can now see the light at the end of the tunnel. The first brown coat (flat earth) is down and I am quite pleased with the outcome of the joins and panel lines. There was considerable filling and sanding required, especially around the join of the tail booms to the fuselage and rear engine nacelle. The blue/white tac sausages are ready for the green part of the camo scheme. There is going to be a lot of weathering ahead - luckily its the part I enjoy as it leaves me open for some artistic licence. Thanks for looking.. I hope you enjoy. Mark1 point
-
The irony of this build is, of course, that Italeri recently did a re-release of their 410, so he could just go and buy one. ;-)1 point
-
Great work so far Looking forward to seeing it painted ! I think you did a great job of the tiles and cockpit1 point
-
Been working away at this in spare moments and during the more boring World Cup games, and finally got the basic colours done - time for decals1 point
-
Many thanks! If I can get it somewhere in the region of hearing the hot metal pinging and smelling it, I am more than satisfied. It will eventually get a base with some sort of packed sand surface. Sadly I won't have time for that before the show this weekend. I'm sure it's the hardener that has given up, I think these tubes are rather old as I brought them in from my 1:1 scale workshop where I rarely use it. Getting new tomorrow. I seem to have gotten away with it this time, after a few hours. And it is indeed a rather large and quite impressive model when you are confronted with it. As we have at least two persons in this thread who now have this kit at home, I would like to point out a few things. Below you can see the four radiator connectors. Drill them through and run a metal rod through them before installation. They are really too week when handling the model, especially during the build. Also the front axle could do with some internal metal reinforcements for the same reasons. I will put up a drawing with my thoughts later on. I fitted the cockpit interior and the sight. That would be the last things. I have a tow hook laying here, but I can't really see it fitted during the runs. I must look again. This is where we are now. I'll check it over tomorrow to see if I want to adjust something. Then I will return to make a base after the weekend.1 point
-
Always wondered why they didn't hang a couple of Merlins on it.1 point


.thumb.jpg.0cb281983c298f55509ab7d9a06994bd.jpg)
This leaderboard is set to London/GMT+01:00