
Leaderboard


Popular Content
Showing content with the highest reputation on 23/06/14 in Posts
-
As requested by some kind fellow, i have attached some pictures of my Stratocruiser. The bottom two are of the finished model complete with antennae. The legend Cpt.Ron Sears is a small tribute to one of our best modelling friends who is sadly no longer with us.18 points
-
This kept me busy for a long while.It was originally started for the trainer group build, but life got in the way and i didnt finish in time. It is the full body Neomega conversion using the Academy 1/48 Mig-21 PF as a base. The fit wasnt the best and the cockpit was a real pain to do. almost all side detail from the seats had to be removed to make them fit the tub at all. and getting the tub to fit....GRRRRRR. A little bit of chipping weathering and a few oil leaks that all migs seem to accumulate were done, but not too much. it turned out better than expected, especially as I was on the point of binning it completely more than once, but it became such and expensive build money wise i had to persist. also includes Eduard wheels, wheelwells and bronze undercarriage, Eduard brassin engine, quickboost airscoops a metal pitot , and some Begemot decals. obviously had to make a lot of the small stuff myself, mostly to do with a frame for the vacform canopy and the bits to mount it plus the antenae,8 points
-
Hello all! August Lambert was quite a case, as, a ground attack pilot credited with 116 air victories is not a common sight! Few documents exist on his plane, only profiles, so I had to make do with what I had. I usually prefer to work with a photo of the real plane but that was not to be the case. The kit is once again the Eduard's one, markings are made using masks when it was possible. Lambert was killed a few weeks before the end of the war, on the 17th of April, strafed on take-off by marauding P-51s. best regards from France, jean;6 points
-
Morning all,here,s the last day or two,s progress.The masks came off the stripes with very little drama only a little touch here and there apart from the middle white stripe under the fuselage which needs a repaint due to a certain idiot splashing black paint on it! I have to admit a tiny blunder if you look carefully at the middle white under wing stripe I have got it a little wider than the rest but I am not loosing sleep over it,and yea! found the missing U/C leg doors.Thanks for taking the time to look.6 points
-
So I do declare this is complete - I am struggling to believe I could build something this quickly! Just a couple of basic photos until I get a chance to do some decent photos: This was a nice fun build, particularly in comparison to some of my more recent long complicated builds!6 points
-
My first 'what if?' project and I actually really enjoyed it. I know B29s did eventually end up in RAF service anyway as Washington B.1s, but I thought it would be interesting to see what they might have looked like if a small detachment of Super Fortresses were given to the RAF as part of an extended lend/lease agreement to continue the bombing of long range European targets late in 1945 / early 1946. Being the tip of the sword of bomber technology at the time, it seemed only logical that 617 squadron should get them. Hence the 'KC' squadron codes. I used the Minicraft B-29A kit, scratchbuilt a basic cockpit and exhaust outlets, and opened up the radiator intakes. I added an H2S like bulge under the fuselage between the bombays using something from the spares box. Paints were Humbrol / Revell / Tamiya acrylics. Also added G-H bombing leader tail markings, wire whip antennas, and 1/144 decals sourced from eBay. The 'Big Bruiser' nose art came from an old Revell armour kit.5 points
-
Hi gang, Here is my 1/48 A-4Q Skyhawk converted from the Hasegawa E/F kit with the Aconcagua resin set. This model depicts 3-A-301 from 1st Air Naval Attack Squadron as flown by Lt. Roberto Sylvester against HMS Ardent on 21st May 1982. It's the first time I've tried to make an aircraft this dirty, and although I'm pleased with it, it might be a little heavy handed. As usual, several members chipped in with help and references on my WIP thread, which you can see here: http://www.britmodeller.com/forums/index.php?/topic/234957342-148-a-4q-argentinian-navy-may-1982/ . Particular thanks go to f4h1phantom and Luis Pacheco I hope you like it, thanks for looking, Gareth4 points
-
Hello everyone, Greeting from Viet Nam, this is my Zvezda La-5FN with Eduard photoetch and Karaya resin engine. This model was built for an local online contest, you can see other build here : http://www.mohinhvn.org/forum/forumdisplay.php?f=173 Thanks for watching !4 points
-
Hello All, Built this Indian Airforce C-17 mostly OOB over the last couple of weeks. Kit is Revell 1/144. The only scratch built parts are the three antennas on the top of the fuselage which the kit does not provide. IAF Decals were printed by a friend of mine. Wanted to pose this inflight , so used a brass tube and a wooden base. Hope you like it. Hope you like it. Any feedbcak, comments welcome. I fixed the decal silvering issue since I took these pictures with future. Thanks Vivek3 points
-
Just to prove that I have put a finished model onto a base he's one I made earlier. Tamiya Cromwell IV with the Crew from the Churchill for effect The base came in at a phenomenal cost of about £1.50 admittedly, a few years ago, but the sea-foam moss was the biggest expense. Ah! those were the days......3 points
-
The Grumman F4F Wildcat was an American carrier-based fighter aircraft that began service with both the United States Navy and the British Royal Navy (as the Martlet) in 1940. First used in combat by the British in Europe, the Wildcat was the only effective fighter available to the United States Navy and Marine Corps in the Pacific Theatre during the early part of World War II in 1941 and 1942; the disappointing Brewster Buffalo was withdrawn in favour of the Wildcat and replaced as units became available. With a top speed of 318 mph (512 km/h), the Wildcat was still outperformed by the faster 331 mph (533 km/h), more manoeuvrable, and longer ranged Mitsubishi A6M Zero. But the F4F's ruggedness, coupled with tactics such as the Thatch Weave, resulted in an air combat kill-to-loss ratio of 5.9:1 in 1942 and 6.9:1 for the entire war. Serial: 50 Pilot - Capt.Josef Foss flew this Wildcat while stationed at Henderson Field, Guadalcanal on 12 November 1942. Camouflage: Blue-gray (FS35189) upper surfaces and light gray (FS36440) under surfaces. paint that I used was model master acrylic as it was the only brand close enough Her are the other items I used on this build Model Kit: - Trumpeter 02223 - 1/32 F4F-4 Wildcat Aftermarket: - Grand Phoenix F4F Wildcat Cockpit (32005) - Eduard F4F-4 Detail Set (32109) - Eduard F4F-3 Undercarriage (32183) Montex 1/32 Masks & Markings for Trumpeter F4F-4 Wildcat - Resin Engine from vector External Detail: - Scratch-built Ignition Wiring in Engine - Scratch-built brake Lines & Hydraulic Lines in Landing Gear - Antenna Wire and Insulators - Use Eduard Photo-etch Exterior Details (where applicable) Stenciled Insignia and Markings hope you enjoy the photos3 points
-
Hi all Finished this about a week ago, its Afv clubs shot cal with the following extras, afv club workable tracks, fire Strom resin tires to replace the hideous vynil ones in the kit, afv club Mantlet cover and a few bits of stowage from the spares box. The figure is an old verlinden white metal IDF tanker. Painted with my own mix of tamiya paints and weathered with oils. The scene is roughly based on a photo of shot cals rushing to the Golan heights in October 73 under their own steam on the highway. Thanks for looking Jon3 points
-
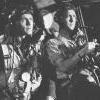
I've wanted to do the aircraft from the film since I saw it as a kid. I have a small "Hollywood Air Force" here and this would be the perfect addition. I also felt that a classic British kit, a movie about a British squadron, a fantastic British aircraft all filmed at well known British locations really should be posted at Britmodeller.com. This build came about because after years of having numb, tinkly hands and fingers I have had the "Bilateral Carpal Tunnel Release" surgery. One hand at a time, two weeks recovery each. My "normal" scale is 1/72 but I thought something bigger would be easier to work on while at home. This needs no introduction as I'm sure you're all familiar with it... Nor does this movie... Everything needed to build a replica from the movie is in the box except for the markings. The aircraft used are target tugs with fake machine guns added and then repainted in fictitious markings. Let's go... Leave out the radios, none appear in the cockpit shots. The only modification we have to do is put machine guns in the clear nose as they did in the film aircraft. The barrels are separated and I will glue them in at the end. I assembled the canopy, polished and Futured. Attached with the 5 minute epoxy and wet finger method. I added a landing light to the starboard wing. This will get a packing tape cover over the two sequins. Everything else went together quickly. 5 minute epoxy used for some alignment time. I know the bomb bay bulge is the wrong shape but I can live with it. Some putty here and there and especially those legendary wing gaps and then some Tamiya Fine Primer all over. I chose to do Wing Commander Grants aircraft, HT-G, serial HJ 898. This is the aircraft he flies until it's crashed after his "Murder Mission". Neither the colors, the pattern or the sizes of the markings and camouflage are correct for a WWII Mosquito, except for the fuselage roundels. This shot is used as Grant's a/c several times so I went with this as my "average truth" for the camouflage pattern and markings. A coat of Future then the decals. The markings all came from the stash and are all mixed sizes picked to come as close as possible. I had to slice the code letters to make them more narrow. The serial numbers are press-type on clear decal film. I wish I could have come closer on the code letters but that's as good as it's going to get. That's all for now, I will post completed pics when we're done. How long before that rousing theme music in my head goes away?3 points
-
Finished.. Not quite how I wanted it but learning with each build.. Kept underwings clean as did not want to ruin the beautiful lines of the plane. Weathered it a little to much perhaps. .. Sorry for the poor photos..3 points
-
Ever since I was a lad I always wanted a jetranger and now I finally have one. I made this to tryout making my own decals from scratch. I scanned in the logo from my business card and then using my colour laser (thrown out in a skip) I printed them out and printed a custom reg (Rodney Stewart Greenway) and bobs your uncle. I'm happy if anybody does have an italeri or Esci 1/48 scale Jet ranger they don't want I have beer tokens As always best seen from a few feet away Rodders3 points
-
I went with the first option on mine - inner to outer then uppers to lowers, trying to blend the join would be a big problem otherwise. You've already got the nose shape noted, probably the same route I took - sand down the 46 nose and install it inside the 47 intake, but its also worth taking the height of the 47 intake down a bit - it should look more like a P-51 and less like an A-7! The other mods I remember are: Undercarriage covers - the join line between the two pieces was changed to help clearence over arrestor wires, it's quite esy if you glue the two parts together, then cut along the revised line. Swap the canopy for a vacform one to get the sit right - the kit one sits too high on the fuselage. The flaps were deeper on the FR.47 - the hinge line sits where the next panel forward is scribed on the kit wings - for flaps up, just fit the flaps and fill the panel line, then deepen the new hinge line. Because of the flaps, the trailing edges of the radiator housings need to be trimmed back to sit in line with the new panel line - it's a simple job, just take 2-3mm off the rear outboard edge of the housing, then a diagonal line across the radiator flap, the inboard edge is unchanged. I can take some photos of my finished one if that'd help. Andrew3 points
-
Hi folks resumed my fight with the wings today and won! all fixed in place leaving a couple of days to dry then an awful lot of filling and sanding to do but apart from the gaps a good fit all round no major contour issues,more soon.3 points
-
Okay, okay. I need to get this sh...ore-based-build in gear. Long day today, actually a long weekend on the whole. Yesterday was one of those days where I woke up, my wife announced she wanted to get doughnuts from Dunkin' Donuts [sic], and so I spent the next, I kid you not, dear readers, two hours waiting on five minutes readiness for her to actually get out of bed and be ready to leave for breakfast, which we ultimately ate around noon. My wife is a wonderful woman, but also often intensely infuriating. I don't even really like Dunkin' Donuts. Then we spent the rest of the day rampaging through our checking account like Godzilla through Tokyo getting a million annoying little things for home projects - a dehumidifier for the basement, deck cleaning fluid and deck stain, all sorts of other fun stuff, and then groceries. Then when all of that was done, company came over, and had to be fed and entertained. So no modelling done on Saturday. So Sunday --and I know you're on the edge of your seats here-- she woke me up and announced she wanted to go to the Botanical Gardens, as an exercise in spontaneity. Well, complain someone never's ready to do anything, and the universe punishes you. So we spent four hours of my life that I'll never get back wandering amongst assorted flowering things, all of which make me slowly swell up like a barrage balloon, before we could finally leave. To tug at your heartstrings more, I'll mention that my mother also subjected me to this as a child, and there's nothing worse -- and I was once sort of half-heartedly shot at in a bad part of Chicago -- than the vague sense that you're trapped in the most boring place on earth, at the mercy of someone who just can't get enough of it, and the added frisson of terror that in the near future you may be called upon to buy and plant some of these horrible things yourself. So! Still with me? Wait, come back! I got home, ran eight miles in an hour and seven minutes (a pretty good time for me for that distance) in a desperate attempt to escape fatter me, who's been overtaking thin me at a high rate of knots. Then my wife made a lovely dinner of salmon, asparagus and rice, and thus sated, I retreated to my subterranean grotto and actually did some modelling. I know you were wondering! Both of the GR7s are mostly assembled now, and I was working on the intakes of ZG479 (sharkmouth minor), as the Telic Harriers seemed to have a rather infuriating bit of interior paintwork. Here's where I am on those: I'm also working on ZD408 (Sharkmouth very major), and I didn't do the intake color there because I've seen no interior photos of her intakes as of Op Warden and also because I'm lazy. Trying to ascertain if she had the strakes or the "gunpods"; the one photo I've seen is inflight and I can't tell. Here's a look down her intakes (heyoo!):3 points
-
Hendie, why do you spit in the face of the potentially angry and vengeful, but always fickle plastic gods? Why must you tempt fate so? Between you, Pete and Nigel, I am going to have to be forced to start doing some scratch building. Do you not want me to stay in my nice and safe comfort zone? The fire extinguisher was brilliant. Really like the looks of the inside of the copter. Keep it up, but not more testing the wrath of the plastic gods!!3 points
-
I got my resin kit back off Duncan B today so I thought as the last act of tonight I would fill the tanks with some resin as the lead was a bit rattly and it will add some more weight. First I made some funnels out of some heat stretched plastic pipe: I bedded the tanks on two blobs of Blu Tack and made a protection system out of some masking tape: I was then a bit miffed to find the resin had turned into a semi solid mass: Funny, it seamed fine a couple of weeks ago when I made the engine part for my Gotha. I got some into a jar and thought I would microwave it into submission - what could possibly go wrong? There is nothing I like better than messing around with resin at gone 1am in the morning, this is the one good thing about not having a woman around - you can do what the hell you like: That worked a treat, after just 20 seconds, liquidity was restored: I got the rest into the jar and gave it a good nuking: How long it will last I don't know, I guess it is reaching the end of its shelf life. I have been thinking about getting a proper resin kit like hendie's anyway so I will have to up that up the priority list. I mixed up 6ml and added some colourant, proceeding to fill the funnels thus: My protection system worked a treat and the only mess was a spot of hardener on my old trousers: Result!!!3 points
-
Some close up of the engine :3 points
-
Hi Mottlemaster and Arniec, Thanks for your comments. Yeah not far off closing the cockpit up but I decided to try and do the sort of thing Wolwe does with adding cables and wires to busy up the cockpit. I do not know how he does it in 1/72. It was really fiddly in 1/48 with parts frequently stuck to the tweezers and my fingers! Anyway this afternoon, after a couple of hours, I managed this: Not a lot but it's getting there. Most probably won't be any updates until next week now. Kind regards, Stix3 points
-
Here's my first entry, Revell's great 1/144th scale A model in VF-142 colours Tom1 by tony_inkster, on Flickr IMG_8875 by tony_inkster, on Flickr Tom2 by tony_inkster, on Flickr Tom3 by tony_inkster, on Flickr Tom4 by tony_inkster, on Flickr3 points
-
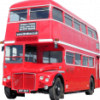
So after almost 2 and a half months, it is DONE!!!! I started with this lot: and with plans I'd created from various research sources which turned out to be 8% overscale, and even then the side panels are a little too tall My aim was to build one of these: Click here for Technical Data Sheet This is a new vehicle introduced to Afghanistan in 2011 which is a combination of a Spartan hull with enhanced mine protection and a Scimitar turret. It also incorporates anti-IED ECM gear and of course the bar armour I cherish so much! The challenge here is that the only Spartan kits in 1:35 are from Accurate Armour and they are of the old version, pre-LEP which upgraded the engine and added extra armour, so there was a LOT of scratch building to be done! I bought the AA Warrior bar armour in the mistaken belief that it would be usable to some extent. Sadly it wasn't directly but the resin brackets, nuts, bolts and connectors came in very useful. The bar armour is constructed from LOTS of 1.5mm wide, 0.25 mm thick Evergreen strip, with 0.5mm brass rod as the vertical bars. You can see the WIP thread here: http://www.britmodeller.com/forums/index.php?/topic/234958222-135-crvt-scimitar-2-scratchkitbash-build/ I had thought I finished it earlier today but forgot the wire cutters and a couple of other small details. In addition, the number plates had to be printed out on decal film and put in place, so once that was done I had to re-photograph the whole thing. Sadly this late in the day the lighting in the conservatory isn't as good as before so I've had to resort to the flash so the lighting isn't perfect in these photos. Phew, that was a bit mammoth! And now for the Buffalo!! Yeah thats going to happen soon...2 points
-
Some Phantom photo's from various air shows in the dim and distant past. Ian [/url ][ URL=http://s1158.photobucket.com/user/camper1231/media/Scan804_zps85e9c5d0.jpeg.html] [ URL=http://s1158.photobucket.com/user/camper1231/media/Scan941_zpsab947c52.jpeg.html][/url]L=http://s1158.photobucket.com/user/camper1231/media/Scan980_zps040a9ec3.jpeg.html][/url]2 points
-
Well this one has been a real struggle. See here for details. A few silly little problems that took a long time to sort out and were nothing to do with the model and all to do with the modeller! A striking aeroplane, that the model does justice too. The only thing missing from the kit is a beaching trolley, but it won’t take long to knock one of those up. Any and all comments welcome Cheers Grant2 points
-
Convair 440 Metropolitan 1:144 Welsh Models with Lima November decals Like many twin engine airlinres of the 1940's, 50's, and 60's the Convair 240 started life as a DC-3 replacement, and went through several developments. This version, the 440, was in answer to the Vickers Viscount and featured more soundproofing and aerodynamically improved cowlings. In service with SAS from 1956 to 1976, they were configured with 52-56 seats and operated with an excellent safety record, not one of SAS's fleet was ever lost. (although in 1965 LN-KLE on a crew training flight hit some trees and landed with various bit of branches embedded in it!) An attractive aeroplane, I wanted on in my collection and obtained the Welsh models kit couple of years ago. Of course this resulted in Authentic Airliners releasing a beautiful resin kit once I started mine! I've been working on it 'now and again' for over a year now, and finally finished it off this week. I bought Lima November's lovely decal sheet 'Early SAS Conviar 440's' as I like this scheme best, and also the decal sheet in my kit was the later scheme and incompletely printed anyway. I made my own little engine fronts from rod and card, so that I could have the cowling fronts correctly open. I cut out and glazed the cockpit windows, but because I had used a full 'keel' inside the fuselage halves, you can't see through from one side to the other! Lesson learned. Here she is (pictures are about life-size) Here is one I prepared earlier, Roden's DC-7c also in Lima Novembers SAS decals; And finally, my growing collection of Welsh Models Twin engine airliners; Thanks for looking, John2 points
-
OK... the Lambo is still under way, but this one is now done! Lovely little kit of a lovely little car. The only thing I'd do differently if I did another one would be to thin out the body at the wheel arches, to give the dropped suspension a bit more room to move... bestest, M.2 points
-
Well that is just as well. Apparently the liquid decal film is an extremely potent explosive with a single small bottle able to completely disintegrate an entire 747 if ignited. How the terrorists overlooked this high grade bomb material is beyond me. I would assume now if you are a not so bright terrorist without access to the internet, you can just visit your local post office to find out what common every day materials you could convert to trigger an explosive or flammable reaction. Just think, the Post Office providing services to all!! Anyway, I ordered it and it has to be delivered by ground carrier. (I guess UPS or FedEx trucks are expendable in the war on terrorism and we can afford to lose them to the hazardous and dangerous materials that have been around for years without being responsible for the earth's mass destruction. Probably is tied to global warning) So, it will be awhile until they get here. I can always use it on some old decals I have in the stash. But, I have Future on hand always. So, I guess a few coats will be put on today.2 points
-
Hi Rick while searching for some tips on small figure painting i came across this page . It seems very comprehensive and the publishers soldiers look fantastic. http://www.artizandesigns.com/guides/hintstips.pdf2 points
-
Not at all mate.....I mostly stick my decals to tanks and they ain't all that big on compound curves and the like so I'm sure your advice is spot on, but to seal decals in place once they are properly bedded down I've still found nothing better than Klear.2 points
-
Rob, It may well be more expensive but every one has a budget including RIAT. One aircraft alone will not draw the crowds especially when it could be seen at other air shows and is comparatively expensive to have compared to other types people may wish to see. I really enjoy seeing the Vulcan fly, am I disappointed its not at RIAT? A little but I can get to see it at other air shows near my home where as RIAT has a lot of other Aircraft not usually seen at UK air shows. RIAT is not the pinnacle of air shows like it used to be with dwindling in service aircraft types and lack of US aircraft (due to budget cuts) the money RIAT has to spend on civilian owned display aircraft is limited and if VTTS was asking for a substantial amount its no wonder they didn't get a slot. RIAT is a charitable business and it makes sense to spend it's money more wisely than smash it on one aircraft even if it is in its last display season! Nobby2 points
-
No peeling paint. Today ( halftime the Netherlands - Chile) clear coat. Tomorrow decals hopefully. Cheers Cees2 points
-
Hello This is my Douglas Skyraider AEW.Mk.1, HMS Ark Royal, 1958. The kit is AMT and the decals from Model Alliance. Built OOB, l have only the armor plates on the hull removed. Painted with Humbrol 181 Thank you for looking regards Martin2 points
-
Update: So I finally found time to get another one done, this time it's the Firefly. Not only that but I picked up their M5 Half Track, again 3 in the box with all the crew and troops for the back. So the Sherman production line was suspended while I put one together. Again no problems with fit, flash or construction, all of which was nice and simple for this newbie. I also got the Airfix battlefront set, I'm going to use the base and forward post and have the vehicles driving down the road while the Paras look on. I'm also hoping to get something a bit bigger, I've just seen the Miniart figures and diorama accessories. Anyway, enjoy and thanks for looking.2 points
-
Hi All This was supposed to be part of the FAA group build a while ago, I did not complete it, I think doing two kits was a bit ambitious, I completed the DH Dominie but this had quite a bit to go. I lost the two lights from the Port Tail fin, bit of a school boy error on my part and I omitted to read the instructions properly and so ended up trying to cut them off the clear insert that was supposed to be there and the pings off into the jaws of the carpet monster, lesson learnt ! The Airfix kit builds up very nicely as does the Alleycatz conversion Not much filler was needed with the worst bit being the wing to tail booms which, tio be fair may well have been my own fault. Model is brush painted as usual using Humbrol enamels although on this occasion I used Revell paint for the white, this was slightly troublesome so have reverted to my trusted Humbrol paints. I have finally finished her and am pleased with the result. Hope you like it. Thanks for looking All the best Chris2 points
-
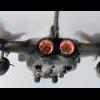
Here's a few photos of the Frogfoot I've just finished. It's done in the colours of the Czech AF airshow 'Frog' colour scheme. All of the spots on the aircraft were sprayed freehand. Sorry about the photo quality, they were taken on my phone. The model is currently packed away as I'm in the process of moving. Frogfoot 01 by Phill Loughlin, on Flickr Frogfoot 02 by Phill Loughlin, on Flickr Frogfoot 03 by Phill Loughlin, on Flickr Frogfoot 04 by Phill Loughlin, on Flickr Frogfoot 05 by Phill Loughlin, on Flickr Cheers for looking2 points
-
Heh, Heh, Heh, you said Hardener!! (Me just being juvenile and silly at the moment, sorry.) I must say I really am more and more impressed with your soldering skills. I have often toyed with soldering PE rather than using superglue. It's just which way do I want to mess up, a gluey blog, or burnt metal? This really is a remarkable build. Waiting for the next installment.2 points
-
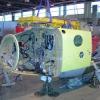
Giving the sequence assembly, some improvements are needed, the engine covers are wrong then be modified. Photo file with a friend's forum. removing parts. new engine covers corrected Internal view Support for engine transport. Wing support2 points
-
Mk.I oil cooler:- Mk.V type:- There's one other item I've since noticed, and that's the oxygen hose, which should not be moulded on the starboard cockpit wall. On the Mk. I & II, the hose was "attached" to the pilot, and plugged into a socket on the starboard wall. Edgar2 points
-
There are some louvres under the front mud guards which I am going to add using the Archer printed resin decals: Here glued in place with a little diluted Gator glue: The front end is finished now and can be mounted ready for some primer: Same with the seat section: The cab cover has these awkward ejector marks which needed filling: There is not that much left to do before the airbrush comes out, the Jerry cans and the wheels (which I have been seriously putting off) are about it I think.2 points
-
thanks guys. well.... I got the fire extinguisher finished...... Then I took the plunge and glued the folding seats in place in the rear cabin. As you can see from these photo's, I also threw in the yellow bags thingies I made the other night. They have just been placed in to see what they would look like in there. I am not sure if I should leave them in or not but I think I need something more than just seats to add interest in the rear cabin. I am still fiddling about with other parts doing lots of dry fitting and phenargling about and it's been a real mishmash of results. I glued the front transparency at the same time as the windows using the same epoxy glue. Tonight I managed to break the darn thing open again. Luckily there is no damage, but that's twice I have glued it and twice it has broken open. I still can't figure out how I am going to incorporate the Trumpeter rotor head and the Heller gearbox. Then I attempted to scribe more panel lines on the engine cowling and made a real hash of it. So that got filled and sanded back again. Then I have probably spent a good two hours today on the little fairings that sit on top of the engine cowling right at the rotor head opening. Needless to say I don't have any thing I think is useable yet. Not related, but to top it all, I finally got around to painting the hemisphere's on my other Dalek build and there appears to have been a reaction with the paint although the primer was left for a good two days before final coat was applied. I guess the next stage is to glue the fuselage together. It seems so easy.... what could go wrong?????2 points
-
Update from when the decal were done. Everything was satin coated to seal in the decals. Then given a grime wash. Then carefully cleaned up.2 points
-
Tim's build Fujimi F-14D Super Tomcat - build here This is the Royal Collection kit. And this cat packs a punch.2 points
-
Tim's Airfix Harrier GR7 build thread here ModelAlliance decals 72104 for No4 Squadron RAF. Lichen Green scheme as used by GR5 and early GR7 Harriers. This is the first generation Airfix kit from 1991 With a full rack of bombs, missiles and tanks - but no guns.2 points
-
Meng's Katsuodori meet the vertical tails of a 1/144th Lanc....2 points
-
Going to do some shopping and some other chores now. I'll get back to this later on. Progress Pic:2 points
-
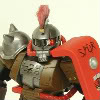
By thunder wouldn't you just know it...as soon as I get five minutes to crack on with this project something else crops up to take up any rare spare time...oh well at least I've managed to make progress ... The seats are now done, whilst Stuarts ones are pretty decent I decided to completely scratchbuild them both using Martin Baker MK.6MSB drawings and photos I've taken from various aircraft around the country. Primarily I made these up from scrap white resin, Plasticard (seat sides and head boxes), Milliput (for the seat cushions and parachute packs), copper tubing, ali rods (rocket tubes), lead wire and scrap PE stock to make up the belt and harness buckles.The ejection handles were made from 6mm lead wire, primed white, sprayed satin yellow then the black loops were added using a 0.1 Unipin ink pen, finally they were sealed with Alclad matt Satin Kote.The belts were made from strips of masking tape of various widths soaked in oil washes before being dry brushed and highlit using burnt umber and sienna oil paints thinned with pure white spirit. The decals were made up on my PC.. They were then both sealed using Alclads Matt Kote and given a light rub down with 13000 grade Micro Mesh. I'm quite pleased with the result to be honest, (just need to shoehorn them into the cockpit now !!!), Here they are with a tub of WEM paint to give you an idea of scale, Also finished the Pilots Display Unit and added the HUD glass, (I'll be adding a scaled decal to represent the data info on the glass), Another thing I was able to get done were the two windscreen inner rails and their prominent rivets. In this scale there's quite a bit of detail to see in this area so whilst time consuming it's got to be done......once fully cured the rivets will be filed down to the correct size. And dry fitted in place, Next hopefully will be the stick and mounting unit...............then joy of joys it'll be onto detailing the inside of the main canopy and fitting the sliding mechanism that hopefully will enable the canopy to slide as per the real deal..... Cheers all and thanks for looking, Melchie....2 points
-
1/48 Hasegawa F-14A, VF-41 Black Aces, Operation Enduring Freedom, 2001. Build thread is here Dave2 points
-
done Hobbyboss 1/48 tomcat Tamiya paints. Tamiya weathering kits. And alclad burnt exhaust Oob build2 points


This leaderboard is set to London/GMT+01:00