
Leaderboard


Popular Content
Showing content with the highest reputation on 12/05/14 in Posts
-
This is the new tool kit, and a joy to build. Painted with MM enamels. All decals are from the kit. Rigged with Ethicon .005 stainless steel.11 points
-
I think it was probably me confused rather than the kit, but in some respects whats happened here actually copies the "real world" Childhood memories of a 1976 holiday in North Wales and seeing those lovely shiny Hunters............ Bar seats and hinging the canopy open, she was all but finished but........wasn't convincing me so I stripped her...... Saw a nice photo of a 4 Sqn a/c so went in that direction - her you see at the early striping stages, still not happy. And this is how she ended up.....finally (staying that way too)8 points
-
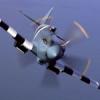
My new spitfire mk IX Kits: azmodel Decals: JBR decal6 points
-
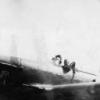
For once I decided to do something about the stash of kits that are massed in the loft. I've got to get around to building some of the kits I bought twenty years ago, otherwise what's the point of it all? So, less new models from now on, and more time spent on old gems like Eduard's fourth release from 1994. I always wanted to build this but just never got around to it, and it's a sharp reminder of how far Eduard have come. It's a limited run kit, the parts of which clean up pretty well and if you don't mind photoetch, most of it builds up quite easily.The Hansa Brandenburg's star-struts are a real pain to put together though, and it was just as well I had already decided to build mine as a crash victim, inspired by a photo that's appeared in a number of publications, notably the Windsock Datafile. So, mainly built out of the box but with a few scratch built items that included a new tail, undercarriage, and a hand carved prop made from a coffee stir stick. Other bits and pieces here and there were replaced or altered, and a modified Alley Cat figure from A2Zee Models was added to the base. Hope you like it. Hoping to go back forty-plus years for the next build! Haris6 points
-
Hi All, A recently completed Stuka. I painted it in the full european splinter camp then sprayed the RLM 79 over the top. I added the seat belts and the seat back from the foil off a wine bottle, and the rear gun was an extra courtesy of Eduard. Unfortunately I couldn't get the rear gun bezel turned so the gun sits a bit funny, and I still don't do antenna wires! The base is a cheese board and bit of builders sand... Hope you like it.5 points
-
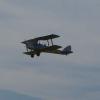
Hi In 2008, my family bought me a flight in a Classic WingsTiger Moth from Duxford. I took control and flew the wonderful old girl towards Newmarket race course. I then turned back towards Audley End House near Saffron Walden. I had a wonderful time and would recommend the experience to all. My wife took these pictures (I'm in the front cockpit): When Airfix released the new Tiger Moth, I decided that I wanted to create a miniature version of R4922. Thanks to the generous gift from a friend (thanks mate!), I built and brush-painted her last Sunday afternoon and then applied a mix of kit and other decals one evening during the week (which aren't particularly accurate). I managed to break off two of the cabane struts while trying to remove the "jig" struts that are intended to ensure the correct alignment of the wings.. I applied a coat of W&N Galeria Satin Varnish and then almost lost the will to live applying the rigging and control cables due to my CA accelerator not working as I had hoped. I painted one of the wheels yellow, as in the above picture and attached the aerial cut from guitar string. I nearly didn't post pictures of the model, as I am not 100% happy with the result. The most obvious issue for me is the over-scale EZ-Line control cables. Anyway, here she is, warts and all! Here she is with the models I made following my more recent Classic WIngs experience:5 points
-
Hi everyone, this latest project is something I have been asked to make for a friend of mine. It represents a Hawker Typhoon Mk 1b, BR-T, MN252 of 184 Sqn in May 1944. This aircraft was flown by my friends grandfather, PO Worthington, who on the 21st May 1944 was flying over Holland when his aircraft was hit by flak and crashed over the Walcheren Islands. He survived and was interned in one of the Stalag Luft camps. The aircraft or at least parts of it have been dug up by local farmer and attributed to this aircraft. Using resources available on the 184 Sqn website, PO Worthingtons logbook and some detective work, I believe this is what the aircraft looked like on that day in the weeks leading up to D-Day. The kit itself is the Hasegawa kit which has been made pretty much out of the box with the exception of some foil seatbelts and quickboost exhausts. I made the base out of a shelf and some wooden trim from B&Q. It has been varnished with Ronseal mahogany and flocked with some grass from Hobbycraft. The pilots and their mascot are the ICM boxing. All was painted with a mixture of Xtracrylix, Humbrol Acrylics and Tamiya. I may add a few more parts of interest such as some jerry cans before giving it to the recipient. Thanks also to RussG for his help, he recently made a 1/72 typhoon of WO Polkey who was shot down a few days after PO Worthington and wrote of PO Worthington's loss in his logbook. Have added the newer photos at the top.5 points
-
Hi folks,just popped into LMS for paint and as I have done in the past decided to go straight to the shelf and pick a kit without deciding beforehand or giving any thought to what I want so this was the kit! I think I must have built this years ago when it first came out,What a nice surprise it turned out to be,not earth shattering detail but a nice simple build out of the box,little filler here and there soft framing on the glazing and tricky under carriage(for me) but all done in an hour a day over six days.4 points
-
Hi to all. Let me share with you my latest work: The Fiat G50bis "arrow" - Special Hobby 1:32 scale model. The model has been completely revised and corrected: I turned down all the flaps, I opened the compartment ammunition, I opened the access door to the left and the engine compartment and much more. The effect "heavy weathering" has been obtained with the technique MWP (Metal work panels) Thank you for watching: For more info & pics :http://www.adventurephotomodels.com George4 points
-
Here is my go at Airfix's 1/72 North American F-86 Sabre. Its an OOB apart from the pilot which is resin. This was my first go at using metalizer paint which was from Mr Hobby ( I will give Alclad ago next time to see what that is like) and bending acrylic rod which I used to make the stand. Any way here are a few photo's4 points
-
hi gents' been working on some of my weathering techniques and didn't originally intend posting any pic's but thought why not, this is the very old tamiya 1943 T-34 76 which isn't that bad a kit' if you add a bit of extra detail then it looks ok, i didn't put any updated tracks on the kit as it was just to try my weathering methods, so here's lots of photos. cheers guys oz!.4 points
-
Along with other current projects I also got out the 48 Fairey Firefly TT and test fitted the clear bits. Everything fits nicely and I should get the other smaller bits done soon along with fitting the tug assembly etc. Anyway this is where I am at now just needs to be finished. Cheers and regards, PJ3 points
-
Tamiya M48A3 depicted as US Marines in Vietnam. The kit is from the 1970's with part of the the Legend M48 Stowage Set added and the AFV Club Indy Track (the black stuff). Weathering with MiG Vietnam Earth pigments3 points
-
well after some retail therapy on evilbay I'm now the proud owner of a 1/72 Anigrand Douglas Skyshark! Am not really sure why I bought it....but that can be said of a lot of my evilbay purchases. Anyway I now have to have to decide how I’m going to build it, figured it will be a Whiffy as it look too boring in its blue test colour schemes. Then I saw this and well...........though I may replace the US markings with RAAF ones. oh and the Heinkel is getting close to painting and I have decided a colour scheme!3 points
-
Amazing what you find in the stash.3 points
-
http://www.britmodeller.com/forums/index.php?/topic/234917993-airfix-gloster-javelin/3 points
-
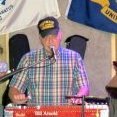
Ha ha! Ask and you shall receive! After a pretty big mother's day with 4 generations at both Shoey's and my house I have recovered on a quiet Monday night and added some hand painting elements. I like hand painting but understand you can't get the same finish as you can with the airbrush. But!......It is very quiet, less intrusive, less chemicals, very comfortable (inside not in the shed) and I enjoy it. In fact I'm thinking for a future WIP I'm going to do a pure hand paint and see how it goes. Anyway I got onto the fiddly bits including the cannons, and tidied up a bit. Here's some pics. Here's the tail wheel waiting for the metallic to dry before the tyre gets done Here's the cannons in place with some colour on the stubs and barrels. The damn micro photography has showed up the mould lines on the stubs....so probably some sanding and repainting required! ha ha..."such is life"...to quote an infamous Australian. Stubs will eventually be camo coloured upper and lower the RAAF Blue with gunmetal for the barrels. Exhaust is gunmetal plus weathering in various washes and whatever I managed to come up with! Fiddly bits look okay...stuffed up a previous prop so this is version number two with tips sprayed yellow to be followed by a masking and then black (first time I've done it in that order...ever) Wheels look nice I think. Spinner etc looks a bit stark in white and has some imperfections in the micro photography but I'll do my best to fix them up. here's a few fiddly bits Here's how she's looking so far.... Need to pinch Shoey's White Ensign RAAF Sky Blue paint then I can fix the underside and spray a gloss ready for some panel line washes. Made some enquiries to try and get some 1/72 SEAC decals, roundels, fin flashes for Hurri's Spit's anything in Burma/India in about 1944 and hoping to get some aftermarket stuff soon. Thanks heaps for looking Cheers Winenut3 points
-
My woes were not over yet, I tried retouching the peeled RLM76 and yet more paint came off: Well Nigey wasn't going to let some poxy acrylic paint beat him, strangely I didn't fancy redoing it all so I sacrificed a small woodland animal, dubbed on some wode, muttered a few secret incantations to the plastic gods and went old school. I got out my finest brush and repainted all the edges free hand: Its not perfect and can still be improved in a few areas but I am quite pleased with that. Time for bed. Night, Nigel3 points
-
Well carry on supporting the tax cheating Amazon if you like and don't come crying when they've put everyone else who pays their proper share of tax out of business.3 points
-
Hi, This will be my build, Firefly FR1, HMS Triumph; early stage of the Korean War right after HMS Triumph took part in striking bandits in Malayan jungle. Years ago, a good friend of mine passed me this unknown kit, which is deem obsolete by him, I have no idea where this kit from, the instruction is in Russian, and the kit came with a unusual brown plastic with Made in USSR molded on the spure. may be a bootleg of Frog kit, anyone know? I see 2 potential issues, - The decal is un useable, I will need to find a solution later, - the clear parts are thick and blur, maybe a future bath can help, let see.. starting soon..plan to build OOB2 points
-
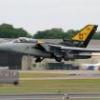
Hello everyone, Just finished these two Harriers, oob apart from the pitot tube from Master and a Freightdog resin tail correction on the GR-3. Another couple of superb kits from Airfix, went together like a dream, no filler, refined panel lines and excellent decals only let down slightly by the GR-3's short tail but to be honest it's not that obvious. The GR-1 is painted in Xtracolors and the GR-3 in Tamiya, both finished with Alclad gloss and matt cotes respectively. As always comments welcomed, good or bad. Cheers, gazza l2 points
-
Gentlemen, this is a old Dragon Imperial Series 1/35 Pz.III command tank, first released in 1996, with many extra details added: photo etched from Eduard, Model Kasten links, gun barrel from Jordi Rubio and others improviments. Humbrol enamels. Heavy weathering. That´s all...2 points
-
Hasgawa I/48 Kittyhawk IV RAF Desert AF 239 Wing 112 Squadron 1944 build oob, paints Humbrol/Gunze Mr Colour Went together really well even though there have been remarks on sites that it doesn't due to the modular design. It went pear shaped when I came to paint, the Humbrol paint took ages to dry and when it did it was very grainy.That though was more me than the paint I think. The decals are typical Hasgawa very thick, but they do settle down with multiple applications of microsol.The shark mouth decal isn't a very good fit, too short to reach all the way around, so I painted the front by hand to match up. I did quite a bit of paint fading, which doesn't seem to show up in the photos, I think I'm being to subtle, and most of it is disappearing under the gloss/matt varnish2 points
-
Thanks for the comments all...bit of a false dawn as far as decalling went...as I suddenly realised I hadn't painted the OD anti-glare and rear deck...so out with the masking tape and on with the OD sprayed with Lifecolor I decided to do the yellow and black striped one in the box decals as I hadn't done this before and this meant the bose ring needed to be painted Chrome Yellow. Rather than another mask job, I broke out a flat brush and hand-painted it with Tamiya. Rubbish finish as anyone who has tried to hand-paint with improperly thinned Tamiya paint. Horrible - so out with the sandpaper and sanded the worst off...stepped back and thought...why not leave that as a weathered nose? I will also distress the OD to match to show a hard working fighter bomber. Now to the decals. Boy am I glad I have two sets of these (current and old un-used set). I cocked up one of the tail decals which ripped and went in the bin and also one of the side cockpit decals too. Don't know what I would have done if I didn't have the spares Usual Tamiya decals (see the other recent thread). Plenty of hot water and then lavishly hit with MicroSol... The tip tanks were even more stressful and will need a minor touch up with the OOO brush However its starting to look quite smart - bar any further disasters! Thanks for looking!2 points
-
You can never have enough Fireflys...2 points
-
Nice save on paint work! Your hairy stick work is excellent. Why is there such an aversion to acrylics? I switched to acrylics when I returned to the hobby about 12 years ago, and with an asthmatic wife and 3 little kids, enamels were just not an option. I've never looked back, having found Gunze & Tamiya acrylics early on I found they both spray well, the Gunze the better of the two. I've tried other acrylics, Humbrol, Lifecolor, Xtracrylics & Vallejo, and have not been overly impressed. Karl2 points
-
Your both lucky! ive ran filler over the sink marks but itll need another pass i think. I did give the seat a lick of paint, a few more details left to pick out but its looking good Still faffing on the console2 points
-
Well, here's how it will look as PK312 if you don't sand off the rivets; I did this last year as the OOB version (so therefore the rivets stayed) to prepare for the Obsolete Kits Group Build, but never submitted it: The markings are put together from various Modeldecal sheets. Dipping the whole thing into a bucket of Dullcote might have improved it somewhat, I suppose... John2 points
-
It worked for the Obsolete Kit group build, that had three sections for the poll. Link.2 points
-
Well it's been weeks since I've done any modelling, as you can see by the dust on the aircraft! (even though I kept it covered. Work has been full on, so I haven't had time... until this weekend I took photo's to check the colour of the new canopy, I think it looks okay. I've got eveything else ready, so just a case now of sticking everything together. I should have it finshed by the weekend. It's only taken me a year ......2 points
-
I'm totally against any open vote and having votes by PM is totally unacceptable as it is open to abuse and accusations of abuse. Even if I know the hosts would never do such a thing. The only method of voting allowed in GBs is using the voting system. I've had to deal with complaints in the past in a poll that was held not using the voting system. Unless we can come up with a method of using the inbuilt polling system then we will have to forgo a poll. Sorry guys, I'm not trying to be a jobsworth but I've been here before.2 points
-
Stix, You're a man after my own heart. It was your spitfire that led me to try pre-shading with a hairy stick and I'm very grateful that you did. The results so far have exceeded my expectations by some considerable margin, so in that regard consider your work something of an inspiration. Winenut, that's looking excellent. You're making some excellent progress and I can't wait for further updates and to see the two birds together. Richard2 points
-
Just looked myself to see what all the fuss was about and the discount is only a fiver or 5%. Perhaps it was much less than this when the thread started but has since been revised upwards by the seller? Changing topic slightly and at at the risk of getting political, I find it interesting all the comments about avoiding tax dodging compies like 'Amazon' to buy their kits from. Well, I don't like their tax model (no pun intended) any better than the next person but in truth, ask yourself this; 1. If YOU were offered the same tax avoidance schemes on a pro rata basis to your own taxable earnings as these big companies are, would you adopt them or insist on still being punitively taxed so the government can "redistribute" your money to others? 2. The government could close all these perfectly legal tax loopholes overnight if there was any genuine concern about the subject - they have no problems changing tax rules for us 'little people' that become effective overnight within 24 hours of a budget - so ask yourself why there is no genuine appetite by any of the parties when in government to do so? You may draw your own inferences as to MPs tax arrangements and the advice they receive from that one. 3. Assuming all companies and super rich individuals did pay their "fair share" of tax, does anyone really, really, think the government would spend it wisely and/or reduce tax bills for everyone else on modest earnings ...or would it mean they simply had even more tax payer money to squader amongst central and local government and to indulge further in vanity projects like the seemingly sacrosanct O.A. budget in order to continue being the self-appointed 'conscience of the world' ? Anyway...........let's hope the big 'Tiffie' is all it's cracked up to be eh! Gary2 points
-
Further progress....compared to others here almost at the speed of continental drift!! Further view of the now completed cockpit 'bathtub'. Does not have the 'wow' factor of those in the Eduard kits being built as part of the group build but it works for me:-) with the photo showing all the dust and some blemishes its time to get the mini hoover, magnifying glass and touch up paint out! And overall progress so far. Next jobs: Mask canopy (now it has been Klear coated) Get dust out of cockpit. Join fuselage halves together Get a shimmy on generally so I can take the time needed on the paint job. Problems so far. Nothing really to report. Some minor niggles around internal fit of items which have gone away with application of a sanding stick. The rather large lugs which attach all the items to the sprues have made clean up more interesting. I would be complaining if everything had broken off inside the bag so its swings and roundabouts. I am concerned with the texture on the surface of the model. It has a slightly 'dimpled' look. My worry is where I have to fill and sand I am going to end up with smooth areas which will stand out. On the plus side to this my airbrushing is still in its infancy so I will no doubt mess up and put too thick a coat on thereby nullifying any texture on the surface Onwards............ Steve2 points
-
Upper Hull The Castoff set includes quite a few bits of resin to upgrade the upper hull rather than replace it completely as the AA set does. I had considered an etch set but these were too expensive (I've been assembling bits for this over the course of months as cash was available) and I have a pretty good stock of styrene strip from my railway modelling hobby, so I'll be scratchbuilding quite a few bits. First leap of faith was to take the razor saw to the back decks. The old engine hatches came out beautifully and the new ones fitted superbly. I'm afraid I have bottled putting in the louvered hatch to the front-offside as there wasn't a part for this int he set and while I think i could have made something out of the scrap part I wasn't confident. Only an expert would spot this: The Stillbrew reinforcement round the turret ring fitted well with minimal clean up, although I did use a tiny bit of filler. The upgrade kit also includes a more accurate gun crutch, shown here for fitting before I cleaned it up very carefully: Again a quick test fit: I added some reinforcing moulds to the rear bins with half-round styrene, hand cut the dozer blade mounts to the bottom edge of the glacis, and made the splashguard into the proper shape with more styrene. I added from the Castoff set the dozer blade trunking inboard of the front-offside bins. You should also just be able to see that I've added padlock hasps to the rear bins: I have also never been completely satisfied with the lights on vehicle kits. A trip to Hobbycraft found me these self-adhesive gems: Having carefully drilled out the centres of the headlights I ended up with this: The infra-red ones were treated to a spray of black gloss paint. I reckon these will do - the rear reflectors only test fitted as they need a small white part behind them. I also needed to drill out the light covers on the front trackguards: More work included putting on more accurate skirt plate mountings, with little discs of rod for the bolt heads. At this point I was also struggling with the internal fire suppression system firing handles, of these more later: I also needed to add wading rail hooks at various points on the hull. These were carved out like this: The hooks were a bit too pronounced so I trimmed them down a bit. I also added the catch which retains the driver's hatch and started ont he more visible of the brackets which retain the front bins: Finally having found a good reference picture I made up the fire suppresion system handles with bits of rod and the wire from bag ties: Handles and hooks in place: I also did the driver's vision block with a coat of silver paint overlaid with a coat of transparent green: I then turned my attention to the exhaust system. I wasn't going to bother with this mod, but my reference pictures showed it really clearly and it proved, after a little head-scratching, to be pretty simple: It was then just a case of hacking out the superfluous light housing on the nearside (the nearside and offside are not symmetrical) and adding a bracket for the rear ends of the tow ropes: This is all pretty much ready for priming now.2 points
-
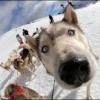
Doesn't look much like Putin. He's clothed above the waist for starters... J.2 points
-
Going to push to get this done by the end of the week so I can then slope over to Harriers Inc. Meanwhile here's a little update: Overview, as you can see she still needs a coat of matt varnish: : Underside views: I do need to add some detail to the bomb rack and inside the flaps, but I think I'm getting close. Thanks for looking.2 points
-
Wrong country Colin! Same as the Tanker deal. But then again most countries do this in the Defence field. Would you rather British shipyards built the QE or an American shipyard if it was cheaper? Julien2 points
-
How many times is that heard each day all around the world... I've convinced my kids that when your an adult - It's your birthday every 2nd day!!! Cheers .. Dave2 points
-
See post above #168, same sentiments. I have never really like the way acrylics behave as far as coverage goes and their ability to remain on what you are painting/spraying. That is why I almost always try to use enamels; mainly Humbrol and Testors/Model Master. I really do not see a way to fix the paint other than to sand, retape and recoat. I do not think you will have to entirely remove it, but it will have to be sanded down and redone. Sorry. If you try to retouch that much paint, it will look sketchy at best, horrible at worst. I guess you could concoct the scenario that due to the lateness in the war, and the limitations of resources for the Nazis, school children were drafted to work in the factories and this is their best result at finger painting a camo scheme on an aircraft. What do you think? Airbrush . . . Black art . . . some sort of blood/animal sacrifice must not have been made timely and the demons that rule the pnuematic dimension were unpleased.2 points
-
Latest.....2 points
-
Great day out at Hendon! The family really enjoyed it and I bought a 1/24 Airfix Fw190 as a project to do with my son. On return I've painted all the under surfaces with RLM 76 Lichtblau. The stuka is primer side up for contrast..2 points
-
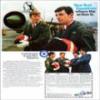
I belive the blu-ray releases are all the remastered jobbies, but I am not paying those prices for a 15 year old show that I can watch on 2 channels and netfix every day of the week.2 points
-
Thanks Dreamcatcher. I'll watch out for the photos this evening. Hope the filler worked out okay. I've managed to get the rest of the basic engine completed. Now it's this far (it's not glued onto the rest of the plane yet) I can better judge what I need to add for more detail when I'm looking at the photos of the real engine. Sorry about the quality of the photos it was getting a bit a dark when I got around to taking them. I've got a collection of plastic strip, rod and tube together ready to try and improve the look of the engine. Should be fun but, unfortunately, not until later in the week. Kind regards, Stix2 points
-
It will be in the Korean scheme from the box. The first coat of Alclad is now on. Hopefully I will get time tomorrow to start with some variations on the panels with other shades. Andrew2 points
-
If you mean the one on the Kent stand, it's the one that Tom Probert has featured on here. So it's only about 80% scratch-built - the rest is ID Models' vacform. But yes, it's a big old brute. We're thinking of giving him his own table in future so that people talk about something else.2 points
-
Julien a word please2 points
-
I have to agree with Jonners on this. I would rather pay an extra £5 and buy from Hattons, which is after all a UK company with a bricks and mortar presence as well.2 points
-
Thanks Richard, much appreciated mate! Papa came over for lunch today, so we had a bit of a photo shoot with myself and him with the Hurri. He was suitably impressed with the detail of the Hurri. Winenut also popped over from next door to meet my grandfather and show him his little 1/72 scale Hurri nearly completed and he thought that was great too!2 points
-
First update of the weekend. I've done a bit of work on the cockpit sides and have given everything in the area a light wash with Revell's Anthracite. There's still a bit more I want to do but I thought I'd get some photos posted to show I have been doing something on it! The seat/IP assembly is just temporarily held in place with Blu tack: Next I'm going to start looking at the engine and working out what I need to remove from the firewall to allow the fuselage sides to join correctly. According to Miggers and Dreamcatcher there's a fair bit to be removed. Updates later today I hope. Suggestions and comments welcome. Kind regards, Stix2 points
.thumb.jpg.65862f744a73c247f2e6e21aa818d29f.jpg)


This leaderboard is set to London/GMT+01:00