
Leaderboard


Popular Content
Showing content with the highest reputation on 09/04/14 in all areas
-
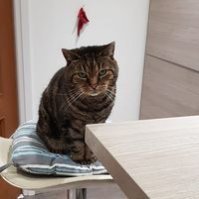
I've finally completed my He-111, hope you enjoy the photo's Comments always welcome, Thanks for looking, Colin11 points
-
Finally finished my F-104G aircraft 26 + 90 from MFG 2, German Marine Hasegawa kit with Ultracast detail set in resin. Resin bang-seat. Cannot remember if the burner can were resin as well. I've used Daco's excellent decal set for this. Future on the canopy and modelmaster gloss and flat lacquer mixed. Thought a German Marineflieger would be rather weathered, considering its operational environments. Clean, no weapons save the internal gun. I scatched the chaff / flare launchers aft and the mounting plates they sit on. I also scratched a position light on the spine and under the belly, in front of the vertical fin. Easy kit - it went together with no problems. Kinks here and there entirely my own creations. I hope you like it!8 points
-
Here's my second completed kit out of group of four HMS Eagle aircraft I'm working on. Trumpeter kit Classic Airframes decals (easy to get hold of separately on ebay) CMK wingfold It's a very straightforward kit to build, only changes I made were to open up all the vents and intakes around the nose.7 points
-
Hello again,time for another back catalogue build, Probably my favorite build since returning to modelling,enjoyed every part of it and was happy with the end result,hope you feel the same. Revell Corsair A7-E 1/48 Straight from the box no extras used Brush painted with the standard revell email paints No problems,went together like a dream. Comments and critisism welcome6 points
-
- The last ZVEZDA model.in 48 scale.What can be said is that it is not the easiest model I ever built...... - Not wistanding the fact that I changed the engine and cowling for the M88 B from Vector ( too small in diameter has to be broadened) there is a lot of headache.The canopy and turret are real nightmares ,the pilot seat has to be changed and its office is abismally empty but it has to be said that the documents are scarce about this subject. -There is a recessed representation of the riveting which should have been raised for a machine of this period but have a look........ -The weathering may look heavy but I guess that the mechanics had other things to think of, than the maintenance of paint in 1941 in Moscow suburbs.......5 points
-
Hello, Sorry, i know that the Me-109 is far to be an original subject, but it's, with the Spitfire and some few other WWII aircrafts, one of my all time favourite WWII fighters. This is my first build since 25 years and my first model painted with an airbrush. This model is built "straight from the box". I just added some details made from scratch (seat harness, a card holder and the oxygen system in the cockpit, some ducts on the Daimler Benz Engine, the radio antenna system and radiators have been modified to be shown in "open position")4 points
-
Hi Guys, Here are my latest creations, I hope you like them. Both are Dragons 1/144 scale models, along with Re-Heats 120mm pilot. C&C welcome The preshading shows up along the wing SR-71 Pilot from Re-Heats 120mm4 points
-
I've done the aerial, canopy (still need to attach handle) Still have to finish the mirror. The flaps have been a complete pain. I thought at one point I should do them closed... but have stuck with it... I'll see what they look like when fully weathered. Should be finished this weekend .. anyway, I took one quick pic tonight...4 points
-
I had finished a Spitfire Mk IX late version of the Eduard 1/48. I liked the model and bought another. This time a earlier version to paint with the colors of North Africa. And he is finished. I used mixtures made with Tamiya paints and decals Techmode. I hope you enjoy. Best regards ajcmac3 points
-
Hi all, here is my latest build, it is Dragons excellent 1/144th scale X-29 painted as an Aggressor from the 64th based at Nellis. Painted with a mixture of Humbrol colours with a hairy stick and completed with decals from Minicrafts 1/144th scale F-16 Aggressor kit. The ACMI pod is a modified AIM-9 from a Revell Tomcat and both of the missile rails are also from the Tomcat. Hope you like it.3 points
-
Hello all, Here are a few more of my older builds: Academy 1:72 Hawker Tempest Mk. V by 6000KingGeorgeV, on Flickr Academy 1:72 Hawker Tempest Mk. V by 6000KingGeorgeV, on Flickr This is the Academy 1:72 kit, built OOB. Decals are from the Freightdog "Keeping the Peace (Part 1)" sheet. Paint is a mixture of Xtracrylix and Humbrol. Academy 1:72 Hawker Typhoon Mk. Ib by 6000KingGeorgeV, on Flickr This is another kit from the Academy 1:72 stable - also built OOB, with Xtradecal decals. Built mostly so I could practice painting D-Day invasion stripes - it didn't go too well, though. Paint is a mixture of Tamiya rattle cans, airbrushed Xtracrylix and brushed Humbrol.3 points
-
Ok so as I'm new here I thought I'd share what I'm currently building, but applogies that one is quite a way along in the process, but I've been hacking it together since december. Against all known sanity, and instead of building the really nice Revell kits, I'm working on a couple of Airfix Tornados - the F.3 and the GR.1. Both are pretty much oob, though I added some PE into the F.3 cockpit and swapped out the nose pitot. Simple and lacking in detail they may be, but they're fun to make! The GR.3 box -takes me back! Here's where I am today, GR.1 pit started and Missles in paint for the F.3 Just look at that detail - actully it's nice to see an attempt being made at ip and throttle detail back in '83! And here's where I am with the F.3. Stunning eh? Thanks for looking, hopefully I'll make some more progress tomorrow! Regards Stuart3 points
-
Hello chaps well here's an oldie. Good to see the original price penciled on the box . I got it years back and it cost me $6 (AUD) I loved the box art. I did a few things to the kit but sadly it's all under the canopy-fuel tank ,instrument panel,control column,repositioned crews arms. I used some old Humbrol paints which were made outside the UK--atrocious they were!! I'm gradually switching over to the new Humbrol/Hornby paints which I rather like. Reminds me of Humbrol of old (remember their Authentic range?) The photos don't show the plethora of faults but I had fun fighting this oldy. I like the colour scheme of the restored machine flying around the northern hemisphere.I'm tempted to get a 1.48th scale version but I seriously need to get stuck into the new Airfix Lightning,Tiger Moth ,Gnat and Vampire. We modellers are now spoilt for choice.3 points
-
http://www.fantasyprintshop.co.uk/AIRFILE-BOOKS_A1IHO3.aspx Jon3 points
-
more photos3 points
-
It's been a while since the last update as painting this model is taking some serious time... I have finally settled on a colour scheme, and have gone for a Halifax GRII Series IA, that began life in Bomber Command and was then transferred to Coastal Command. The serial number was JP328, and she flew with initially with 502 Squadron (wearing the codes V9-H) and finally with 58 Squadron (coded BY-H) at St. Davids throughout the summer of 1944 until the end of hostilities, being SOC on 6th May 1945 and sold for scrap. Interestingly, this aircraft retained its Bomber Command colours, with the only change being the serial and codes painted grey rather than the more familiar red codes in her previous role. JP328 was fitted with Merlin 22 engines driving four bladed propellers, and was fitted with the late radiator intakes and Morris Block radiators - perfect for the model I have chosen. Another reason for choosing this scheme is the fact that the Halifax served with distinction within Bomber and Coastal Commands, and this hybrid scheme represents both services and is my own little tribute to them. I initially primed the model with Halfords' white primer - I feel this shows up blemishes more easily than grey and polishes better with micro-mesh. After I had rectified a few surface blemishes I pre-shaded the upper surfaces with matt black, and then sprayed the area where the fuselage codes go grey. The codes were carefully measured and then masked off with thin Tamiya tape in preparation for the top coats. Next came the roundels - a coat of slightly darkened Humbrol gloss red, which was masked and then followed by the 'roundel' blue from Xtracolour, which was again darkened slightly as I felt it was a little 'too' blue. The whole roundel was then carefully masked in preparation for the camouflage colours. I really like Xtracolour's range of enamels, and I used gloss dark earth, followed by gloss dark green. The camouflage pattern was sprayed freehand using a Badger 200 airbrush, and with the pressure low and the nozzle screwed tight, it was easy to get a nice and tight feathered edge. I then picked out random areas of the upper surfaces with with slightly lightened and darkened versions of the base colours, trying to follow pictures of real Halifaxes as best I could. The following pictures show the current state of play - it doesn't look the best due to the high-gloss sheen but this will be matted down in due course: I will now turn my attention to the black undersides and will update you again when that's done. Until next time, Tom3 points
-
Revell 1/72nd FW190A-8 and BV-246 Hagelkorn: Build thread: http://www.britmodeller.com/forums/index.php?/topic/234955354-revell-72nd-focke-wulf-190-a-8-and-bv-246/ Cheers, Stuart3 points
-
As the sun was so nice this morning I took a quick few snaps outside in natural light to show you the results of my paint experiment I believe its worked out pretty well and I am chuffed with the results. I need to plan what to do next with her. I need some punches to mask off the round radar panels on the fuselage 1 on top 2 on the bottom. I then need to remove the wheels and doors so I can sort out the holes I added to add some gear door struts too. also to make them easier to decal as I need to as the number XM597 to the insides of the rear doors and possibly the smaller ones to the front ones. I will have to check my photos. The Glue and glaze is brilliant for setting the doors wheels etc as it not only dries clear but its also goes like a rubbery jelly. So it has some spring and cushioning but also with care its easy to remove should you need to. But once set grips very solidly. I love the stuff. I recommend you pick some up from deluxe materials. The do some good stuff and their putty is amazing. General Melchett give me the heads up on both these products I really must buy some Gator Glue which he tells me its wonderful too. Then I will need to add the last few stencils to the bottom and then mask the windows off with PVA again so I can give her the final finish. I like the satin look she has but the radome and fin cap need to be returned to matt, Once thats done I can mask them off and spray a final coat of varnish and then I might polish it up to a super flat high shine gloss as per the real thing, But the satin does look nice from the can. The very last job for this build will be to paint up and add with glue and glaze the smaller aerials etc. Right then so its all Vulcan Vulcan Vulcan at the moment I really have too many threads on the go at the moment but as I have finally organized my work space Its nice to keep switching between projects. Hope no one minds. Currently the build list is this. This vulcan Tiddler vulcan and dio Tiddler XL426, Tiddler XA895 Tiddler XA890 Frog Vulcan restoration job Matchbox Jaguar Matchbox Buccaneer Tamiya Spitfire Vulcan B1 Airfix Vulcan Nose Frog Hornet. Whiff Avro Azrael Project and many more on the stash... Yikes I must have really got the modelling bug I have always loved it but Britmodeller is like a drug dealer to a modeller...HEAVEN Cheers Rob3 points
-
I quite often leave the very small ones off. I think in 1/72 they can swamp the finished model with detail that wouldn't be visible from a distance on the real thing, especially on darker camo schemes. Anyway, it's your model so you can do it the way you want it. Duncan B3 points
-
Clearly not often enough. Several hours later I had cleaned up the cut outs and no cracks this time: There was the odd scratch on the outside (how, I have no idea). I started the repolishing with a fine skinny sanding stick: Here it is all repolished, hopefully a coat of Klear will work its magic:3 points
-
This fantastic kit took me a little bit more than one year to put it together only because I have to managed with job and another projects. Aftermarkets were neomega seat and Eduard PE set that IMHO has everything that you need to build this kit. The fuselage was painting with Alclad Aluminium Airframe, some panels with Alclad Dark Aluminium and Aluminiun, nose intake ring Alclad Chrome, exhausts frame Bare Metal Foil and exhaust using Humbrol Metal Cote. I would like to say "thank you" to some Britmodeller members who helped me a lot with "Free Lightning lectures" about RBF flag and some aircraft systems: John "Camberra Kid", "Scarlet, Rob "Bomcombe73"and Gary West. And the most important "thanks" to PC2012! Whom sent to Brazil a CD full of Lightning and another amazing aircrafts pictures and tought me everything what I know about Alclad! Thank you very much, mate! Build thread: http://www.britmodeller.com/forums/index.php?/topic/234924209-ee-lightning-f6-airfix-148/2 points
-
What can I say about this ship,that is not know already,served with the Royal Navy from 1959 to 1984 and still in service with the India Navy as INS Viraat. Another great kit from Orange hobby,I would have to really nitpick ,this kit is so good,so far only need to add some railings to the walkways around the funnel and clean the resin !!!, all the paint fell off the bridge opps.It comes with a excellent P.E. set with instructions that could be clearer,but there plenty of photos on the net of the ship, built by OH to check,oh good decals for the ship,but nothing for the aircraft,you only get 2 SeaHarriers and 2 Seakings but you can buy extras ones from OB and they come with a tug and tow bar included and HMS Victorious 1966 is about to be released and they are working on HMS Eagle 1968 and yes they are going to look at HMS Ark Royal 1978,At Last2 points
-
Hiya Folks, While photographing some finished models the other day I also took some of models which I don`t think I`ve ever posted here before and here are some of them,.....some folded (or partially folded) Faireys; Smer 1/72nd Fulmar- ED Models (Xtrabits?) brass etched fold. If I was doing another I would drop the ailerons though; MPM 1/72nd Barracuda- ED Models (Xtrabits?) brass etched and resin wing fold;. Airfix 1/72nd Swordfish; Tamiya 1/48th Swordfish conv to Mk.III using MDC conversion set; Trumpeter 1/32nd Swordfish Mk.I; Trumpeter Gannet T.5- Alleycat resin wing fold; Dynavector Vacuformed 1/48th Gannet E.4- not finished yet,...shelf of doom resident for 5 yrs!; If any of you have seen these before I do apologise, All the best Tony Edit- A few more below and on page 22 points
-
De Havilland DH.82a Tiger Moth 1:72 Airfix The de Havilland Tiger Moth was one of the most important and most widely produced trainer aircraft to have seen service with the RAF. It was designed by Geoffrey de Havilland himself in the 1930s and was based on the Gypsy Moth, suitably redesigned to meet Air Ministry Specification 13/31. In comparison to its predecessor, the Tiger Moth's wings were swept and repositioned, and the cockpits were redesigned to make escape easier. The airframe was also strengthened and the engine exhaust system was redesigned. The Tiger Moth entered service with the RAF in 1932 and remained in service until well after the war. Over 8000 examples were completed and the type also served with the Royal Australian Air Force, the Royal Canadian Air Force and the Royal New Zealand Air Force as well as a great many other military and civilian operators. In service it proved itself to be ideally suited to its role; easy enough to fly, but challenging enough to weed out the weaker students. It was also cheap and easy to maintain. Always popular with civilian users, many Tiger Moths found their way into private ownership after the War, with many maintained in flying condition to this day. Airfix's new Tiger Moth was one of two kits announced by the Kent-based firm at Scale Model World. Although overshadowed to a large extent by the huge and fearsomely complex 1:24 Typhoon, the delicate Tiger Moth is still an important and well thought out product. The kit is Airfix's first all-new release of 2014 and has been released in three separate editions. We're going to take a look at the boxing which includes decals for N-9181 of No. 10 Elementary Reserve and Flying Training School, but the other editions are also detailed at the end of this review. The kit arrives packed into a red end-opening box with the usual high-quality artwork on the front. Inside are three sprues of grey plastic and a single clear sprue, holding a total of 42. The mouldings are clean and crisp, with fine, recessed panel lines around the nose of the aircraft and a subtle but effective stretched fabric effect elsewhere. Although relatively little will be seen through the tiny cockpit aperture, the interior is well appointed. It is comprised of two different seats which fit into a long floor piece, two control columns, two pilot figures and two instrument panels. The inside of the fuselage sidewalls are richly detailed and, just like last year's Gladiator, you have the option to remove the access hatches and replace them with dedicated parts which can be fixed in the open position. The nose of the aircraft is moulded separately and includes an air intake, exhaust and propeller. The whole sub-assembly then fits onto the front of the now-sealed fuselage. The lower wing is moulded as a single, separate part with ailerons moulded in place. The upper wing is also a solid part. There is no jig to line up the two wings, but the inter-plane struts are joined by a small sprue which holds each strut at the correct angle. These have to be left in place while the wings are joined together and then removed afterwards. This is a thoughtful addition which proves that Airfix have tried to make this model easy to build without compromising on detail. Once the upper wing is in place, the tail planes can be added. The rudder is moulded in place with the vertical tail, as are the elevators with the horizontal tail. The undercarriage is simple but effective, with the main part being made up of five parts including the wheels. The windscreens are tiny but nicely moulded. If you choose to rig your model, a full page diagram is provided, which shows how to break the job down into simple steps. I would still advocate studying pictures of the real thing though, as 2D diagrams only go some way to explaining where everything goes. As this is a series one kit, a single scheme is provided on the decal sheet, for N-9181 of No. 10 Elementary Reserve and Flying Training School, Royal Air Force Yatesbury, Wiltshire, England, 1940. The aircraft is finished in Dark Earth and Dark Green (and Light Earth and Light Green) over trainer yellow. The decals are nicely printed and include the full range of stencils, as well as a decal for the instrument panel. Conclusion I think it's fair to say that on balance this is now the best Tiger Moth available in this scale. Although just a series one kit, Airfix have packed in a wealth of extra detail whilst making the kit as easy to build as possible. It's nice to see Airfix putting so much thought into their new kits and overall this kit looks like a real gem. Highly recommended. Also available: Review samples courtesy of2 points
-
Hi everyone! I want to present you several new models of soviet aircraft. First will be the new "Zvezda" kit - Su-2 bomber. It`s a nice kit, but it needs some work on the mistakes. Also i use Vector resin conversion sets and make M-88B modification and wheels from ZIP. I do not dwell on assembly process, but you can see it on some photos. Some parts in cockpit and wheel bays were added and modified. I made the lower turret, scribed some new panel lines and so on. As a prototype I chose an airplane from the 288 bomd sqadron, which was depicted on the newsreels in winter of 1941-1942. That plane had very interesting paintscheme with traces of removed winter paint. I used hair-spray technique to make it on the model. Ivan2 points
-
Dear Fellow Modellers The old Academy kit is actually very nice other than the problem of attaching the separate tail unit. With this one the windshield is vacform after a disaster with the original. The 4th FG markings are from Xtradecal and the figures from CMK. Paint is from Gunze. I noticed on period photos that the cowling fastners typically had all their paint chipped off! The refueller is Academy altered with a resin tank from CMK Hope you like it? Andrew2 points
-
Another chapter in RAF aviation history has just passed with the last operational flight of the Lockheed Tristar. Operated by 216 Sqn since their conversion from BA and Pan Am airliner stock in the early 80s, the RAF notched up over 30 years of service with the Tristar. The aircraft were originally purchased to help provide the airbridge between the UK and the Falkland Islands after the conflict in 1982. They went on to serve with distinction in all major conflicts since that time including Iraq, Kosovo and more recently Afghanistan. Following the VC10 retirement in Sep 2013, the type has also provided support to the QRA Typhoons of 1435 Flt at Mount Pleasant Airport. Three variants of the Tristar served with 216 Sqn - the C.2 pure freighter, the K.1 air refueller and the KC.1 combined air transport/AAR platform. Sadly the aircraft have reached the end of their economic lives and as part of the RAF's AT/AAR modernisation, together with the late lamented VC10, are solely to be replaced by the A330 Voyager of 10/101 Sqns. Until recently 216 was the largest sqn in the RAF with nearly 500 personnel. Over the past few months the drawdown of aircraft and operations has stepped up with aircraft being progressively retired to Kemble and Bruntingthorpe. By March 24th just 4 Tristars were left serving, including the specially marked 30th anniversary aircraft, K.1 ZD951 which only returned from fighter trails to the US on Sunday 23rd. March 24th was the date selected to be the last operational flight of the Tristar before the sqn disbands on 31 March, and ahead of the last 4 aircraft retiring to Bruntingthorpe for scrapping on March 25th. For the final mission there were to be two KC.1 aircraft flown: Fagin 11 - ZD948 was to conduct AAR for the last time followed by flypasts at several airfields with which the type has been associated including Cambridge (Marshalls) and Bournemouth (Cobhams/Flight Refuelling Ltd. Fagin 12 - ZD950, carried the media party and recorded the final flight for posterity. Here are some shots from the final flight including the last tankings followed by some ground shots of the anniversary aircraft and the type that has now replaced the Tristar. My thanks are extended to Wg Cdr Morgan -OC 216 Sqn, Flt Lt Beauchamps (organiser) and all the personnel of 216 Sqn who made the event possible and so memorable. Sadly in a shrinking RAF the chances of Two-Sixteen being reformed are slim to say the least and so it is both the end for another historic and famous squadron as well as farewell to an important and distinctive aircraft type. Thanks for looking. C&C always welcome. Mark2 points
-
Hi I’m back with a new build or builds to be exact this time I will build two F-14A from Hobbyboss in 1/48th scale. Since I saw Top Gun I always wanted a couple of F-14s in my cabinet and it was actually that movie that got me into this hobby from the beginning. I decided on the Hobbyboss after reading a lot on the internet, it would seem that about 50% hate it and 50% love them but I think it’s going to be a great build. I also have some extra bits from Eduard and Aires and the DACO book Is on the way. I also have the furball sheet with 7 cag birds that I’m going to use. For the markings I have decided to build a bird from VF-84 (of course, who doesn’t want a jolly rogers F-14) and one from VF-142 Ghostriders . I hope that I will be able to finish them this year but we will see. I also have a couple of pictures of all the stuff and also the 7 markings available an lastly my “man cave”. Cheers Jakob2 points
-
..and that is that. WIll get more photos up in the next day or so- want to do a base and possibly a couple of figures to go with it. This has been one of the most enjoyable builds yet- plenty of new techniques tried. Alan.2 points
-
Finally finished the Hobby Boss kit of the Land Rover 1/35 WMIK with Missile Launcher. It's not a bad kit in all honesty, very cheap and fun to build. I wanted to do this quite rugged and not too clean. Would recommend it, especially for the price! Sam2 points
-
Not sure I'm happy about that... it depends whether all the main characters are 23 or not, I think. If they try to turn it into another franchise for the dewy eyed teenagers to drool over unfeasibly young protagonists with no thought about the storyline - Vampire DiarrhoeaDiaries, The Tomorrow People and their "powers", the Twilight Saga with the pathetic sparkly vampires I could go on. In fairness however, there will need to be a good proportion of younger characters due to the military usually being full of 'em, but their superiors are usually substantially older. I'm waffling...2 points
-
Just to give the story another little tweak, in a National Archives "Malta" file, recently, I found an explanatory note, which stated that, when Malta specified "sea camouflage," they meant Mediterranean Blue (presumably the Dark version.) This referred to Hurricanes, (in the middle of a discussion that Malta didn't want them, any more, since they were now outclassed,) but I doubt that their requirements for Spitfires would have been any different, especially as they (in another file) had asked for the Sea Grey Medium, on top surfaces (VI or H.F.VIII, possibly?) to be overpainted in dark blue. Edgar2 points
-
Rob, ever thought of doing a Vulcan ?...I know it's a bit off piste for you but..... Looks really good, as pointed out it just need the radome black and fin cap matting , the tan circular plate and a few aerials fitted and she's good to go, (but at least you can do these at your leisure !!)....though I know you enjoy the stress.... Right I'm off to finish my camo Valiant B(K)1 ready in time for Milton Keynes.........maybe !2 points
-
I know some people enjoy the scribing process but I dread it... Looks very neat. I'm rather jealous that you can continue the hobby whilst at work what limitations do you have on the rig? Are you allowed to do your 'homer' in a workshop at all or are you confined to the cabin? Are you limited to just minor work or can you paint and use a wonderful concoction of chemicals too? To be fair I'm only away for 2 weeks which is nothing compared to 4 weeks so its great that you can carry on. There's only so much corrie and emerdale a man can take! Cheers Aaron2 points
-
West Coast Hobbys [sic] say that the Sword Lightnings are delayed, but doesn't have revised ETAs. Better late than wrong, though.2 points
-
I never seem to have that problem2 points
-
I've put in a big effort over the last few weekends and finally have my little Fujimi Skyhawk close to the finishing line. All that really remains is a matt coat and assembly of components. What have I learnt since my last post? Consult your references before doing anything: My instructions had me place the "Rescue" arrows pointing away from the jet intakes. On revisiting my reference photos I found they actually point the other way on RAN single seaters. Tamiya tape was needed to rip off the offending decals which were nicely stuck down with Microset and Microsol. The 883 numbering could have been placed a bit forther forward as well to give the rescue decal more space. Have a sense of humour: The supplied "Danger" decals in the Pagely set are not left and righ hand, so the port side decal goes on uppside down. I was going to leave this as is but finally resorted to covered this with the lettering from another decal sheet. I've also found that Vallejo paints hand brush very smoothly: All the red for the intakes and control surfaces was locally masked and hand-brushed. This saved me half a day wrestling with broader masking and airbrushing. In future, I'll spray the red first and mask over it before applying other camouflage. I made the brake lines on the undercarraige with fine threads of milliput. They do look a little "overdone" however so so I'll re-visit these with some fuse wire and reference photos before putting it all together. I'm holding my breathe that I put enough weight in the nose and am a little concerned that the tail hook will be enough to make it make it into a tail sitter!2 points
-
You have problems with dust spots on your camera's sensor.You are wright. Thank You. Thank You. You are too kind ,-)) thanks ,-)) And Thanks U2 And pleasure for me, to read so kind coments ,-)) Thank You why ? 1.Recon POD looks nice ,-))) I have no idea, that German zips didn't used this. 2. Decals was a improvisation. I know, that silver zips with white wings was in German services. And I used decal , which looks similar ,-))) Thank U2 ,-))2 points
-
Think a Lightning is bad? Try a full set of factory stencils on an F-4 or an F-15. You'll be there for weeks2 points
-
Thanks! I just saw your F-14D and it looks great! So here’s an update! The last couple of days work has been mainly sanding and trying to fit the cockpit into the airplane and the first cockpit fits now, one to go. As with most Aires’s stuff the cockpit took quite a lot of sanding but more on that later. First of I did some modification to the cockpit and it involved the locking mechanism of the canopy. The locking mechanism is made up off hooks on the canopy and on the sidewalls and they hook into each other. For the hooks on the canopy Eduard came to the rescue and Aires included some very nice hooks on top of the sidewalls as you can see in the picture: What Aires did miss is that the hooks aren’t supposed to sit level with the top of the sidewall this is how it looks in real life so some modification await: I began with adding some Etch from Eduard and thinned down the HB plastic so that the etch is wider than the plastic thus creating an overhang. I also added a styrene strip to the top of the Aires sidewalls. The next step was some sanding. And this is how it looks after some sanding, I must say that I’m very pleased with the result. As I mentioned earlier I have removed quite a lot of resin to fit the cockpit and some plastic also. When I was done I had the impression that the fit of the pit was quite good but comparing it to the cockpit that hasn’t been sanded yet I realize that I’ve gotten used the bad fit of Aires stuff: See ya! Jakob2 points
-
I'm calling this one finished, I'll post some more photo's on "ready for inspection" Thanks for looking Colin2 points
-
I have learnt to look where I put my clod hopping feet first when a delecate part that I have spent hours working on falls on the carpet. I started on all the major surgery including wiper removal: With all the lessons learnt hopefully I can be a bit more efficent this time round.2 points
-
More pics from the stan; The CO's Rafale (See everyone is getting involved) Robb's Gnat. Adam's Letov (Extra points here as its a KP Kit!) Alex's GR.32 points
-
More from the guys in the stan. Adams UH-1 Elliots I-162 points
-
Seems our model Hurricane has been for a little spin over Afghanistan in something slightly more modern!2 points
-
My very first civilian, very weird with no pit`work, no window-masking etc, but fun to try Nice noseweight solution1 point
-
Hi Just got to second Sir T post what a great idea. Have been watching your Vulcan Builds with interest and found them very informative.1 point
-
No 112 Squadron Hunter?1 point
-
Right guys this is back online and after a few hours this is where I got up to. Some of the moulding misalignments with this kit. I have added a couple of bits of wire to the sides just to give it a little something else. I could have scratched more details but I didn't want this to turn into a longer build than it needed to be. Tomorrow will probably see primer and paint.1 point
-
Wa'son I haven't done much today but what I have done I'm very happy with. I've finished the front of the airplane and the decals from Xtradecal are lovely and really take to the setting solution very well.. I'm happy with how the the wheels turned out and that tip for painting them is my new favourite modelling thing... Any how ttfn yours aye Iain1 point


This leaderboard is set to London/GMT+01:00