
Leaderboard


.thumb.JPG.3498f40362ff13ebfc4b2e45abbd545e.JPG)
Popular Content
Showing content with the highest reputation on 02/04/14 in all areas
-
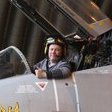
Seems our model Hurricane has been for a little spin over Afghanistan in something slightly more modern!12 points
-
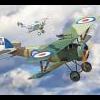
Easy model just fur fun ,-))11 points
-
This is my completed 1/48 Hasegawa Fw 190A-5, of Walter Nowotny when in JG54 'Grunhertz'. I used the Hasegawa 'Priller' A-5 kit and some of the decals from the Eduard ProfiPack to make Nowotny's mount. I used a combination of Humbrol, Xtracolour and White Ensign Models enamels, some Eduard seatbelts and Master Brass gunbarrels. I drilled out the spar behind the armour headrest to run the antenna wire down (not as convincingly as Mal's Sturmbock build!) and used a strand of hair for the antenna wire (reacts well to CA and is flexible). I also added the 'gear down' indicators above the wing, made from some toothbrush bristles cut down and painted red. On to the pictures. Need to fill the antenna hole in the yellow theatre band... Wing cross (port ) looks off centre, it's just the camera.6 points
-
This is my other Fw 190, the Fw 190A-9 of JG.301 which was found abandoned/captured at Bad Langensalza at the war end. I used the Hasegawa 1/48 kit, and combined some of the painting advice from the Eduard ProfiPack instructions. As with the A-5, I used Eduard seatbelts, Master Brass barrels and added hair antenna and toothbrush bristle 'gear down' indicators on the wings. Paints used were enamels, Humbrol, Xtracolour and White Ensign Models. I used the kit decals which I succesfully 'nuked' with MicroSol - it worked well. A nice kit to build, I made life hard for myself, but I'm happy with the result.6 points
-
Hi Folks the last aircraft produced in any number by Boulton Paul.This is the Magna 1/48th kit,not quite as traumatic as the Devon but still had a few issues namely the quality of the resin and the wafer thin canopy which caused a few problems when masking it.The model is depicted as the station hack from Abbotsinch circa1961/62 when the base was a major Air Handling Unit for the Navy.This is the only Balliol I ever saw flying so it holds a little bit of nostalgia for me.Note to Magna i could do with an Anson C19 and piston engined Provost but please use a different resin and make the canopies a tad thicker. Ian [/url ] [url=http://s1158.photobucket.com/user/camper1231/media/IMG_3484_zps408f7d77.jpg.html]6 points
-
Finally the weather is just right to take a few pics outside! This is my effort at the new Airfix 1/72 Gnat kit. I found the kit somewhat fiddly to fit, so much so that this is in fact build No2, build No1 getting trashed as it emerged that it was quite easy to build this kit badly! red3 Main tip is to fit the intakes to the fuselage halves before you fit the cockpit sidewalls, which otherwise will stop them fitting flush. The fit of the wing also needs a fair bit of sanding and fettling to get it to sit down tight against the fuselage without gaps. I also left off the main gear until the rest of the kit was put together - this needs some nervous bending to get them in, but it was a better result than on No1 where I mashed them up proper with misplaced thumbs while sanding the seams. red1 Paint is Humbrol Acrylic Arrows Red which sprayed very nicely, and has been observed here, is proper red rather than orange like the Xtracrylix version. Decals are a mixture of kit and the S&M Decals Gnat sheet. The S&M has a number of decals which are not identified on the instruction sheet and after much peering through a magnifying glass I reckoned one tiny one was a Silver Jubilee marking found on the tails of the Red Arrows in 1977. I chatted with Mr S&M (aka Mel) at the Croydon aviation fair in January who confirmed this. As I hadn't seen any kits with this marking I thought I would do one, and found a nice pic of XS107 on the net to use as inspiration. red5 To add a bit of interest I also opened up one of the nose panels as can be seen in a few pics on the net, but as I have no idea what is in there, I just blanked it off and hope no-one objects!! red6 Hope you like! red4 Pat5 points
-
Was clearing some old kits that were my grandfathers, and came across this one: Not familiar with it - is it worth anything? (I have the Airfix one, but this seems cruder and older, perhaps a 60s kit?)5 points
-
Hi, I finished this kit today, the first Soviet aircraft to exceed Mach 1. it's a resin kit of prop and jet, very easy to build, paint with gunze super metallic. For the next it will be a British plane5 points
-
Would you trade for any of these?5 points
-
Tomorrow sees the 70th Anniversary of massed raids on 3 April 1944 against the Tirpitz in Kaafjord, Norway by Fleet Air Arm Fairey Barracuda dive-bombers of 8 Carrier Air Wing and 52 Wing. Although the Tirpitz wasn't sunk, she was badly damaged and no longer able to interfere with the ongoing Arctic convoys or to tie down critical naval resources needed for the forthcoming D-Day landings. Tungsten was a key operation for the RN, not least because it immobilised the newly repaired Tirpitz, but also since it marked the first combat operation of a very different FAA from that which had fought the war up to that point. Newly equipped with modern British and US aircraft, conducting offensive massed multi carrier raids (86 aircraft participated in the operation from the carriers VICTORIOUS, FURIOUS, EMPEROR, FENCER, PURSUER & SEARCHER) in the style pioneered by the US Pacific Fleet, it marked a step change in operating tempo, capability and mode. The 163 Fleet Air Arm personnel in the attacking units included 28 New Zealanders, three Canadians and one South African. I already have an Op Tungsten Barracuda in the collection, but fighter cover and flak suppression for the raid was provided by Hellcat and Corsair fighters, the latter in its first ever combat operations with the RN. So, as is my want, I have built an example of both this month to add to my WW2 70th Anniversary theme, using the ancient FROG kit for the Hellcat (markings out the kit box), and the more modern Hobbyboss kit for the Corsair (markings out the spares box). The FROG kit hails from the early 1970s (FROG did a lot of OP Tungsten kits), and is typical FROG; OK but chunky and lacking in detail. That said, it looks reasonably convincing, although its undercarriage is far too short, giving it a strange squat look when finished. So much so that I removed it and rebuilt the kit in a wheels-up pose, the first time I have done this in over 20 years! I added the wire aerial and substituted the "alien blob" pilot for a more convincing Airfix one. Other than that, what you see is what you get in the box. The decals, for an 800 Sqn aircraft from HMS EMPEROR, must be over 40 years old but worked superbly, although the fuselage roundel was a little out of register, so I swapped it for a Modeldecal replacement. The second model was a far easier build of a modern kit, although not necessarily any more accurate. I've built one of these very low cost kits before (it was a good way of using up the 2nd decal option on a Hasegawa Corsair kit) and despite its simple assembly and very low parts count it, the end result is very pleasing. I messed around a bit with the cowling, and added the pilot (Airfix again) and a spare instrument panel decal. Trying to establish credible markings for Op Tungsten is very difficult as there are very few dateable pictures. In the end I went for an 1836 Sqn aircraft from HMS VICTORIOUS (although I'm not sure of the serial). The other Corsair squadron on VICTORIOUS was 1834, who carried "7" codes. Vought painted their aircraft in "substitute" British colours (as opposed to Grumman's "equivalent" colours, or should that be colors), but there is little agreement on how these should actually look in service, or indeed if they were repainted in the correct colours before use. I've gone for a more green olive drab in place of the dark slate grey and a lighter dark sea grey in place of the extra dark sea grey, the latter being perhaps not light enough based on some photographs, I'm not sure if I'm right (but I defy anyone to prove beyond doubt that I'm wrong in how it turned out!). Decals are from the spares box. I fitted both aerial masts, but with no wire rigged - this may be wrong as well, but photographic evidence I have found is inconclusive. To complete the set then, here are all my Op Tungsten aircraft together, including a Frog Barracuda of 831 Sqn from HMS FURIOUS (827, 829 and 830 also participated) an 881 Sqn WIldcat from HMS PURSUER, plus a Seafire (the latter not the correct squadron which should be 881 or 842). Swordfish from 824 sqn also participated: FLY NAVY FredT4 points
-
Well - my second post to RFI...gulp. First off, some thoughts about the kit itself for anyone who hasn't built one... The level of detail straight from the box is superb, especially with the PE included. There's been a recent build by Vanja #66 that shows what you can do with this kit with imagination, skill and patience, but sadly for me I'm somewhat lacking in all 3 of those vital areas. The surfaces are extremely crisply moulded, and as this is my first kit moving away from the locating pins and trench-like panel lines of basic Airfix models, I was very very impressed by how restrained and 'in scale' it all looks. The build took quite a lot longer than I thought it would, but that's just the nature of these things. I've learned an awful lot from building this (now my 6th complete effort) including when and when not to use C/A, which I think is a valuable finding! Nothing proved exceptionally tricky, apart from the PE aerial under the fuselage which I broke off more times than I care to remember, and now looks rather mangled. As I'm still learning a huge amount from each build I'm just going to let that - and the vast number of additional flaws I've introduced myself - lie. I've been taken by the idea of doing a whitewash scheme for a while, and I'm sort of happy with how this has turned out. I tried the hairspray technique and found it, if done carefully, to actually be pretty easy and very effective. It is - however - where I nearly binned the whole thing, as it's a real lesson in restraint, stripping the paint off, trying again, going too heavy again, stripping the paint off...you get the idea. I reached a point with it where it's probably 70% like I hoped, and just wanted to get it done and on the shelf. Next time I whitewash I'll know a lot more where to go with it...hopefully with less head-scratching. Painted with Mr Colour, odds and sods of Tamiya and a little Xtracrylics, weathered with the airbrush and an oily pin-wash. Many thanks to Colin and SaintsPhil for the advice about Alclad Klear Kotes, which I've found to be stunningly good. Enough of the waffle:4 points
-
Revell (Monogram) 1:48 Bf109G-10 K4 points
-
As some of you are aware some members have been sending kits out to our troops and their NATO colleagues serving in Afghanistan. http://www.britmodeller.com/forums/index.php?/topic/234957197-stash-cull-for-the-stan/ We now have a few photos in of the models that have been built. Please bear in mind most of these guys have never done a kit before and are working with basic tools and acrylic paint (mainly starter set pots) Adam's Hurricane. Keno's Sea Harrier II More to follow when we get them. Julien3 points
-
Hello All, Here's my build, from my late Dad's stash, from I guess the 1970s or 80s. So it may have been under a quid! This is the original 1/72 Revell F4U Corsair, and it doesn't look too bad for its age: I am building more or less out of the box. The cockpit insert is reasonable (compared with the contemporary Airfix peg for the pilot to sit on) and I didn't want to spend too much effort because the canopy is pretty difficult to see through, so I just added a rough control panel and a harness for the pilot: And the pilot needs to see! Thanks for looking, Adrian3 points
-
This has been on the shelf of doom for some time after an incursion with one of the grandchildren,major repairs necessary.Modelled on a picture in the first Squadron in Action book on the aircraft was dumped on an airfield in California [i think] awaiting its fate along with a few others.Decals were from an aftermarket sheet can't remember whose.Anyway it seemed to scrub up well. Ian3 points
-
Well this is finished too. The Airfix 1/48th kit and Freightdog decals. depicts VP202 of 14 Squadron RAF Wahn, West Germany 1949. 'CX-B was written of following a belly landing. Just a little more to do such as fabricating a handle for the nose hatch and a couple of other things. Pics to be added here soon. Cheers.3 points
-
This is my take on the old Revell kit(I believe it's ex-Monogram) with a fair bit of scratch building in the cockpit and some little embellishments on the outside. Build thread is here: http://www.britmodeller.com/forums/index.php?/topic/234954668-monogram-148-bf-109g-10-finished/ The interior detail Anyway; The finished photos... I'm quite proud of this one, especially since it's my 6th build since staring this hobby Any comments are very welcome K3 points
-
Thanks a lot guys. I still don't really know what I'm doing, but I'm enjoying it. Tonight I added some more variations to the "red" and grey areas, still easier to see IRL than on my pics. Then I did the black heads and a base coat of black-brown for their feet and legs.3 points
-
Just the little stuff to do, light at the end of the tunnel is approaching rapidly. John3 points
-
Back to work on this one as I still want to get that challenger MBT in before the end!Troy,s information has confirmed my worst fears that the white scheme was actually a wash so trying to work out how to achieve a decent finish with my limited skills.Anyway first step is a blast of green on the upper surfaces to start with.3 points
-
3 points
-
Fantastic. Possibly THE coolest display case ever. Chris3 points
-
Well finally finished it. My Mojo slowly coming back but only to finish of part builds! (No bad thing that!) Anyway here goes: G-ACDA of the DE Havilland School of Flying 1933. Airfix 1/72nd 2014 tooling, Pavla decals. The real 'CDA is airworthy again nowadyas but flies with the wing registrations in black. Not sure if thats right or wrong but looks VERY authentic( as too I hope my model does) Sitting pretty inside the front cover of my Profile Publication inspiration booklet!! A bit 'fuzzy' this pic... sorry! I have changed my mind about this kit now I have it completed and simply love it! The Pavla decals were reluctant to stick but assisted by decal solutions and Klear they behaved. The Blind flying hood you see fitted was from the AZ kit (as are the mainwheels) Lost the kit tail skid due to it breaking off and replaced temporarily with a shaped pices of spare strut! Thanks for looking!3 points
-
Houston, you are embarrassing me. I do not deserve such accolades. Banana Build - Day 127 I have to report that no actual Banana Building happened today as it was a club night meeting. I took my Flying Banana along to the meeting to show what I had been up to for the last month: I think it was quite well received but they are a tough crowd so it was hard to judge. At least my mottling masks were returned to me: Duncan, I forgive you (for not stealing them), with your skills you have no need of such things. I will finish with some pictures of the amazing WWI trench diorama that my fellow club members have created for the Gordon Highlander's museum: This is just a tiny piece of the whole diorama: There is even a rusty Dalek in there somewhere but I forgot to take a picture. If that does not want to make you visit the museum, I don't know what will. Bye for now, Nige;3 points
-
Does this count? Peter3 points
-
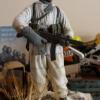
This is now complete! Its a nice kit and the optional PhotoEtch set is well worth the addition. In this model I've added figures sourced from the companion Vehicle crew and Patrol sets along with stowage gear sourced from Red Zebra (aka Paul Wade http://www.network54.com/Forum/433829/thread/1392309591/last-1394538084/Pauls+Warrior+Set+Sneaky+peek ) plus carbon-fibre aerials from Accurate Armour Hmm just noticed that the rear mud flaps are way too clean! Needs more dust!! The bar armour is of course overscale but in my opinion still as good a representation as you could get at this scale with injection mould technology. It was a nice build with no major fit issues. The most complex part was the tracks which took a bit of jiggery pokery to get aligned properly. The PE gives you lots of nice extra details along with nicely scaled mud flaps, underseat stowage bins, grilles, handles and tie downs. The aerials that come with the kit are thick and bulky and look IMO pretty awful so replacing them with stretch sprue or some leftover carbon fibre aerials I had in the spares box originally from Accurate Armour. The driver was taken from the Vehicle Crew set as was the raised arm of one of the figures in the turret. The other 3 figures come from the Patrol set. What is interesting is the two sets appear to be slightly different scale as the vehicle crew is a smidgen larger and bulkier. The stowage set from Paul Wade is very nicely cast with much more than you can feasibly use on the Warrior alone, so that useful for the other vehicles I have in the stash!2 points
-
Hi Gents, Having heard about this over the weekend I went chasing after it this morning despite the dodgy weather. On the first two shots we tried to prompt him to cycle the canards but no luck. The later shots at least caught a little light! Gary2 points
-
Hi all, I have been working hard on our house since the move but I have found the time to squeeze in a few small projects here and there. A failed attempt at a train (lost bits during the move), a couple of Battlestar Viper models that I enjoyed and then this…the RMS Titanic 1/700 from Revell. Overall I really enjoyed the build, not too many issues to sort. A bit fiddly in places and the transfers went all silver on me (against the black) – if anyone has any ideas on this please let me know! For your enjoyment. Thanks for looking. Leigh.2 points
-
Hey guys, i finished this kit as part of the tenner GB here on BM. The goal was to build this OOB and practice some new techniques and paints on it, which as usualy (at least for me) led to not as clean build as it should.. i just have to learn to focus on OOB kits too Anyway, to the kit - the kit is not so bad, but it has some catches. Two worst for me were the canopy and decals (both tooooo thick, ll replace these on my next AZ spits with aftermarket). The marking is one of very first IDF spitfires with C wing, which was finished and painted mostly by green primer, but some panels were taken from wrecks and other spitfires. I wanted to make the extra panels looking diferent and more or less aged. I tried to make the exhaust stains with airbrush by hand, using much much thinned vallejo air black colour with drop of brown and white. Obviously i need a lot more practice in the airbrush handling For those interested, the WIP thread can be found here (though nothing special as it was mostly OOB realy ) http://www.britmodeller.com/forums/index.php?/topic/234956074-spitfire-mkixc-idf-172-az-model/ So, here are some shots, any recomendation or tips or comments are more than welcome guys2 points
-
Hi all, I managed to get this one finished within the last month to add to my growing collection of 1/72nd scale VTOL/STOL jet projects and which will hopefully feature in an upcoming book article about such projects that's underway at the moment. Apols in advance for all the text but the system the aircraft used needs a bit of explaining... This is my take on the amazing Rockwell XFV-12A VTOL fighter of the mid seventies which never made it beyond the prototype stage, not really surprising when you consider the technological hurdles that the company faced in designing the project. The aircraft was designed as a supersonic fighter/attack machine using a "Thrust Augmenter Wing" concept. The design used a modified 30,000 lb thrust (in afterburner) Pratt & Whitney F401 engine. For vertical lift, a diverter valve in the engine exhaust system blocked the nozzle and directed the gases through ducts to ejector nozzles in the wings and canards for vertical lift. The thrust of the spanwise ejectors could be modulated by varying the diffuser angle: pitch and roll were controlled by differential variation of the four ejectors from fore to aft and left to right; yaw was controlled by differential ejector vectoring. An auxiliary engine inlet for use in vertical flight was located immediately behind the cockpit. If certain parts look familiar then that's probably because the prototype aircraft used the forward fuselage and nose gear of an A-4 and a resized centre section and intakes of an F-4 to save money, (the main gears came from a T-2 Buckeye). Unfortunately the system was flawed as the engine could only lift 75% of the weight of the aircraft in which it was mounted and even though an extensive upgrade program was considered to improve the power/weight ratio the costs were spiralling out of control until it became one of the most expensive aviation projects the US had ever undertaken. It did make a couple of tethered hovering flights using the old NASA LEM test facility which only went to validate the inherent problems with the thrust weight ratio. Needless to say the whole thing was wound up in 1978 and in retrospect should never have been given the green light...another costly 'dead end' sadly. Had it worked it would have been an amazing aircraft..it's top speed was cited to be 1595 mph...no slouch and very agile. I've portayed it as an operational F(V)-12E of VF-191(Satans Kittens) aboard USS Oriskany for work up early 1975, (had the program gone through on time as sadly the Oriskany was decomissioned in late 1976), armed with two AIM-7's and four AIM-9G's. The Sidewinders and Sparrows are mounted in the proposed positions as stated in the Rockwell brochure, the long range tanks are from an Emhar Demon. There were several different proposals including a twin engine version and one tailored to the USMC for close support. This model took a lot of work to be honest as all the individual control surfaces had to be cut out and then their relative positions worked out as Anigrand provide everything in flight position as a simple kit. Same goes for the wepons loadout. The dustbin lid in the exhaust is actually the sealing nozzle to prevent hot gas leaving the exhaust when diverted to the thrust augmentors in the wings, (ala Saab Viggen thrust reverser), and was closed when the slats and flaps were in the VTOL mode.. The main gear has been replaced as it was too short and over simplified and a new cockpit was used from an A-4 kit. The resin had a lot of air bubbles and bits missing as usual and a rather pebbly soapy surface texture which was a right pain to get right, but I'll be building a lot more Anigrands in the future, love 'em. Finished using Gunze and model master paints, Flory light dirt washes, Alclad metallics, pastel and oil washes and decals from the spares box. Although a footnote in aviation history it's still an interesting aircraft/concept and a good all round fun build.................Can I can come off the meds now nursey ! Cheers all, Melchie2 points
-
hi,just noticed BBC2,tonight 8.00,...collectaholics star wars stuff....bound to be intresting,sorry not a lot of notice don2 points
-
the white wash finish you mean white winter camo? i can recommend you reading this stuff http://vvs.hobbyvista.com/Modeling/Lavochkin/La-5/Vector/FullBuild/Sekularac/, i found few very usefull tips there about painting winter camo and chipping overall2 points
-
Hi mate. 70s Vulcans were mostly Light aircraft grey underneath, though a few were white. The official colours you would need are Humbrol, 165, 163, 166. Though the Green looks a bit cheerful as they very quickly faded to a darker brown olive drab look. As for the engines you can have 201, 202, Available in resin from Frieghtdog. There are plenty of machines with 301s too, But the kit ones flare out at the ends incorrectly. they should run more paralell with the tubes, I have just had to correct this nightmare on my current build a few days ago, Still rushing to get it done. You need to watch out for which airframe had which mods, and when so pick a Vulcan with lots of photos from the same year/era. as things changed, like, does it have or not have any arangement of the following. Nose thimble, IFR probe, What type of Fin cap, Tail cone 3 variants on the b2, what under wing mods does it have such as skybolt fittings front and rear, skybolt plate etc.. You also need to get the right type of stencils, If you have the lastest boxing from airfix they are only suitable for XH558 as she is now, Not the same as she was in the 90s and not the same as in service Vulcans. You will find these two websites very helpful http://www.avrovulcan.org.uk/ http://www.users.zetnet.co.uk/mongsoft/vulcan_production_list_page.htm Cheers Rob2 points
-
That F-16 looks so real!!2 points
-
Well not quite the drum roll but here it is! The serial number came out almost perfect on this side! There's a slight issue with the marking on this side, the mask wasn't quite in the correct position. I’m actually really happy with the paint job, was almost worth all the effort....will leave that till it’s completed! There are a couple of things that need to be touched up, the serial numbers plus I forgot a splinter! This is easy to do when you have well in excess of a hundred individual masks! I can use the reverse masks for the individual touch ups I need to do, so that will be fairly simple. As mentioned I need to run over the model with a micro mess (not fibre) pad to help knock off a wee bit of the paint build up from the top coat. It’s not 100% accurate when compared to the real scheme but considering. To get it right you need to work bigger 1/32, then you could do the masking perfect. For 1/72 forget it, use the decals and save yourself lots of headaches! The end is now insight for this one, once I have a clear coat on just a light wash to bring up the panel lines and that’s it, as there appears to be only some minor (hmmm) safety markings and that it! Oh plus putting the rest of it together as well!2 points
-
I have to make one more comment. I know i said the bottom seems to be a bit overdone and many ppl said the same, but today i found "scale aircraft weathering" page on facebook and while browsing by the photos there, i found photo of spitfire mk. I or II in flight, taken from bottom side. And it was maybe even more dirty than this So i guess one never knows how much dirty the planes could be2 points
-
I have a theory. Something went wrong - they simply can not bring it home2 points
-
The turnout was actually better than normal. If anything your absence seems to positively encourage others to show up. The Me 109 is Alasdair's. I started putting some of the photos from the meeting on the AMS website including his Me 109 but photobucket stopped working so I will have to finish them off later. I am not sure about the smoke ring, it certainly does look like it and incredible modelling if it is the case.2 points
-
Nope, just the annual subs were due! We're now gonna have to send round the heavy mob to extract cash from those who weren't there....2 points
-
It is, I wouldn't attempt this in anything smaller the 1/48, they do produce a 1/72 version but you'd have to be mad to even attempt it! Not too bad, there's something calming about spending +3 hours masking..........though I haven't found it yet! oh yeah!!! I've had a sneak peek, will not say anything further! Ok another fun 3+ hours masking this morning, it should have been a lot easier as the positioning bits had all be done with the initial mask......but it wasn't! The initial masks weren’t quite right and gave me grief getting their positions correct, well the second set were even worse, they just didn’t seem to match at all! So after much cursing and wishing I had gone the transfer option the masks were done. Other than that they didn’t quite match the hardest part was getting the serial number masks to line up, they took forever to sort out and.........a wee touch up is required. Painting was just as much fun as well, the air brush again played up but sort of settled down for the main job. Again this is a reverse paint job so normally you would paint a lighter colour over a darker one.......especially not with super thinned paint! So to get the colour right it required multiple coats, which of cause made the top coat a bit thicker than I would have liked. Not too much of an issue, will just need a light going over with a micro-fibre cloth to smooth out and all will be ok.......oh and cause I forgot to put some liquid mask fluid over the marks to fill in the gaps! Needless to say it takes nearly as long to remove the masks as it did to but on, and how does it look......... I've had a peek2 points
-
Thanks Mark, I'm catching up on posting my photos (I actually started in late Feb), so I can in fact answer that very precisely! Here's the picture I took on Monday after a pre-work decal session: They are resistant to extra decal glue (rub the backing paper over the model to transfer more "stick"), strong decal solvent, a puddle of Future and even Mek-Pak! The decal in question is rattling around in the box with the spare parts and shows no signs of damage after two days. I will just limit myself to saying "they aren't over-fragile..."! I have ordered "Superscale 72-740 F4U-1A & FG-1A Corsairs" from Mr Hannant for the princely sum of £4-odd, so I am still inside my tenner! Thanks for looking, Adrian2 points
-
I think this was the stuff. Just some random mesh from the scratch box and possibly from a Tamiya kit leftover. I'm always bringing bits of junk home that could be useful for scratching. Differant gauges of wire, mesh, aluminium tape etc. If I did any it would only be the driver and only if he didn't inter fear with bits in the pit. Me having the time and effort are the next to that. Watch this space...2 points
-
I flew four flights this morning coupled with an early start and to be honest I just wanted to get back home. But as we landed, over on the far side of the airport, we saw the unmistakeable line-up of 12 red Hawks! Now, that's the most I've ever seen in one go, but the 'nine' were present as well as three other airframes. After finding out that they were departing in an hour, I quickly drove home, grabbed my three-year old son and camera and just got to the viewing area in time. Thanks for popping by chaps, you made our day!!2 points
-
As you're all probably aware............surprise surprise it as an April Fools. Nice to see most of you have a sense of humour and just think it could have been much worse..............I could have said we were getting an entirely new kit and then you'd have your dreams crushed when you found out it wasn't true.......but even I think that's too cruel.2 points
-
Thanks guys. The hagelkorn is now attached along with the prop and other details, I will have to redo the paint on the canopy before that gets fitted, but that will be the last step. Back to work tomorrow so it will probably be next week it will get finished. Cheers, Stuart2 points
-
2 points
-
Now, the wheel wells I was really pleased with, and basically I used a thin coat of Vallejo interior green built up over a black undercoat, then drybrushed with a lighter mix of this green. Then I picked out a couple of details, and drybrushed again with silver, but tried to be reserved about it. Finally, a wash of raw umber and black oils was quickly done after a gloss coat (Alclad Aqua, same time as the rest of the model). Now, the wheel wells I was really pleased with, and basically I used a thin coat of Vallejo interior green built up over a black undercoat, then drybrushed with a lighter mix of this green. Then I picked out a couple of details, and drybrushed again with silver, but tried to be reserved about it. Finally, a wash of raw umber and black oils was quickly done after a gloss coat (Alclad Aqua, same time as the rest of the model). And here are the other bits which are to be, probably quite badly, stuck to the model! The end is in site! I'm currently working on props and wheels, which are resin replacements - I wasn't happy with what I'd done with the props and got some more, and thought I'd get some wheels while I was at it, and will give the Tamiya wheels to my Revell kit, they look hopeless!! Advice is strongly welcomed as always, happy modelling!! Val2 points
-
Ok preshading has been done but I have a problem to make thin line I don't know if that was a paint problem or pressure or me?? so it was fail! but I will cover that later so maybe it will turn ok Have a nice day2 points
-
You are right about the logical subjects, but it seems that the Ju88 was built throughout production with 70/71 and was not repainted into 72/73. However the Do217, even when used as a conventional bomber, was painted in 72/73. Although other schemes are available for both types it seems that the obvious exchange didn't happen. For your specific example of Mediterranean Ju88s, the 1942 ones attacking Malta would be 70/71, with some desert-camouflaged ones in North Africa. Later operations from Italy were in a dark blue, recently identified as RLM83, with 76 wave mirror/meander/arabesque/squiggle on top.1 point
-
Very nice work, Pat. I do hope Airfix would make one in 1/48. Even at that scale it's small.1 point


This leaderboard is set to London/GMT+01:00