
Leaderboard


Popular Content
Showing content with the highest reputation on 24/03/14 in all areas
-
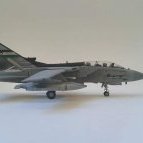
My second vacform, but much tougher to finish than the first, mainly due to a series of stupid mistakes when painting it. Aeroclub kit Modified Quickboost seats Berna decals 3d printed wheels and nose undercarriage In progress thread is here: http://www.britmodeller.com/forums/index.php?/topic/234942403-sea-venom-sea-hawk-wyvern-and-skyraider/7 points
-
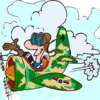
HI all, here a some pictures of a kit I completed some weeks ago. It's the Tamiya D520, with Regia Aeronautica markings. On the web one can find several pictures of this plane on the Istres airfield in the south of France, at the time of its transfer to the italians. On these pictures, the french cockades are overpainted in grey, but the italian fasci are missing, I added them thinking that some months later they would be present. I took the decals from an old Aeromaster sheet. The cockpit is detailed with an Aires resin kit, the exhausts are from Quickboost. The camp is done with mixes from Gnuze paints, that I found on the web. The basis of the small diorama is some 'cardboard foam' glued on a photo frame. The ground is done with isolation foam, covered with wall putty, then sprinkled with earth and small gravel. The high grass is static grass, glued on diluted white glue, using a 'grassinator', this small gadget can easily be done using an electric fly swatter, the grass stands then upright because of static electricity. The tree is done with thyme branches from our garden, the leaves are from Mininatur. I will add an italian pilot from Jaguar, which is currently waiting to be painted. I hope you will like it, regards, Christian. <script src="safari-extension://com.ebay.safari.myebaymanager-QYHMMGCMJR/f470c93b/background/helpers/prefilterHelper.js" type="text/javascript"> </script>6 points
-
Starfix 1/72 scale P51d Mustang. Painted using Revell and Tamiya acrylics Decals from the Airfix kit courtesy of Chrisrope. Thanks again.6 points
-
Evening All, Number five of 2014 see's me return to 1/48th Here is my rendition of the much aligned HobbyBoss TA152-C1 I picked this up at SMW for a bargain £9. I did no corrective work in terms of basic accuracy, but have to say this was one of the best fitting kits I have had the pleasure to build. I used no filler any where and just a touch of Mr surfacer to hide the seams. Decals are from EagleCal and depict a possible scheme from JG300 Welzow Germany April 1945. Paint is my usual Gunze light weathering, and Albion Alloys tube just for pitot and gun barrels. I added seat belts from foil to seat, ashame I didi not complete it for Hinckley show yesterday but ready for Cosford, Thanks for looking, feedback as always most welcome, Rick G5 points
-
Hi folks here is one I have just completed. Seafire IIc of 880 NAS, HMS Indomitable. I used the tamiya spitfire Vb Trop kit and the Airwaves IIC conversion kit. The decals are Model Alliance. The aircraft features in some well known colour photos which is great for reference. I like this aircraft as it has the blue under the nose. Paints were Xtracrylix. This is my first time using the salt weathering technique which I was a bit unsure about, especially looking at some of the work in progress photos, there is a lot of blotchiness which I had to go back over with the airbrush to get something I was happy with. I'm also not a big fan of the radio hatch which I think stands too proud. The resin wings fitted very well with only a minimum of trimming. Also if you know the photo of this aircraft, what do you think of the tailplane? Does it have a coat of light aircraft grey at the tips or is this a reflection? The decal instructions haven't inlcuded it.5 points
-
Dragon 1/144 MiG-27M Flogger J. Build thread.5 points
-
Starfix 1/72 scale P51d Mustang. Painted using Revell and Tamiya acrylics Decals from the Airfix kit courtesy of Chrisrope. Thanks again.4 points
-
This is my first picture post.The build was finished about 2 years ago,my first build for about 35 years Revell twin seat typhoon 1/48 No extras,straight out of the box Brush painted Comments,good or bad very welcome4 points
-
My first RFI post: Eduard's 1/72 MiG-15bis from their Dual Combo, painted as MiG-15bisSB, 6. sbolp, Prerov Air Base, Late Sixties, Early Seventies She's painted with shades of Alclad II and various others paints, then given a chalk-based wash. A pleasure to build and will certainly build another. Hope you like her.4 points
-
hi guys' after a month or two of being MIA due to some serious family issues here is my latest build, its a panther f (again) done in a late war what if color scheme, took a while to eventually finish but must say i rather like this one' and its great to be back. cheers guys oz!.4 points
-
Good afternoon, This week I took the opportunity to take some pictures of the finished model. I did it for the Training type GB. Initially, I wasn't sure about which version to do. After a while, I decided to do the Vampire Preservation Group aircraft, since it is a scheme I don't have in my collection. The HSS/Dayglo Orange will be used for the Gnat and Gannet. The kit is really nice. The panel lines may be a bit on the heavy side, but airfix is moving in the right direction, as they get smaller every model. The build itself was very straightforward, I just needed some force to bring the wing panel flush with the intake grill part. And I needed to cut away a small part of the lower wing, so that the gear legs can be attached at the end. The seats have been improved with some small bits and belts to make it look more realistic. Otherwise, no aftermarket parts used for this model. Even the decals are from the box. Colour is tamiya flat alu, yellow is xtracolour RAF trainer yellow, over a white primer. All in all, a very nice kit from Airfix! Thanks for watching! Alex4 points
-
Hi all Inspired by Ian Price's Harrier GR3 I thought I'd better create mine so with no further ado here she is. Cheers guys. Clive4 points
-
Been a while since I posted any builds, real life always gets in the way.. Here is the Academy OV-10A, nice kit with good detail and engraved panels, only really one warning...nose weight,nose weight, nose weight, loaded it with Deluxe Materials Liquid gravity. Decided to build this after reading the excellent book " A Lonely kind of War" which follows a forward Air Controller in Vietnam. As always all comments and critics appreciated.4 points
-
Hiya Folks, My recent `Hurrifest' has moved up a scale now and here are a few Airfix Hurricane Mk.I`s,.....a great reproduction of the old girl; Battle of Britain Night Fighter; and an Irish Air Corps Mk.I too,....unfortunately the varnish didn`t play ball with this one; Told you I`d been busy! Cheers Tony4 points
-
Sad end albeit one that always seemed inevitable Assuming the press reports are right though I would suggest Malaysian Airlines review their public relations policies and skills. Relatives getting advised by text is not exactly professional or considered4 points
-
Dragon 1/144 Su-22M-4 Fitter K. Build thread.4 points
-
Time to get the brush out.4 points
-
Hi there, Its been a while since my last model here at Brit but fast life slow modeling... anyway. This is my latest finished model german modern Leopard 1A5, Revell 72 kit plus Extratech PE + selfmade base. I have got the kit from my son as a birthday gift. He is happy with the result I have achieved. Enjoy. All coments are welcome. Thanks for watching P3 points
-
Hi Just finished this one, from the box apart from a resin pilots seat, for the Bomber Command SIG, we don't have many Canberras. Got the kit for a tenner and bought Xtradecal 48-054 to make a B2 from 100 Squadron at RAF Wittering in 1956. The main kit decals were used for the roundels but only 'cos I couldn't get any replacements straight away. The upper wing ones are rubbish and in fact I removed one by mistake and had to put in an appeal on Britmodeller, thanks Spooky56 (Rick) for coming to the rescue. Xtracrylix PRU Blue, Light Slate Grey and Medium Sea Grey paint job. Not happy with the canopy, should have attached and masked before painting but otherwise a straight forward build. The last picture is of the weight I used to make sure she didn't tail sit. Not sure of actual weight but there's two inside the bomb bay and there's a penny next to it for sizing. Regards Paul3 points
-
The box art for the new tool Airfix Mustang, I am sure, showed an Antenna cable there, that's why I did it. It was built for the Under a Tenner GB, and I did it because I enjoyed it.3 points
-
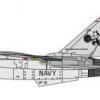
Hey everyone, Here's my first RFI (and first Tomcat) for this year, Hasegawa's original 1970s-era issue. You can read the WIP here but in summary: Model: Hasegawa JS-134 in 1/72 Build: OOB mostly but the seats & cockpit got some minor tarting up Decals: VF-1 Wolfpack from the later Hasegawa 04039 boxing Paint: White sprayed (Halfords), otherwise brush painted with Revell Acrylics. Future, Pro-Modellers wash, Humbrol Satin varnish She's not perfect, has a few goofs here and there and won't win any awards. But for a 70's kit, I'm really happy with it. Now on to my next Tomcat! Thanks for looking, Dermot3 points
-
Hello again from last few days I really does not have time for modeling but I manage to find some . I start my work from the cockpit and other small parts.The pit is almost done I just need to add a seat belts.I have also paint prop today This build is not that fast like the previous one but it might be better for Finnish result3 points
-
Afternoon chaps I was trying to finish off all the small detail in the Navigator/Bombardiers compartment before posting here but it took such a long time making the Chin turret gun sight ! that I thought I would post now to give myself a break!!! CHIN TURRET GUN SIGHT This was not easy to replicate due to the fact that I didn't have great photos (with all angles showing) of the frame work that the N-6 Gun sight sits on!....and so my friends the gun sight you see is the best I could offer and is my own interpretation of it!!!... The first couple of photos are of the Glide and climb angles for bomb release chart............... .....and I now present to you my interpretation of the Gun sight mechanism!!!... So.......there you have it!!! I have got to find some more information on the cable/spring attachments for the Guns in the front before having a go at building two 50 cals!!.....should be a laugh!!! Cheers Fozzy3 points
-
Well I'm finally in a position to declare construction work complete and the big Halibag is ready for the painting process to begin. Before I start painting I wanted to get the exhausts done in case there was any major alterations needed to the nacelles - this would be a bit of a headache if the painting was complete and I had to cut/sand things. The Halifax I am replicating was fitted with Merlin 22s and drove the four-bladed props, and was fitted with the late style of exhaust. I was relieved about this as they would be much easier to replicate than the 'saxaphone stacks' found on the earlier Merlin-powered Halifaxes. Here's what they looked like on the real aircraft (used for illustrative purposes only): My effort was produced using some U-shaped Evergreen strip, cut into individual stacks and shaped accordingly, and then mated to a plastic-card backing piece, which in turn will attach directly to the nacelle: They still need a bit of refining, but you get the idea. Whilst paint is drying I'll be able to make the rest. I've also scratch-built a few more of the aerials found on the real aircraft - the DF loop was made from Milliput, and the small grab- handle was made from Evergreen strip: The balance horns on the ailerons were also made from thin steel tubing bent to shape and Milliput: Other aerials will still need to be made and added, but these will go on after primer as the whole model will be micro meshed and I know I'll end up knocking any finer bits off! The cockpit has been carefully masked and the frames primed with green: And now here we are, ready for painting to commence: The first job will be paint the squadron codes and wing roundels so I'll keep you updated as I progress. Until next time, Tom3 points
-
Hi folks hope you like my attempt at adding the prototype Hurricane to the collection.Part of a six plane stash clearance build in WIP this is the first one done.Airfix new tool kit,no major work other than filling the exhaust aperture and using decals(thanks Rick) and re-doing the early U/C doors as per this model.Not 100% accurate but I don,t count rivets!2 points
-
Hiya, this is my take on the Airfix 1/72 Messerschmitt BF 110. This is about my 5th model completed since my return, but the first one I'm really happy with. The kit is great in terms of fit, and she looks like a 110, but it lacks detail in places, and the panel lines are too deep, but that has been discussed to death!!! I had a number of problems of my own doing, hence I've had to replace all the guns on the kit. I would also say the decals performed brilliantly for me, I understand others have been less fortunate. Paints: Vallejo for all main colours, preshading and weathering in Tamiya Weathering: Flory's dark dirt, Tamiya smoke, Flory pigments on the engines PS I'm a rubbish photographer!! Please let me know what you think, I'm here to learn Cheers, Val2 points
-
2 points
-
Hi modellers - here is a quick build I knocked up over a weekend a few years back. My wife abandoned me for the weekend and left me £10 for a trip to Costa after leaving me to do the weeks shop - I diverted to the local toy shop and scooped up what I could get for my Tenner - here she is nose down and taking on water... I used a scrap of 2x1 and some Vallejo Water Effects for the base plus a few straps of spare picture frame offcuts to tidy it all up Some flower arranging wire was used for the lifeboat lines - the lifeboats had to be individually cut off too Thanks for looking in here - John2 points
-
Greetings, good people of RFI threads, I come bearing gifts (or sacrificial material, whatever you please)... This is my little BF110E, Eduard's Profipack with some scratchbuilt details - engines, ventral guns, nose guns, a number of things in the cockpit... The kit itself is a treat to work with, I enjoyed every moment of it, pieces fit perfectly, panel lines are as they should be, highly recommended for beginners and experienced modelers alike... It took around 6 months to build it, mostly because my studies haven't left me much time in first 3 or 4 months... There's a WIP thread as well, you can find it here... Here it is next to a Bf109, one of my first models built, almost 10 years ago now, when I was 11 (11 and a half, halves were very important at the time )... This is the only picture of the actual plane I managed to find... Not much to compare from there, though there is a bird similar to this one, G9+HM, that also had sharkmouth nose art, so I made a B&W photo for a bit of comparison... It's a bit cloudy and windy today here in Belgrade, hopefully tomorrow it will clear so that I can take this thing outside for some shots on natural sunlight... This is my first RFI thread, so naturally - every comment, every critique, every advice is most welcome... Cheers!2 points
-
Finished this one a couple of days ago. 1/48 Hasegawa F-16D built OOB and painted with Lifecolor paints, the decals are from Zotz. The canopy is not glued down and I have not armed it yet.2 points
-
Kit - Italeri 1:72 Paint - All enamels WEM & Humbrol Decals - Xtradecal Extras - None - Built for the OoB Campaign/GB on www.modelersalliance.com & Early Jets GB on www.kiwimodeller.com SEPECAT Jaguar GR1A 41 Squadron RAF Coltishall 1991 Didn't want to weather it too much, so just 'Flory Washed' it. Even tho' I rarely work in 1:72, I really enjoyed this build, so much so that I pulled-out another couple of 1:72 Italeri kits and will be building them in the near future. In the meantime, thanks for taking the time to look at this one - All criticism, comments and questions are welcomed. AFN Ian2 points
-
Hello Dear Friends, I have recently finished the construction of two Vampires and one Venom that belonged to the Venezuelan Air Force (FAV), and operated during the years 1950-1960. The first De Havilland Vampires FB-Mk52, arrived in Venezuela in late 1949, to replace prop fighters P-47 Thunderbolt. These were the first jet aircarfts used by the FAV. A total of 24 FB-Mk52 were received. In 1955 five DH Vampires T-Mk55 two-seat training aircraft also were received by the FAV. In 1961 all Vampires became part of Fighter Group No. 12, together with DH Venom and F-86F Sabres. From 1968 they began to be replaced by the more advanced fighters, American F-86K Sabredog. A Vampire FB-Mk52 and T-Mk55 still preserved in the Museum of Aviation FAV, in Maracay, Venezuela. To build the Venezuelan Air Force DH Vampire T-Mk55, two-seat trainer, I used Classic Airframe kit "DH Vampire Trainer" 1/48 scale. To build the DH Vampire FB-Mk52, I used the Alley Cat multimedia kit (resin, white metal, and photo edge) De Havilland Vampire FB.MK.5, 1/48 scale. I used "Model Master" acrylic paint; and all decals were home made. De Havilland Venom FB-54 jets, began arriving in the Venezuelan Air Force (FAV) in 1955. Twenty two were received from Great Britain. After more than 15 years of operation, they ended the service in 1973, being replaced by the American fighter F-86K Sabredog. To build the FAV DH Venom FB-54 fighters, I used "Classic Airframe" kit DH Venom FB-4, 1/48 scale. I also used "Model Master" acrylic paint; and all decals were home made. The detail building (step by step) of Venezuelan Air Force DH Venom and Vampires can be seen in this thread: http://www.modelismolatino.net/vampiros-amp-venom-venezolanos-tema7702.html BEST REGARDS RSK48, From Venezuela2 points
-
Grumman X-29 was built to demo swept forward wing technologly, there was two aircraft built for the program. This is the Dragon kit in 1/144, good kit with excellent detail and fit. The kit comes with two canopies, a one piece canopy closed option and the one below for the open version, I have no airbrush so Tamiya Gloss white rattle can was used and other paints used via hairy stick. As always all comments and questions welcome.2 points
-
I still haven't painted... but after looking at the printed photos almost daily I mixed up some paint tonight that I think will work as the base coats of red. I wanted to use the same base in the mix for both the male and female to sort of keep them together. Not sure if that's the right way, but I will start with these and see what happens.2 points
-
Hiya Folks, I had an old Airfix Lancaster which either needed scrapping or renovating so I went for the latter and pulled it apart, sanded the old Coastal Command scheme off, added Freightdog resin wheels, Aeroclub propellers and exhausts and painted it Sea Blue with Aeronavale decals from Xtradecals, so after all of that,...here it is; Its not perfect by any means but I`m still quite pleased with it, All the best Tony Oh bugger,.....I`ve just noticed that the props need painting again,....I`d missed that until I looked closely at the photos just now,........my eyes are definitely going! Time for another visit to Specsavers!2 points
-
Well I got her finished! Rather than a blow-by-blow account of some very fiddly etch and placing of the guns, I thought I'd just show the end product. It was a great decision to use the etch railings as they look so much better than the plastic ones. The cable cutter on the prow wasa pig to get right but a little patience and it popped into place. The little triangular structures at the stern were also awkward but my long-nosed snips allowed me to bend them into shape and they are fine in detail. The guns were applied and so was the flag mast. The flag itself is a decal. All-in-all a real cracker of a kit and I can't wait to do another few. Here are the pics, rather than a separate RFI in the maritime thread. I'll post some to the gallery later. Thanks for the comments and the support!2 points
-
The deck wash has been finished and I have started the streaking. I'm not sure if I'm happy with it yet. IMG_3699 by Snapper_city, on Flickr IMG_3698 by Snapper_city, on Flickr2 points
-
Calling this finished now. More pics in the gallery.2 points
-
Time for an update on this one, not had much to report as it really does fall together, fit is great and even the majority of the joins have been engineered into panel lines to minimise seam filling and sanding (my most hated and tedious job!) Got the main airframe complete, primed with Tamiya rattle can primer and now sprayed in alclad airframe aluminium Also got the gear, wheels and gear doors painted, added brake lines to the gear doors with lead solder and some tubing made from heat stretched cotton buds, also added the bit of tube thats on the front of the gear leg and drilled out the gear locking bracket, these have now been given an oil wash. Radiator cores have had the same treatment as well as the spinner ready for a coat of red Final pic, managed to get some red on the spinner last night and gave it a little chip with a toothpick, had used a coat of hairspray and was going to use a stiff brush and water but the red paint doesn't adhere that well to the alclad anyway so managed without it Like to get some of the small bits done first so it feels like i'm getting somewhere, hope to stick a gloss coat on this tonight ready for a wash and decals. Then time to get off the fence and decide whether to go with xtracrylics for the azure blue / mid stone / dark earth or try out gunze......hmmmm Thanks for looking, Stu2 points
-
Thanks folks, I am trying to make it Interesting as well as realistic as possible. Here are two pictures of the folded sail made up,' what do you think really' With flash. Without flash. Not sure if it will spoil the effect, this will go in the lower main sail position. Some more progress on the boats. Oars/muskets etc placed. Liberty boat coming on. Cheers foxy2 points
-
I guess we can be sure that the F.1, F.3 and FB.5/9 are covered. With Airfix's trainer that just leaves the NF.10 and the Sea Vampire. And then hopefully some Venoms.2 points
-
I've got a Su-25 tucked away in the stash, but to be honest I'm calling this one done. Thanks again for the offer but even if I applied new stars the rest of the decals are out of register anyway. This kit and the Flogger serve to remind us 1/144 modellers how far the quality of kits have come with the likes of Revell, Eduard and the modern Dragon kits. More photos in the gallery.2 points
-
Finished! Overall a fun build but like most of the Dragon stuff from the early 90's there are quite a few inaccuracies. The nose gear, the ventral tank, the main gear doors... Not to mention the out of register decals. More photos in the gallery.2 points
-
okay then... second attempt at posting an update - crashed the first time. A little bit of progress was achieved today on both Robby and on B9. Let's start with Robby.... following Kallisti's advice and sticking with the kit parts, a little bit of filler was required, actually a lot of filler was required - this is about halfway through sanding. Unfortunately, the gaps only get worse from here on in. Once I got tired of sanding, I decided to try and open out the vents in Robby's head a little using the narrowest file I could lay my hands on. The original vents as you can see in the photo above have very little definition, so, hopefully, this will help highlight them a bit when painted. Then I turned my attention to Robby's belly box. For whatever reason, PL had decided to put 4 diamond shaped buttons on the lower panel. The real buttons are standard rectangular shaped, so I simply cut 4 little rectangles from styrene and stuck them over the original buttons. The belly panel was then glued in place and showed up some horrible gaps all around the box.... So, a liberal application of filler was applied - this is going to be fun when it comes to clean up time... or not! Then I took a look at fitting Robby arms - this showed up some not very nice features around the arm sockets. As you can see here, when viewed from the side, there is a large dip in the center... some more sanding was required... I got as far as this and couldn't go any further as I had almost sanded off the outer rim around the arm socket. Well, at least it's better than it was. I also de-seamed Robby's arms a bit more, so another application of primer was required. That was enough of Robby for one day, so it was on to B9 next. The photo below is the result of about 2 hours spent masking... painful job it was I might add. Try as I might, I could not make a decent job of masking these little brackets in between B9's legs. I think I shall just touch these up by brush after the legs have been sprayed. It should never be noticed unless you are really looking for it. I wasn't sure how well the grey paint would take being applied on top of silver gloss, so I decided to apply another light coating of primer, just in case... That has now been set aside to cure before being given it's final color. I then turned my attention to B9's body, and in particular, the two lift points on his shoulders. I had previously sanded off the mounting points as they looked a bit "blobby". The base of the mounting point was created using some of the ever useful styrene sheet. I then used some of the stainless steel wire that I had left over from the DB5 build, and created the two little lift eyes. Which was then given a quick coat of primer. One thing to notice here is that, yet again PL have got it wrong - look closely and you will see two rows of seven buttons on B9's chest plate. Seven ? the real B9 only has two rows of six, yes, that's six buttons. and the last thing on the agenda for today was to do some reshaping of B9's wrists. These are machined parts so should be nice and sharp, however, take a look at the one on the right below, and you will see that the wrists are a bit soft, and rounded. I have started the one on the left and you can see that the wrist joint is looking a bit sharper once it's had a little bit of filing completed. and that is how I spent my Sunday, oops. almost forgot... had to fit a tray under the washing machine today as well. Fun!2 points
-
Not much to report, yesterday a bit of RLM 02 went on. Tonight I shall be base coating the cockpit.2 points
-
Hi all! Let me introduce you one of my models. Prieviously, i wanna apologize for my poor english (i hope so far...) So. A kit was built last summer. In scratch build i was use a lot of putty and foil (to imitating a panels) All panel lines was rescribed from outward to inward. Also i added all the rivets. In paint works i used AKAN and Revell acrilic paints. For wethering i used aquarel paint (for panel lines), tamiya wethering master sets, filters and method of the oil paint dots. Cheers!2 points
-
Well, here she is! I’ll post some more photos over in the ready for inspection section (that rhymes ) I hope you've enjoyed it? It’s not what I started out to build, that will need to wait until later now, because of that it turned out to be more work than I’d planed on but I guess it was fun. The over all purpose of the build was to try out the new Aeroclub nose and to that end I would say it was a success as is the new nose. I must point out the fact that I’m not overly happy with the Model Alliance decals, the decals then self are fine, the problem is the wing roundels are too small, I can’t see how as in the On target Profile 11 there is a photo of one of the aircraft and you can see the top of the wing and the roundel! but as there is no alternative that I know off they will have to stay. thanks for looking in! John2 points
-
I couldn't agree more with Canberraman when he said "its surprising how much more appealing certain aircraft become when you know they wont be around much longer!" Here is my tribute to this beautiful aeroplane taken at RIAT last year:2 points
-
Has anyone noticed that the press (CNN at least) keep referring to it in captions as a "jumbo jet"? Are they that stupid, taking a cue from the folks on that island (I forget the name) that said they saw a jumbo jet flying low nearby, or is it just a reference to the size of triple 7?2 points
-
Thanks for taking the time to comment guys and sorry about the delayed response! Stix - I thoroughly recommend getting hold of one its been a really enjoyable build so far, not sure i'm the right one to take notes from but the kit fits so well so far even i might struggle to get the inevitable easily avoided problem that i manage to create for myself on every other build Anyways not a great deal of progress to show, been tinkering away with gluing various bits together and tidying seams, have the main fuse together and sprayed black above the cartridge ports in the top wing and interior green in the lower wing ready to get these together and start thinking about priming. I have managed to get the exhausts sprayed, Eduard make it necessary to fit these prior to fitting the top of the cowl i decided to paint them first and then should be able to mask them in-situ. Thanks for looking, Stu2 points


.thumb.jpg.158e2e086d45b8f96b7d93b8bee8dc21.jpg)


This leaderboard is set to London/GMT+01:00