
Leaderboard


Popular Content
Showing content with the highest reputation on 20/03/14 in all areas
-
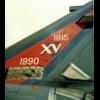
Hi all, Just putting the finishing touches to this monster, in fact its a nut & bolt restoration job, I originally built it 5 or so years ago and it resided in my boys bedroom until a near fatal accident reduced it to a pile of bits. Its sat in a box in the garage since gathering dust, but its such an iconic aircraft I just had to re-do it. It was originally brush painted so its been sanded down, partially re-scribed, stuck back together and given a nice lick of paint in 57 Squadron colours. The decals are from the newer Revell re-box and theyre terrible, most have disintegrated, I had to spray the hi-viz marking on the wing tips. Its far from perfect, couldn't do away with the seam on the fuselage and the fit is poor in places, and I need to finish the intake covers properly. Anyway, i'm chuffed to with it, 57 was one of my dads old squadrons when he was on the V-force before the Victors were converted to tanker duty, he'd have liked this I think! cheers Simon12 points
-
Hi modellers - here is a quick build I knocked up over a weekend a few years back. My wife abandoned me for the weekend and left me £10 for a trip to Costa after leaving me to do the weeks shop - I diverted to the local toy shop and scooped up what I could get for my Tenner - here she is nose down and taking on water... I used a scrap of 2x1 and some Vallejo Water Effects for the base plus a few straps of spare picture frame offcuts to tidy it all up Some flower arranging wire was used for the lifeboat lines - the lifeboats had to be individually cut off too Thanks for looking in here - John6 points
-
Build#4 Revell 1:72 Spad XIIIC-1 Capt. William M. Fry, No.23 Squadron, Royal Flying Corps, January 1918 Build#5 Arfix 1:72 Bristol Bulldog IIA, No.56 Squadron, RAF North Weald, 1935.6 points
-
Hiya Folks, Another one from my recent Hurricane modelling `fest', this is the excellent Legato Hurricane Mk.IIc built in the markings of an aircraft operated by the Inter Allied Flight of the Metropolitan Communications Squadron based at RAF Hendon near London. During 1945-46 this aircraft had its RAF roundels replaced by Belgian markings in preparation to joining the Belgian Air Force and although at least two aircraft wore the Belgian coloured spinner, this one doesn`t appear to be one of them but I couldn`t resist adding it,....call it a `what if' which might just have occurred? More to follow! Cheers Tony5 points
-
My latest model, a nice and easy build, hope you like it! More about the construction and painting you can find here, using a translator: http://www.modellingnews.gr/el/%CE%BC%CE%BF%CE%BD%CF%84%CE%B5%CE%BB%CE%B9%CF%83%CE%BC%CF%8C%CF%82-%CE%BA%CE%B1%CF%84%CE%B1%CF%83%CE%BA%CE%B5%CF%85%CE%AD%CF%82/tbf-1c-avenger-uss-natoma-bay-1944-italeri-1485 points
-
Built for the under a tenner group build5 points
-
Hi all This is not hot of the bench by any means, I completed this about 5 years ago and sold it after displaying it for a few years at work. I have posted this as a memory of the kit being one of Airfix's classic oldies which I also built a few times as a lad in the 70's. This build was inspired by a trip to RAF Hendon where you can walk through their Sunderland. I used a number of 3rd party PE and resin add-ons and ended up with a mix between a III and a V - I could not get hold of any fishtail exhausts for the model at the time of assembly. There are numerous inaccuracies throughout the build, in particular the direction of the fuselage side door hinge opening and bomb bay doors but I wanted to try and add as much life and interior detail as possible. What is nice to see now are all the new aftermarket bits for the new Italeri Sunderland which comes with quite a good basic interior to work up from. Thanks for looking in - good old Airfix kits still work well... Not very accurate but here we are inside anyone for Milk or cabbages !! Thanks for looking - definitely not one of my best but definitely one of my more enjoyed builds at time4 points
-
First post on Britmodeller. Recently completed Blenheim 1F, purchased on ebay as a way back into the hobby after a 35 year break1 Thought this would be an easy one to start on but ended up replacing the nose glazing with a Falcon one having completely ruined the original, framing is decal strip. Tried my hand at weathering, wanted it to look well used, the paint finish has been sprayed using cans and then thinned with fine wire wool and top coated with weak black oil paint. Also my first attempt at a detailed cockpit interior. The finish depicts 25 Sq North Weald 1939 based on details from the Blenheim Warpaint book, still need to find a serial number to show L1257. Thanks for looking. http://s124.photobucket.com/user/neilh2/library/3 points
-
Just got this finished in the Construction Thread, and realized that I should put a few images on the Ready for Inspection Thread! First, the subject: Then the result: Thanks to all who visited the Build Thread. I had a lot of fun building this kit, and learned a few ideas along the way from Britmodeller forumites. More builds in future!3 points
-
Day off work today, woke up and had a look at the Spitfire. In the light of day the paint job didn't look too bad, so I decided against getting the compressor/airbrush etc etc out and all set up. Its a great thing, but not having a permanent set up is a hassle, for such a small job. So on with some Green for the camouflage bit, and then touched in a few bits, including the spinner. A steady(ish) hand took care of the cockpit canopy. It dried off fairly quickly, as these matt enamels do. A bit too quick really, as it would be easier to hand brush if it didn't start to go off as your still painting it on! Anyhow, I felt confident enough to give it a gloss coat later on in the day, ready for the decals. Here's what I mostly did on my day off! Maybe some decaling this evening Thanks for Looking.3 points
-
Great work! On the real F-4 it was the same hard way (and a similar procedure compared to model decals) to apply all those stencils.3 points
-
As some will be aware, in between building Lynx and Wildcat helicopters, I do like to diversify by building 1/72 boats - MTBs, Patrol boats and HSL's. I find them a great scale because they arent too small to put some good detail on and they dont take up a huge amount of room. Not only that, they just look great (Perkasa, lots of the Vospers and several other lesser known boats). I decided to build the very old Airfix RAF HSL as a part of my clubs theme for this years Telford - Rescue, Repair and Recovery. I decided to set it on a base to give it a bit of context. Nothing too adventurous; just a tail from an old Revell Spitfire in the drink with the pilot in his dingy getting rescued. It did however allow me to experiment for the first time making a sea base. I'm satisfied how it came out and may even make bases for my ever growing collection of MTBs. For the base, I simply used a piece of stiff picture mounting card (dark green) then loosely painted it dark blue using artist acrylics. After that I added differing shades of greens and blues to add a bit of depth. I then applied artists gel with a large(ish) brush to replicate the waves and crests. This product dries clear so it helped to also add a bit of depth. Once that had dried, I then applied more greens, blues and dabs of white. Once it was all dry, I chucked on a coat of semi gloss artists varnish to lock it all down and also give it the final sense of depth. Prior to all this, I carefully cut out the hull shape in the card. I decided to do this instead of cutting the hull on the kit down so I could still mount the craft on a stand if I wished. The boat simply sits in the hole on the base (excuse the bits of white-tac filling the gaps!). To finish, I placed the whole base in a suitable picture frame. Despite it being an old kit, its actually really nice and simple to build. It took me about 2 weeks to complete and its pretty much straight out the box apart from adding rigging (EZ line) and various bits of rope to dress the deck and the bloke in his dingy (CMK). EZ line is the way ahead when doing rigging and the like as it is very forgiving and simple to attach. Another bonus is because it is effectively elastic, it wont snap if youre a bit clumsy! Here she is: Thanks for looking Tony2 points
-
My latest build for the year, and the first of many Spitfires/Seafires planned, is the Academy Mk.XIVc converted to a PR.XIX. I used the Airwaves conversion set and chose to build one of the early non-pressurised airframes. I also added the Aires XIVc cockpit set, slightly modified by removed the spare gun sight lens bulbs and adding the camera control box, which goes where the gun sight would normally go. A fairly stress free build, apart from the HGW seat belts, that just involves lots of filling of unwanted panel lines, gun ports, shell ejection ports etc (converting to XIV wing to a bowser wing) and then scribing some new ones. I also modified the fuselage around the cockpit opening in order to try to correct a poor bit of the kit and also make it more like the PR.XIX set up. Painting was taken care of with Xtracrylix paint, Klear and Xtracrylix matt to finish with. Weathering was with Florymodels Dark Dirt and some Mig Productions/AK washes. Markings came from Xtradecal, Kits-World and Eduard in order to build RM645, a XIX from 682sqn. I would say that I used the HGW belts and they are a test of patience like nothing other but do look great once done. I said I wouldn't use them again but I've already ordered some more for another couple of builds. Nothing more to add other than I'm pretty happy with how this one has turned out. If you're interested then the build thread is here: - http://www.britmodeller.com/forums/index.php?/topic/234931667-academy-supermarine-spitfire-xivc/ As usual comments and critique welcomed. Pete Onto some piccies: -2 points
-
Hello fellow Britmodellers, This is going to be my next project while I'm waiting for the weather to improve so I can start painting my P40B project. It has been sitting in the stash trunk for more than 20 years. Yes the trunk is quite full with mostly vacforms WWI scary things It is a shame it never flew I think it is a fantastic looking aircraft. I will start by cleaning up the plentiful flash and finding some info. Stephen2 points
-
Hello Another finished kit this year with this modern fighter. Actually this kit is easy to assemble but not so when it comes to paint her. I had worked for more than eight hours masking around the light areas over the dark grey camouflage. For sure I am not ready to start a four colour Swedish Viggen ! Should be published in Tamiya Model Magazine French edition. Patrick2 points
-
Afternoon all. Just down the road from me is the wreck of HMVS Cerberus, a Breastwork monitor built in the 1860's for the Victorian Colonial Navy. With a piece of maritime history so close and a model of the ship that didn't quite work out in building, I've done it as the wreck. Hers a link to the work in Progress http://www.britmodeller.com/forums/index.php?/topic/234955214-hmvs-cerberus-1700/ So on with the pics. So its been a learning experiance and I'm glad its finished, But I hope you like it. Thanks for looking Cheers Callum2 points
-
Hi First one I've posted here. This is the Doyusha kit, nose has been replaced by resin copy of the Hasegawa kit, decals from Aviagraphics. Andrew2 points
-
Airfix 1:72 Hawker Typhoon, complete OOB build, Tamiya paints over buffed Humbrol Metalcote aluminium then the paint chipped off with a coarse sanding stick and scalpel. I've got another to build as I bought the Bren Gun PE set. http://i1323.photobucket.com/albums/u588/Bigusmickus/Airfix%20Typhoon%201B/AirfixTyphoon_zpscdd9cc3c.jpg http://i1323.photobucket.com/albums/u588/Bigusmickus/Airfix%20Typhoon%201B/AirfixTyphoon2_zpsf4349e94.jpg http://i1323.photobucket.com/albums/u588/Bigusmickus/Airfix%20Typhoon%201B/AirfixTyphoon3_zpsaef073f7.jpg2 points
-
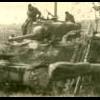
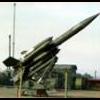
You would have to make a few modifications to the Bloodhound to make that photo in model format, as I do believe it was a Series 1 pre-production round and not the Series 2 (which is what finally went into service as the Mk 1). There were major differences in back half of the missile between the two in body shape and ramjet stub wings (The Airfix kit has bits of both designs with it being harder to build the production round (some major rework of the stub wings is required to build an operational round than to build the pre-production round)). Also the Missile in the photo has prototype boost fins than were resigned in shape for the production missiles. you would have to scratch build the trolley as well, as its a lightweight servicing stand, not the loading trolley that comes with the kit. That photo is a bit of a con, as the fully operational missile (both the Mk 1 and 2) were too heavy to be lifted by a Belvedere without the missile being defuelled, the warhead being removed and the boost motors being empty dummies (A live Mk 1 boost motor had nearly 400lbs of propellant in it, the Mk 2 boost had about 50lbs more) . There are photos around of Belvedere's lifting Bloodhounds in the far east, both at RAAF Butterworth (33 Sqn round shown below) and RAF Seleter (65 Sqn) though in both cases the Missile is a Mk 1 modified to look like a Mk 2 (a number of Mk 1 airframes were modified to Mk 2 length as part of the Mk 2 development to check the missiles new aerodynamics in flight, plus develop the uprated boost motors needed for the Mk 2 due to its extra weight. Not all of the rounds were required in the R&D programme, and a number ended up as display missiles or use as loading trainers (normal both!) with the operational Squadrons). The one on the photo below is one of these Hybird rounds (it has Mk 1 Thor 100 Ramjets, the Mk 2 had Thor 200's which were an almost completely different engine, plus the missile has no proximity fuze aerials and the ramjet mounting stub wings and Yaw stabilizer of a Mk 1). I do have the drawings for the Gosling 1D boost motor that is on the missile under the Belvedere (at Farnbrough if memory serves). The production Missile Mk 1 boost motor and fin was the Gosling 1G. The Mk 2 used Gosling 15's.2 points
-
I rarely go to the hobby-shop for that...2 points
-
so this is where I am at, just awaiting decals and prop now2 points
-
Hi again, The Mk.I is under a coat of Khaki Green #3. I did some pre-shading but you'd never know it. The turret is just sitting atop the hull for photographic purposes. This is a modelling milestone for me as this is the first plastic model where I have made it past the priming stage! Kind regards, Adam2 points
-
Ben, As a rule of thumb, when picking a kit work out what subject you want to model and in what scale and then find the manufacturer that does it best. For a lot of subjects there are definitive mouldings that stand out above all others. Examples would be the Mosquito (tamiya in 1/48 and 1/72) the He111 (in 1/72 this one, which is also sold for half the price by Revell), the Ju88 (in 1/72 revell new tool blows all competition out of the water). The Ki45 you're looking at doing looks like it's highly regarded so if that's the subject and scale you want to do it's probably a good choice. That said, I ventured into 1:48 with a Tamiya Mosquito and it's the only kit that I've never completed and is in pieces on my shelf of doom. The kit is lovely but my skills simply weren't good enough for it at the time and I must have spent £60-£70 in total for very little return so far. The other thing about 1:48 is that I was shocked by just how huge it is. I'd only ever built in 1:72 and I have no idea where I'll put my mossie if I ever finish it. As a student bear that in mind. If I were to offer any advice to a newbie modeller it would be don't bite off too much too early. You would probably be better spending your limited money on some cheap 1:72 new tooling kits from Airfix and building up your modelling toolkit. Good brushes, tweezers, decal solvent, a good scalpel, micromesh, fillers, Klear, good paints and practice practice practice are the way I made progress. Those and a £5 new tool Spitfire were my eureka moment. That kit was the first model I did and thought "that's actually not bad". I tend to try one or two new techniques with every build I do. Bear in mind that there's always a risk with something new that it will go horribly wrong and you'll end up with a puddle of melted grey plastic after hours and hours of work. And it might be better to make that mistake on a £5 kit than on a £30 one. My advice would be to bang out an airfix Spitfire Mk1a and Bf-109E4 and maybe something else, like their Typhoon, in 1:72 OOB and if you're happy with those then take the plunge and tackle something a bit bigger and more out of your comfort zone. Doesn't mean you can't buy the Ki-45 and just fondle the plastic though/ I have an Eduard Bf-110 profipack that i've had for over a year now and about once a month I get it out of the box and just drool over it. Richard2 points
-
If you're interested, I spent six years working on K.2 Victors with 55 and 57 Sqn at RAF Marham from 1993 to 1999 so am very familiar with the lovely beast. If you have any questions, or need some guidance please feel free to get in touch. XVTonker2 points
-
Thank e kindly folks. Well its on with the little people, this time the boatmen. Not painted yet, and the tiller man is altered from a standing position. There will be a marine on the bow. Cheers foxy2 points
-
KASL Hobby has just released a cockpit "simple fixed" resin set for the Wolfpack T-38 Talon - ref.K48047 Source: https://www.facebook.com/media/set/?set=a.793275787367675.1073741846.169696056392321&type=1 Available here: http://www.hobbyeasy.com/en/data/5bmccgp21sxux1pmuzxv.html V.P.2 points
-
After buying the new Airfix 2 prop Hurricane , I decided to make it up as the protoype. Ordered the decals last week and as I was off work and home all weekend , I had a go at it.I know its far from accurate but I really like it! My modelling skills have never been top notch but still at 45years old, I still enjoy making these wonderful kits. And its now added to the others I have built over the years! cheers Jason2 points
-
Je suis right up pour this. It's une brill idea. Trevor Hugo2 points
-
Looking over the posts here, it is sad, but true, that terrorism to some degree is working worldwide. The main goal of terrorism is to create continual fear or apprehension in a targeted population group that will result in the terrorist's goal being accomplished. A good majority of the posts on this site speculate what probably is an accident, is terrorist activity. How things have changed in the world. I wonder if this same event had happened 25 years ago, the primary focus, suspected cause, or apprehension would have been terrorism by the public. Not the experts, but the public will not dismiss the possibility of this event was a terroristic activity. And with that, the terrorist's goal is somewhat accomplished. They have succeeded in causing continual fear and apprehension that any unexplained event may be the result of terrorism. I just think it is sad. This is a sign of the times I do not like.2 points
-
Banana Build - Day 114 Tonight I threaded the cabin wires back through the enlarged hole in the rear bulkhead using this method: It took ages to get them all through but in the end I had this: I then appied custom length of heat shrink tubing to each joint: I noticed that my spirit burner used to activate the heat shrink tubing was also quite capable on removing some of the heat sensitive enamel insulation off the wires. I think I will try to repair this with some brush appled laquer. i will have a further think about that so it is goodbye from me for tonight. Nigel2 points
-
And here is the Bulldog finished. Thanks for all the encouragement guys.2 points
-
On my rest days so plenty of time to progress! Oil wash applied to the panel lines, matt cote sprayed on, masking tape removed and she is standing on her undercarriage. img image upload image url Continuing with the weathering.2 points
-
again after what seems forever I'm finally back on this........well in between the Mig! Well the build for the cockpits is finally done, the radar operators space looks great, almost exactly as I planned it! So all interior areas have been given a base coat of RLM66, I will give this a good 24hrs to dry before I start the detailing. I took the plunge and started on the radar nose, had an idea of how I wanted it to look so just hooked in with files and Dremel, much dust later..... It’s going to look good, if I’m clever i’ll make a resin copy (never done that before) for the Amerika bomber. I’m keeping the flat undersides of the nose and will profile the rest of the nose to match...hopefully! This is because I need to fit a 50mm Bk.5 cannon in the gondola below it, which will require some major changes to the front section of the gondola. Similar to that of the He177A-1/U2 Zerstörer, but only with bigger cannon! I still wasn’t happy with the centre wing section and my “special weapons” pylon, it was too long and just didn’t suit the design I was after! So whilst making the new radiator fairing I had a bit of the brain-wave (they have also been called crazy ideas as well). I need to lose one of the rear facing machine guns in the port gondola to fit the Henschel GT.1200 (it’s very long) and I’m not sure it’ll even fit on the new centre pylon! So I decided to fit a remote 20mm turret in the end of this fairing. It shortens it nicely and would just be the thing that some mad designer would fit there. So using the lower sections of the removed tail gun fairings joined together, this was then fitted to a cut back centre section fairing. As you can see I’m using plastic to make up the bulk of the new fairing. Once complete it will give me a good location for a weapons pylon, I might still be able to fit the GT.1200! The new 20mm cannon will be controlled by a remote sight system fitted in the gondola where the machinegun was removed. It’s now starting to look like a real beast! Once the fuselages are closed up and the centre wing is finished then the next build is the new tail. This is a centre section only, no outer elevators, I think I’m going to have to build this from scratch....that’ll be fun! note: I originally posted this yesterday but the server crashed as I was unloading it!2 points
-
I've been looking at doing an RAF F-16 to go with my F-15 F.1. I will probably go for an F-16A, so I can keep it in camo, as after 1978, British fighters started turning a boring shade of grey....2 points
-
"If it were done when 'tis done, then 'twere well it were done quickly." - Some Scottish bloke in an old play Yeah, right, Will. Even when I try to build quickly, life and work conspire to prevent it! Anyway, here it is: my first completed model in my first GB: I'm extremely grateful to Harry Lime, whose generous and unexpected offer of the correct fin flashes allowed me to complete this model with minimum cursing after the 'cobble-together' efforts planned in my last post failed miserably. Thanks mate - spot on. The model has a big piece of lead in the nose but will still try to sit on its tail at the slightest bump, so I drilled each of the wheels and pinned them to the base. Some more photos (taken with a Fuji Finepix compact camera - I don't have a DSLR): Jon2 points
-
Coming together . . . few more pics Finally got the water looking how I wanted - Med in the sun ;o) Cheers Kev2 points
-
Okay, here she is, I decided to let you guys see her before I go any further. As per my original plan, most of the fittings are scratch built, Vinyl stickers for the markings, the deck is grained rather than "real" wood, simply because I messed up the original ply surface (which I wanted to varnish). She's not perfect and is a mix of several types, having been drowned in references I decided to just build a mix of the bits I liked, not historically or factually accurate, but not bad for a first attempt (I hope) Just a few more bits to do, a test in the bath or my son's paddling pool and it's off to the big lake....pictures of the sink or swim will follow!!!!2 points
-
Hi Folks, As some of you may know my eldest son, Scott, who is 12, was diagnosed with T-cell Acute Lymphoblastic Lymphoma just before Christmas last year. His treatment so far has been intense, but he has responded very well to it, prognosis is good and most importantly he is in very good spirits. He has taken an interest in modelling so what sort of a father would I be if I did not encourage him to get stuck in ( beats him playing games consoles) We have bought the great wee Airfix P-51D Mustang to start with. This is definately a kit I will build more of in the future. The obligatory box art. I have started the cockpit for him- he is more interested in trying to paint the pilot, LOl. The only Modification I have done so far is a styrene disk punched out to represent the elevator trim control wheel. That is all so far.1 point
-
This is the ICM 1/72 Nakajima Ki-27b 'Nate' built for the Less Than a Tenner Group Build, painted to represent the aircraft of Lieutentant Hyoe Yonage, 24th Sentai 2 Chutai, stationed at either the Philippines or China in December 1941: The kit was built out of the box but the decals used were from a Print Scale sheet on the Ki-27. This particular camouflage scheme was available as part of the kit decals, but they were not very good. The kit was painted with Humbrol and Revell enamels, and Lifecolor Acrylics. The three-colour scheme for the Nate, especially the indigo caught my eye and chose the colours based on this blog post by Nick Millman: http://www.aviationo...sen-part-7.html Consensus holds this kit to be the most accurate Nate in outline, with fine-too fine for a brush-painter like me-surface detail and some unusual engineering choices for assembly. These can be best characterized as 'interesting' and must have worked like a dream for the first release of the kit. Here it is compared to a 1/144 model of the same subject from FE Resin I built last year: For the record, the kit cost me 6 pounds 50 from Hannants. More information on the build (and what I thought of some of the engineering choices) can be found on the progress thread here: http://www.britmodeller.com/forums/index.php?/topic/234955850-icm-172-ki-27-finished/ Thanks for looking! Comments are welcome.1 point
-
Simon - I love this - it is brilliant. I had to swap monitors over to my 30" to enjoy it close up - magnified excellence. I love the old Victors - they don't make 'em like they used to... Thank you for sharing1 point
-
Hi Paul, I used to spot until many years ago. These days I just photograph things of interest. When I used to spot, I would only class an aircraft as seen, if I'd physically 'reg'd if off myself and wouldn't accept it even if the details were obtained via the airband scanner. I still use my trusty scanners these days and have then running in the background whilst I'm doing other things. As for SBS boxes, to me they're cheating! Scanner are still readily available for most enthusiasts shops, Ebay, Maplin's etc. Regards Reggie1 point
-
You're right - it's sort of an optical illusion like the A3D's wing. The dihedral listed on McDonnell documents is zero. Because the wing is swept and mounted at an incidence to the fuselage reference line (water line), the wing tip looks lower than the wing root in a front view or when photographed from directly in front or in back.1 point
-
Hole punch winscreens! D'OH! I wish I'd thought of that. I'm nicking your idea and caling it mine1 point
-
Hi everyone I cannot believe the response from this posting - thank you all for the kind words. I see a number of questions so I have posted a number of pictures which are hoped to cover most and provide the answers you have asked me for. Incidentally, I had a spare 2nd model of this kit that was sent to me with my annual SAM subscription which was put to use during the base assembly rather than get Vallejo water effects all over the finished model. here we go - sorry if it comes out a bit endless and lastly, here are the home made radomes1 point
-
It is looking pretty impressive Richard keep it up Cheers, Stew1 point
-
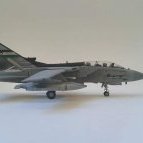
One thing to note about the Hasegawa Jag (I'm going from memory here) is the airbrakes. Not only are the holes represented as raised lines but they are in the wrong place (the holes, not the airbrakes), as they represent the position shown in the prototypes. I have the Italeri Jag but have not studied the brakes on that yet. Again I may be wrong but the Italeri was repopped by Revell. Trevor1 point
-
Nope... it's my memory playing tricks... The Mirage F1 definitely has raised panel lines and that was of a similar vintage to the Jaguar.1 point
-
Almost happy with the intakes. Almost there...1 point
-
Outstanding paint finish and overall great build1 point
-
Hi folks, I need some practice posting pics, so here are some of my first ship model that I started in February! Jockster.1 point


This leaderboard is set to London/GMT+01:00