
Leaderboard


Popular Content
Showing content with the highest reputation on 10/03/14 in all areas
-
Its been a while since I posted a finished build so the sun coming out was the perfect excuse Baden Soellingen based CF-104D from around 1974. Decals are Leading Edge, finished in Alclad Chrome and various shades of Tamiya Metallic paints at the back end.10 points
-
Hasegawa B-47E kit with the DB Models (Now Flightpatch) RB-47H conversion set. Decals mainly by Warbirds.... Cheers, Haydn.9 points
-
Hi, here's what I have been working on, Revell kit, Freightdog improvement set, Sky Models decals. Tamiya NATO black and Gunze for the camo. Managed to lose a couple of windows, so I need to get myself some Krystal Klear I guess!. Thanks for looking. FF8 points
-
Okay.. This T plus build 8 since getting back into this modelling 'thing'. (and counting till I've done 12 ) This was supposed to be a quick build, and finished some weeks ago. It was going really well, but a little thing called life did something very unexpected in a manner I couldn't have even imagined.. so on the back-burner it went. Also kept me away from having a browse around here! The horror! So, this is the Eduard rendition of the Mig 15 in 1/72, recently reviewed right here on Britmodeller. This one being from the Dual Combo kit they do which I bought on a whim at a silly bargain price. A bit of PE in the box, some masks, and a few resin stores that are not used on this version. My first go with one of these Eduard things and golly! I'm impressed. Nicely engineered and the only area you really need to take extra care about is making sure the gun pack and nose all fit nice and snug. Oh, and stick some weight in the front where there is space fore of the cockpit tub. I had some liquid gravity on hand so it was the perfect test for it. Alclad Alu all over. Nose is painted Xtracolor high speed silver where apparently this aircaft had it's old code painted out. The blue bands were applied for wargame duties and I've done them using one of those nice Revell acrylics. So few markings this was the quickest decal session I've ever done! Thank you for your attention again. Next up after this one... I think it's back to something with familiar RAF roundels on. Which probably means I'll do an IAF Spitfire. I am so fickle. First, obligitory cockpit shot, because just for a change I had a pocket cam handy. Mig_15_150214_01 by IrritableRabbit, on Flickr Mig_15_150214_02 by IrritableRabbit, on Flickr Then my usual let's not even attempt to pretend it's not a model images. Mig_15_100314_04 by IrritableRabbit, on Flickr Mig_15_100314_08 by IrritableRabbit, on Flickr Mig_15_100314_09 by IrritableRabbit, on Flickr Mig_15_100314_05 by IrritableRabbit, on Flickr Mig_15_100314_11 by IrritableRabbit, on Flickr Mig_15_100314_13 by IrritableRabbit, on Flickr Mig_15_100314_07 by IrritableRabbit, on Flickr Mig_15_100314_16 by IrritableRabbit, on Flickr7 points
-
Here at last the pictures of the finished model. Before I glue my models on to the final bases, I allways like it to pose them in front of my lil hangar and take some pics. The link to my WIP thread of this model you will find here: http://www.britmodeller.com/forums/index.php?/topic/234954601-heinkel-he-100-gpai-hipm-148/ Hope you like it. And here are the pictures with the model glued on the final base.7 points
-
Gundam MSM-07S 'Z'GOK' (char's custom) in 1/144 scale, from the HG Universal Century Gundam universe. Build thread here chaps and chappesses - hope you like!6 points
-
Dear all, At the same time as building my recent VC10, I put 3 1/144 Concorde's into production on the dining room table. 2 from Airfix and 1 from Revell. It was interesting to see the similarities in the 2 makes, but also the differences - I am not an expert but I think Airfix have the correct wing lipse shaping. I have also used some resin and PE aftermarket add-ons purchased from Hannants. All the windows have been filled as I have a number of delightful decal sets form Ray at 26Decals. I will produce a 1970's Red Tail, 80/90's Landor and Chatham versions. The Airfix kits will be built wheels and visor up and flying above a fish tank filter wool fluffy cloud diorama while the revel kit will be depicted at V2 stages of her take off. I saw on this forum some interesting 1/72 Concorde builds which prompted me to by the Airfix 1/72 but this is on the shelf for the time being - thank you for looking and I will try to keep the Topic updated as best I can but I have a RAF KC1 L1011 also in production which needs to be finished for the REME Model show next month so these 3 ladies will be built during trying time stages. Both Airfix kits came from Ebay missing their doors do I had to fill them in and bulk up from the back forwards Hmmm Just like Airfix's old SRN4 kit - there is a lot of filling and sanding needed The 26 Decals have very goo cockpit window and visor decals so the visor has been sanded down into the spray booth5 points
-
Here ya go - calling it done - but funnily enough I had a gear leg shear part way through photo's - and quickly fixed - ho hum! Comment/abuse/banter all gratefully received! Right - off to tinker with something else... Iain4 points
-
Having found out how to upload pictures, I can now display a couple of my builds. Today we have the Accurate Armour Foden 6x6 Recovery Vehicle. As usual with these resin builds, lots of bits break easy, so much time spent scrap building replacements...the hand rail on the body sides was flimsy and just etched brass, so this was replaced with square tube, string for the lifting howser and front winch cable was replaced with wire sold in packs for hanging pictures on. Operating levers for jib all replaced, as was the etch brass window bar protectors by correct diameter brass rod.........bunk in the back has cotton sheets and featherlite pillars as well as 3D TV in the corner which actually receives sky TV......shame you cannot see them!!!!!!!!!!!!!!! I enjoy building these kits but I do hate painting them......my enjoyment is in the build, the hard work is the painting. I used Xtracrylix XA1814 British Deep Bronze Green, a lot!!!! .....as this was the colour these vehicles were initially issued to the units with. I enjoy applying the decals as you can slowly see the vehicle coming to life.......the fun with this one was there are no decals for this kit so it was lots of research and sourcing decals from other kits, used or unused. I also built the Firing Line AFV432 Engine pack to go with this as I plan a diaroma of the Foden lifting the pack from a 432.......I scratch built the lifting frame and currently I am chopping an Accurate Armour 432 to pieces just to make sure the pack will go in and out............but, sods law, I have cut away engine access bay and the engine is just 2 mil to big, so, thinking cap on at the moment. Hope you enjoy. [/url]">http://4 points
-
Hi all, After a couple of very long 1/32 Hawk builds, something completely different from my usual cold war subjects. Built oob apart from the metal pitot and the stand which came from a Corgi diecast model. Made a refreshing change to build an airliner, I think I'll be making a few more in the future. All comments welcomed, gazza l.4 points
-
Yes - I think that using Araldite or some such would be ideal. Here I pre-moulded the palsticine 'jig' whilst dry-fitting so that it gave a pretty positive location and support and then I used thick cyano - which seemed to give me just enough setting time to get the wing relocated in the plasticine; then I ran some thin cyano all around the joins. I hope it will be strong enough. We were down in Pembrokeshire last year - near St David's. I thought the coast was superb. Didn't know about or spot Skomer Island though. Sounds like a good reason to go back. You can see awe inspiring seabird colonies in various places in the Shetlands - but probably the best place for Puffins was Noss. We also go walking in the the North West of Scotland most years - and Handa Island is another great place for sea birds - as long as if you don't mind the odd low fly by from Skua's Have to say that the 5 was a rather more exciting aeroplane for a young stude in the 80's: (1) flying it it meant you'd passed the first part of BFTS and been graded group 1 (fast jets) - at Church Fenton/Linton on Ouse anyway - IIRC at Cranwell the whole course was done on the 5 - but also IIRC only university graduate types did their BFTS at Cranwell. (2) it was much more powerful - 300kts at low level vs 240kts in the JP3 - better rate of climb etc. (3) it had a pressurised cockpit so was more comfortable. (4) it had a nice little electric motor to slide the canopy backwards and forward - a much cooler solution than the little windy handle you had to turn in the JP3 You could see a studes little head nodding away as they turned the windy handle - very uncool. Now why did that last reason seem so important at the time? Anyways I've got the 3 and the 5 to a similar stage now: One of the two has taken rather a lot more work to get there though! No prizes for guessing which Hi Phil, Yes you're correct - the JP 5's used for pilot training at Church Fenton, Linton on Ouse and Cranwell did not have tip tanks - but the ones at Finningly used for fast jet nav training did have the tip tanks. Good on you with the Kittyhawk Jag. Why not a nice wrap around scheme on a GR1a with a gunners strip in the tail? Oh. BTW. Feel free to omit the ugly bugger getting out of it.......... Steve4 points
-
Good evening all, I been following the forums for a while now and I gathered was about time to join. This started to bug me as a project since I got hold of the Olympic airways decals in 1/72. I have not found a decent Comet kit in 1/72 and the available vacform I would not even consider after I had a close look at one second hand. So I started with the next nearest thing the Nimrod. After I managed to put my hands on one eventually, I started the chopping and filling. Progress is slow since I have only time to work a few hours on it at weekend, this is two weekends worth of chopping, filling, sanding, chopping, filling, sanding................. So from this... I will arrive at this...... Hopefully. Thanks for looking, Kostas3 points
-
Evening, Unusually for one of my builds I haven't done a WIP. Mostly because I didn't have a decent camera on me, but also because I was enjoying the build so much I didn't want to stall it To start off my DeHavilland Moth collection I chose Airfix's beautiful new Tigger and chose to backdate it to how it was in the 30's. This mostly consisted of painting the reg codes on top and bottom wings. Built to the only two pictures I could find of G-ACDC. The kit is superb, I hope I've done it justice! There's been a lot of discussion about the shade of red, however, I chose to stick with Humbrol 20 Crimson as I think it looks nice I rigged the ENTIRE model, bracing wires, control wires and all! Scratch built the pitot and belts before giving the whole thing a high gloss varnish. Anyway... IMG_6855_zps3dc8d9eb by Ben Standen, on Flickr IMG_6857_zps364e1aff by Ben Standen, on Flickr IMG_6858_zps07490844 by Ben Standen, on Flickr IMG_6859_zps21853ae3 by Ben Standen, on Flickr IMG_6860_zps96e55fea by Ben Standen, on Flickr IMG_6861_zpsd4de01fb by Ben Standen, on Flickr IMG_6862_zpsf03e3d6d by Ben Standen, on Flickr IMG_6863_zps1cc89a98 by Ben Standen, on Flickr Attempting that classic 1930's BW out-of-focus photography On final approach to land... Just waiting for my 1/72 Frog DH.60G to turn up in the post from Kingkit... should turn up tomorrow seeing as I ordered it last tuesday evening (fingers crossed) I'll do a WIP on the DH.60 as it's going to take a lot to bash it into an acceptable shape! Thanks for looking Ben.3 points
-
Hi everyone, Here is my WIP thread for my entry into the Less than a Tenner Group Build, Project Pink Arrow. I'd like to give you all some background to this project before posting anything. In November 2012, my niece and her family emigrated to Australia, however before she went my wife and I took her to the Shoreham Airshow for our last day out with her. Her favourite aircraft was the pink aircraft from the SWIP display team (shown below). Ever since she moved we have talked via Skype and she always likes to see my models (especially the Vulcan I built), so I have decided to make a model for her birthday (which is small enough that my step mum can take it on the plane for me in July). I selected an Airfix 1:72 RAF Red Arrows Gnat Starter set for the kit and because I know she will want the kit to be painted pink, have gone with Tamiya X-17 Pink acrylic paint. I guess you can call this one a What If build i.e. What if the painters of the Red Arrows planes picked the wrong colour for one of the planes when they were spraying them, thus the Pink Arrow was born. This kit is going to be a complete one off. I have decided that I will create a Limited Edition certificate for it along with a document to send with it to show my niece, how I went about the project and what it started out like etc. Here is the kit : Airfix built Red Arrow : Sprues : This kit will be the simplest build I have built for a very long time and as such probably won't take a long time for me to do. Thanks very much for looking. Excuse the fact that I have to paint this one pink. Rick3 points
-
This is the Kinetic kit of this Hawk on steroids. It looks like a Goshawk to me but the kit needed a bit of work to get it built. This was no shake-the-bag-and-out-it-pops job. Poor fit in places which was a disappointment but the rest of it was a dream and the build thread is here http://www.britmodeller.com/forums/index.php?/topic/234952800-148-kinetic-t-45-goshawk-update-0603/ Painted using Humbrol Gloss White and my own mix for the International Orange. She is built as Bu.No.167106 Aircraft 328 of TW-2. Nice to see her on the shelf. Thanks for looking3 points
-
An old Skywaves Fletcher class destroyer kit,converted into a Catapult carrier destroyer, USS Halford DD480. One of three out of ten ordered that was complete, before reconverted back into 5 gun Fletchers’. I have added a 20mm gun position in front of the bridge, drilled out the bridge port holes and, two 20mm gun positions in place of the 40mm gun tubs on the forward 2nd level. The after 20mm position was relocated using brass sheet. Also new gun pit for the twin 40mm mount and director was added to the stern. Small items were also added like the practice 5in gun loader, a power winch, port side aft of the boat davit. From my USS San Francisco I took one of the catapults and added to the aft deck house behind the aft smoke stack. A crane was also made up on the port side near the aft stack also. Tom’s Modelworks Destroyer detail set, Deck hatch set and, various spares were used to detail the 5in gun director, radars, antennas and railing. Also used were Tom’s Railing net set for the forward deck rails. The paints are MM 36044 (lightened) for the vertical surfaces and Humbrol 104, for Deck Blue. The Kingfisher is from Trumpeter (any one need one or two I have a few extras) painted Tamiya Med Blue and Lt Grey. Decals for the ships numbers and the stars and bar, are from Midlands. I have yet to find a decal small enough for the jack staff on the aft stack Thanks for looking3 points
-
Hi all, what a beautiful kit this is, it fits together perfectly and has great panel lines. Really enjoyed doing this one. Comments welcome3 points
-
Hi all, This TBM is from the original boxing, Accurate Miniature’s 1/48th scale, TBM -1C kit. I got this kit in a trade and am very glad I did. I started out using this as a pattern for at 1/72nd scale Avenger I had, with horrible detail (read NONE). I noticed things on the model did not look right… the gun for the turret, block with a rod! I replaced it with a cast resin one, I have also added barrels to the wing mounts. The model is a mixture of AM, Eduards cockpit, a little scratch building and fishing line (the wire antenna). Markings are from the kit and the spares box except for the white triangles, these were masked and painted. The kit National Insignias were too large for the indicated placements thankfully I had a sheet of 1/48th scale Stars and Bars in the spares box also. Exterior painting is Tamiya. The Sea Blue was toned down with white just a little, weathering, was kept to a minimum, light washes, some of the final semi-gloss had rubbed away, I think this helped the weathering in places. The wheels were weighted in the old traditional manner, an Iron and parchment paper( non sticking) The 1/72 scale turret was also assembled in the same manner as the AM kit’s but that is for another posting…nothing but the turret has been done. Thanks for looking3 points
-
Hobby Boss 1/35 U.S. M3A1 "White Scout Car" late production.Enjoyed building this straight out the box. Took a few days to put together, plenty of little fiddly bits which add to a nice detailed item. The only downside was the chassis did not match up with the main upper shell. Had to use my Dremel to adjust the inner wheel archers. Don't know if any one else has done this model and had the same trouble as me putting it together, let me know.3 points
-
I think both the E170 and E190 could be converted from this with a little extra work...3 points
-
Another brief update having managed to get something done between golf on Saturday and a trip to the Zoo yesterday, weather was too good to waste this weekend. I got a coat of Xtracrylix PR Blue on and then lightened it before infilling the panels. I then thinned the mix quite a bit and randomly oversprayed the whole airframe to blend it all in. Having got that done I noticed a bit on the nose that I wasn't happy with, so out with the filler, sand it all back,rescribe and respray that bit. Great, only I then saw another bit on the wings that I didn't like, so out with the........you get the picture. The next step was to get three coats of future on before Dancing on Ice came on the TV, it's not that I wanted to watch it, it's just that the wife likes me to watch it with her, errmm, honest guvnor'. So that's it, all ready for decals tonight.: - The home straight has come over the horizon and it's time to start thinking about another build. Back soon Pete3 points
-
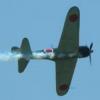
Since Zeros aren’t supposed to lean down on their undercarriage to allow pilots ease of access to the cockpit, something had to be done to get the main struts in the right position and keep them there. I removed them, drilled holes in each strut, put a piece of styrene rod in the strut, drilled a corresponding hole in the wheel well to insert the strut, inserted the strut, let it dry for 4 hours, set it on its gear, and came back to find the undercarriage in pretty much the same position they were the last time when I rested the weight of the model on them. All I could figure out is the age of the plastic in the kit in this particular section when it reacts with model cement melts rather than bonds. The cement did not dry in this area. Rather, it was a gooey mess even 5 hours later. I then left it to dry for about 4 days. Then, I reformed the end of the strut with some new plastic stock, filled the holes in the wheel wells with some rather new sprue and let everything dry for another 2 days. Holes were then drilled in the wheel well to accept the rebuilt struts. After that, copious amounts of Loctite Ultra Gel Control super glue was put down, the struts positioned and left to dry overnight. I was afraid to use any accelerator as I wanted the least amount of chemical reaction in this area as possible given the past results. The moment of truth arrived; I placed the model on its legs and so far, no problems. That means I get to complete the kit!! Yeaa!! I then drilled out the wing cannon and put them in place, attached all the landing gear doors, attached any other little pieces that were left and set about to touch up the paint where needed and add the landing lights. I also drilled out some holes in the wing and inserted red painted wire for the landing gear indicators. A coat of Testor’s Dullcoate to seal everything in. The canopy masking was then removed and here it is in all of its dirty glory. A more complete RFI photo selection will be made when the sun comes up tomorrow and there is better light. Comments welcome and thanks for watching. I really enjoyed this kit and the level of detail in it for its age is amazing. Fit was also exceptional. Other than the landing gear incident, it was a great little kit.3 points
-
Very little progress as I have been doing anything but modelling this weekend! Primed with Tamiya fine surface primer. Coated GW Skull White Airbrushed the lower hull with Citadel Mechrite Red. I couldn't be bothered to spend the money on whatever shade of red it should be, looks close enough for me. It's not lighter in the middle, just the lamp being used a spot light. I'm going to let it dry 24 hrs before I mask it and spray the black band around the hull.3 points
-
The indigo has gone on, and it's not fully dry yet: It's a somewhat convoluted mixture of Lifecolor blues and greens, but came out OK. As all the profiles I found only had details on the port side of the fuselage camouflage, the starboard side is pure artistic license. This is the second time I've painted (relatively) large areas with thinned acrylics, and used several thin layers to build up a coat. The flash makes things look worse, though . The patterns are more or less done now, and I simply need to touch up each colour (and maybe add a final coat of dark green too), make the edges of the camouflage neater, and then add the gunsight, propeller and canopy before going ahead with the decals.3 points
-
The final steps of my Heinkel kit are right now done. For standart german Splinter Camo I`ve used RLM 70 from JPS (the darker colour) and RLM 70 from Aeromaster (the lighter colour) The Blackgreen from Aeromaster Acrylics has the right complexion and looks far better than any RLM 71 colour from other brands. Fuel stains are painted with AK Interactive. A nice product, well prepared and easy to use. I prefer to use Citadel Washings for painting the position lights The main canopy is vacu formed as the original part is not realy useable. As an little splash of colour I scratch built for both elevator typical small rudder locks of Luftwaffe aircrafts. Pictures of the final model can be found here: http://www.britmodeller.com/forums/index.php?/topic/234956949-heinkel-he-100-a-0-gpai-hipm-148/3 points
-
Hello everyone I finally finished the upper camouflage , the first color is not the RLM 79, but a sand and then over sprayed with RLM 79. The spots are instead in the classic RLM 80, all colors used are Gunze. bye Ettore3 points
-
Plasticine has suddenly become my modelling aid of choice..... The the CMR wings are a simple 'butt' joint albeit with two nicely cast stubs/sockets to get themlined up correctly and I've been stressing over how to (1) get the dihedral correct and (2) get them symmetrical. So plasticine to the rescue once again... Dunno why it takes me so long to figure stuff out? Obviously need to make more models and get more practice,3 points
-
Hell's teeth, you should put a health warning, on that, before inviting us to look. It had a 33B vocabulary reference, so would have been made to a Farnborough-issued shade card, and was probably produced (like P.R.U. Blue) by Titanine.3 points
-
Hi everyone. I show you my latest finished model. The Me 410 A1 from Italeri. I have tried to represent this aircraft that was downed over the british islands the night of 7/8 October 1.943: I think Italeri kit is a good base to make a good representation of this aircraft. But you need to make some efforts in the iteriors. I have made some scratch modifications: I had to add some panel and rivets lines: And finally I reached what I wanted... I hope you like, friends. Best Regards Fernando2 points
-
Hope I'm not bending the rules by joining the GB with this, Yes you can get them for £9.99 including postage, but I bought 3 of them for £20 so basically this one was well under £10 pounds (Ie £6.66 pence) Anyway Cracking looking kit, Cockpit went together like a dream So far I've sprayed the cockpit black ready to detial paint and apply the decals, and the intake trucking is prepainted before fitting. More Soon Dave2 points
-
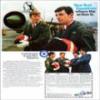
Some images of museum in March Air Reserve Base in Riverside California, about 40 Miles east of Los Angeles. Sorry about the spots on some of the pictures, i started the phot session with a clean lens and sensor but in some point i got spec of dust on the filter and i didnt noticed till i dumped the images on the PC.2 points
-
Built Mostly from the box with some resin wheels and a little scratch building to open crew hatch and blank of a few resulting gaps. Weathering was with Tamiya smoke and pastels.2 points
-
Finished this last week. Its a nicely detailed kit but took a lot of work to get everything to fit together. Austin 8 car is from Matador models and the BSA motorbike is from the new Airfix WW2 vehicles set:2 points
-
No.4 Air School, South African Air Force, based at Benoni, South Africa, June 1945 (New Airfix kit with markings from the Xtradecal X72190) Talk about having a go at something outside of your comfort zone ! First time I've ever built a biplane and the first time I've ever had a go at rigging - Let's just say that I'm pleased enough with the results to have gone out and bought a second one ! Nice stuff Mr Airfix !2 points
-
So as well as the Fujimi Mig-21 I finished today for the group build I have also put the finishing touches to a 1/72 Fujimi F-14A. This has a Pavla resin cockpit (designed for the Italeri kit) and decals from CAM. Painted with Xtracrylix. The CAM decals sheet also has options for Vf-111 and a VF-41 Black Aces bird that was involved in the Su22 shoot down over the Libyan gulf in 1981. Very difficult to choose which option but as I still have another couple of Tomcats in the stash hopefully I will be able to do all three at some stage. Andrew2 points
-
Hi all, Having been a member here for over two years without posting anything, I thought I'd introduce myself with something I did a while ago. This is the 1970s kit, not the updated version, so some of the details are rather crude by today's standards. Also eagle-eyed viewers will notice a wonky balkenkruez at the rear & a track on backwards! Anyways, here are the pictures: Thanks for looking, all comments welcome! Cheers Patrick2 points
-
Hey Mike. Just think how things could have turned out if you ended up with the other one. Charlize returns from a long day on set. Mike- "Hi Charlize. How was work?" Charlize -"All day kissing George Clooney, but I just couldn't get it right." Mike - "My day was a bit like that. All day airbrushing jet pipes and that, but it still didn't look right." Sorry Mike. The Tigermoth is a little cracker.2 points
-
Finally! An accurate 747-400! I can throw out my Revell kits now! Andrew2 points
-
Why... you... young whippersnapper...2 points
-
Calling this little cracker finished! I had such a lot of fun on this model - a complete change from the norm for me - I decided to build this mobile suit as to how I imagined it after a heavy campaign (though I did take some pristine shots - in case I mucked it up)! As you can see, he has taken a licking; but is still very much ticking. For the weathering and damage I used a variety of techniques and products, I will try and jot down everything I did (but memory may fail me in some parts). 1. I started by adding scars and bullet holes to the model; I used a heated round bradawl style tool that I have (think of a really thick needle about the size of a cocktail stick), I used a small tealight candle to heat the metal (light it first or it does not work so well) - then I dragged it across the plastic areas I wanted tear and graze marks on; for the entry holes I just got the point of the bradawl really hot and stuck it in; as I would imagine a bullet spread would have impacted on the armour. 2. to paint the battle damage with a small degree of fantasy realism ('fantism'?) I painted all of the damage in mr metal aluminium, then I painted in the deepest parts mr metal iron - this seemed to work pretty well judging by the end result. 3. For most of the weathering I decided to use some of my AK interactive washes and effects; streaking grime, winter streaking grime and salt streaks (for experimentation). I started by brushing on thin lines of the effect using a small 00 brush, then I left it about twenty minutes to dry before I went back to it to start the streaking process - using a small flat brush moistened in white spirit (ish) - the first attempt was a bit of a disaster; I had bought some Bartoline 'Clean Spirit' to try, in place of white spirit - this did not work so well at all, it either clumped the AK paints or removed them completely. So, I removed all the weathering and started again (only on one leg this time, just in case, you know how it is), WITH the exception of using real white spirit this time, I waited twenty minutes and commenced to drag said flat brush, moist with white spirit, down the leg of the model - success...of a sort, it did work better than last time, but, did not give the effect I was looking for, to me, the drying time was too long. Third time lucky, again, I did all the above - fine lines of AK products, BUT THIS TIME I did it in small sections - giving the AK products just a minute or two before I dragged my well used flat brush down the paints to get my streak on! This worked brilliantly, I got the effect I wanted at last (as you can hopefully see from the photographs). 4. Finally, for the worn edges I decided to use a tiny piece of sponge dipped in revell aquacolour aluminium paint, dabbing off most of the excess I then gently tickled bit of the model with the sponge to get a nice random chipped effect in a very small amount of time - I could have spent a bit more time on it but I feel I have hit the right balance (as long as that balance is to look thrashed to within two rounds of Mike Tyson). After that I gave it a very thin wash (50:1) of Vallejo gamecolour brown ink to remove any harshness and finished it all off with a couple of coats of Vallejo satin varnish thinned with water. Apologies for the reeeeaaalllyy long post but there was quite a lot of info to get down! More photos in the gallery.2 points
-
http://i.imgur.com/OFRw2b6.jpg Just to cool a pic to pass by2 points
-
I don't remember that far into the past...2 points
-
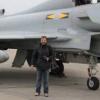
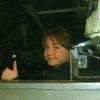
Great phot - looks as though you're climbing in, but looking shiftily behind you. "Quick, let's get airborne before they realise I actually work in the SE section and borrowed this goonbag".2 points
-
This morning I painted the black and I think this is starting to look quite smart. I have the deck clutter to paint and a couple of other bits then it will be ready for a coat of Klear. Next weekend will be my next chance to work on this... IMG_3635 by Snapper_city, on Flickr2 points
-
Greetings folks, First completed build of the year. When I saw this it jumped right to the top of the to do pile! Please forgive me for deviating from the one true scale. Whilst it might happen again, it shouldn't happen too often Very nice kit, went together easily, with excellent fit. I say that, however the instructions call for some glazing to be installed before the fuselage halves are joined, one window of which straddles the fuselage seam. I considered this a recipe for disaster, so I ignored the glazing, filled the seams and then filled each window with white glue to protect the interior grey from the white paint to follow. After the sealing gloss coat, I removed the white glue with a new No. 11 blade and then filled each window with Airfix Clear Fix, albeit with only partial success, some are crystal clear, others have fogged over as it dried. At least I got a sharp edge on each window. The instructions call for 5g of nose weight in each fuselage including SpaceShipTwo. It seems overkill initially, but once built there's not a huge load on the nose gear. It also gives a nice weight to the finished product. There's not a lot of space in there, however, so I tried Deluxe Materials Liquid Gravity. Nice stuff, though I found it time-consuming mixing it with white glue and packing the required amount in. Paint was Zero White Filler Primer, which gave such a smooth finish once cut back with Micromesh that I just gloss coated with Alclad Acqua-gloss. The rocket nozzle was done in Alclad Copper, the engine inlets in Xtracolour Boeing Grey, and the tires were done using the new Tamiya XF-85 Rubber Black acrylic. Finally a quick drying replacement for Xtracolour Tire Black! Decals went on pretty well, treated with copious amounts of Set and Sol, with no adverse effects, and by large settled down nicely, save for a few wrinkles that refused to budge on the large underside decal. On with the photos! Normal service will resume (1/72 scale)... Darren2 points
-
Revell HE162 Salamander 1/32 build thread here http://www.britmodeller.com/forums/index.php?/topic/234954471-volksjager-revell-he162-a2-132-scale-finished/2 points
-
Managed to get the decals on, but had a boo boo with the Mk.II roundel and letter 'S' on the left hand side after applying paint over it. In the end, I've made a new decal using the white centres from some old ones (had to use two as they were thin) and made the cross using strips of Air France 737 decals! Unfortunately, it's a slightly different shade as I run out of rudder decal. Cocking the decals up seems to be a habit on recent builds! If anyone has a spare S, it would go to a good home, if not I'll make do as it's only really noticeable up close2 points
-
Just a little more progress before work this afternoon.The Hurricane fuselages are joined up and heres the Spitfires ready for the next step.2 points
-
Finally got the body together and am now trying to clean up the joins without doing to much damage to the raised rivets,I took a few shots with the wings dry fitted and even though I got as much lead in the nose as I could you just have to look at it wrong and it turns into a tail sitter so got to get some more weight in it some how.2 points


This leaderboard is set to London/GMT+01:00