
Leaderboard


Popular Content
Showing content with the highest reputation on 06/03/14 in all areas
-
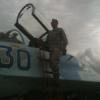
Here is my Hasegawa F-18F VFA-41. I first saw these jets in 2004 during Operation Cope Thunder held at Eielson AFB. These were brand new jets so I kept the weathering very minor. I put a weapons load that I envisioned that might have been used on their first deployment. Pictures were taken with a Fuji camera set to auto. I started this project several years ago but I put it back on the self to finish a commission build. So after the completion of my Backfire I decided to finish. I used Model Master Paints, Two Mikes intakes, Eduard cockpit set, G Factor landing gear, Black box cockpit and superscale decals. Thanks for looking. V/R Rod8 points
-
- Another Dora, this one is a Tamiya with sone Aires modification job.......7 points
-
Hiya Folks, While building a number of the new fabric winged Airfix Hurricane`s in 1/72nd scale I also had a go at the old 1979 release with `metal wings' and with the help of a SAM resin Vokes filter and Valiant Wings DH propeller and wheels I had a go at replicating a Hurricane which I`ve always fancied doing, one of the silver Mk.I`s/Mk.X`s flown by the Rhodesian Central Flying School circa 1945. All of the panel lines were sanded down and re scribed and after locating photo`s of the subject aircraft which covered each side the anti glare panel was found to be different on both! Anyway enough blubp, here it is; It is still a good kit after all of these years but it is quite a chore to box in the undercarriage well, rescribe the panel lines and obtain extra parts such as the Vokes filter, prop, canopy etc so please Airfix,.....can we have a new metal winged one too,.......please,...please??? Cheers, Tony PS- I meant to say that I also put the cockpit from an old scrapped Academy Hurricane into it too!7 points
-
Hello chaps this would be almost my last post.My plane is almost finished I just need to add exhaust do smoke marks etc and put a coat of varnish.a But I have a small problem.What kind of varnish should I use Matt or satin??Building this model was a pleasure. Here are pictures7 points
-
Some finished pictures: Paints used are LifeColor acrylics.7 points
-
Here's some pics of the AA Stalwart I've been working on for a while. First attempt at an all-resin kit, but the engineering is superb - once the pieces are cleaned up, the fit is excellent. Thanks to Dereck too from AA for supplying me with a few parts I was missing (or put aside somewhere and lost!). Still got the cab searchlight to add (waiting for some Little Lenses) and might dial back the weathering a bit. My first use of pastel chalks to weather - went a bit overboard, as when wet, they are quite hard to see (a bit like real mud!) Didn't want to obscure the lines of the Stolly too much, as they are fascinating subjects - so futuristic and 'Thunderbirds'-looking! Couple of SLRs in the rifle-racks if you look closely! I really think Britain reached the pinnacle of engineering in the 50s-60s, with machines like this, E-Type, Concord, the TSR-2, hovercraft and Harrier!6 points
-
6 points
-
Recently finished, lovely kit, but there are some things I would do otherwise next time (got a floatversion waiting in my gigantic stash) Comment is always appeciated! Dave6 points
-
Hi folks built for the under a tenner GB( bought for under a fiver) this is the old Hasegawa kit.used the kit decals but added weapon load from spares,I used to build loads of this period US navy aircraft as a kid but this is the first for many years.thanks for looking5 points
-
Hi All I finished this model last month. I built it for a friend. It’s a Revell 1/144 Airbus A330 and is out of the box. I did add some extra decals. When I get a but more time and space I will build my two A330. Ken5 points
-
Here we have an Accurate Armour Mark 3 Tank Transporter with Sankey 60 Ton Trailer designed for carrying Chieftain and Conqueror Tanks. In this case the Cromwell Models Conqueror. As one of the original members of 3 Tank Transporter Sqdn....23 Tank Transporter Sqdn disbanded shortly after to become 3 Tank Transporter Sqdn and this is the equipment we used in the 70s at Antwerp Barracks in Sennelager BAOR. Both kits, well, 3 actually counting the trailer, fought me all the way with brittle parts breaking and replacements having to be hand made. I have made the antar with options for ballast or 5th wheel, crew canopy or, as often seen when not being used just the skeleton framework for the canopy/crew quarters behind the cab open to the elements. It still need some weathering on it although these vehicles, like tanks, only moved 6-8 months of the year so much time was kept keeping them clean, spotless and depending on the driver "bulled up" The rather long ramps on the Sankey Trailer can be displayed up or down with all chains detached or in situ5 points
-
History: Between 1962 and 1967 the Canadian Ministry of Defence acquired 18medium weight tandem rotor helicopters used primarily for search and rescue (SAR) operations. (Total prize: 25.500.000 USD) The twin gas turbine engine multi-purpose helicopter is suitable for take-off under minimum IFR conditions. Besides the SAR mission it performed medical evacuations (MEDECAC), training, passenger transport and transport missions. Most famous rescue mission was performed on the 3rd of October 1980. The Dutch luxury liner “Prinsendam”, on fire and positioned 170 miles out, in the frigid waters of the Gulf of Alaska signalled an SOS. It had left Vancouver three days earlier with 510 souls on board. This large American-Canadian rescue effort resulted in all passengers safe and well. To be mentioned here is the use of the supertanker “Williamsburg” as a floating landing platform. In 2002 the helicopters were replaced by the Cormoran. The helicopters were for sale for USD 158.300 a piece. The Model: Years ago I selected the Hobbycraft 1/72 model. I think the boxart made me buy it. To complete the model I acquired Belcher Bits decals and the Eduard cockpit set . Paints came from Xtra color and the bright red was from Testors. Construction was, with the exception of the cockpitglass no problems. Most difficult was the “paint” job. Especially the red band over the side of the helicopter. Yellow is already difficult to spray on primer, but red on yellow is a challenge. The cockpit glass was taped for many times to get everything covered in a nice rescue yellow color The paintjob finished I tackled the decals. With micro set and sol the decals were put in place. The lightning bolt was cut into pieces to cover the open hatch on the starboard side. Own construction: Searchlight Sight mounted HF antenna Landing lights /anti collision lights Crash Transmitting Locators5 points
-
Hi everyone, Just finished this one for the Less than a Tenner Group Build: More pics in the Gallery, here: http://www.britmodeller.com/forums/index.php?/topic/234954229-gallery/page-2#entry1564620 Cheers, Stew5 points
-
Hi, Besides the 1/16 Steam Roller the unforgotten manufacturer Bandai made a kit of the 1919 Garrett & Sons Steam Road Tractor Pendle Princess. The Steam Roller was shown here http://www.britmodeller.com/forums/index.php?/topic/234928567-116-steam-roller-by-bandai/ I suppose I built my model 30 or even 35 years ago. My memories of the build are almost completely gone. Nevertheless I am sure that building it was a pleasure, because Bandai kits were really outstanding. I know that in England there is a very strong interest in all kinds of vintage steam vehicles. Therefore probably many of you will know the original vehicle. For those who don't, however, this short information: Up to the thirties steam trucks and steam road tractors were a common sight at least on European roads. One of the most renowned English manufacturers of steam vehicles was Richard Garrett & Sons Ltd., Leiston, Suffolk. Their 1919 road tractor, initially built for pulling trailers of a brickyard, later converted into a showman's tractor and equipped with a current generator, was preserved by the English enthusiast Tom Varley and displayed at his Museum of Steam. There it was nicknamed Pendle Princess. After Tom Varley's death Bandai purchased the vehicle and made this kit.4 points
-
Here are some photos of my 1/48 Academy MiG29A Fulcrum. Added Wolfpack cockpit, Quickboost intake covers, Aires wheelbays, exhausts, missiles and wheels. Decals by Authentic Decals. This was my Xmas present to myself in 2012!!! Many thanks for looking.....4 points
-
I built this one pretty much OOB. She is reaching the final stretch: Panel lines are post shaded with Tamiya Smoke sprayed through my Iwata gravity feed.4 points
-
Here is my third build completed couple of more photos will go in RFI section4 points
-
Hi fellow modellers! Once again thanks a lot for all your coments Its taken some time with a few problems arising to get the rear of the IP wired up...but loads of superglue and odd bits of wire later I managed to finish it. The main problem I am finding with this build is the detail around the centre line between the two halfs!!....so literally some of the detail has to be built in two halfs! ...this is very time consuming and complicated to say the least!....but I am beating it ...sort of ...slowly Any way ....I make no apologies for the amount of photos I have taken...its taken me long enough to build this section ....so you will have to lump it!! ............... The IP wired up........... All done!!! I will be detailing above the Navigators table next...so will post again when complete........ Cheers for looking in guys4 points
-
Heller 1/72 Caudron C635 Simoun Build thread here: http://www.britmodeller.com/forums/index.php?/topic/234956524-heller-172-caudron-c635-simoun/ Cheers, Stew4 points
-
I thought it was time I stopped just admiring everyone else's hard work and posted some pictures of my own. This is the old tool Airfix Blohm & Voss Bv141, and it was, surprisingly to me, an enjoyable little kit. Yes, it has raised panel lines and rivets, and I'm sure that there are technical problems (e.g. proportions/length etc.), but it looks about right compared to reference photos and that's all that matters to me. Overall, fit was good. I added the swastikas on the tail from some leftovers from another kit - because I chose the paint scheme that I did, it really needed it (I feel). Paint is Tamiya XF-12 J.N. Grey (diluted with a little white in places to give some streaking, but I don't think that has really shown up terribly well. Such details as there are were done in Vallejo (mostly) bits and bobs. I chose the second scheme because a) I'm bored with splinter schemes, and I like the colour. I realise that there are many flaws, including but not exclusively: Canopies are a little rough (notwithstanding the 2+ hours spent masking them). Please bear in mind that the plastic was thick, and I can't get Future here in Oz. Washes are pretty much my first foray into anything like that, and I need lots of practice. This kit was chosen as a bit of a morale booster and practise run after a particularly traumatic DH2 build (and then I noticed the canopies!), and overall it served it's purpose - I enjoyed it quite a lot. Anyway - on with the show, and thanks for looking:3 points
-
I must be mad but here they are... The Airfix Bristol Bulldog and Revell's Spad XIII C-1. These builds will fill gaps in my British Forces Aircraft that is a personal GB. The Bulldog was £3.40 from Mr Models and the Spad can still be purchased for less than £4.00 from WHSmiths.3 points
-
Second listing so go easy, looking to improve, I found this kit very awkward, it was part of the Victoria Cross Icons set and have since found out how old it is. I have not attempted any weathering. The canopy masking is a real bug bearas at 1/72 scale, my eyesight and finger agility are not what they used to be. Having just started back into the model making I am amazed how much of a history lesson the modelling provides, as you delve the internet for information the stories and background information can be fascinating.3 points
-
Hi everybody, here I present my currently finished RF-4E, built of Hasegawa J.A.S.F.D (07230) kit. I used addiionally Aires pilot seats, Hi Decal Line decals, Master tubes and probes, Steel Scorpion "Remove before flight" pendants (correct word?..) and Eduard painting masks. I finished my Phantom in Iranian markings: 62nd TFS, 61st TFW, Islamic Iranian Air Force (IRIAF), TFB.6, Bushehr, 1985. Thanx to Arkady72 for stencil decals! Model was paited using Lifecolor, Tamiya and Mr Hobby acrylics and Mr. Hobby and Model Master metalizers. I hope you enjoy!3 points
-
Hey guys, I wasnt so mutch active online lately... but I have produce new armor... Hope you like it Cheers Roman3 points
-
This is the Welsh Models 1/144th Tristar K1 ZD951, that I have painted up as she was during the Gulf War. The Two K1s were painted rather rapidly by Marshalls as the white scheme made the aircraft stand out like a sore thumb over the desert. The paint was very prone to peeling especially around the nose area.3 points
-
Hi people, this is my personal interpretation of the legendary Mig-21. Aires cockpit, CMK seat, Eduard undercarriage and wells, and some scratch. Painted with Alclad an weathered with Ammo products. Some more photos, for those interested: http://dqscaleworks.blogspot.com Cheers, Q3 points
-
I always seem to return to the hobby after a hiatus with a Spitfire, often a Tamiya Mk1. In this case, after almost two years moving house and qualifying as an architect (that was a long one!), Alley Cat's new 1:48 Spitfire Prototype kit was pushed to the top of the pile. A beautiful resin kit, had of bit of filling to do around the wing roots but otherwise fitted together very nicely indeed. I mixed together my own version of the infamous mystery grey/green/blue colour and used Model Alliance roundels from their interwar set for a slightly less bright blue than the kit decals. Bare Metal Foil was used for the spinner and edges of the propeller blades. Weathering was intended to reflect the aircraft just after a flight based on a Google search of images a bit of exhaust staining and some highlighting of panel lines around the cowling panels. Hope you like it! [3 points
-
First posted in Photography Technique thread of the forum. I have a lot of fun trying to make a model come to life, so some night time flash photo,s and some floodlights and wet tarmac added = Revell 1/32 Hawker Hunter F.Mk 6 Night shoot.....Well sort off DSCF0196 by triumphspeedtriple, on Flickr DSCF0212 by triumphspeedtriple, on Flickr DSCF0206 by triumphspeedtriple, on Flickr3 points
-
G'day Chums, Calling this one done.This is the Airfix Churchill in 1/76th scale,the build thread is here http://www.britmodeller.com/forums/index.php?/topic/234956435-airfix-churchill-in-176th-scale/#ipboard_body .Enjoy. Thanks for looking in.3 points
-
Hello again Chums, A little more progress today.The lichen is still propogating I brushed some yellow on top of the greeny yellow and a little drop of orangey yellow into the bobbly bits.To my eye this does not look too far away from the real thing. I'm finding this part of the job strangely addictive and am actually quite enjoying it.Sad? Basil had a little more attention too.The blue down each side of his head should also have the speckling found on the top so I scraped away little spots of paint with the tip of a scalpel blade and then brushed a thin coat of Baltic Blue over the top.This seems to have had the desired effect. A tidy up and a brush down will sort it all out nicely.The next step is to make the orange look a bit more interesting. More soon chums,thanks for looking in.3 points
-
I bought the big Airfix Merlin a few months ago, planning to leave it until they had been transfered to the RN to build as an HC4, but impatience got the better of me.. With credit to Heloman for the inspiration and some great in-progress shots of his project, I've been working on converting the kit to one of the Royal Navy Anti-Submarine helo's. I've been taking photos, but not posting until I was fairly sure I'd not just wasted an expensive chunk of plastic. Hopefully the photos will show why evergreen (and other plasticard producers) deserve equal billing... I started with the cabin, which is significantly different to the transport model, changes include: Extended floor, Cut off side panels with a number of windows covered and sound proofing New cabin rear 2 Sonobuoy launchers 1 sonobuoy rack Liferaft (I think) Sonar winch /control box pax seats Observer stations Crew seats Here's an overview of the new parts Pax and crew seats Sonar winch Observer stations and sonarbuoy gear The sound proofing is kitchen foil pressed into the cabin roof of an Italeri Merlin for the pattern Just a few changes to the bulkhead between the cockpit and cabin Finally for this post, a test fit of all the parts Next up painting2 points
-
While I have been 'resting' this has snuck into my builds and here are some progress pics. I won't do lots, just a few to show as I go along. Its the Airfix 1/48th B.16 boxing from way back. Airfix are re releasing this kit so it seems timely. All these pics focus on the cockpit area. Quite pleased how its come out. I know its not fully detailed as I am working with what I've got and within my abilities. The only extras are the etch seat belts. Anyway a lot won't be seen much! The final finish has been decided and will wear decals from a Freightdog set!2 points
-
Well after just about a week she is done, although not quite as detailed as the 1/12 Tamiya kits straight out the box I have to say that as the build went along I became more impressed with the quality. I certainly will be adding a few more of these 1/9 Revell kits to the collection, decals were a challenge, I was expecting this but lots of patience and Microset/sol got the job done. This is the WIP, http://www.britmodeller.com/forums/index.php?/topic/234955110-19-honda-rc-211v-revell-wip/ Model finished in the late Daijiro Kato scheme. Thanks for looking Danny2 points
-
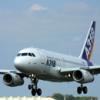
Hi all I've had the idea for a long time now about building another A380 but wanted something different so what could be different ??? Last year Bruce Dickinson wanted a new aircraft to replace the old tired Boeing 757. He wanted longer range with a bigger capacity so he placed an order with Airbus for the mighty A380. Well in spring 2014 the aircraft was going though the production and she is almost ready........ Hope you enjoy. The Kit is Revell's 1/144 and decals are custom made by Richard Warcup2 points
-
did the gnat so thought i'd to its younger brother.2 points
-
Finally I have finished this project, that I started three years ago. Today, most people who build Lansens would choose Tarangus' new 1/48 kit. But fools like me are still building this, more than thirty years old, 1/72 kit. I have used Maestro Models' photo-etched airbrakes, interior detalils, air brakes and ladder, plus Maestro's canopy and resin belly tank. The decals (apart from the "39") are RBD Decals' excellent decals. A new wheel well was scratch-built. I also made new panel lines and a few other modifications. I painted it with Gunze acrylics and used dry pastels for weathering, along with some chipping. This was one of the last Recce-Lansens in the Swedish Air Force, operating from F 11 wing, Nylöping about 1977. Perhaps an odd subject on this forum. But a beautiful aircraft that was used in Swedish Air Force for more than 40 years.2 points
-
Hi all, here is a kit build some years ago, I had a few spare time to build a custom lightbox and take a few pictures. It is the well-known Tamiya F4U-1D, build as a plane from VMF-351, aboard CVE Cape Gloucester, pilot was D.K. Yost. The mototug and pilot figure come from another Tamiya kit. The carrier deck is done with balsa strips and some photoetched tie downs. The finish is Gunze paints, markings came from a Superscale decal sheet. I ended up using only the kill markings, the rest was painted with masks. I hope you will like it, Christian.2 points
-
No, you're not alone there, had a look around but after casting two votes and having to refresh every time then wait for it to slowly reload it tried my patience beyond its limit. Wanted to check for or suggest reissuing their 72nd scale Hawker Hunter and MiG-21 F-13 kits but maybe just leave them to work that out for themselves.2 points
-
Well, another update, didn't do much last night, but I did start on the landing gear. Once I mocked it up, I realized that I had weighted the wheels in the wrong direction... grrr... I have also sprayed the plane with future, decals to come later. Comments etc always welcome. K2 points
-
I think it all depends on the scale you're working to. I should have done this chore much earlier, when there was no running rigging in the way - c' est la vie. I may have recommended this book before (I have it) http://www.amazon.co.uk/Period-Ship-Modelmaking-Illustrated-Masterclass/dp/1844156966/ref=la_B001JP2ALM_1_1?s=books&ie=UTF8&qid=1394111631&sr=1-1 is very useful. Reed works at rather smaller scales than I do and does all his rigging in wire. His Shrouds are done in a home made jig, cross-laid with thinner wire for the ratlines and then each one is given a slight sag.... At 1/96th, I tie hundreds of clove hitches, until the the shrouds are too close, then I glue... It's not too difficult, you just need to take your time (lots of it). A slip of card with the height of your ratlines marked off helps. Getting an even sag is, um, difficult, as is obvious in the photo! In answer to Kev, yes there will be a contingent of swabbies....they'll be the last thing to happen!2 points
-
Just started on this. Found something interesting while washing the wings, so that's what vortex generators do. They seemed a bit thick for me so I thinned them down, but they still look thick so I will thin them down a bit more. The seats are a bit bare so I've done my own interpretation, I don't want to open another can of worms, so they are what they are. A few more straps and I think it's done. More to follow BB2 points
-
Hi Rob and Snapper, Thank you for your comments. I got a bit more done yesterday - mostly painting up the wing insides before assembly. I'll get some photos posted at the weekend. Kind regards, Stix2 points
-
Or wait until it arrives here in the UK and then you won't pay them nasty customs/handling fees (last time I got stung for £21), which take away any saving you might make from buying in the UK in the first place! Remember every time you spend money with UK traders you are helping the UK economy! thanks Mike2 points
-
I've had an AS186 clone for four years now. Very reliable piece of equipment, it has never let me down and I have sessions where I use it for three hours on end.2 points
-
Hello, this is my next work typ59, base to build tamiya model t-55, I added the part with the Eduard and barrel with rb model.Mao forever alive:).2 points
-
G'day Chums, Deacon,thanks,glad you're enjoying this. I'm calling this one done.I added the twiddly bits,painted the exhaust Dark Earth 'cos that's about the best compromise colour I can think of at this size and added a couple of antennae made from thin wire. She's had a coat of Vallejo Matt Varnish.This build has served to remind me why I'm doing more and more airbrushing and also how much less of a faff brush painting can be.Her ultimate destination will be a D Day diorama the kids at school are occasionally working on so any weathering will be done then.Thanks for looking in chums.2 points
-
Here are a few shots of the external changes: Left hand side needs a window removing and another smaller one adding, a door latch and a few holes drilling out. At this stage I've drilled out everything and will add all the details once everything is buttoned up and the tail added permanently. I've ordered the new Eduard set for the HC3 which should give me a number of the details still needed here. Right hand side is a bit simpler, with just the window removed, latch and a couple of other minor additions, I'll have the main hatch open, but am still making all the changes, including those that will be covered by it. The biggest feature of the underside is the radome - this was built up from a set of plasticard discs and milliput (note to self - when spinning that in a drill to shape the wet milliput, duck when it flings lumps of the stuff everywhere) Other changes are the four cut-outs for cables that run to the pylons, removal of the cargo hook hole, adding the sonar hole plus the deck attachment location. Finally for now, the fuesalge and tail taped together - it;s a big beast!2 points
-
Part II - Intakes. Ah, the dreaded things. Why they got them wrong, we'll never know. These are undoubtedly 'off' as the lower lip is not parallel to the upper lip of the intake. All of which makes it Satan's own spawn to some, inconsequential to others. I'm somewhere inbetween, but would love it if someone made a corrected intake or HB provided replacement intakes... :rolleyes:/> Anyway, you would be advised to sand the inside bottom lip of the intake down as it is too thick anyway. The mounting holes for the fuel tanks are too far forward - I re-drilled locating holes by eye (about 5mm, IIRC) for mine, but if left as-is, the fuel tanks will sit too far forward. They also appear too central on the kit, so I drilled mine 1-2mm off centreline, but don't overdo it or you could have interference later with the MLG struts. Don't place the intake ramps in place before you place the intakes. This will allow you to fill the seam on the inner side of the intake funnel. If you want the ramps in the 'supersonic position', ie. as per the kit, then the ramps will cover the side seam. If you want the ramps 'flat' and the intake funnel open, you'll also need to cut the ramps and don't bother with installing any of the actuators for the ramps. This will let them lie flush. There exists the same 'problem' as the Hasegawa F-14's - how to make seamless intakes! It's genuinely not that difficult to achieve, but will require a bit of effort and a lot of sanding. - Tails. These are all the same, ie. late versions with the layered triangulated plated on the top of the fins, not the two diamond shaped plates on the early Tomcats. Annoyingly, the tails mount on an odd split to the fuselage, so it's preferable, for a clean seam, to mount before painting. Some people prefer to paint the tail seperately, then mount later, but I fear you might not get such a great result with that method on this kit. - Pitot. I would recommend, gluing the kit pitot on, snapping it off, sanding it down and using a Master brass pitot replacement. Part III (final) - Rivets. These kits are known for their infamous amount of rivets, a lot of them in the wrong place (most prominently the stabs, or staiblators). I'd recommend filling with a fairly liquid substance like Mr Surfacer 500, or if you can't be arsed filling and sanding, then a wipe or two with Tamiya Extra Thin or Mr Cement S to 'melt' the riveting down some and soften the appearance. - Engine shrouds. The -B and -D have the GE engine shrouds, which thankfully are smooth, unlike the Hasegawa which have the PW ribbing. The only drama is the 'soft' edging of the shroud to the aft of the stabs - it just blends right in to the carbon case. Some judicious masking or even a quick scribe will set this right. I masked mine (the strange looking stuff on the Abe Lincoln decal is MicroSol) - Arrestor hook. The arrestor hook is, like the Hasegawa offering, a tad long. It's quite an easy fix though - cut about 2-3mm out of the length. Voila. Also, the actual hook can do with a bit of carving out to create a more rounded 'hook'. The arrestor hook mount has a poorly rendered dump pipe. I removed the 'pipe' and added a small section of sprue. This was drilled out and then shaped by carving and sanding to get a realistic looking dump pipe. - LTS (LANTIRN) Pod. The LTS pod is quite nice, with some good detail apart from the vent being on the top of the rear, not the bottom. Easy fix once again - fill the top, scribe the bottom! (Yes, I only saw this once I'd painted it, so shoot happens!) - BRU-32 bombracks. Frustratingly, these are good representations, but only come with two in the box! They also have a strange casting, so need filling - frustrating again, but not insurmountable. - Loadouts. The HB kits come with some impressive loadouts - but most of it is for the ammo dump. The forward Phoenix pallets are clearly not 'deep' enough, but the rest of the weapons rails seem pretty good and comprehensive to me. LAU-7 and LAU-138 are well represented. The GBU-31 JDAM is ok, the AIM-9L/M's superb (there is a seperate sprue of two very well detailed 'winders), the AIM-7M's are great, the AIM-54's just need the weird forward and centre 'driving bands' removing to make them good. The GBU-10/12 is more an older GBU. The Mk.82's are ok, and the AGM-84's just not applicable! The Mk.82's and the JDAM's will need an ablative coating manufacturing if you are that into detail, and I'd recommend Mr Surfacer 500 stippled on to create this effect. There are a multitude of AM weapons available, so shop around. I'd recommend North Star models' AIM-54's and GBU-38 500lb JDAMS (already with ablative coating!) - but remember that not all Bombcats got to fly with the GBU-38. The SJU-17 seats OOB are pretty good, even the PE details are nice and soft brass, not SS. Rearview mirrors are seperate, which makes placement easier than the Hasegawa 'ring of steel'. Masking idea for the non-slip walkway: I simply masked the walkway, then sprayed over with a 'thick' mix of black, on a low pressure, to achieve a worn looking surface on the intake tops. Aftermarket. Wheels - Wheeliant by Aires has just released F-14A resin wheels for HB, they already have the later -B/-D wheels released - very nice they are too Pitot - Master brass pitot and AOA are super updates. Wolfpack Designs Bombcat update - complete pallets, BRU-32's, LTS and pylon, LAU-138's. Decals - Fightertown Decals ONLY please! (ok, I used TB 'cos FT hadn't yet released their awesome Felix Final Flight...) GBU's - Northstar models for GBU-38's, AMRAAM Line for GBU-12's. Both come with the ablative coating already applied. Seats - Verlinden for GRU-7's, and I'd use Quickboost for the SJU-17's as they're Aires seats with the belts cast in resin ;-) Exhausts - Aires for PW and GE. SHULL or Dr Pepper for just GE cans. Wheel bays - Aires Canopy masks - Eduard Fuel tanks - Wolfpack Designs or Royale Resin And that folks, is that! All I can think of for now.2 points
-
And off we go. The rear deck is a dry fitted so I can glue the ill fitting transom in the correct place before I sand it down. There's flash galore on these sprues...2 points
-
Well, I promised I'd post a picture to show where all those wires had gone, and here it is! This is the starboard bay completely done, with the unmodified port bay as a comparison. I've purposefully chopped part of the undercarriage retraction jacks off-I removed the bit that sticks up and attaches to the leg further down towards the wheel. This'll make it much easier to prime and paint the bays. Signing off for a few days, as I've got the other bay to do!2 points


.thumb.JPG.3498f40362ff13ebfc4b2e45abbd545e.JPG)


This leaderboard is set to London/GMT+01:00