
Leaderboard


Popular Content
Showing content with the highest reputation on 22/02/14 in all areas
-
8 points
-
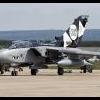
Morning gentelmen! Please take a look another my build. For this time Spanish Air Force unit based at Los Llanos (Albacete). 14 Wing of the EA.. All rivet was made by my self, pilot and wing tips armament from tamiya F-16 kit. I hope you will like it!8 points
-
Here is another one started - this will be strictly OOB as it is for Tamiya Canada. I think the cockpit is done... These are the included belts. yes they are very stiff material but they can be manipulated into place. I know the new fabric style would be better but these are good for "standard equipment". The engine so far... After an airbrush of X-18 semi-gloss black it was dry brushed heavily with Humbrol flat aluminum. Washes next. more to come... Bill B.6 points
-
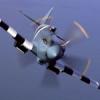
Good evening, Long term project that I just brought to an end. Fujimi's XIV with Armycast resin Engine and cockpit. One hell of a frustrating build that has turned out ok (although the consensus seems to be that it's better than ok ) Spitfire XIVe EB-P/MV260 Flt Lt Peter Cowell 41 Sqn B118 Celle, Germany, April 1945 IMG_6716_zpsee26b073 by Ben Standen, on Flickr IMG_6717_zps82857e25 by Ben Standen, on Flickr IMG_6719_zps735c8b24 by Ben Standen, on Flickr IMG_6720_zps5f96f8fc by Ben Standen, on Flickr IMG_6721_zps9e8d63bf by Ben Standen, on Flickr This is the last Spitfire I'll be making for a while and CERTAINLY the last ETO XIV, having just built three in a row! Thanks for looking! Ben6 points
-
Academy 1/32nd F-16I Sufa With Eduard Etched Belts and External set Finished this on Monday - I have very mixed feelings about this kit, it's very impressive but it's also somewhat variable. Being made out of a mix of kits the plastic and details are slightly variable, which makes things more interesting. The fit isn't bad, but does need fettling in places, and some of the engineering could be better. The Eduard seatbelt set is great, but the External set is completely pointless - the Afterburner parts which was the main reason that I got it simply didn't fit, being too wide to fit in the jet exhaust. Work in progress is available here Peter5 points
-
4 points
-
This is my finished Airfix 1/72 MkIa Spitfire - the new tool version. I really enjoyed building it. It's the first plane I've built in many, many years so it was a bit of a learning experience. It's all brush painted apart from the final application of matt varnish which was from a rattle can. I tried some pre-shading, which I think worked, and this is my first attempt at weathering. The build can be found here. The first photos are ones I took after deciding it was finished and in proper daylight rather than electric light: Next I decided to make a little display base for it on some scrap MDF I had: Which I then tried some close-ups of with the sun at quite a low angle: .....and a couple without the sun: Well that's it for this one. Comments and suggestions welcome. Next off I'm going to do another Spitfire for the 'Less than a tenner' group build. In fact I may even be making two. Kind regards, Stix4 points
-
Hello gentlemen, This is the old KV-1C from Tamiya with super detailing: engine and compartment from Verlinden Productions, Model Kasten tracks, panzer IV commander´s cupula and gun from spare box, hand painted crosses. Finished in Tamiya acrylics. Represents a Panzer KV-1 735®, 22 Panzer Division, Russia, late 1943. PHOTOS: Bye!4 points
-
The latest of the bench. This is the Airfix kit with the Aeroclub conversion. Decals from Cutting Edge and the spares box. I've always wanted to do a two seat version of the Lightning as it looks as good if not better than the single seat. The Aeroclub conversion was a breeze to fit. After that it went all down hill. I used the Model Alliance book on the Lightning as my guide ............ not a good idea as I found out much later. The colour of the grey they quoted was wrong .....I found this out when I had done all the painting. I found an insert of paper at the front of the book stating there was an error with the greys Anyway a respray latter......the paint would not go off (xtra colour enamel). Several coats of gloss varnish latter, it was time for decals....... the lion on the Cutting Edge sheet was out of sinc. hence the white edge to his bum. After a lot of It's finished. Not up to the standard I would like but........it's finished A great build apart from the paint and that book Hope you like it. Comments are always welcome. Thanks for looking.4 points
-
First off, many thanks to Wez, Bill Clark, and Dave Fleming, who all offered helpful advice and suggestions. All errors are, naturally, my own, and generally stem from laziness and/or incompetence. I decided to try and build a Matchbox Meteor that I'd purchased two years ago in a fit of madness and tried to rescribe freehand (this was a mistake). I filled all the wobbly scribing I did, and then rescribed the kit while watching endless episodes of Magnum, PI on Netflix while my lovely wife was away at a teaching conference. I also decided to try to mask the canopy with bare metal foil, which I'd never done before, either. I have very few delusions. I worked hard on this kit for about three weeks, but I know that many people here could build a better (and more accurate) model in half the time, or take longer and build something that might be mistaken for the real deal. So there's no need to be gentle! Anyhow, here's what I did: Rescribed most panel lines (some got lost in the shuffle after being sanded down). Masked the canopy with bare metal foil. Blew up a diagram of the Meteor's camo to 1/72 in Photoshop and cut out the camo masks from it. After painting the base scheme, I discovered that, ha ha, I'd used the wrong intakes, so I grabbed the wider intakes from the Revell boxing of the MPM Meteor 4, sawed down the intakes, glued the new ones on, and puttied and sanded until, I think, they look decent. I also had forgotten about the NF13 underbelly intakes, so I filed away at two pieces of sprue and glued them on. Then, I lost one of the drop tanks, so again to the Revell F.4, and I used those tanks and pylons. The landing gear went on surprisingly easily, but the little side bits of the gear for the main gear and the main gear doors have baffled me and are not fitted. The Matchbox diagrams are pretty vague. The stencils are all originals from the kit, dating back to 1987. The other decals are from Carpena's Forgotten Operations: Suez set, and went on pretty well. Please excuse my terrible camera work; I use my cell phone, and Chicago is trapped in perpetual night until about May. As you can see, I'm not a master builder. And, one before the primer went on: I used every kind of filler I owned on this model.4 points
-
Finished this one a couple of weeks back, but finally was able to get some reasonable photographs. Includes Ultracast pilot's seat & main wheels, Barracuda exhausts & prop blades, and a selection of bits & pieces (roundels, servicing stencils, aircraft code letter and serials) from the decal stash to do the markings. I have a couple more of the Airfix Spitfire PR.XIX to build in late War and post-War schemes. Nice kit to build with no major issues encountered.4 points
-
An old build, but since I had the kit out I took some new piccies today. This is the Eduard Mk.V with the Airwaves resin conversion, plus resin wheels and a scratchbuilt fin fillet. all the best, Jason3 points
-
I finally finished this little kit. I obviously build very slowly, and for me, alot of the interest in modelling comes in researching and learning about the subject. This one proved to be a research challenge..! Very little documentation exists about this particular airplane. It was one of two, coded 515 and 516, that flew out of Yeovilton in the late 50s and early 60s, as part of 700 NAS. It was used for evaluation flights, and one of the two made the first landing of a jet aboard the then new aircraft carrier HMS Hermes, in May of 1960. After scouring the internet, and even contacting the FAA Museum, my only source of additional information came from a fellow Britmodeller in Italy (thanks again Claudio)...! Initially, I only had the Warpaint #29 book as my main reference, and it only shows one black and white photo, and one color profile of the airplane, in its pages. Unfortunately, the photo is hard to interpret in places, and the color profile is inaccurate. This plane had two, not one, orange bands per wing, and a narrow orange stripe which ran forward from the fulseage band, along the top of the fuselage. (The additional photos provided me confirm this.) Also, after scrutinizing the Warpaint photo, I believe the elevators were orange as well. The tailhook was EDSG, not striped... there were no ejection seat warning triangles under the cockpit... and the top of the ejection seat was unpainted aluminum. Also, I cannot find any photos of any Seahawks, which have stencil data on the righthand side of the drop tanks. I used Xtracolor emamels for the EDSG and white, and mixed my own orange from two shades in the Testors paint line. The decals are from Xtradecal, and performed flawlessly. But be advised, the markings are very well printed, but the color painting reference cited is the Warpaint book. Otherwise I highly reccomend the decals and the kit... Its a little gem... Here's my build thread: http://www.britmodeller.com/forums/index.p...&hl=seahawk And here's the finished model.... be kind, it the first kit I've finished in many, many years...!3 points
-
Hey guys that's my first entry for a less then a tenner GB and it was a fun Wip is in here http://www.britmodeller.com/forums/index.php?/topic/234955064-sdk-reports-for-duty-my-first-gb/ that was a nice build that teach me few things and I hope my next buil will be better ok here are some photos [/url] http://i936.photobucket.com/albums/ad210/zetwu/me%20109/DSC_0525_zps52db37e9.jpg Like always comment and critic are more than welcome cheers Pawel3 points
-
I'd already been planning this before Sword decided to upstage me!! And as I had beenplanning how and why I thought I'd persevere anyway... Its a kit bash using the new Airfix F2a and an Aeroclub vac form fuselage....... I wanted to use as much as the hoist kit as possible, hence the butchery... Not sure which scheme to finish this T5 off in, but it may well have Binbrooks Blue Lion on the fin!!! Started yesterday and here's how far I am by close of play tonight. 1. Airfix's F2a butchered..... 2. Aeroclubs vac-form fuselage partly butchered.... 3.. Intake ducting built up and added to right fuselage half.. 4. Fuselage halves joined 5. Aeroclub's humped section has been glued togetherand supported internally with rod, Aeroclub's cockpit bulkhead and floor have been cut out and added. I have since replaced the cockpit floor to a thinner piece of card. 6. The humped spine has been added....I'll use Milliput to fair this and the section aft of the cockpit side walls, once the wings are on... Next up.... I'll be adding the nose sections and the belly tank.....3 points
-
Hello, here are some photos from my finished McLaren M26, Studio 27, Patrick Tambay, Canada 1978, 1/20th. John-w3 points
-
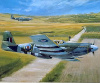
Recently finished P-51D, great kit, build in about one week. Dave3 points
-
Calling this done now so first things first, a picture of the man himself crouched on the wing of his Hellcat. You will note that during the Hornet cruise of 1944, the Sundowner emblem was not present on squadron Hellcats, but were added once they got back to the US in early 1945. The picture also gives you a pretty good idea of how he got his `Skull` nickname. Lt. Charles `Skull` Stimpsom VF-11 `Sundowners` USS Hornet 19443 points
-
Evening all! Yep, I've been putting in half hours/hours in the evenings this week, getting it ready for todays 'top wing on' phase. Good idea! the Pfalz D.III is a good one to start with, lovely looking and not too difficult. Thank you, Zebra it is, why didn't I think of calling it that! I'm glad you said that Jonners, I thought I had done something wrong. I had noticed when I test fitted the lower wings that they had a bit of anhedral and coudln't figure out how it had happened. I cut a 'V' along the upper surface of the tab where it meets the wing, bent it up a bit and flooded it with liquid cement and let it dry for a couple of days. I forgot to do any photos this week as there was no daylight when I did the work. I also photocopied the fuselage crosses on the decal sheet and used them to cut out some matching white decal film. These went over the black stripes to give a sort of white undercoat for the crosses. I was worried that the black might bleed through the white edging of the crosses. I forgot to photograph this as well, but it's why the crosses are already on the fusleage, although I usually leave the decals to as late a stage as I can. I also noticed a couple of cock ups due to my not paying attention. I had painted the axle wing half white half black. Wrong! I don't know how that got into my head, but it should be all white, and is now corrected. Also I used the wrong green on the lower wings and repainted them. With wings, guns, cabane struts, engine etc all in place I started the rigging today. First holes were drilled right through the upper wing, and half way through the lower where the wires go. Then each wire was cut from a length of maxima Chameleon fishing line. Stretched cotton bud tubing was made over a candle flame and 2 pieces threaded onto each line, the groups of them then taped to the wing to stop them getting in the way. I've left the rudder and elevator off as experience taught me that they get knocked off during the rigging process. Another underside shot, just to show that the wing stubs are actually part of the fuselage and needed striping too. Then top wing on! it was done upside down, just the cabanes first with Revell Contatcta on the locating holes in the wing. After half an hour the interplane strus were fixed in. Then It can be turned over and all the wires pulled through the top wing & secured with cyano. The cotton bud turnbuckles can be slid to each end and painted later. Lines all protrude the the top wing, as yet unpainted as the lines will be trimmed and the holes filled with Milliput. Clean up,priming & painting will follow tomorrow. Not far to go now, thanks for looking, John3 points
-
This was another commission and my first complete build for 2014, I was asked to restrict the weathering to represent a relatively new a/c. I had heard allot about this kit and I have to say for such a small scale the detail is stunning and it was a real pleasure to build, a very well thought out kit. This is also being picked up today. Danny "In Wildness Is the Preservation of the World" http://www.modelmasteruk.com/3 points
-
Looking really good there Wellsprop! For grimy looks etc - give the humbrol enamel wash (or AK interactive etc) products a try - easy to use and loads of youtube vids available! try these - http://www.youtube.com/results?search_query=grimy%20weathering%20plane&sm=3 Pete3 points
-
That's OK, I need the space. So here are the directions: Cross Atlantic Ocean. Oh, go west, I guess that's important. Enter St. Lawrence Seaway and proceed to Lake Ontario proper. Be careful here, there are about a thousand islands in your path. Google if my weak attempt at humour passes by. Meander around the east shore until you find the south shore. (Easy, they kind of come together.) Proceed to Genesee River. Head south and proceed to Erie Canal. (This might be tricky, there are a few waterfalls you have to go up. The worst is High Falls In Rochester, but that's only 90 feet. Get a running start.) Park boat at Lock 32. Leave keys with attendant. Walk to my house (about 2 miles). The two dogs (three if my daughter is over) will not be a problem if you bring meat. However, my dogs don't know sit. (That was bad, sorry.) And that's it, see, easy! Cheers, Bill PS. Someone please bring this thread back to Lightnings!!3 points
-
A major step forward today . . . . I've finally stuck the deck down - lets hope I've remembered to put everything inside. Note I've added an engineer ! I must say I'm pleased with the amount of detail visible through the various hatches especially with the lights on ! Thanks for looking Cheers Kev3 points
-
Thank you all for the kind comments, a bit more progress has been made. Doing those stripes has been putting me off for some time now, but I so want to do this scheme that I must 'bite the bullet' and get on with it. First thing was to mask up and spray on a coat of white primer and Halfords appliance white. The lower wings are only push fitted in to hold the fuselage level for the photo. Then the nightmare begins. Masking up. The thing with this scheme is that it looks like one thick and one thin black band wrapped around the fuselage in a spiral pattern from front to back. Having studied drawings and photos, I can say it absolutely is not! It would be impossible. The widening and tapering of the fuslelage along its length means that the bands also have to widen and taper, but not so as you would notice. Keeping the same slant on them when viewed from the side is also a challenge. And lastly, it can not work as continual bands. The breakthrough that showed this was the amendement to the instructions on Wingnuts website. The crucial thing is that some of the bands join together on the underside. I used thin strips of Tamiya tape, infilled with regular cheapo masking tape. The real difficulty is seeing what you are doing, trying to make one thin, one thick black band in that order. And keeping a fairly consistent witdth and slant was a nightmare. Anyway, I've given it my best shot and can live with the result. Its not perfect, I think the spacing could be better but I'm not going to strip it off and start again! About 3 hours work; The eureka moment that meant that I could understand how this scheme worked. How it looks on the underside; More complicated painting coming up on the tail feathers next, but nothing as traumatic as this striping! Thanks for looking John3 points
-
I still remember one of the early models my mother bought for me, at a time I was very young to go to the centre of Athens and buy kits myself. It was an Academy F4U. I even bought my first reference book for a model back then. That was some 25ish years go. Ever since I always felt that the F4U was the most striking WW2 airplane along with the Spitfire. When Tamiya introduced their 1/32 gem I began contemplating building one. However, for reasons of space and (at the time) money, I decided to try the 1/48 first - kind of like a rehearsal. Tamiya's 1/48 is a good kit. A very good kit. But when its big brother came out, I felt it was kinda felt left behind - even after one considers the scale difference. In my eyes it got left behind big way. Especially when it comes to the cockpit, lots of details (granted, not easily visible in 1/48) are omitted. So, I set out to add some detail, not with expensive after-market kits - which would increase my budget for his kit but with a bit of scratch-building here and there. Along with Tamiya's kit I will use photo-etched parts from Eduard, including the placards and resin wheels and control surfaces just to add a bit of character there. In the process some more after-market kits where added, so the original plan was somewhat... extended. My first modifications were to rebuilt the mounting mechanism for the pilots seat (Tamiya has a hideous solid slope-y mount there), add the front plates of the feet-rest, add wiring here and there and replace some of the clunky controls. Below are pictures of the cockpit parts and the sides which detail reworked and added where missing. I also added the air-hose and the map pouch.I removed the headrest as well - seems that many early Corsairs did not have those so I thought I'd do mine that way too. The instrument panel and harness from Eduard. The latter was modified with some brass foil to add a bit of depth and 'randomness' (sec photo). Prior to painting, everything was primed with AK Interactive grey primer. I have to admit I quite liked this primer, easy to spray and my wife did not complain about the smell! Awesome! The cockpit was then pre-shaded, especially on the head-rest and seat-mount mechanism. I mixed my own shade of Dark Green and washed everything with Light Earth oil. I have to admit working with a dark-coloured cockpit was something I have not done before in my 'second modelling life' and I was afraid I was going to mess it up. But I am happy with how things turned out.I had do omit the bob lever by the pilot seat - I need to think how to rebuilt it and fit it in the space I got there. 'Till next time, thnx for watching2 points
-
I did actually make some kits without putting any lighting in them and this is one of them. Like most of my smaller kits, this was built 'as is' straight from the box. I've also done the Airfix Saturn V and will post some pictures of that once I have worked out how to get it all into one picture.2 points
-
Hello, I have just finished building this small diorama , here are some pictures for the finished work , the rest of the story in the video clip , thank you for watching. Video Clip2 points
-
This is a Fine Mold 1/72 scale X-Wing as Red 5 with lights to engine and cockpit. The base is scratch built and then stuck on a box with a switch at the back. Cheers, Warren2 points
-
Hi everybody, AMODEL's SU 9 U is probably unique but it is the most difficult kit I ever had to put together. In the chapter "nothing fits", I will mention : The cockpit bathtub, the parts forming the exhaust, the wings, the auxiliary tanks and the canopy. I added a lot of weight to avoid the "tail sitter" attitude and the pictures I found on the net helped me a lot to enhance the details of the canopy structure, they are completely missing in the kit . Sometimes, two-sitters are ugly, I think Suchoi's SU 9 U is fine . The model was painted with REVELL's gloss silver, the different panels by using the same color with some white, grey or black to enhance the contrast. A coat of KLIR was necessary prior to some acrylic black paint in the panels lines I don't trust AMODEL decals, but the ones in the kit were ok, trapped between two coats of KLIR and decal softener U/C legs were painted in HUMBROL 145 blue grey, the tires in ...tire black My last grams of positive energy were used to scratch build the different pitot tubes, antennae . This one was a challenge, a tough one ! But the kit is on the shelves ! Critics and comments welcome, Cheers, Pierre2 points
-
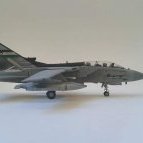
Latest to come from the bench is this Harrier from Revell. What a delight to build straight from the box with no vices at all. Finished in the anniversary markings of 41® with decals provided in the kit and painted using Xtracrylix Dark Sea Gray over Medium Sea Gray. Finally, before some restrained weathering as this ship was kept quite clean, a coat of Alclad Klear Kote flat was applied. Hope you like. Thanks for looking.2 points
-
Another one to finish off with Ben is artists oil paints. Tiny dots of various colours randomly over the spine and upper surfaces then dragged with a wide flat brush in the direction that rainwater would flow should add to the abandoned look. The advantage with the oils is that as you continue to streak, the effect will become more subtle until you're happy. White/Black dots together will give you plenty of bird poo streaking down the fuselage sides as if its used a lot as a bird perch. :-)2 points
-
Thanks Stix, i think this is quite behind my zero in the detailing, but hopefuly it wont look bad when finished Did a bit of painting afternoon, wash, drybrushing and overall patinating i ll once i have bomb bay and cockpit painted too Just reminding, all this you ll be able to see only through the small doors opened behind wing. So all the painting is done with this on mind, some areas where you wont be able to see i just didnt paint or polish2 points
-
Hi all this is a Sherman M4A3E8 from Dragon. Figures from Alpine. Hope you like it. Cheers Nacho2 points
-
Just tried a quick test fit. I'll probably mount the engine and the panels I will use, before I start the weathering process. Most of the decals are on now. But I'm not vert pleased with thw Tamiya ones... Some just refuse to go down and are quite badly silvered but I'll have another go tonight.. any way, getting closer.... long build this!! The panels aren't fitted properly - just resting - but you get the idea2 points
-
I changed a pilot's hands2 points
-
Oh no, not again lol. I've got both of these kits in the stash too but you're on your own this time Bill. I know when I'm beaten. (but you're making it look easy again and there is a little voice in my head saying I just need to cut along a few panel lines.....) Duncan B2 points
-
I didn't know whether to laugh or cry! I'll enjoy the (virtual) beer though. I'm going to order one for the other F2A in the stash, I'll either be going for an F1A of Leuchars TTF or an F3 of 74 or 23 Sqn (need both). Duncan B2 points
-
That would be wonderful and as well as the 3 princess coronation class you mention add in the remaining to Princess Royal Class and you have a fantastic event. 2 lizzies and 3 big lizzies. wonderful stuff2 points
-
Here you go Bill - - and have a bag of to go with it....!!2 points
-
For those that enjoyed the VX-388 tyre popping story perhaps this war story may interest. Back in the early days of the RAN Historic Flight we restored a target tug mark 6, WD-826 back to airworthy. She looked quite the tart in EDSG and slate green. Not 100% accurate for a RAN aircraft as that scheme was only used on the loaner aircraft from the RN during operations in Korea but what the hell. We had been booked to take the Firebox, S-2 and Dak to the Moorabin airshow but the mighty Griffon in the Firebox decided it wanted to stay home and refused to generate full boost. After many hours of head scratching, tweaking the boost control unit and innumerable blasts down runway 21 at not quite full squirt we decided to start from scratch. The boost control adjusting screw was duely screwed right in and the thought was to go from there and wind it progressively back until the right numbers were acheived. So the CO takes her out, opens the tap right up and the aircraft immediately thinks its turned into an A-4 instead of a Firebox and proceeds to launch itself into the wild blue. The boss was somewhat surprised to say the least (the cockpit did smell a mite stuffy afterwards) It turned out we had managed to wind it up into "emergency" boost which tends to turn the Griffon into a rocket. The worst part? As he taxies back in and gives her a boot full of left pedal the tail wheel tyre departed the hub with an appalling loud boom. I believe a certain officers flight suit needing a good scrub afterwards.2 points
-
Given that Hornby were responsible for this magnificent reunion do you think that Airfix could do a large scale 'static'? Even though they don't have wings, I would be tempted to have one of those in a glass case. Trevor2 points
-
Thanks Guys keep the orders coming......................Well I have been told by people very much in the know Airfix wil not be doing the early versions hence my set. BUT I am sure glad the news on the 2 seaters by Sword was made, as after my big HOUSE / WORK move that was going to slip onto the work bench. I will be back with more sets soon, well after the MOVE Ali2 points
-
Scale and manufacturer: 1/48 Testors Kit: Howard DGA-4 Built as: NR56Y, "Ike", 1934 National Air Races, US Built using: Kit decals, Humbrol paints, Tamiya pilot (modified) and fishing line rigging. Pylon is the kit's, with sratch-built panelling, wooden base and grass matting. A/c support is 3mm clear rod. Build thread: http://www.britmodeller.com/forums/index.php?/topic/234954876-148-testors-howard-ike-finished/2 points
-
Well I've been staring at this over the last couple of weeks wondering whether to 'leave it be' or process those stripes further. I decided that the problem was I had more or less done the black stripes in a constant width, and what was really needed was some fattening out on the fuselage sides where it got wider. So out with the masking tape again to widen the black bits; By this time I had aready done the green tail with its red edging and white stripes. Seeing as Wingnuts fit is so good that you can often dry fit parts together, lets pop the undercarriage on see how it looks in profile now; I'm happier with that, it's not perferct but this is probably the hardest masking job I've ever undertaken. Trying to get those stripes spaced at the correct proportions keeping the slant even between them, and as I now know, tapering them as they go up and down. All on a compound curved fish shape body. I've learned a lot, which I will probably now forget by the time I need it again. And Mr Tamiya has made a tidy sum from me buying reels and reels of his masking tape. It's ths only stuff to use though! (I need another masking session to spray in a few touches of white where it has given a fuzzy edge etc). All the other bits and bobs have been prepared while I have been agonising over these stripes, so next we move into the assembly phase. I must be mad, but I am ejoying this. Honest. Thanks for looking, John2 points
-
Nearly there now, just the railings and rigging to do. Had a bit of a fight with the decals as they are very thin and wrinkled up at the slightest provercation. Managed to muck up some of the windows so had to paint them in. Just glad I was able to get the pennant numbers on correctly.2 points
-
Some more updates, didn't really posted. So , here we go: Piping scratched for landing gear bay. Took some time but really enjoyed it. Also, cannons and gunbay doors and handels have been added. If you are waiting for a logic explanation for not having wings covers but having doors already...well, there's no such explanation... and2 points


.thumb.jpg.76f12b87ce9ca9929c9aabdcf8f9d2dd.jpg)


.thumb.png.6e11fc11af5645499ae76cb59fcfb788.png)


This leaderboard is set to London/GMT+01:00