
Leaderboard


Popular Content
Showing content with the highest reputation on 17/02/14 in all areas
-
Hi Everone, Just completed my latest `Secret War` build, so I thought I`d share some pic`s Rodens T-28D kit, built to represent an aircraft used by the RLAF during the South East Asia conflict and actually the first `D` I`ve built from the `D` boxing Mostly from the box but added bomb load from a Hasegawa weapons set and..... decals from; Hobbycraft Beaver, the stash and a few from the kit the only other additions are scratch built gunsight and some seat belts Hope you enjoy looking at, Cheers Russ6 points
-
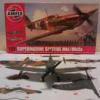
Inspired by Alpha Delta 201's excellent rendition and kind encouragement, I decided to make my second Britmodeller build J.B. Nicolson VC's Mk1 Hawker Hurricane G-NA. The kit was Airfix's old-tool Mk.1, from their "V.C. Icons" boxing. GN-A was a significant aircraft, being the 'plane in which Flight Lieutenant Nicolson won the only Battle of Britain Victoria Cross and Fighter Command's only VC of the war, an exploit described in the following extract: Air Ministry, 15 November 1940. The KING has been graciously pleased to confer the Victoria Cross on the undermentioned officer in recognition of most conspicuous bravery : Flight Lieutenant James Brindley NICOLSON (39329) No. 249 Squadron. During an engagement with the enemy near Southampton on 16th August 1940, Flight Lieutenant Nicolson's aircraft was hit by four cannon shells, two of which wounded him whilst another set fire to the gravity tank. When about to abandon his aircraft owing to flames in the cockpit he sighted an enemy fighter. This he attacked and shot down, although as a result of staying in his burning aircraft he sustained serious burns to his hands, face, neck and legs. Flight Lieutenant Nicolson has always displayed great enthusiasm for air fighting and this incident shows that he possesses courage and determination of a high order. By continuing to engage the enemy after he had been wounded and his aircraft set on fire, he displayed exceptional gallantry and disregard for the safety of his own life. Unfortunately Wing Commander Nicolson did not survive the war. For more on his career see here: http://en.wikipedia.org/wiki/James_Brindley_Nicolson As a build it was pleasant and uncomplicated and it came out looking quite like a Hurricane to my eyes, which is the main thing! Although not really a scratchbuilder by inclination, I was nonetheless moved to do some fairly rudimentary, impressionistic (and now completely invisible) cockpit detailing, put in a cockpit floor to fill the gaping void which would otherwise have been visible through the wheel-wells, and cobble together a pitot tube and a foot stirrup (the latter being made out of a twist of picture wire.) I also had another go at weathering with a combination of dark washes and silver paint on the leading edges, which were then overpainted with some gaps to simulate chipping/flaking. I also tried to do some exhaust staining, which I think was slightly more successful. My painting still leaves something to be desired, though, and I *very* swiftly regretted forgetting to mask-off the cockpit canopy before I sprayed-on the varnish...6 points
-
I live in the homeland of Caribbean Airlines and I worked in the Airport, Always loved hearing the Dash 8s roar either on take off or landing.. Anyhow my love for Dash 8s drove me to start a search for Dash 8 model planes and I happen to find Hobbycraft 1/72 Dash 8s via Russell at Airline Hobby. I did some search on the 1/72 Dash 8s and it appeared that they only made Q100s no Q300 or Q400 which I believe would of been wise. I had to cut the fuselage and stretch it, plus re-create the main landing gear since the Q100 landing gear is Different to the Q300.. I am so Thankful for Ben @ V1 decals I approached him first to do the Caribbean Airlines Dash 8 Liveries he was so helpful and now I see he started doing more for sale. The decals on the Dash 8 was a mixture of Nazca decals and V1 decals... So far I did two Caribbean Airlines Dash 8 Q300s 9Y-WIN and 9Y-WIZ. 9Y-WIZ was sold to a lucky Air Traffic controller, damn she loves it...Now more people want me to do more Dash 8 Q300s and sell them..The sad parts is Hobbycraft is not around any more and its hard to win one on Ebay.. I more lucky to win an Md80 or B737, Look out for more Caribbean Airlines and BWIA model collection soon..check it out and tell me what you think... Cheers Holmes5 points
-
Hi All This is my GWH 1/48 Mig-29A (9-12 Late) built as "4121" of the Polish Air Force. This is one of the aircraft transferred to Poland from the Luftwaffe. Aftermarket items used were: Quickboost resin seat Quickboost resin FOD guards Aerobonus resin standing Pilot figure Eduard PE for other guards and ladder Master Model brass pitot tube Combo of Caracal and Aztec models decals for Polish Mig-29's. Some other minor mods were made for polish fit. It will go onto a base soon, I'm happy with it - hope you like it. Comments welcome.5 points
-
Roger - Had several days with no time for modelling but have crept forward a bit over the weekend. More of the spadework type stuff - not awfully interesting I'm afraid - so unless you have a high boredom threshold lookaway now...... The horizontal tailplane joins have proved a time consuming b*gg*rs to get right. The wire inserts helped with the strength of the joins but getting them seam and step free was a challenge - especially whilst trying to avoid sanding off the elevator stiffners. Plenty of dry fitting and trimming and thinning of the tailplane parts followed by Plenty of Mr Surfacer and some masking tape: Even so I lost the inner two stiffners on each elevator and had to replace them with stretched sprue (the sprue hasn't yet been finally sanded down to match the moulded stiffners in this shot): In this one you can just see the newly scribed curved panel lines either side of the fin. The joint doesn't follow a panel line - which is no bad thing actually - but I think the paint scheme follows the curved panel so it was worth getting it right: This was something I didn't spot on my chimpunk until late in the day. I scribed some lines on the belly - without taking too much care - they should have been curved and I scribed a straight line for simplicity - only to realise that the red/grey divide in the paint scheme followed the curved panel. So I had to fill and rescribe I've Never really been one to plan ahead...... Drilled the fin and added a couple of lengths of plastic rod to act as guideds/strengtheners for the rudder joint: Looks ok dry fitted: And, finally for now, I've fitted the engine intakes and filled the - rather large - residual gaps. Starting to look like an aeroplane now. Just gotta hope it ends up looking somewhat like a JP5a......... BTW. Went to the Huddersfield show on Sunday - it's only an hour down the road from where I live - and I'm sure I saw Woody's Whitley and Lancaster and dr-gn's BP Defiant, Hawk and Spitfire on display. They all look even better in the flesh then they did in the piccies on BM. Awesome in fact. Sigh...... Steve5 points
-
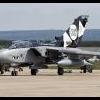
Latest to come from the bench is this Harrier from Revell. What a delight to build straight from the box with no vices at all. Finished in the anniversary markings of 41® with decals provided in the kit and painted using Xtracrylix Dark Sea Gray over Medium Sea Gray. Finally, before some restrained weathering as this ship was kept quite clean, a coat of Alclad Klear Kote flat was applied. Hope you like. Thanks for looking.4 points
-
Model basically from the box, with added several wires and extruded own vacu canopy. Painted in the colors of Israel - late 50s - "First Jet" Squadron IAF.4 points
-
The second R.F.I today, this is the old Typhoon built as part of my inhouse GB. Usually I build straight from the box, but for this I changed tack and decided to 'upgrade' the kit. I was happily going about my usual routine, had finished the paint, liked the result and decided I couldn't use the kit wheels, which were pretty horrid. Splashed out on a set of Aires wheels, much better. So I figured I should do something about the canopy, so raided the spares box for a better looking one. It will have to changed later as the windshield is from a Spit, and the hood from a Mustang(?), but it looks far better for the moment. So, the canopy is open, I stuck in a seat which had belts engraved. Done that, might as well do something with the tailwheel. Back to the spares box, job done. So with all that, I looked for something to help with the intake, nothing to help there, so with the new Typhoon and an Academy one in the stash, I had a look in them as well, nothing. But the Academy has a three blade prop wide enough to cover the lack of detail in the intake and the Airfix has better looking bombs. Finally, the kit decals (apart from the Sky band and yellow on the leading edge, they were painted) were applied with Humbrol decalfix, used for the first time, great stuff to use. Brush painted with Humbrol enamels, Klear/Pledge for decals and finished with Humbrol Mattecote. Sorry for waffling, it's not everyday I do modelling this way, didn't realise it takes so long to say so, Pics: Overall, pretty chuffed by how it turned out with a bit of effort, who knew? Thanks for looking, Sean4 points
-
Hasegawa Hei kit with Wolfpack cockpit and Tei conversion Finally finished, no decals just paint.4 points
-
Thank you! OK...nearly at the end of the rigging now. WHEW! All of the sails ( at least all it's getting...) are up now. There's a bit of fettling left and the main mast shrouds need rattling down... I think a couple of days off and then start on her boat and anchors.4 points
-
I started this one at Christmas thinking it would be a nice quick build. Few parts, rattle can of white paint, a bit of red at the front end...... Well it has taken me until now to get it done! I always thought the Dreamliner was a bit on the ugly side, but I have to say that building this model has changed my mind. It has lovely flowing lines and had gone from ugly duckling to beautiful swan. Maybe it has something to do with them now appearing in proper airline liveries rather than prototype colours. The kit is the Revell boxing of the Zvezda mouldings, and is beautifully done. The fan blades in the engines feature individual blades, cleverly moulded as two rings of blades that fit together. The cockpit glazing was a slightly oversize fit and required sanding to blend it in. I polished it back to clarity with micromesh cloths as I prefer clear glazing to window decals. Decals are from Lima November and very nicely done. I chose EI-LNB (Irish reg. as these aircraft are leased and not on the Norwegian register) 'Thor Heyerdal' as my Grandmother was at school with him! All in all an enjoyable build, not as quick as I thought it would be, but it is a big aeroplane especially when seen next to a 737. Thanks for looking John3 points
-
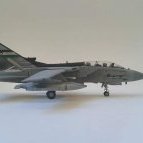
Hi All, Whilst waiting for bits of my Hawk to dry in the Training Types Group Build, I thought I might as well introduce myself to this GB also. I will be building the ancient Airfix 1/72 Multi Role Combat Aircraft, bought off Ebay for about £3.99 I think. This kit is quite special as I first built it when I was about 9 years old (some time around the Silver Jubilee). It was also the kit that really got me into the Tornado and wanting to work with the aircraft 'when I grew up'. I realised that ambition after I graduated, albeit on the Tornado IDS MLU (or Tornado GR4 as most people know it) as a Systems Engineer at Warton. So - the kit box:- The obligatory sprue shot:- And the very yellow instructions and decals - Nothing that a couple of days on the window ledge won't sort out (I hope):- I have to admit that I am looking forward to this, even though 1/72 is not my scale of choice. It's going to be a real blast from the past. Thanks for stopping by. Cheers, Tom.3 points
-
This is my Hawker Hunter F.6A, from 111 Squadron part of the famous Black Arrows display team, famous for looping 22 aircraft at once. It is the 1/48 Italeri boxing of the Academy kit, only real draw back is that it unfortunately has underscaled cockpit and ejection seat, so the only after markets used were the True Details cockpit set which inlcudes the ejection seat, side walls, resin cockpit tub, flight column/stick and ejection seat mount which is placed behind the headrest, very much recommended. Apart from that straight out of the box, very nice build goes together nicely. Bit of background, the F.6A is a F.6 almost upgraded to the FGA.9 spec. F.6A were delivered to 111 Squadron in the late 1950's around 1957/58 but only for a few years then re-assigned.It also featured to revised landing flaps with the 'cut-out' so it could carry the bigger 230 Gal fuel tanks. Decals were from Xtradecal, very good sit on the surface very nicely. These were the only Black Arrows decals available, and the aircraft on the sheet is an F.6, but i quite liked the F.6A spec as 111 Squadron didnt have the FGA.9 model, so a bit of artistic license has been used, thanks for looking Stuart3 points
-
Airfix 1/72 Mustang IV. OOB and hand painted. Now, I know it's not accurate, but it was a helluva lot of fun (y)3 points
-
Hello, Here is my first model for 2014. It's Hasegawa Bf109-K4 with Aires cockpit and Barracuda wheels. Paint scheme from the box with German crosses and nose decoration painted with home made masks. I find easier to weathered painted markings, and for the one the nose I was afraid of the fit of the decals. Best regards3 points
-
what you can do with a brush......... Hi all the 104 probably best-known, 811 of NASA. To break with all these warrior outfits, 811 decos have not disrupted in RENO decos, for me one of the most beautiful ever worn by a hunter. Other acronym NASA and the inclusion of derivative, the rest deco perso. (djp's White brush, sanded and reponcees, Midnight blue and gold, edged paint varnish after the laying of decals and very glossy to the compount. tamiya) Improvement home of the cockpit and the canopy.3 points
-
Hello model Hasegawa of the... years quite distant, which represents an... German F104, which was part of a lot of F 104G serve German pilot training. The 58th TTW is based a LUKE AFB and the Park made on American soil required them to wear colors americaines.le German seat been redone in scratch, the improvement of the cockpit, rub do Polish and paint humbrol.la model represents a plan in a long distance navigation of configuration where the boxes under the wings, model mounted in 1986 and at the Paris air show on the occasion of the 10th anniversary of the IPMS. CA rejuvenates us not! first scale 1 le kit [/url]3 points
-
First finished build in just over a year and i'm quite pleased with this one, apart from the fact that i've just noticed the canopy is not on straight. Comments welcome. Thanks for looking Skeg3 points
-
This was started after my participation of the Obsolete G.B was finished, inspired thus I decided to continue on with my own inhouse GB of sorts. Due to my modelling room being over run with Christmas paraphernalia, these builds couldn't be finished until this past week or so. First to be completed was the Matchbox He-70, finished as a Spanish Civil War plane. Built out of the box with kit decals, which for 30 or 40 year old decals, were ok apart from a bit of silvering against the brown paint. Brush painted with Humbrol enamels, Klear/Pledge for decals and a final Humbrol Mattecote varnish. Scheme taken from the AZ colour guide. Pics: So, for a old kit, it went together pretty well. There's not much detail and a hell of a seam along the bottom of the fuselage,( but sanding took care of that), pretty happy with the outcome. Thanks for looking, Sean3 points
-
Can't sleep (what with the cold/cough) so don't want to keep Mrs FlyingBadger awake by coughing so thought I might as well post those pics..... The camera battery was flat for the first part of this process so only pics from later once I got some charge in it. As I outlined above I'd created a collar for around the hose and around that I'd attached closely packed lengths of very fine wire. Next I built a jig (just a bit of plasticard and a evergreen rod of the same diameter as the piano wire I'm using as the hose) Stuck a thin section of evergreen tube to the jig with double sided sticky centred on the rod and then slid the collar/wire into place on the rod with all the wires bent back out the way (whilst making sure they stayed in order and not crossed over each other). Then slowly started glueing the wires to the section of evergreen tube - alternating sides so it was nice and even - the tiny bits of masking tape are essential or the wires move before you can glue them down. Kept at it slowly attaching more wires: Until they were all done: That image also shows the matchbox HP Victor K2 HDU for comparison! once all the wires were glued and the glue was dry I started very carefully trimming off the excess wire with a sharp scalpel until I had this: Then I gently prised it off the double sided sticky and hey presto we have the basis of a 1/72 scale hose drogue unit: It still had bits of sticky from the double sided on it at this point. Need to work on it a bit more but it's not a bad start I think....3 points
-
Another update from Nigel, he's a busy little bee... Finally!3 points
-
Not a great deal of progress this week, mostly cleaning up the fuselage seam which looked more like a pitched roof than the flat surfaces they are supposed to be.Plus I managed to get a start on the engine..... Starting with a piece of scrap perspex, a lathe, the old engine for dimensions and a couple of basic tools... I ended up with this, all I need is the inlet filter cage and the exhaust pipe.... A little bit of surgery and a lot of thinning down with sandpaper later..... How it looks dry fitted, detailing next. I have also removed the instrument cowling from the front of the cockpit as there is no way the instrument panel will fit inside the cowling! I'm not getting a lot of time on this kit, so it could be a while before we get a finished model! Regards, Jocko.3 points
-
Nigel sends his best to all of you for your support and lovely compliments... To quote him: We wuv u & miss u, Nigey!3 points
-
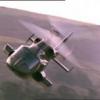
Flying wings are supposed to be ultimate flying machines. But for different reasons there are very few examples of successful flying wing designs. Most of aviation enthusiasts know about mighty XB-35, but have you ever heard of DB-LK - Soviet pre-WW2 attempt to build a long range bomber based on flying wing concept. ДБ-ЛК stays for "Long Range Bomber - Flying Wing", the plane was designed by Victor Belyayev and remains one of the oddest aircrafts ever flew. AMT/ERTL XB-35 kit is well known, DB-LK replica in 1:72 is represented by resin kit from AirKits http://modellingworkbench.blogspot.co.uk/2010/09/db-lk-172-resin-kit-review-kajukair.html The photo of completed model by made by kit manufacturer himself Okay - let's get started. The boxes Airbrushed parts with Mr. Resin Surfacer Mounting rear turret assembly Fuselage parts glued together - had to remove a lot of resin from the side walls and do some scratch building In a mean time - assembled and painted XB-35s cockpit Joinned it with ..... a wing ?.... The canopy has developed an incurable crack when I removed if from the sprue so I decided to "push" a new one from acetate film Filled the original canopy with epoxy for strength and mounted a piece of film is attached to a piece of cardboard whith a hole that matches the canopy and heat over portable electric cooker (no open flame) once the film is hot and soft it is gently "pushed" over the mounted canopy "master" I made about 10 copies and chose the best The result Usually I use Mr.Surfacer as a primer, this time I decided to prime with Halford's Alluminium that I poured out of spay can and apply with conventional airbrush to reveal scratch marks Well well - American approach in visibly different from Russian2 points
-
This one came out of left field for me, I haven't heard anything about this. Apologies if this has already appeared. New Sword 1:72 Lightning T.4 (Kit SW72079): New Sword 1:72 Lightning T.5 (Kit SW72080): (pictures from www.ksmodel.pl) My heart is racing - how about yours? Cheers, Bill2 points
-
Finally finished my first build after 6 months of work, it was supposed to be a gift to my dad for his 60th birthday in October but it ended up being a Christmas present as well haha. The reason I chose to do this was that for his 40th birthday my big brother built a model of his motorcycle. Now that he turned 60 I thought it was my turn to build him a model. His favorite beer is named Lancaster Bomber, which of course inspired me to do this subject. Anyway, he finally got it yesterday and I could take some pictures of it. I wanted to use a good camera but I couldn't get hold of anything other than my iphone. I think I have got stuck in this hobby now and I've had the time to collect a lot of other kits during this build, next up will be some Swedish armor and also a F/A-18C. Back to this build, I used Eduard canopy mask and p/e for the interior. I also used Miracle Masks, very happy with those. I think that's it, the WIP-thread can be found here: Lancaster build Well that's it, thanks for looking! Cheers, Erik2 points
-
Hi Guys This will be my third entry for the GB. From what I have seen the kit looks clean and goes together well. Lots of tiny parts involved with this one. IMG_3570 by Snapper_city, on Flickr IMG_3571 by Snapper_city, on Flickr IMG_3575 by Snapper_city, on Flickr2 points
-
Finished this little beastie. It's one of the cheapie £3.00 kits that are everywhere in cheapo shops, hardware stores etc. You can get them on Ebay but at an increased price of about a fiver. Still whacking good value though. The little kit even has a small fret of etched brake discs. It went together really easily. I painted it Audi metallic grey with black rims and did the interior with Tamiya rubber black, gloss and satin black. A fun little interlude from the big stuff. Remember that it's only 1/43 scale. Roy.2 points
-
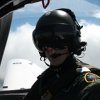
Hey guys Just got back from the Singapore show, was pretty awesome, lovely and warm, seeing the A350 was cool, and the Black Knights and Black Eagles put on some amazing displays enjoy2 points
-
1/144th Spitfire XIV Belgian Air Force Made from Peters Planes resin model All hand painted(last summer!) retrieved from box of shame and decalled and weathered All comments welcome2 points
-
Because of my interest in prototypes I did consider modifying it to represent one of the first Meteors but I felt that after building an Arrow, Lavochkin La 250 and Campini Caproni N1 I needed a little modelling therapy just assembling a modern kit. It did go together pretty well apart from some up/down left right confusion which resulted in having to swap the front portions of the engine nacelles after fitting them wrongly. (I thought the parts should fit better than that!). The only real problems came with the canopy, camouflage and decals. The canopy is designed to be shown in the open state and getting it into the closed form was a bit tricky. I don’t think that camouflage pattern shown in the drawing is consistent between top and side views. I thought the colours used in the decals were too bright and I used some from the spares box. To be really picky I don’t think that they are quite the right size as they didn’t scale up to neat imperial dimensions. I started a thread in the WWII section about the camouflage and it looks as if Dragon got it completely wrong. Troy Smith provided what appears to be an official drawing. see here for more info http://www.britmodeller.com/forums/index.php?/topic/234955747-camouflage-patterns-and-their-accuracy/ I had difficulty in getting enough weight forward of the CG to prevent it being a tail sitter as there is no room in the nose. There are a number of transparencies which are supposed to be fitted early on but the thought of trying to mask these led me to leave them out and use Clearfix after painting. Paints were Xtracrlyx with a matt spray applied after decalling. Apart from thinking that the engines don’t look too much like Wellands and that there is some doubt whether this a/c had the ‘bubble’ on the top of the canopy I am quite happy with it. John You can see that in one view the area is green and in another it is grey2 points
-
This is my latest finished build, it's the Bronco models 1/35 scale V1 the build is on here but this is it ready for inspection. no problems with the build but any of you that know a little something about the V1 will see the prop is missing off the nose, one very simple reason for that I broke a blade so I decided to remove the other enjoy and please let me know what you think.2 points
-
2 points
-
2 points
-
Finally got some time to start these two. Managed to get the pit's done, glued the wings together, wing tip tanks, ballast fitted and the nose for -2P. These will be build OOB along with the two Panthers. They will be glued together this evening so I have a chance to get them painted tomorrow. A long needed quick build2 points
-
A little more progress tonight as I put on the first paint coats on the rest of the base parts.2 points
-
One more - in colour2 points
-
Thing is one of the best parts of modelling to me is using the airbrush.Cleaning it is no more a chore than when I clean the brush, yes I still use one of those for detail painting.2 points
-
Right lads & lasses. Here's the explanation for the locking off of the topic - I would have done it sooner, but I was too pooped out to get sat in front of a "proper" computer, which is where I feel most comfortable typing "official" stuff. I agreed that Duncan was allowed to post for Nigel during his enforced time off, but in hindsight it was the wrong decision. We've had a number of complaints that it's 2 fingers up to the suspension, and unfair to other people that have been suspended in the past, and I have to agree with that. Sorry to back-track on my decision, but I feel I have to under the circumstances We'll re-open the thread on request when Nigel is back2 points
-
Finally got this done. This is the first Hasegawa Lanc I've built, and on the whole, it's pretty good. The landing gear design is a bit naff with a separate parts joining the two main legs which kept breaking throughout the build and the canopy needed the escape panel moving. Built using the CMK surfaces set which gives ailerons, flaps and complete tail feathers with separate parts and the Pavla replacement radiator intakes. The squadron codes are a bit low, and also a little small in height looking at photographs. It was painted using Gunze dark earth lightened with white and Tamiya XF81 dark green also lightened with white. The under surfaces were predominantly Tamiya sky grey with a bit of blue grey and white mixed in. The build thread is here Thanks to Chrisrope for donating a tail wheel from an airfix kit as the Hasegawa one is far too big, cheers mate It represents PD131 serving with 15 Sqn in 1946. This aircraft formerly served with 617Sqn. Anyway, hope you like it. Thanks for looking, Neil2 points
-
Just finished this one for the Less than a Tenner Group Build, the ancient but lovely Heller Potez 631: More pics in the Group Build Gallery, here: http://www.britmodeller.com/forums/index.php?/topic/234954229-gallery/ and build thread here: http://www.britmodeller.com/forums/index.php?/topic/234954439-heller-172-potez-631/ Cheers, Stew2 points
-
They look enticing from a distance, but when you get closer you find that there is nothing there... Cheers, Stew2 points
-
His jokes aren't as funny when you've already read the draft script!! Great job on the build so far. The priming really does show the scratch built stuff off to a T now that it is all the same colour. Strange how the fuselage roof has collapsed, is that due to the superglue pulling in the etched ribs as it dried? One last question, what is that big yellow thing in the sky outside his windows? Igor Vanja, thanks for taking over the posting duties. My work's network was nearing meltdown.2 points
-
Having taken a break from the build for a day as I had a rare chance to go ashore and enjoy myself in Stavanger (not too much Mrs B, honest!) I'm back with the next instalment. Col mentioned that I'm working on this away from 'base support' as it were with limited materials so I thought I'd post a picture of my cabin desk as configured for my modelling. The two plastic boxes contain all the materials and tools that I have onboard, There is a cutting mat on the desk and I have a set of magnifying glasses which I can't model without now. Back home I have a whole room to myself for modelling with bookshelves full of books, spray booth, computer for BMing, racks of paints and yet more of those plastic boxes of various sizes (the Missus thinks I'm addicted to buying plastic boxes) filled with decals, projects in progress etc. This is more like a grown up version of the Saturday afternoon modelling of my childhood on the living room table (on top of newspaper of course) while Grandstand plays on Telly and my Mum does the ironing. I now have the wings and tailplanes attached (although they aren't shown in this picture). I have had another round of filling, now aimed at all the little lumps and bumps that have been missed so far and also an attempt to do something about the poor fit of the flaps, especially on the underside where there is a large step from the trailing edge to the flaps. I forgot to mention that the wings went on without too much drama, for some reason one of the wings fitted very positively with no movement and at what appeared to be the correct angle of anhederal. The other wasn't quite so tight a fit so I had to be careful to get it set at the same angle, I think I managed to get it right. A little filler was required around the wing roots but nothing drastic. The tailplanes are fitted in this photo and they went on with no problem, they have the mating faces contoured to fit the fuselage and that assists with getting them at the correct 0 degree angle, hopefully! I am rapidly getting to the point where the basic construction is completed and that is where I generally stop with my builds offshore, I will clean up the areas that have filler on them then that will be it until I get it home. Once home the models I've done offshore join the (ever expanding) queue for the paintshop for priming, painting and final completion. My thoughts have already turned towards my next project (don't worry I'll not be boring you with a WIP for this one). This will be finished as another Leuchars aircraft but I haven't decided which yet. See you next time with the last offshore update from the Lightning conversion. Duncan B2 points
-
Hi guys, I finally got around to starting the painting process. So far the turret and hull has all the base cammo on. I based it on one of the decal options in the kit but added more black to the scheme. I forgot to take any photos as I progressed so this is where it is at now. I also got the base coats down on the wheels and tracks For the cammo I used Vallejo model colours olive grey, deck tan and black. One thing I really am regretting is not priming the model first. The Vallejo paints are having a tough time gripping to the plastic and are coming off rather easily. I'm not sure why this is happening as I've painted plenty of models without priming them first. Maybe I didn't clean the parts throughly enough. I've since coated it in a heavy coat of gloss varnish which hopefully will seal the paint. I also noticed that Zvezda failed to mould the rims on the wheels which is going to make the tyres look rather strange! Cheers Matt2 points
-
Made a start on this today. If anyone has ever made a Hobbycraft kit, then they will know what to expect. A bit of flash, soft plastic and very basic really in terms of details. The cockpit has some formers and some flat representations of boxes so I spiced these up with various grades of fuse wire and some plastic rod. The canopy is heavily framed so I'm not looking for out-and-out accuracy here. The main parts were then primed and sprayed with Lifecolor Interior Green (even though Bell a/c may have employed a darker bronze green). I did some detail painting of the cockpit bits. The seat will be Aluminium. A 12.5g fishing sinker was glued into the nose as was the nose well. I had to try and ensure that it would not tail-sit, so I taped up the fuselage. The tail comes as a separate plug and that was glued and sanded separately and then taped as a dry fit. It's quite a size! I then tackled the slab-like wings. They need the leading and trailing edges sanding as there were a few bits of flash. The locator holes are too shallow, so I dispensed with them. After the basic cockpit Hobbycraft have included nothing inside the intake tunnels apart from some rudimentary splitter plates. You won't be able to see right through as the jet exhausts are solid. I'm not going to bother - I will paint it flat black inside. As I've decided to do the USN version, the whole fuselage will be Gloss Sea Blue and unless I shine a torch up there, there will be nothing to see. If I had opted for the USAF version, then with the lighter finish, I may have tried to portray something. Lazy? You bet! All the undercart pieces were prepped and then sprayed with Alclad as was the cockpit seat. The exhausts were glued in - they are just tubes with a capped end I will try and get the fuselage sealed, filled and sanded this week. Thanks for looking.2 points
-
Well covers are contaminated with sink marks and air screws are quite flashy. Cured and primed Propeller shafts are in place. Some putty was needed but not much Finally all the major parts are glued together. This beast is quite large I was ready to fight with large gaps but the fit is in fact rather good Sharpened trailing edges2 points
-
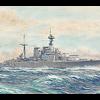
Only a little visible progress this weekend; most of my work has been distributing Mr Dissolved Putty to places that need sorting, of which there are a good few. But the 909 domes are essentially finished; trimmed and sanded to that they are the same size and symmetrical. Primer only at present - and you can see some paint that has pooled low on both dome walls because of gravity; nothing that some fine sanding won't sort, though. They'll be put aside for a while now - there is still lots of work to finish off the bridge (which is where quite a lot of the filling has been) and rebuilding the rear of the island (where Lusty's mizzen has been removed), and the forward one especially would just get in the way of that work. But I am now happy with their shape.2 points
-
Guess who was busy yesterday... Oh, and - Nigel said you should feel free to give all of your Likes intended for him to me...2 points
.thumb.jpg.d17ff607fc7e89ed057e63fcb6f2a888.jpg)


This leaderboard is set to London/GMT+01:00