
Leaderboard


.thumb.JPG.3498f40362ff13ebfc4b2e45abbd545e.JPG)
Popular Content
Showing content with the highest reputation on 11/02/14 in all areas
-
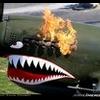
Way back in 2012 I posted some WIP pics of my scratch conversion of the old Tamiya kit. Finally got it finished a couple of weeks back so here is what I ended up with. It represents an RTR vehicle, but my attempt at Chinese Eyes decals failed miserably, my spares box did not have a complete set of useable Tac signs, and wanting to get it finished I resorted to using the kit census number which may never have been a Mk11, or served with RTR! Oh well, it does look a bit like a Chieftain. The figures are the kit items with Hornet heads, the headlights Little Lenses, padlocks Accurate Armour, grass Woodland Scenics, remainder Tamiya and scratchbuilt. Hope you like, regards Dave7 points
-
Hello! Here are some photos of a model i built for Airfix Model World. It is published in this month Magazine (March 2014). It is the Great Wall Hobbies kit, with the adition of True details engine and magneto covers, engine cowls and props. Painted with Tamiya acrilics. Here are some photos. If you get curious, the detailed proces is here on my blog: http://josepiresmodelismo.blogspot.pt/ Hope you like it! José Pedro6 points
-
Hallo friends! Please welcome my Tigger (u-hu-hu!! It is from Vinie Pooh)))))6 points
-
The new Airfix Gladiator is an excellent kit. It is pretty accurate and goes together very easily. I was impressed with pretty much every aspect of it. I’ll maybe try a bit more cockpit detail in my next one but what’s supplied is quite good. The only extra parts are the seat belts. I used the somewhat scarily named “feeling parts” from Kamizukuri (available from HLJ if you can cope with their ponderous ordering system). They are described here http://z15.invisionfree.com/72nd_Aircraft/index.php?showtopic=4311 I did mine as #G-23 from the Belgian Air Force as I had a set of ABT decals from a long time ago and good pictures of it. http://www.belgian-wings.be/webpages/navigator/Photos/MilltaryPics/interbellum/Gloster%20Gladiator%20I/Gloster%20Gladiator%20I%20Frontpage.html G-23, like most of the Belgian Gladiators did not have a distinguished career. It was taken on charge in September 1937 It escaped destruction on the ground as happened to many but crashed after a mid-air collision with G-20 at Schaffen on 14 March 1939. The uppersurface colour is the subject of speculation but the decals described it as Khaki. I mixed mine from Humbrol 150 and 155. Undersurfaces are Humbrol 11. The rigging was the subject of some experimentation with Nitinol wire. This stuff is perfect for rigging if you are an extremely good modeller. It requires that you drill the reception holes exactly in the direction the wire is going to go or. if your holes are not near perfect, that you cut the wire to 0.1mm tolerance. In the end I gave up on it - the 0.005 wire I have is too thin for. most rigging anyway - and used an alloy wire intended for fuses. if rolled and stretched it looks okay. I did use the nitinol wire for the tailplane rigging and the aileron control wires where it looks right. Some time ago I bought an early Airfix Gladiator as a source of Malta Gladiator decals at a very good price. I was going to throw away the plastic, but, as i have never done the early Airfix offering, I thought I’d quickly build it. I used the decals from the Frog Gladiator for 423 of the Norwegian Air Force. http://commons.wikimedia.org/wiki/File:Norwegian_Army_Air_Service_Gloster_Gladiator_423.jpg By modern standards the old Airfix kit is rubbish and I didn’t put too much into it. I amputated the pilot head, replaced it with a piece of card and black decal. replaced the cowling with a white metal one of unknown provenance and painted it in Humbrol 11 overall. The propeller is the second one from the Airfix kit. The rigging is as above but simplified a little. [ x5 points
-
Completed for the Lynx Group Build here. XX153; The fifth Lynx prototype to fly and the first one used for Army trials. It also held the air speed record and was the first to do a barrel roll (100 degrees a second) and loop. She currently resides in the Museum of Army Flying, Middle Wallop. Because the prototypes were quite subtly different from production Lynx, I needed to carry out the following conversions: Modify footwell window Modify cabin doors Modify upper sliding fairing Modify engine bay doors Modify Main and tail rotor blades Modify tail boom Modify skids As well as modifying, I scratch built the following: Nose bay detail Instrumentation probe Upper forward deck area 2x Engines Tail support strut detail. Painted with Tamiya fine primer, Humbrol 273 spray can and Vellejo 093 Field green through airbrush. Decals are from Belecher Bits (roundel and lettering) and Airfix Naval (white stenciling). I used Eduard exterior and interior sets. Due to being a prototype, its configuration changed throughout its career so I chose the config with nose probe and tail support struts. Upper sliding fairing removed4 points
-
Hi All, Here are some nice pictures of the Blériot XI monoplane. Cheers, Daniel. P.S. For those who may be looking for the source files of these Public Domain images please take the time to look through the George Grantham Bain News Service Collection of the Library of Congress.4 points
-
Good Morning BMers, I bought this nice little kit from Eduard on a whim, as a stop gap before the Mig-21 GB started. It was a nice quick build, no real issues, I made abut of a mess of the wing to fuselage join, but that was completely my fault! The only tricky part of the kit is the fit of the nose ring, but a little sanding fixed that. For anyone interested here's the WIP http://www.britmodeller.com/forums/index.php?/topic/234953800-172-eduard-mig-15bis/#entry1529705 One thing to watch out for is nose weight, there's not much roo. And you need plenty! Mine was a tail sitter, but I managed to cram just enough down the intake out of sight (just) to make it sit right! Finished in various shades of Alclad, with a fine wash of heavily thinned Mig Oil and grease wash. I couldn't decide if I should use a wash or not, but I'm glad I did. I was also going to try a Satin coat over the too but decided against that in the end, I like the sheen of the Aclad. Pictures not the best, take with the iPad using a strange yellow ball that briefly appeared over head as a light source.... Thanks for looking Phil4 points
-
4 points
-
Swiss air force ME 109G from the airfix newish tool kit thanks for looking.4 points
-
Mine arrived this afternoon, I had a quick go with it. The pattern is a male and I really need to take a female mould from it to get a correctly sized piece, but it was a worthwhile exercise to prove it works. Here's the test piece in place (it's an Airspeed Horsa Mk2 cockpit) I should have cleaned and polished the pattern more thoroughly - clear PETD isn't very forgiving - but I'm very happy with the first test, Cheers, Bill.4 points
-
I am going to try this again and do my best not to loose any bits,it will more than likely be a wif as the decals are shot3 points
-
This is another in my series of builds "Aircraft my Father Fixed". Up to now I've built mostly the aircraft my Father worked on while in Burma in the latter half of WWII while attached to 5 Squadron. Before that he was with 81 Squadron from their entry into Operation Torch at Gibraltar Oct '42 up until Sicily had been pacified in Oct-Nov1943 whereupon he was transferred to Cairo en-route to India and 5 Squadron. Funnily enough, 81 Squadron followed his his wake a couple of weeks later and ended up based 5 miles down the road in India, re-equipping with Spitfire VIII, hence why we have a Christmas dinner menu from 81 Sqn in 1943 in my father's effects. Anyway, back to Tunisia in the spring/summer of 1943. Up to that point, the squadron had been equipped with Spitfire Vb Trop and Vc Trop (hence my earlier abortive attempt to convert the Hobbyboss Vb Trop to a Vc Trop), however these were beginnign to be outmatched by the German aircraft. The Tropical filters used on the V series had an unfortunate side-effect of reducing overall performance of the engine. So in May '43 81 Sqn started receiving Spitfire IXs. At this point they were based in Tunisia at Souk-el-Khemis airfield and subsequently moved to other airfields in the general vicinity. From reading Alan Peart's book "From North Africa to the Arakan" you get to see that conditions on these airfields were basic to say the least. So I want to try to capture a snapshot of the activity of the groundcrew in these conditions in my diorama. Build thread viewable here So here are the photos of the finished build: Made it in time for the Farnborough club meet tomorrow! Phew!3 points
-
For my introduction I thought I'd post a recently completed Panzer Ia. This is the DML kit that I let sit on a shelf for nearly 6 years until I felt I could do it justice. The tank was basecoated in gray primer, then a mix of Tamiya Buff, Deck Tan and White was sprayed over all. I went at it with brushes and the occasional tooth pick to get the worn effect. Burnt umber oil mixed with tan enamel gave a good dirty brown wash which wasn't too dark. The figure is from Masterbox as I thought he fit the mood of the piece. Living in a desert helps as the base is tinted Celluclay with sand from my backyard. I am really happy with how this turned out. G3 points
-
FOKKER F27 MK400 MPA MARITIME PATROL AIRCRAFT EJÉRCITO DEL AIRE REINO DE ESPAÑA In 1979 Spain bought 3 F-27 aircraft, serialsD2- 01 D2-02 D2-03 for Maritime Patrol, Fishery protection, Coast Guard duties, SAR and Communication between the Canary Islands. The same three aircraft are still in use today. Based at Gando Airbase Las Palmas. Lately they are painted overall grey. So if you travelling to these Islands for vacation/spotting, keep the camera ready. Scale model 1/72 from Esci (very basic) Built out of box, including the excellent decals Revell Master Class Airbrush and Xtra Color Paint brought the model to life. Dirk3 points
-
I present my first finished aircraft on Britmodeller! It's a 1/48 Italeri Hawker Hunter, a rebox of the Academy kit. Has a Aires resin pit to correct the underscale box offering and Xtradecal markings for 4 squadron as I grew up on a 4 squadron base! Paints used are the Xtracrylics for the main colours and Tamiya for anything else. Really nice model to build apart from the wing/fuselage joint which was a bit awkward. I managed to drop a 20g weight on it from a Meteor project so a couple of photos are missing parts . I also noted after I'd finished construction that I'd fitted the wrong cannons for this mark! Oops! I decided not to weather this one, I wanted it looking 'just out the paint shop' due to the decals.3 points
-
OK, so this is the first time I've dared post in RFI, so be kind... OOB build, with a few scratchbuilt additions, and my first reasonable attempt at weathering with oil washes... sorry about the state of my cutting-mat... Scratched the detail behind the cockpit from some photo-refs lurking on Britmodeller: Likewise the control pod for the Bullpups [fell off an F-15 and grew some fins... and yes, it should be on the inner pylon, but after I finished it I realised it fouled the undercarriage... And t'other side: Top view shows up the effect of a dot-filter on the wings quite nicely - though it was subtler before the matt finish went on, for some reason: I reckon if it was about 10% better it would be half-decent, what do you think?3 points
-
I've had this lurking partly built to a primed stage and waiting final assemblies for the last two and half years under my bench and it started to get in the way!! So what to do?? "Well finish it man!" I told myself! And here it is completed on Sunday night(09/02/14) And I wanted to do something really unusual or different for this one and opted for this Puma Squadron Hungarian schemed one because I rather liked the tri coloured fin and tailplanes! Decals by Aeromaster and again my feelings of this range of decals strike again. In this case the code letter/numbers are a bit too oversized. I know of a couple issues on my model but I'm not going to tell.... Instead lets just get on with the photos: One last view and enlaregd version. By the way, its the very nice Hasegawa 1/48th kit. A joy to build really but on the rare occasions I choose to do a Luftwaffe type I dread trying to succesfully airbrush the mottling. And I kept it clean with just subtle exhaust staining. Less is more !!! I don't think its come out too bad considering. Enjoy!3 points
-
Dassault Ouragan(Hurricane)! Heller kit and roundels, with Modeldecals markings. I built this way back.... or at around the time the Modeldecal set was released if that helps. Nothing special done to the kit, just straight from the box other than the markings. More of my oldies to come.....3 points
-
Hi people Is much time that I do not enter in this forum, but work commitments, issues of life and other boring things have prevented me. Now I return with this Bf 109 E-3 ok Kurt Wolff crashed in France August 1940 I hope you enjoy, but every criticism is always welcome sure ! Ettore3 points
-
Hi All, Here is a nice picture of an an Italian Ansaldo S.V.A.5 as flown during 1917 by Tenente A. Cantoni of the Aeronautica del Regio Esercito. Cheers, Daniel. P.S. For those who may be looking for the source files of this Public Domain images please take the time to look through the Harris & Ewing Collection of the Library of Congress.3 points
-
Hi All, Here are some nice pictures of a SPAD S.XIII as captured during 1917 in the United States. The French chap is Aviation Militaire Lieutenant Georges Flechere, while the American chap is Brigadier General George Owen Squire, United States Army, Aviation Section of the Signal Corps. Squire was an interesting fellow in his own right and even brought Muzak to the world. Cheers, Daniel. P.S. For those who may be looking for the source files of these Public Domain images please take the time to look through the Harris & Ewing Collection of the Library of Congress.3 points
-
To close and glue the fuselage was a hard step, I proceeded to areas with a lot of patience and I came to the end... It seems to me that the result is good, yes? After two day: the wings At next ! Ettore3 points
-
Mega LOLs. I did get a little more done: I hope you like it. Good night from Nigel3 points
-
Engine done! I'm very happy with it given that it's my first ever scratch built engine. It looks fine for 1/72 IMO! One for size I have the full kit now... I'll start the build on Wednesday hopefully...3 points
-
Hello For a web contest with theme: "The desert" I started 2 week ago this Revell 1/72 Ju 88A-4 Bomber. Now I show you some passage about the construction. This is the box art and some Eduard phoetched I started with a very tedious job: the multiple metallics panels on the wings and fuselage; Fortunately, I am a fisherman and patience I do not miss. the part of the cockpit is always more fun, even in small steps, and I really enjoy it, more that the final color and oils washings. I prepared all for subsets The RLM 66 was brightened with a light dry brushing medium gray and a bit of silver, next time I show you the difficult task of closing the fuselage. Ettore PS The Italian web site with all branches of modeling is Modellismo più http://www.modellismopiu.it/index.php2 points
-
She's finished - the latest addition to my collection - 1/350 scale USS Tunny converted from an AFV Club Gato plus some scratchbuilding... Ken2 points
-
Hi all This is the fantastic Hobbyboss 1:35 GMC Bofors that I've just finished. RB Model replacement barrel, MK35 Editions French officer all sitting on a Miniart base. Really enjoyed this build. Work in progress HERE. GMC 001 by Snapper_city, on Flickr GMC 002 by Snapper_city, on Flickr GMC 003 by Snapper_city, on Flickr GMC 004 by Snapper_city, on Flickr GMC 005 by Snapper_city, on Flickr GMC 006 by Snapper_city, on Flickr GMC 007 by Snapper_city, on Flickr GMC 008 by Snapper_city, on Flickr GMC 009 by Snapper_city, on Flickr GMC 010 by Snapper_city, on Flickr GMC 011 by Snapper_city, on Flickr GMC 012 by Snapper_city, on Flickr GMC 013 by Snapper_city, on Flickr GMC 014 by Snapper_city, on Flickr GMC 015 by Snapper_city, on Flickr GMC 016 by Snapper_city, on Flickr Thanks for looking.2 points
-
Hi folks,another under a tenner GB entry,now I know the weathering is completely over the top but I wanted to give it the look of a wars end clapped out machine and try out maskol in the process. WIP in the relevant section.thanks for looking.2 points
-
Good morning from a very cold Stoke-on-Trent. I thought I'd introduce myself using the medium of pictures, these few are past completed works. The 'Hog and 'Flanker are both Trumpeters offerings. The Tornado is brought to you from Revell and built by my lovely wife Amy The Lynx is the rather pricey and difficult to finish well, Accurate Armour all resin puppy And the Hawk is Kinetics new Kit with add on markings, built as a commision for a current serving 4 Squadron Instructor. Enjoy2 points
-
Hello, this is my last building. The kit is an Academy stuff in scale 1/72. I've made some modification there. I aded scratch tail fin, rescribbed panel lines on the engine cowlings and filed the small gabs behind the exhaust pipes to make the K version from the E.... The interior and cockpit glass is from CMR/Aires range. I aded resin bomb (Pavla) and scratched the bomb ejector. Some minor changes to the main gear... ahhh I almost forgot...there are rivets on it, but a lot of paint cover them almost And some more here if you wish...: http://ipms-warszawa.pl/p-40-k-assam-draggins/ greetings from Poland2 points
-
Coming along marvellously Nigel. Ignore all those comments about how long it's taking, you're working at warp factor 9 compared to the speed my builds are currently moving along at....!!2 points
-
Hi All, Here are some nice pictures that show the Avro 504J; R.3. 8232, E.F.3., C4312 of the Canadian Imperial Royal Flying Corps as flown by Lieutenant Colonel Charles E. Lee during an Allied Aircraft Demonstration held at the Potomac Park polo grounds, Washington, D.C. during March 1918. Cheers, Daniel. P.S. For those who may be looking for the source files of these Public Domain images please take the time to look through the Harris & Ewing Collection of the Library of Congress.2 points
-
Ah-har me hearties (Buccaneer talk), first full week of the year, first fully finished model This is the old FROG offering with Modeldecal markings and a very small amount of photoetch (for the air brake and ejector seat handles). Other minor changes include a few sprue inspired cockpit details (although I eventually forgot to add my carefully crafted Observers windscreen before the canopy....grrrr), plus paper roll intake trunks (remarkably successful) and straw jet pipes to fill the gaping hole from front to rear that is the model's interior. The air brakes use Airwaves photo etch, plus a little plastic card and sprue (Frog's left and right side aren't identical). Not entirely successfull as I thnk I have fitted them too far forward - however its a learnign experience and the next one I will get right! The weapons (Bullpups and 1000 lb bombs) come from the spares box. And here she is with the rest of the fleet (so far): At this stage I think I prefer the FROG to the other two, with its slightly more convincing nose profile, although it is very obvious that the vertical tail surfaces are rather compressed: FredT2 points
-
STL50-3 "Elefant"2 points
-
Calling this one finished folks put a couple more photos in RFI section2 points
-
Well its been up to me so far to get the background on its way, but the Mem Sihib has done some of the painting. So its a joint effort. Some progress. Still a little way to go. There will be three pubs, but for now its only water to drink. Cheers foxy2 points
-
Cheers for all the comments and tips, really appreaciate it. Little update before I take a break for a bit (got a column to write, still not started...) - all the little sub-assemblies put together ready for spraying. The plan is to paint the tracks and the wheels, then add the outer covering to the tracks. Having dry-fitted them, I am worried about how well they will go together and all line up, doesn't look good... Quick question to those that have done this kit, do these outer parts sit on top of the inner wheel support, or butt up against? One side fits better one way, the other the second. On the turret I've drilled out the holes at the end of the barrel, and added a lip with liquid green stuff. More progress next week! I hope...2 points
-
Thanks Guys, Although there are now better kits around I still like this one. The moulds aren't too bad and it ends up looking like a DVII. First job was the clean up. Very little flash but there are some ejection marks. Some are proud and others inset. The raised ones were very easy to get rid of with a semi circular/flat file and a tab of filler did for the rest. Painted the lower wings a diluted green as these will have lozenge applied and the upper wings are red. Fuselage will be red and white halves. Should end up quite a bonny little beast. Regards, Steve2 points
-
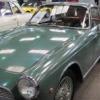
Lamborghini Reventon in 43rd scale: Cheers, Stuart2 points
-
The Lambo is finished: More pictures in gallery. Cheers, Stuart2 points
-
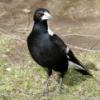
Correct! I know because I had one sitting on my sunroof while I was driving through one of those African Safari zoos. Or perhaps it was a Baboon? Or some relative on wifey's side... Cheers, Bill2 points
-
The plaster mould I made from the original clear parts. The dark spots is 1mm holes drilled through the plaster mould. To get the soft Plastic drawn into all recesses. The Plaster mould was then duct taped firmly onto the Vacuum box so the only holes the Vacuum cleaner could breathe through was through the holes drilled in the mould. Finally I got something done that looks acceptable. I made a couple of cast's with white 0.5mm Plastic card partly to check if the mould was okay. Had a really hard time to find Clear material which worked properly. Finally found some clear sheets for a overhead projector. Tried CD covers, Acrylic sheet and some packing material. The overhead sheets worked best but is very thin. So if it need some kind of support the white will be used for this. Now this delay is out of the way I can focus on building. Stay tuned2 points
-
Hi All, Here are some pictures that show the Aéronautique Militaire Nieuport 17, 2474 with American Captain J. C. Bartolf and French Lieutenant E. LeMaitre at Fortress Monroe, Virginia during 1917. Cheers, Daniel. P.S. For those who may be looking for the source files of these Public Domain images please take the time to look through the Harris & Ewing Collection of the Library of Congress.2 points
-
More weathering! One final dry brush to go and I'll be laying down a matt coat to finish it.2 points
-
"Well, Gentlemen, so I understand that RAAF followed British MAP patterns - at least these destined for <75ft span twin-engined and for the four-engined bombers. But as Ford wing span is roughly 78 ft it should wear the scheme provided for the Wellington, Whitley and Albemarle - am I right? And one more (hope that this will be the last) question: did RAAF follow alternating schemes for odd and even serial numbers, painting A45-2 as the "mirror image" of A45-1 ? " From the time of its formation the RAAF was closely allied to the RAF. In 1921 the United Kingdom Air Staff opined that aviation lent itself “in a high degree to Imperial organisation on a world-wide basis”. This tenet was expanded to suggest that all the Dominion Air Forces should adopt RAF equipment, practices and training methods. From the British viewpoint this meant that a reserve of trained personnel would be quickly available from the Dominions if Great Britain found herself in need and, the Dominions gained by having ready access to experience, knowledge and research not available in their own countries. Although it did tend to limit the Dominion forces to ancillaries of the RAF, both in equipment and practices, Australia agreed to this proposal. It should come as no surprise, therefore, that at the beginning of WWII the RAAF closely followed the new camouflage practices introduced by the RAF. The RAF’s Air Diagrams for camouflage patterns were adopted by the RAAF, the only changes being to specify locally manufactured colours in place of those specified by the RAF. To the best of my knowledge, the RAAF utilised the following RAF Air Diagrams: AD 1157 Twin Engined Monoplanes – Heavy Bombers - Transports AD1159 Twin Engined Monoplanes – Medium Bombers AD1160 Single Engined Monoplanes – Interceptors AD1161 Four Engined Monoplanes – Bombers AD1162 Single Engined Biplanes AD1164 Twin Engined Monoplanes – Flying Boats AD1165 Twin Engined Biplanes – Flying Boats AD1167 Single Engined Monoplanes – Communication and Trainer AD1168 Twin Engined Monoplanes – Communication and Trainer AD1169 Single Engined Biplanes – Communication and Trainer AD1291 Four Engined Biplanes – Communication Aircraft Air Diagrams that apparently were not adopted were: AD1158 Single Engined Monoplanes – Medium Bombers, (the RAAF had none), AD1163 Four Engined Monoplanes – Flying Boats, (the RAAF had none in Australia), and AD1166 Twin Engined Biplanes – Flying Boats, (essentially the same as AD1165). In late 1942 / early 1943 the RAAF replaced the Air Diagrams with its own series of drawings in the 51** range. As regards the drawing that may have been used for camouflaging the Ford, I believe that AD1157 was the most likely. The RAAF described this drawing as being for “Twin-engined monoplanes (night bombers, torpedo bombers, close support bombers, general reconnaissance landplanes, troop carriers and bomber transports-all of wing span of 75 feet and over.)” The Ford would have fiied well into this definition. However, I would not get too uptight as to how accurately the drawings were applied, if indeed the contractor had access to them. Regarding you query re the use of alternating patterns by the RAAF, the answer is yes and no. Australian built Beauforts originally used alternating patterns for odd and even serial numbers before orders changed. This probably had as much to do with the fact that the original production was also intended for the RAF. On the other hand, locally produced Wirraways and Boomerangs did not utilise alternating patterns. The RAAF’s DC-2s, which were camouflaged at about the same time as the Ford, do appear to have used alternating patterns but, they are not related to odd and even numbers. As Ed indicated, there are no simple answers to your questions. Camouflage regulations are bit like building regulations. They are regularly revised and changed at a national level, (or State level in Aus), and also subject to change and interpretation at a local authority level. I hope the above, albeit a bit long winded, is of some help. Cheers, Magpie 222 points
-
Bill - "Solution - roll it around a mandril (some sort of primate) or mandrel (round shaft-like object) of suitable size and life will be good." Bill, this is a Mandrill, do not, I repeat DO NOT try and wrap anything around any part of it! It does not like that. By the way, great work on the Liberator as always. Regards, Jason2 points
-
Thanks, More progress.. My favourite bit.. Painting. The sub assemblies are only placed on top for show - next up is a Klear coat for the weathering process Guy2 points
-
And a video about this K-MAX2 points
-
2/Lt., Henry Brown's P-51B-10-NA "The Hun Hunter/Texas" of the 354th FS (355th FG)2 points
-
Slowly getting there, I'm going to make masks for the wing decals, and apply limted decals on the side. Whites on though.. Winter distemper on. by Totallyrad.co.uk, on Flickr Winter distemper on. by Totallyrad.co.uk, on Flickr Thanks for looking..........2 points


.thumb.jpg.76f12b87ce9ca9929c9aabdcf8f9d2dd.jpg)


This leaderboard is set to London/GMT+01:00