
Leaderboard


Popular Content
Showing content with the highest reputation on 02/02/14 in Posts
-
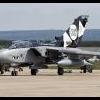
Hot off the workbench tonight. Had a blast with this one although the decals proved to be tricky due to being extremely thin. Got there with them in the end though. Paint was a bitch to get right as the real aircraft uses standard car paint that proved too difficult to track down. Think i got real close with the blue but due to metallics having a grain in them i just could not get the gold spot on. looks ok to me though so hopefully it will pass. Thanks for looking. hope you like it.11 points
-
My 11yr old daughter decided that she wanted to build a model plane, so off we went to the local Hobbycraft with some Christmas money burning a hole in her pocket. After much deliberation, she settled on the Airfix Bf110C-2 - purely because she likes the shark's teeth on the nose! Also on the shelf was the Bf110E-2 Trop, so I decided that we would do a parallel build together. She's done the vast majority of the cutting and trimming of parts (new knife skills for her and palpitations for me!), she used my airbrush to paint it (Lifecolour and Tamiya acrylics), did all her own glueing and sanding. When it came to the canopy we used the painted Sellotape method (thanks to my 1974 Airfix book of plastic modelling) which looks great. No help was given with the decals except for the shark's teeth which needed a few cuts and a drop of Micro Sol. My model was done in the same way with a bit of pre and post shading, plus oils to highlight the panel lines. The kits went together very well and, in my opinion, look very good together on the shelf! We'll have to see where this takes her... Concentrating hard...10 points
-
Hello, here is my Italeri (ex AM) 1/48 Apache. Thanks for looking.6 points
-
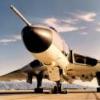
With all the talk of the new Airfix Lightning releases and the suitability to convert the new F2A to other variants, I thought I'd take an easier route and build this ex-Maintrack Models (now Whirlykits) resin F3 of Treble One Squadron. I've built this kit in the markings of one based at RAF Wattisham, Suffolk, in 1965. I was inspired at the RAF Leuchars airshow when I saw a Lightning in the static in these colours. It's just a shame it didn't fire up the Avons and disappear vertically into the blue above! This is nicely moulded resin kit, with white metal undercarriage and ejector seat. I used the Whirlykits refuelling probe as this wasn't provided, and an Xtradecal sheet for the markings. Humbrol metalcote was used for the dull aluminium airframe, with various panels picked out in other silvers. My favourite aircraft in my favourite squadron colours. Rob5 points
-
4 points
-
NF11 FR9 (which may need re-painting in lieu of recent findings!!!!) F84 points
-
This is an old Williams Brothers' 1970's release of the Curtiss F9C-2 Sparrowhawk fighter that was designed to attach to the airships USS Macon and USS Akron in the early and mid 1930's. The trapeze on the upper wing enabled deployment and recovery on these huge airships as a self defence system. This is a re-issue that I bought late in 2013, and I have built it out of the box. This is a typical short-run kit, so did throw a few challenges along the way such as many parts not being moulded correctly and alignment issues; the undercarriage was particularly awkward in this respect. I used 8lb fishing line for the rigging, with the addition of some stretched sprue. The model was completely hand painted with Xtracolour and Humbrol enamels, with the exception of a satin varnish which was done through the airbrush. Markings were very good and were from the kit without additions. I really like the bright colours of the pre-war US aircraft so this makes a colourful addition to my collection. Rob4 points
-
Hi Lineo, New Freightdog Blue Eric pod is ready, will be on sale in about two weeks. You can use with Combat Decals HMS Hermes 'Operation Corporate' 1982 sheet CD72002. Best regards Colin4 points
-
Hi all, Some of North American's Production. 48 scale.3 points
-
Evening all The kit was in a sale at my local hobby shop just before Xmas for 1/2 price. Never one to pass on a bargain, I bought it even though, for reasons of space, I'm trying to restrict my builds to British armour. It's finished with Tamiya acrylics sprayed freehand, the decals applied over a few coats of clear and finished off with a couple of coats of the new (at any rate to me) Tamiya XF86 Flat Clear that's thinned with roughly 30% Tamiya thinners. One snafu in the build - whatever is that etch mesh long box shaped thing that's mounted on the left arm of the jib should be mounted on its narrow side not the wider side. I'd super-glued it on along its length before checking the instructions!!! Chris3 points
-
Another one of my models for 2013, painted by airbrush and Humbrol enamels, free hand for the upper surfaces Hope you like it!3 points
-
Got to be honest here - that is pretty hideous. Looking at the real interior pics... the seat backs are pretty open and the webbing is quite narrow. I think I would be tempted to see if there was any plastic mesh/netting available, maybe from supermarket onions, or something. That would be a lot easier to deform, and would still let you see the interior detail you have created here.3 points
-
Decals on now, Should be finished in the next few days. Andrew3 points
-
Hi... I am still fighting brave in the battle of the internal construction ....so far so good! Living in the back waters of Bulgaria it is almost impossible to find a supply store of any description...I mean my nearest super market is a round 100km trip!!....and so one has to improvise...... Yes...these are Bulgarian yogurt pots which I will utilize into plastic cards......plastic card is very expensive as you know and since I cant get hold of any ...this will do. In fact there isn't much difference...so use yogurt pots for all your scratch building!!! So I have made a start on the side walls of the upper half of the fuselage......lots yet to do...... will post again when I have got a bit further with it.......cheers!3 points
-
Though it was about time I posted re my progress. To be frank, it's been a harder job than I imagined. She's been effectively rebuilt with the lower wings reattached, top wing reattached & re rigged. The latter involved redrilling all the holes & filling & sanding after the rigging was attached. You can see here that's where I am. The upper & lower wings need repainting & decalling (thanks to Simon at Silver Wings for the decals). It will be a fiddly job to reattach the long exhausts with the rigging in the way but it avoids handling difficulties if the exhausts are in place running down the fuselage sides. Anyway, it'll never be what it was but it's coming along!3 points
-
3 points
-
"She does other crafts though and took to this really well." That's the key, isn't it? That shot of her hands says so much. I 'helped' my 11-year old nephew with a build a few months ago, his training is entirely X-Box related. I soon realised it was going to be very slow going because he couldn't even hold a knife, or squeeze glue out of a tube. He struggled with even the concept of instructions and following diagrams and mostly he tried to glue arts together other than how they were supposed to line up. Even if they never make another model, these are the skills modelling teaches. I have been renovating our house, and I work on cars and motorbikes, and in all these situations I often reflect on how modelmaking has given me a good start. I salute you and your daughter (and the people who do the box art at Airfix, who clearly know what sells a kit).3 points
-
Hi Erik, no straght on to the camo. Yeah I know what you mean about using masks. I didn't know what to expect, in terms of paint bleeding along panel lines etc. But - I'm quite pleased. As always, i try and lay very thin layers of paint down, then your less likely to make mistakes. I'm quite pleased with the results. I've taken several pics of the process of spraying using the masks because I found it quite difficult to find information of the correct sequence to spray!... I worked it out in the end.... fuselage next3 points
-
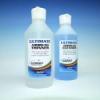
So far in our product line up we have a range of sanders, washes, airbrush sundries and a photo etch tool. We will be adding more lines over the coming year so, please keep an eye out for new products. We will announce them on our Facebook page, International Scale Modeller and here on Britmodeller when they are due to be released… Our range so far…. Painting Airbrush Thinner - Our Ultimate Airbrush Thinner is specifically formulated to work with ALL brands of acrylic modellers paint. Our blended formula of six ingredients ensures a fast drying, smooth finish every time, no matter what brand of modelling acrylic paint you use. Airbrush Cleaner - Our fast & effective Ultimate Airbrush Cleaner is specifically formulated to work with ALL brands of acrylic modellers paint and all types of airbrush. Our cleaner is not overly aggressive and will not ruin the seals in your airbrush. We have also added a blue dye to the cleaner to be able to distinguish it from our thinner. Ultimate Primer - Our Ultimate Primer is a water based acrylic polyurethane self levelling surface primer. Offering a simple and easy application with excellent adhesion and durability, it dries to a hard flat finish and is simple and easy to clean up. Ultimate Primer can be applied with a brush, airbrush and sponge for use on styrene, plastics, resin, metals, woods and various other substrates. There are three base colours to choose from: Grey, black and white and three new colours - Oxide, Olive and Gelb. Building Modellers Sanders - Our range of specially produced Ultimate Modellers Sanders provide an excellent abrasive solution for the discerning modeller. Uniquely shaped they are provided in several grits (100/180/220/240/400/800/1200) and a buffer. They are long lasting and washable, which will allow them to be used to their maximum potential with the minimum of waste. We currently offer all our sanders in a triple pack, format plus a starter pack that has one of each sander and a buffer in it. Thinny Sticks - Our range of Thinny Stick Sanders have been developed specifically to help modellers get to those hard to sand areas on all genres of models. They come in five grits (180/240/400/800/1200) and are uniquely shaped to accommodate all your fine sanding scenarios. They are made from the same high quality materials as our Modellers Sanders and are available in packs of six. Thinny Sponges - Our Thinny Sponges are designed to compliment out Thinny Stick range. They come in the one grit of 220, but being a softer sponge it's equivalent to roughly a 300 grit, just like the full size Ultimate Modellers Sanders. This will prove to be the go to sander on your bench. Photo-Etch Placer - Our photo-etch placer is a re-usable wax based positioning stick that will help you to hold and place even the smallest piece of photo-etch or styrene. A real helping hand when dealing with the more fiddly side of modelling. Weathering Weathering Wash - Ultimate Weathering Wash has been formulated with several key non-toxic ingredients to bring you a superior clay based wash to add detail and realism to your model. The eight vibrant colours in our range cover the most widely used in modelling. Be aware, the wash will dry slightly lighter than the colour of the bottle and a good shake and stir is recommended before use. Burnishing Liquid - A must for any armour modeller that likes to upgrade there AFV tracks to something like the Friul Models excellent metal track systems. For a non-uniform finish leaving a plethora of tonal variation that needs no extra weathering afterwards. Extensively tested to work with most types of metal track, but especially those from Friul Models, you can now naturally weather white metal tracks. Just dip the tracks in the liquid for a few minutes and the metal will begin to appear dark and rusty, easily and effortlessly. You can vary the effect using different dilutions and lengths of time in the solution as well as different types of agitation. If you have any question at all about any products from our range, please feel free to ask by either shooting us a PM or emailing us on [email protected] - We're here to help…. For prices and purchasing please check out our (basic) website at http://www.umpretail.com or from several retailers including - eModels.co.uk - SnMStuff.co.uk - ScaleModelShop.co.uk, in Ireland TheHobbyDen.com and in Finland/Europe hpns.eu (Hobby Paint 'n Stuff) Below is a reference chart for the recommended Ultimate Thinner to paint ratios... Model Kits - We also stock the full range of model kits from selected less main stream manufacturers including.... TanModel - Tarangus - Retrokit2 points
-
1/32 Trumpeter Mig-29K Well it has been a long time coming but she is done, I started this last summer but with commission work coming in at a steady rate I did not manage to get allot done. I finally got stuck back in to it a couple of weeks ago. The only additional parts for the kit where the Aires burners, very nice they are too. Not entirely sure if the internal depth of the flame holder is correct but much better than the standard kit ones. I did buy an AIRES quick boost seat but it is too wide for the kit tub and not just by a little bit. I also added a set of intake covers and burner covers, the intakes on the kit have an internal FOB mesh, the kit representation was pretty grim so I decided the best option was to cover them, I suspect I will leave the burner covers off. As always the airbrake is up, probably would not be but whats the harm in a bit of modelling whimsy. As she is a carrier Aircraft I wanted to make it with the wings up, the wing fold on the kit is grim but I really struggled to find any useful images of it so I could scratch some improvements. They are only very lightly glued in place so if one day a nice resin set appears I can always change it out. Wings Folded I did a fair bit of research for the load out and configured her in an anti ship role with a couple of short and medium range air to air missiles. The two external tanks may be a presumption to far but I found a few images of MIG-29K models with them. As fleet defenders I would imagine range would be important just not too sure if the ordnance as well makes her too heavy. The Green is a base coat of Tamiya XF-65 with a post shading filter made with a few drops of white and thinned. The Grey is a base coat of Tamiya XF-19 with a post shading filter made with a few drops of white and thinned. A dark wash was applied to all the panel lines etc, my camera work really does not show it up to well. All the cam airbrushing done freehand and I am very happy with this, getting better every time i do it. I will leave the decals and the basic instructions alone, I suspect someone has already covered this long ago. Besides all my Trumpeter kits seem to be much the same making reference material essential to say the least. Time to add another Shelf. No to sure what the next build will be, I have a bit of time so I may well attack some of my 1/9 Superbike kits. Thanks for looking. Danny2 points
-
Hi everyone, Finalising my February releases (all 1/72), some of which will be on sale at the Huddersfield show. Those marked with an * may be ready a bit late for the show, but will be listed on website once in stock; - Lancaster 'Blockbuster' bomb set - Lancaster bulged bomb bay doors - Hurricane Fabric wing 20mm underwing cannon set - Hurricane five spoke wheels (for Airfix fabric wing kit) - Sea Harrier FA.2 fuselage pylons and AMRAAM missiles* - Harrier GR.9 TERMA pod* - Harrier GR.3 Blue Eric modified gun pod (collaboration with Combat Decals) - Hawker Hunter P.1109A conversion/decals (collaboration with Airdecal re-print) All above items are for Airfix kits, except P.1109A that goes with Revell base kit. Thanks Colin2 points
-
Having dug out a stack of kits that cost less than a tenner, I thought I would build as many as possible. First up is this little beauty: I bought four 43rd scale cars from ebay for £12, produced by a Chinese company I'd never heard of, but for £3 each they were worth a shot. Opening the box I was surprised to find a lot of well moulded parts all carefully packed. And a very nicely moulded body shell. That's all for now. Cheers, Stuart2 points
-
Hi, I'm Xan Berasategui, french (basque) modeler. here's my last mount, the Eduard's Nieuport 11. It's the Jean Navarre's plane. He flew with that plane in the sky of Verdun in march of 1916 for those who speak french, the biographie is more detailled in this post: http://fighters.forumactif.com/t65102-1-48-eduard-nieuport-11-n576-avion-de-jean-navarre-verdun-mars-1917 you can either find the step by step here: http://www.master194.com/forum/viewtopic.php?f=50&t=79157 when the diorama will be ended, I wil send new pics Best regards Xan2 points
-
The first for the year was supposed to be finished in the KUTA group build but didn't quite make it. It's the Hasegawa 1/48th F-4G Phantom II, a great kit that really doesn't need much effort to get a good result. I added the foolowing: - Aires Cockpit and Exhausts, which provided the usual fun and games fitting them but add so much to the build that they're worth the effort. True Details pylons, or some but not much of them anyway. My set came with 4 outer pylons and no inner ones. As it was the inner ones that I needed I ended up re-scribing the kit ones and adding the extras from the True Details set. AGM-88 HARM missile from a Hobbyboss F/A-18 kit. ALQ-131 Pod and mounting rails from various Hasegawa weapons sets. Royale Resin F-4G Wheels. Xtradecal decals for a Spangdahlem based F-4G (The worst bit of the build, these early Xtradecals really are poor and out of register. I really wish I had some options but I wanted to do a Spangdahlem F-4G and this was my only choice. Painting was with Xtracrylix and Alclad for the metal bits. I also used a product from Vallejo called Liquid Silver for the oleos which is just superb. It does warn that you shouldn't get water near it once applied though as it will rust, time will tell if I managed it and no rust appears but I'm sold on the stuff. Gloss was with Klear and Matt with Xtracrylix. All said and done I'm happy with how it's turned out and as usual comments and critique welcome.2 points
-
Hello collegues! That is my another bird! Very nice kit from Trumpeter 2013. In construction i have got only pleasure and interesting!)) Paint work were whith revell and AKAH acrylic paints/ Pannel effect i made whith help of aluminium, steel and silver colors. Wethering: brown preshading, aquarel paint for pannel lines, oil paint dots and tamiya wethering sets. Some word about prototip: The aircraft from Santa Clara AFB, Cuba, Dec.1962. After oct.4,1962, when "unidentified" MIG-21 tried to intercept pair of f-104 USAF over cubian territory. That mig was from ussr 213 fighter regement adopted Cuban national insignia. After the Cubia missile crisis came to end, the 213 FR was deployed to San Antonio AFB near Havana. 20.08.62 all the mig-21-s was adopted to the Cubian AF. Please wellcome!2 points
-
Hello, I have just finished building this diorama , here are some pictures for the finished work& link for video clip , thank you for watching.2 points
-
This is my Vindicator. I build the kit with mixed emotions. Fit was between good and poor, interior is great but some ridiculous errors. I'd corrected some, but not all. Correction of the wrong canopy was easy (metal instead of glass frame), but I didn't change the position of the gun (correct would be the right wing, not the left). The rest is complete OOB. Original from VS-41, USS "Ranger". I'm quite happy with the result. Next the Avenger?2 points
-
Hi everyone I was in the converted barn the other day having a look at some of my models in my stash when I came across this kit..... that the Rats have already started it seems......luckily on opening the box lid I was pleasantly surprised that the rats obviously didn't have a supply of glue and nothing had been done...so I thought I would have a go!! This is the Fujimi 1:72 scale navy Lynx which I built OOB and painted it with the good old hairy brush mk1. I think the rats would kind of like this...I hope you do too!!2 points
-
1/48 scale showing the first and last types flown by 74 `Tiger` Sqn. (Well..., if you choose to ignore the Avro 504 that is..?)2 points
-
How bout doing something truly crazy and combining Pete's idea and Nigel's. I think the combination would solve your color problem while adding a pretty good illusion of depth at the same time. Together they are brilliant!2 points
-
Tamiya clear red might be your answer. Though I do like Nigels idea. Glad you are back on track.2 points
-
I then added a seat level stringer like this: By removing the other seat backs and side door I completley cleared this sprue: There are a few other parts left on the other main sprue but not much. I always think that once the sprues are clear I am about half way through a build. The final job required to finish this cabin wall was to remove a section of rib so that the ducting could be inserted later: I have had a closer look at the seats and came to the conclusion that it would be less work and more realistic to scratch build the whole thing from brass rod, tube and lead sheet: With the kit seats in place a lot of my detailing becomes hard to see: The PE seats are more open but it still seems like a shame. Of course the seats are modular and removable. Plenty of examples don't have any seats at all. There is even this interesting version with stretchers and a folded seat: I suppose we have to ask what would the Japanese civil defense version be fitted with? I would also be interested on g-usa's thoughts as he has actually flown on them.2 points
-
G'day Chums, Snapper,I'll be as careful as I can but no guarantees. Jorgen,they'll go together,it just takes a bit of patience.I've seen photos of some of your work,I don't think you'll have any problems. Wolwe,I made my own,once you get the hang of it it doesn't take long . Just a quick in and out,took the tape off the twig. That is still an unfeasibly large amount of tape.There are a few gaps and steps but not for long.Little fishy was next. This bit came up reasonably well,a few small gaps but nothing that can't be cured with a spot of stretched sprue. More soon chums.2 points
-
Shackles added front and rear as well as the hull machine guns. I cut off the plastic rungs on the KV-2 turret and replaced them with copper wire.2 points
-
Latest update: Wings The wings consist of a one part bottom wing with two top wing halves. In this section, the wings are constructed with the main wing spar; and in each wing, two wing cross beams, the machine gun support structure, a fuel tank and the machine guns. In the middle of the bottom wing two cross beams and a support are placed. The first step is to put the kit spar that runs the span of the lower wing in, clamp it shut and make very sure it is aligned properly as down the line this becomes quite important. (Yeah, I know that from the hard way.) Here is the port wing with the main spar attached, the two cross beams and the machine gun rack. It is painted with a base of Testor’s metallic silver and then weathered with Tamiya Smoke. I did not spend too much time on the weathering and finishing as I believe hardly anything will be seen even with the top wing machine gun access panels open. Here is the center section with its two cross beams, support structure, control lever and to either side the wing fuel tanks. I test fit the upper wings and there is no way these wing tanks are visible, I was feeling lazy, so I inserted them just in case they are needed for some sort of stability or strength issue, but did not even bother to put on a spit of paint. Again, the center section was painted and weathered the same as the port wing, but not a lot of effort was done as I do not think it will ever been seen again. Here is the starboard wing, same effort as the port wing as to painting and weathering. Next up are the machine guns (okay, I know they are technically 20mm cannon, but don’t get hung up on the terminology or I will start calling them the bang makers!! And being in the military I have upon a time or two either recited or heard the difference between gun and rifle.) Taking them off of the sprue, I am so impressed with the detail on them. There looks to be some tiny injection marks, but I do not think they will be seen once the guns are installed. If so, can always fill them before I fasten the top wing. I bought the metal gun barrel set for this kit. I compared the metal barrels with the kit barrels, and to be honest, there is such a slight difference, I am not going to use the metal barrels on this kit. The kit barrels are already drilled out and look just as good as the metal ones. Fear not, I will not waste the metal barrels. For they, like the seat with the PE seatbelts will find a new home in the Hasegawa Raiden I have in the stash. (Actually, I discovered I had two; got to stop the impulse buying. Kits, pretty kits, come here my precious. Feel like an old Gollum (which really doesn’t resemble the description of folk stories of golems, guess no relation) going into a hobby shop; just can’t resist. Anyway, here are the plain jane kit guns, no paint, just plastic. I hope I can do them justice. More importantly, I hope they are very visible once the wings are put together. What I am beginning to realize with this kit is half of my work will only be preserved in pictures. Because once the kit is buttoned up, even a proctologist will not be able to view the details. So, boys and girls, if you have this kit, and you don’t just like painting and weathering to amuse yourself, might want to put it together with tape to see what will show and what won’t and just focus on the show part stuff. My original goal was to paint and weather everything, but I have run out of steam for that as evidenced by my just throwing the bare wing tanks in. Here is the kit guns. Note the rather prevalent injection marks in the smaller gun that goes in the outer position. I still do not think these will be visible, so not going to bother with them right now. Here is one set of wing guns and their respective magazine cases with the base paint on. For the guns, Humbol 53, for the magazines, Tamiya Nato Black. I have painted all 4 magazines with a base of Tamiya Nato Black. The 2nd and 4th from the top have been weathered with a dry brush of Testor’s Metallic Silver to bring out wear and details. The 1st and 3rd are awaiting treatment and are in the picture for contrast. Here are all 4 magazines painted and weathered. And here is the guns with a black wash over the gun metal base. This was followed by a dry brushing of silver to pop the detail out. Here is the starboard wing installation of the guns and magazines. Here is where you find out if the main spar and the cross beams were properly aligned. If you do a good job initially putting them in place, no problems. If not, the trimming, fettling, filing and manhandling come into play. The starboard side, not aligned too well. The port side, much better. What I am finding with this kit is the prior step’s proper alignment of parts is critical to continue with construction of the next steps. That really became apparent when I put the engine, firewall, petrol tank, cockpit and radio set together. The subassemblies that were properly aligned during construction slid together with little effort and just clicked into place. The subassemblies that were even off a smudge, results in problems. Starboard wing gun installation. And port wing gun installation. Next up are the wheel wells. Each wheel well consists of 3 sections that butt into the main wing spar. Installation was relatively easy and went a lot better than I thought it was going to be. There are multiple complex curves in this assembly that the 3 sections must follow and mirror and got to give credit to the ZM designers, the parts fit perfectly. Here is the starboard assembly followed by the port assembly. Now, my extensive knowledge of the interior wheel well paints of Japanese aircraft is, to put it bluntly, non-existent. So, foolish me, this should be such an easy thing to discover on the web, right. Yeah, discovered it’s like asking for a consensus on the color Sky. Who was the manufacturer, what month of the year was it produced, what year was it produced, what unit did it go to, was there a full moon when the aircraft was delivered to the unit, did a unicorn make an appearance in a dream to the emperor the night before . . . So, I went with the kit instructions which calls for the interior color of the wing from the main spar back to the tail, silver and from the front of the spar to the leading edge of the wing, the same color as the bottom of the aircraft. What color is that you say, back to the internet. Seems the bottom grey of Japanese aircraft is about an elusive color as Sky is to the Spitfire. So, I went with Tamiya Japanese grey. And I would like to tell you if it was the army grey or navy grey, but prior to this build, it seems I knocked the paint bottle over and got paint all of the number and description of it. Looks right though. Now why all of this rambling about the interior paint. It arose because the instructions call out for the gear wells to be the same color as the exterior bottom, but then want the actual wheel well inserts to be painted in Aotake. (Yeah, another color that has 50 different versions.) So, I just gave up and painted everything as per the instructions with Tamiya paints, IJ grey for most of the interior forward of the spar and Tamiya X-13 for the aotake. Then each section was given a slight wash and then a drybrush of silver. A heavier drybrush was done on the aotake parts to help lighten the Tamiya paint. Here are the results. In the first photo of the finished wheel wells, it shows the oil cooler intake vent with screen. I am not too happy with the aotake results. I last used this paint on a 1/24 Trumpeter Zero Floatplane and I remember it being a whole lot lighter. I don’t know if the paint has darkened with age. I may get a new tin and repaint. But, I will wait until after the kit is finished to see how much of it shows. Next up, the top wings are installed and I get to see how much of the gun bay is left for viewing pleasure. I am stopping here. I am a bit disgusted as so little of those fine weapons show through the access panels. The tooling on them is beautiful. Luckily I have pictures to remember them by. I am truly glad I did not waste the metal barrels on them, especially the outer guns. You don’t even see the barrel because of the positioning of the weapon. There was just a significant amount of research, design, complex tooling and execution that went into the machine guns. Have to wonder why put that investment into something that won’t be seen. Seems like it could have gone to areas that will be quite visible. Oh yeah, since I have already bent one machine gun barrel, I am taking bets as to how long or if I will make it through the build without breaking off one or both of them. I give myself slim odds for the barrels remaining intact. Next step will be mating the fuselage halves together and then attaching to the wing. Comment and criticisms welcome.2 points
-
Tim's Airfix Vampire T11 http://www.britmodeller.com/forums/index.php?/topic/234952724-airfix-t11-vampire/2 points
-
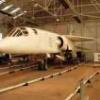
Well my friend, 'YO was on jacks at Marshalls (Cambridge) when I first encountered it in 1968. I was an apprentice at Southend and we went there to install the HD wiring for the modded rear galley, prior to service entry with BKS. I believe it had done a 'wheels up' in BEA service and was having the belly reskinned. The canteen at Marshalls was esoteric. I remember having mock turtle soup at dinner time (we Yorkshiremen have dinner and NOT lunch), quite a refined step for a 17 year old at the time. Later, 'YO was the last V806X to get the updated VOR/DME fit in 1973 (I was at CWL by now) and it was also the last Viscount to be resprayed in Northeast yellow. I did most of the kit mods personally but not that a/c oddly enough. The boys who did it cocked up the wiring loom behind the cockpit door and when the fitters came to refit the cockpit trim panels they wouldn't go in at that point. A small panel fairing was incorporated to allow this and thus 'YO could always be identified easily on the flight deck by those in the know. Maybe this still holds true with the sad hulk of 'YO as she sits at TFN airfield. At LBA in the '70s, 'YO continued in BA colours and me with it! Later on, 'YO had a left maingear collapse on landing (1977?) but was repaired quickly and stayed with BA until 1982 when she went to BAF. Is that enough anorakishness for you or do you want more? tee hee.... Nige B2 points
-
Not much interest in this thread, it looks like, none the less; Here I have painted the pink form with a concrete color that I had mixed at a department store. I must say that the colors did much to the outlook of the facade. It made the foam look like concrete. After the concrete paint was dried I went over the form with a black wash which amazingly brought out the details and made the concrete even more believable. Added a door at the side of the facade and painted it yellow :2 points
-
And of course the lowered flaps of the P-51D, where it would be wrong to have them retracted for an aircraft on the ground. Well done Airfix: this sort of attention to detail keeps you well ahead of the field.2 points
-
Eduard 1/144 Avia CS-92. Build thread.2 points
-
Kit – Academy 1:48. Paint – Alclad lacquers, Humbrol & Xtracolour enamels, Tamiya acrylics. Decals – Aeromaster 48-278 ‘Sabres over Korea III’ Extras – None. North American F-86F-30 Sabre ‘Nina V’ Assigned to Col. Robert Baldwin CO, 51st Fighter Interceptor Group K-13 (Suwon AB) South Korea Summer 1953. Not my best by a long way, but now I have a Sabre in the cabinet which is something that I’ve wanted for a l-o-n-g time. As ever please feel free to comment, ask questions or criticise constructively and thanks for taking the time to look. Ian2 points
-
Hi Steve your right the wheels are to cambered, my own stupid fault. Attached them to the axil and left for a few mins then thought I would make a cuppa, big mistake when I came back the wheels were set like that! I should have supported them. The assembly was so fragile I did not want to remove them.2 points
-
On detachment, whatever aircraft was due to take you back home was known as a "Gozomie Bird".2 points
-
Excellent build, whatever the age of the modeller! And developing the 'hand brain' is much more important than many people realise these days. Bravo! Kind regards, Joachim2 points
-
Well done indeed. I cant remember what age I started building, but I certainly didnt have the same level of skill at that age. I can certainly remember the old tubes of polystyrene cement (which got everywhere except where you wanted it), and gluey fingerprints on the canopy. But I certainly never had an airbrush or access to one, all hairy brush and smelly old enamel paints with turps to clean the brushes. My old room smelled a little bit back then from the fumes.2 points
-
Cheers abat! The nose was re-modelled to house the Bristol Gnome turbine engine as far as i'm aware, guess somebody with more knowledge than me can confirm that. cheers Simon2 points
-
The 1972 release date is for the USA, though it had previously been released there in 1968 in a triple pack with the P-36 and Macchi MC 200. The kit was first released in Great Britain in 1967, and was reviewed in the June 1967 Airfix Magazine. The first release was in one of the smaller boxes initially used by Revell GB for the "600 Series" kits.2 points
-
Hi Robert Airfix have got their act together, the kits they announce each year are now generally well into development, most will have been taken to test shot and and final approval before the range is confirmed, aother will be at prototype master or finalised design so they know how long it should take to finalise and produce over the course of the year. They have actually said in the past that they work 3 years ahead so they will be doing research for 2017 models now designing 2016 models and developing 2015 models ready for the end of November. This is why at the trade shows at the start of the year some of the new kits are to test shot and sprues, others are resin masters and the rest CGI or artwork, as the year goes on the road show then keeps abreast with development as we then see the models develop to test shots and eventual sale. Airfix have learnt from the past, they have developed their own research and design team and now work within their capabilities to ensure where possible that what they announce they produce within the desired yearly window. They really do put the opposition to shame as no rolling over of new kits, no piece meal announcements as and when a kit is ready to be announced and no grand 2 year announcements that may or may not happen, and surprise kits that just suddenly appear that have not been in the new catalogues. I say well done Airfix as they are showing how things can be done, about the one area i would like to see them expand into is starting up their own mainstream kit production in the UK2 points
-
I got a little bit more done last night, the ducting was cut to length: I then started to wrap it in Micropore tape to represent the insulation: I don't think there will be an update until Sunday now. Bye 'til then, Nigel2 points
-
Hi guys, here are more pics In a blue background Cheers, Pierre.2 points


This leaderboard is set to London/GMT+01:00