
Leaderboard


Popular Content
Showing content with the highest reputation on 05/01/14 in all areas
-
Happy new year everyone. I realise that this isn't the most exciting or inspired build but since I finally decided to give up on this build and call it finished I thought I should post it here. Taken me months to get this one done just because of a lack of free time and disaster struck when my rattle can of varnish crinkled the finished paintwork on the underside and leading edges. Guess you can't win them all but I was gutted that the whole thing had been ruined. Anyway, I went for dropped flaps and drooped the ailerons a little and an open canopy for the first time. The kit was so so, large sprue gates and a terrible dihedral being the major problems. I corrected the latter and did the best a novice can with the undercarriage to get the gait right, although the wheels do appear to just be too far apart on this kit. Apart from the top coat it's all hairy stick painted. Hopefully I'll get more than 3 builds finished this year. Thanks for watching. Richard5 points
-
Polish Albatros D.III - Mokotow airfild in Warsaw IV.1919. Kit Roden + Part PE + custom decals.5 points
-
Hello, here is my Hobby Boss Mirage in 1/48 with AML Tsniut nose. I hope you will like it. Thanks for looking.5 points
-
Hi fine folk of Britmodeller land, I'm gently battling toward the end of my latest build, the Tamiya 1/48th scale Spitfire. I'm calling this one a practice run for a possible 1/32nd scale version if ever one comes out. During the build I have experimented a little with some alternative techniques that one or two folk might find challenging. Nothing out of this world you understand but a few things that fly in the face of modern modelling techniques. I hope that by including them here I might give some food for thought. So, I'll begin conventionally enough with the interior. This is not totally OOTB but I deliberately chose to keep any additions or modifications to a minimum. I opted to include the pilot figure to reduce what could be seen in the cockpit tub. With "Ginger" at the controls very little sidewall detail is visible. The cockpit interior is sprayed with Citadel Miniatures colours with the details picked out using a fine brush. I sprayed a darker shade at an oblique angle from the bottom upward then a lighter shade from the top down. Finally I used the lightest shade for some moderate dry-brushing. The silver is Humbrol metalcote Aluminium with a dark wash for the recesses. As you can see, I added straps using Tamiya tape. This was continued through to the rear of the fuselage once the fuselage halves were buttoned up. In the image above one or two may have noticed my first deviation from the norm. I decided early on to fill many of the panel lines on the model. I don't want to give the wrong impression. The panel lines on this Tamiya model are beautifully restrained. However, after looking at plenty of on-line images I felt that they might look more accurate if they were even less apparent. I used the Valejo mica based tube filler which is easy to wet sand. It shrinks a little so the panel lines are still visible in the right lighting. Hopefully, under paint, they'll look ok. Finally for this initial post a quick look at the windscreen. Whilst browsing images on the net I was struck by how green the bullet proof portion of the screen looks from certain angles. This is not any kind of tint, purely the thickness of the glass. So, as an experiment, I used green ink to colour the edges of the glass just in case it added anything to the finished article. Chances are, this mod won't be visible but if that's the case then there's no harm done is there? More soon.4 points
-
As per title, my first model in over twenty years. I've been lurking on here for a while and after taking 12 months to complete this thought I'd share it as many of you on here have been an inspiration. Overall, I'm pretty pleased, Would like to add a little more detail with each build (Airfix Tiffy next). Wash on the bottom went well, pleased with the paintjob considering I only have two brushes. Disappointed to see the photography shows some mistakes I didn't spot before (paint creep on canopy and paint not getting into some of the details). Also the canopy masking lifted as I was spraying a matt coat slightly fogging the left side of the canopy. Oh, and I found the photography hard. Be kind! Chomping at the bit to start the Tiffy4 points
-
First time posting anything I've built on BM... Built OOB with the kit supplied decals. I didn't bother to weather the aircraft - I just loved the scheme too much to do so *LOL* The kit went together quite nicely but I know I still need practice when it comes to filling/sanding/smoothing and the pressure I'm using to airbrush along with thinning the Xtracrylix used probably could use some help as well *LOL* I'm just happy when I'm able to finish one!! Cheers, Dave4 points
-
Hello every body, here I want to show you an older model from me. Its from before 2-4 years I think and before two years it was in the SAM magazine.... Hope you will enjoy the pics eather when its an old model so far.... To build up this Model I used followed things... Thats all, hope you like them. See you bye!4 points
-
This is my most recent completed kit and first foray into 1/32 scale for me. It's Revell's 1/32 Red Arrows boxing of the Hawk T1. Used the Big Ed photo etch set and Xtradecal's 2009 Display scheme decals, also had to buy their stencil sheet as there is a couple of mistakes with the stencils on the display sheet. Paints were Tamiya X-1 black..... lots of black! If I do another one I'll be getting resin bang seats as I don't like the look of the photo etch belts.4 points
-
Got the tail feathers finished this morning. Not too happy with the gaps between the tails & rudders, so may do something about that, but generally, it...well, looks like a Lanc now!4 points
-
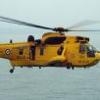
That's looking very nice, I've had a soft spot for Vanguard ever since we went up to photograph her first dive when she was "brand spankers" I was on 846 Sqdn at the time.....We managed some very close pictures with the pilot of our Sea King Mk4 hovering sideways as she slipped below..... May have to acquire one of those..... Smudge4 points
-
Thank you a lot guys and sorry for the smiley.... But you know I´m from germany and they have a lot problems here with her history, thats the reason for the smiley. Once again one picture with the "word I´m not allowed to say"4 points
-
Cheers guys. Toned down the RAM panels with a heavily thinned overspray of Gunze H301.4 points
-
Happy new year all. I intend this to be a quick build, I started it on Friday 3rd Jan and I thought as I build a lot of models for other people it, being new year would be good to start with one for me Also it may reduce the stash just ever so slightly! Having said that I have just purchased: Airfix Boeing 727 in 1:144 (From Hobbycraft because it was reduced to £5.50) and I have plans for it. Airfix Westland Lynx HMA8 in 1:48 (From Hobbycraft because it was reduced to £17.00) as I've always wanted to make this kit. A Model Il-14P (Nato code Crate) in 1:144. A Model Christen Eagle in 1:72 as I once was lucky enough to have a few flights in one!! So the stash went down by 1 and up by 4! Anyway onto this build. It is the Revell 1:32 Alouette II, this is a kit which I've always wanted to build for a few reasons. 1. I for some bizzare reason am drawn to helicopters, especially the early ones and especially ones which look like they are made with scaffolding poles or bedsteads. 2. I like the challenge of all those clear parts! So the obligitary box photo, which shows how much this kit was. There are lots of parts on 6 sprues (4 large and 2 small) and 1 clear sprue with 53 construction steps, approx 150 parts which build into a model of 29.5cm in length. There are 2 versions : 1.Sud Aviation S.E 3130 Alouette II, Dutch Navy, 1965 (with wheels). 2. Sud Aviation S.E. 3130 Alouette II, Gendarmerie, 1985 (with Skids). As I say I started it on Friday and I managed to complete the cockpit by Saturday night. This went together well and I think looks quite smart when completed. And Saturday night managed to complete the ..... undercarriage. This despite looking very fragile also went together well and along with the wheels turning is quite sturdy and I will be interested to see how it manages to suport the whole thing. So there we are, thats the current state of things and as yet no filler has been required! Hope this to be a quick build so feel free to follow its progress, along with leaving points, hints, CC etc. Thanks for reading. Tommy3 points
-
This is my Matilda II under Caunter scheme, painted withTamiya and weathered with pastel chalk. Cheers.3 points
-
Hi 'gang' I made the decision last year to sort myself out this year and actually finish some kits, due to work reasons over the last year or so that has halted me until now. I've moved where I make models to an area just for modelling now which is much easier airbrushing and leaving parts out for the next day etc So my kit of choice is the lovely 1/72nd He-111 H-6 Revell/Hasegawa kit to be built out the box, no gimmicks, no resin, no scratch building. Just a nice clean build! Wings are primed and prepped, fuselage is together and ready for priming. I just have to clean the joins up to mate the two together. Cockpit is done as you can see from this photo, although I might just play a bit more with it.. ? He-111 H-6 cockpit by Totallyrad.co.uk, on Flickr and this is the kit. Heinkel He-111 H-6 by Totallyrad.co.uk, on Flickr With what I have done so far, I am really enjoying it and I can see me getting a few more 1/72nd scale bombers! Thanks for looking3 points
-
Its been a while since I did a WIP, and what better may to start anew, than to bash the living daylights out of an Airfix Lightning or two! Airfix's new F2a is superb! I'm already approaching painting on that one, but before I get the Alclad warmed up , I thought I'd start another..but with a difference. It appears that Airfix aren't issuing an early Mark Lightning, i.e one with straight wings, small belly tank and rounded wing tips, so I thought I'd see how feasible it was to use some parts from Airfix's ancient F1a/F3. Ultimately it seems that I'll only be using the latters belly tank!! First of all then the F2a fuselage needs to be amended...simple enough just scribe around th erear part of the tank, cut through the rear and snap off,...... We then need to butcher Airfix's F1a to rob it of its smaller belly tank....... Next....the Fin....3 points
-
Recently my wife took me to the Bournemouth Aviation Museum on my birthday. We specifically wanted to see the recently arrived nose section of Victor XL164. We were initially disappointed when the chap in charge said that her interior was not yet accessible due to "Elf and Safety" issues. The then added, very meaningfully that he was terrible at keeping an eye on things and what went on when he might be looking the other way was up to us and on our responsibility. The hint was taken and we were over the barrier in a shot, the hatch was up even quicker and in went the camera. It was all over before the chap knew what was happening! In its stripped state I remarked that t would adept into a really cool man cave. Gill the endeared herself to me still further by suggesting that the empty radar compartment woud make a really great stash area! I want one now! Still enough waffle, here are the pictures I took..... Martin3 points
-
Another one just finished - the ill-fated USS Thresher, nuclear-powered attack submarine. 1/350 scale injection-moulded kit from Micro-Mir Models..... Ken3 points
-
Here is my effort of the Academy's 1/72 Hawker Tempest Mk V. I also used the zoom set EDSS129 by Eduard and Xtradecal X72094 decal set. I did use the kit decals but I removed them as they were for want of a better word crap. I tried Micro Sol/Set, X20, Decalfix, etc and nothing would soften them so off they came. I also had to scratch build the tail-wheel doors as one decided to go exploring somewhere in my shed! Anyway here are a few photo's so please let me know want you think? Cheers Ian3 points
-
Now, the wings. Airfix's F1a wings are next to useless, so don't even go there!! I also had a pair of Trumpeter straight wings, and had considered using them. They're not too bad, but what really lets them down is the wheel well bay. Its too long! Trumpeter's on the left, Airfix F2a on the right Committed therefore in using the F2a wings its a straightforward matter of removing the outer wing cambered area..high-lighted in blue here.... The wings are glued together and I'll let them dry overnight, and remove the leading edge tomorrow. At the same time the intake and tail pipe sub assemblies have been knocked together, so can be added then as well..... I had originally thought of building this as an F1a of 111 Sqn., as XM192/"K" - which many may know was the subject of Airfix's first Lightning F1a kit. I may still do this, though I do rather fancy a four canon F2 of 92 Sqn........3 points
-
Graham, is there any way we can help you? Do you need any spare parts? We will send them free.3 points
-
The misses often says "Why do you bother, you wont see it anyway." To which I reply "But I know it is there and I had fun doing it." The end...3 points
-
Hello, here is my just finished Bf 109G-6 in 1/72 scale. Pavol2 points
-
Having just finished my last two AFV models, I fancied a bit of a change and a challenge. This re-boxed Italeri kit from Tamiya has been sitting in the stash for a while and was chosen because all of the panel lines are raised. I have done very little re-scribing, so I thought that it would be fun(!) having a go at it. Initial impressions are that the kit is fairly basic and the moulding is not at all crisp, so I.m not expecting too much, but still looking forward to doing a clean build with only minor weathering. Here we go then....... Very Basic Cockpit. I made the seat belts out of masking tape and small pieces of foil. They are a little large for the scale, but look ok and add some interest to the simple cockpit. The interior was washed with dark dirt, cleaned and then dry brused with Tamiya Weathering Master grey.2 points
-
its taken 4 months, and countless cups of coffee, an M88A2 conversion that went wrong, and a shelf big enough to put it on, but...... its done. Hobbyboss M1070 and trailer, with Academy Bradley as a load, all that is left to do is fit the sussies, but that will only be done when I mount it on the display case that is getting made for it. more photos and close ups here, http://malcolmireson.co.uk/ Thanks for looking and as always, all comments most welcome, Malc.2 points
-
Just finished this one. The F-16 is from Hasegawa and the tail of the KC-135 is from Italeri which one of my cats knocked off the bench before I had a chance to paint it and the tail was the only part that was salvageable.2 points
-
The Soviet Union's first nuclear-powered submarine. Injection-moulded kit 1/350 scale kit from Flagman models - also released by Zvezda. Ken2 points
-
Here's the first one for 2014. I've had this kit for a couple of years and it's taken me a couple of goes to be happy with the paint scheme. Me 262 by simon_rw, on Flickr A not terribly good cockpit shot image by simon_rw, on Flickr Me 262 by simon_rw, on Flickr Pictures taken with my iPhone so apologies for the poor quality.2 points
-
Happy new year to everyone! I hope 2014 will bring us happiness and plenty of models we were waiting for ! I started the year by putting on the shelf my new YAK 28 PP from AMODEL. A really challenging kit but I guess the effort was worth it because the look of this plane is absolutely unique ! Here are some pictures : Thanks for looking, Cheers, Pierre2 points
-
G'day Chums, Tom,a challenge she certainly will be. Enzo,you're not wrong. Rodders,I haven't decided how to tackle the canopy yet but what I come up with I will try to explain in detail because I think that the yellowing will affect all kits of this. Deacon,enjoy the ride. E.E.,I don't think that there were that many of these made in the first place. Managed to make a start on this little beastie today.For a change to the normal routine of construction I decided to start with the wings.Each wing consists of the upper and larger lower surfaces. As supplied there is a fairish step at the join so a little light fettling to remove this was in order. This was also a way of divining the consistency of the plastic,which was found to be some of the hardest I've ever encountered in a kit. This done I moved on to the fuselage and offered up the two halves. The mating faces looked like they were going to go together with no fuss so I gave each edge a quick once over with the sanding block to make sure that there were no errant lumps and then set about glueing them together.My usual method of taping the halves together with insulating tape took a few moments longer than normal due to the lack of locating pins,but once done held it all together a treat.My glue of choice was Polyweld liquid glue which is very hot stuff and worked absolutely splendidly well on this plastic. While that was setting I thought I'd have a play with the white metal components.First off the cowling. Two parts,the larger one being the upper portion and having a very prominent part line on both sides and around the front. A spot of scraping,filing and sanding led to this being taken away and an attempt to burnish out the sanding marks got me to the point of priming. The various intakes and the exhaust were all opened up or hollowed out,the two components dry fitted and then superglued together and then set aside. The cockpit components are all made from white metal and the castings were all very clean and crisp with no flash or part lines to clean up. These were separated out into the bits that were going to be painted black and the bits that were going to be green.The control columns,trim wheels and throttle and mixture controls were all superglued into their respective locations and then a coat of Humbrol Matt Black was sprayed onto the resultant subassemblies. By this time (about 3 hours into this build) the fuselage had set well enough to take the tape off and give the joints a tickle up with the sanding block. I then turned my attention to the tail surfaces.These had a few little niggles to sand off,but nothing major,and the slot for the fin locating lug needed to be opened up. This was a matter of a couple of minutes with the Dremelesque (it's not a Dremel) with a suitable burr fitted. I thought I'd busy up the cockpit aperture a bit,so I cut some masking tape into thin strips and double layered them into something resembling structure. A few slivers and squares of plastic card were made to look like map pockets and boxes and all was placed to roughly resemble the diagram in the photo of the instruction sheet that I found last week. A coat of matt black and a little highlighting will make it look believable. The canopy will be the next part of the job,I would like to sort it out and fettle it before I do any more inside so that I don't cover everything in dust. And after all that I still don't have the faintest idea where this bit goes. More soon chums,thanks for looking.2 points
-
So, a bit of an update. I've been trying to take photos as I've gone along and what I've posted below represents the work of three evenings or so. As I've said in other threads I'm a fan of Italeri but I have to say that I've found the fit of some parts of this kit quite challenging. This has been particularly around the nose but I have found quite a lot more flash than I've expected around many parts given the age of the moulds. The interior of the cargo hold goes together quite nicely but like a prat I omitted to take any shots before closing the whole thing up. I've done it pretty much OOB with a bit of weathering and some pipework in places where it will show, not much effort but it busies the whole thing up a little. Strapping the main body together is relatively straightforward and it clips neatly into place leaving the cockpit proud: This was where trouble started to creep into paradise. No matter how I tried, the nose section refused to go together neatly; it was a three dimensional nightmare where fitting in one place meant that the whole thing was off to cock somewhere else. I wrested it into submission finally by applying copious amount of filler and sanding away much of the lovely detail, replacing it with my own scribings and rivetting. It looks OK but it was annoying to have to do this on a kit this age. At this point I started to install the etch parts and for the most part they fitted fairly well. IMHO it is worth cutting a few mm from the back of the large rotor grille on top to make it fit the hole properly, and as always a bit of filler is required to fair some of the grilles in. At this point it was time to install the main cockpit glazing and I tarted up the overhead console a bit to add interest. The dangly bits are supposed to be radio wires I think, I had some cable left over and it seemed like a good idea at the time. Like an epic tool I realised that I hadn't fitted the instrument panel before glazing the cockpit and had to pull the transparent parts off when the glue was almost cured which didn't do the whole thing much good. I then scratched the paintwork on the cowl while trying to fit it so ended up having to repaint this in situ which frankly looks a bit rough. Still, a bit of dry brushing and it doesn't look too bad in the end. The transparency looks OK in place but (wait for it) needs a fair bit of filler to seal some amazing gaps.2 points
-
What an excellent picture, Smudge. It will certainly help my finishing off. Thanks for sharing it - have you got any more? The size of the vessel is superbly illustrated by the crew atop the sail. Is the submarine astern of Vanguard some sort of safety vessel for her first dive? I have applied the second coat and have realised that this is the largest model that I have made! Tomorrow, I think I will give her a gentle polish with Micromesh before applying a coat of Klear for the decals. Does anyone know why this class of boat has relatively few markings on the hull compared to the Astute class? Anyway here is another awful picture (this time on the dining table with the rest of my mini-flotilla!)2 points
-
Thanks guys! Another small update since I haven't had much time to work this weekend. Here are the wheels and the 500-lb bomb.2 points
-
Had a disaster with the matt enamel Two new tins from humbrol and the paint is pale brown in colour. Not to worry I thought, it'll be fine. Mixed it and sprayed. Came back later and the ENTIRE model was covered in a white waxy substance. Something is very worng with that matt paint, it's more like painting with paraffin blocks. So i sprayed it with thinners and wiped off all the rubbish before giving it a high gloss cote to cover the remaining few bits. Need to buy rattle can matt varnish! Ben2 points
-
for the top side, i decided to go freehand airbrush painting, for the very first time (only masked the "walking paths" on wings and the bottom side). it was fun, but i ll need to practice it A LOT yet.. still dont have the feeling in fingers for the gentle airbrush handling, so sometimes i used too much colour and had to repair it again and again.. as result, most of the preshading is gone.. well, i m still in the very early learning stage, so its long way for me but you cannt learn if you dont try, right ? the surface is still fresh, finished it and made the photos few mins ago2 points
-
Hi all, this has been finished for a few weeks but never got round to posting it. It was a nice kit to build and, although the details are very very minimal, it looks fairly nice and is a classic Russian jet.2 points
-
The Fin....I had considered using Airfix's rounded topped fin from its F1a, but this appeared to be a bit short, and anyway, its not that hard to amend Airfix's square topped fin..... fin.... The pen mark shows where the cut has to go.... Here's the fuselage taped together... Quite a bit of fettling undergone, and more to go.... Next up ..The Wings,,2 points
-
You're doing a super job on this. There seems to be a fair few of these conversions going on at the moment which can only increase the probability of a new 'proper' kit One thing you should be aware of - the rear cockpit in the FGR2 has a fair few differences to the FG1 although both are based on the early F-4J (which itself is closer to the F-4B than the 'late' F-4J cockpit provided in the Aires set). So far, Black Box have made the only aftermarket cockpit to correctly reflect the FG1 layout; Aires did get the FGR2 right but assumed the FG1 was the same as the F-4J(UK) . So, if you plan to make a 892 NAS jet there's a little more work to do yet... Here's the FG1 layout from the Aircrew Manual: If you'd like the FGR2 layouts to complement the photos you took at Hendon, I have those too. HTH Jonathan2 points
-
Cheers mate Got the flap interiors on now. For some reason, they stop short on the inboard section, so the gap was made up with rod and plasticard. The trailing edge is rather thick with the resin insert, so some sanding is required to thin it out. And here's one I made earlier! Also stuck the tail planes on, I'll leave the elevators off for now, but very happy with the CMK set.2 points
-
OK, Sailmaking for Dummies actually more like by a Dummy... Ain't rocket science, but um, ain't easy either... I've been doing a lot of, um, experimenting...(read 'cocking up') I've tried various papers. Reed uses tissue, but then he's working at a smaller scale. I kept ripping them. Daler Layout Paper, is strong, acid free and weighs in at 45g -thin- without being too fragile is what I'm using at the moment. So watcha do is stain the paper a nice warm off-white with some yellow ochre water colour applied to both sides with an airbrush. I taped the paper to an old canvas stretcher so I could do both sides at once... Then, draw lines (both sides, and make sure they line up) to represent the panels that make up a sail, back then they were generally about 2ft. wide. It helps, a lot, to have patterns printed out to trace from. Layout paper is thin enough to see through to do this. I tried printing the lines out, but couldn't get an accurate enough line up to do both sides... Right. Cut out yer sail/s The usual thing is to then put the sail onto the 'mould' a ceiling light glass cover, in this case, but a a plastic bowl giving a reasonable curve would be best. Then stretch a chunk of old tee-shirt over it and dry. A hair drier or fan heater is good at this point as blowing on it would probably be exhausting and take a long time... Then you'd start gluing on the relevent doubled bits, like the edging and where the reef points go through.. In fact, I found that it worked OK to put all those bits on while it was still flat and then set in the curve. Here's a tops'l I made today. It's not quite right as it stuck slightly to the glass and shows a bit of damage so I'll be making yet another, but you get the idea: a translucent sail with the shadows of the tablings etc. It'll be alright on the night, really!2 points
-
Sculptamould is like a paper machete, only more fibrous. It's white to start with but I have mixed Tamiya XF-52 Flat Earth to give it some base colour. I'm much indebted to my Friend Dave Oliver (Wingnut) for the sculptamould and advice on how to use it.2 points
-
Its about time this got finished I think. I picked this up the other day with the intention of spraying on the exhaust staining, how ever I've never been happy with my feeble attempt at the oil staining on the underside so I've decided to re do it, this is where I'm up to at the moment with it. I don't want it looking just like some sort of a after thought and it looking like a smudge of ink! Also I've added a bit more fading again using oils. Quite a bit has been lost in the flash of the camera. Just got to wait for the oils to dry out, again! Before moving on. Tim.2 points
-
I can hurt myself badly with a modelling knife, so that sort of thing scares me...1 point
-
Far be it for me to criticise Nigel (I'd probably have just painted all the kit interior black!) but the thing is to me, that is just what it looks like - corrugated iron. I'm looking at the heavy velvet cortina's (I like that!) on my window, & the folds are of different widths & thicknesses, & not all completely vertical. Your's just looks a little too regular? But as I say I can't really criticise as I can't think of another way of doing it.... EDIT: Cancel last transmission!! I hadn't noticed the last shot in your post for some reason. At that angle I can see that the folds don't look anywhere near as regular in depth & angle as the earlier straight on shots did to me. Apologies for doubting you...!!1 point
-
Yet again nigel your ingenuity astounds me. I don't know about by anyone else but a new branch of modelzone has opened in my local wh smiths at meadowhall. It's not as large as the original branch but it sells paint,equiptment and kits. Trouble is they also are selling die cast again, which I think was one of their downfalls.1 point
-
I was sort of imagining that they were made out of smooth plastic sheeting like thick PVC so I thought smooth would be OK. The curtains will not be behind glass but very visible through this open side door: This is the lead foil, I think Paul is being very rude about me I have been called all sorts of rude names recently, what have I ever done to anyone? This ceiling cover looks a bit short to me: I am not sure why that is. I am going to fill it with Milliput as I am doing a mix but first I partially fill it with old sprue to minimise the filler required: I glue that in place with five minute epoxy, partially for speed and partially because I am getting dangerously low on thin superglue: Model Zone going is a pain, does anyone know if Hobby Craft do it?1 point
-
I remember it in SAM and it still looks as good on here apart from that silly smiley you've placed over the Swastika, something you've no need to do when posting on this forum. Tim.1 point
-
I used an old #1 brush, cut the bristles back to 1/8" (4mm) and held it perpendicular to the surface. Tried it on a piece of card first.1 point
-
Maple leaves, of course1 point


.thumb.jpg.76f12b87ce9ca9929c9aabdcf8f9d2dd.jpg)


This leaderboard is set to London/GMT+01:00