
Leaderboard


Popular Content
Showing content with the highest reputation on 30/11/13 in all areas
-
No I'd pick it up and take it to the police, as I have done with various purses, mobile phones, a gold watch, and a credit card that I have found on the street over the years, but then my personal sense of morality and "doing the right thing" seems to be different to some people, which I find rather depressing.9 points
-
Hi all! Im new here at Britmodeller. I like to show you my Gloster Javelin in 1:48 scale from Airfix. My scheme of choice was George H. Beatons Javelin in NMF. The XH898. I have used 5 different kinds of Alclad. I have enhanced the ejectionseats with belts och restrainers. This Airfix kit is far the best Airfix kit i have ever built. The Guys at Horby knows how to mould a great kit.7 points
-
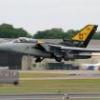
Hello Folks, My latest batch of 7 models had passed down the assembly line but fell at the last hurdle when the final coat of matt varnish dried like a streaky milky mess,......arghh,...we`ve all been there haven`t we! Anyway out came the fine brushes and I reapplied the camouflage scheme around the existing decals and the roundels were touched up where needed,....., these are the first two to be touched up and although the finish is not as good as they were originally,.....I`m just glad that they are finally out of the way and in the cabinet. First of all here is the 48th scale Italeri Sea Hurricane Mk.Ib in the markings of Z4550/6G of 800 NAS aboard HMS Indomitable at the time of Operation Pedestal, the famous convoy to Malta. It was the regular mount of the CO Lt. Cdr. J.M. `Bill' Bruen who achieved ace status flying this aircraft during the vicious fighting above the Pedestal convoy on the 12th August 1942. In reference photos it is a well used Sea Hurricane with extensive exhaust staining down the side of the fuselage; The next Sea Hurricane is the 72nd scale Mk.IIc from Revell which has had the wing chord narrowed by clipping the trailing edge and the propeller and canopy have been replaced. It wears the markings of NF699 `Libby' of 824 NAS aboard HMS Striker, early 1944 and again had to receive a total repaint around the decals; Hope you like them despite the repaint jobs, Cheers Tony PS- Just noticed that the foot step from my Mk.Ib has snapped off,.....damn, another grapple with the carpet monster looms!7 points
-
Ok enough is enough.7 points
-
With the benefit of some sleep, this whole thing does seem a little sordid. There are all sorts of things on the internet, more or less easily accessible, but does that morally, or even legally, justify downloading and distributing them...... What's done is done, but it does leave a rather unpleasant taste in the mouth. Claiming an intention on Airfix's behalf, whether or not this is the case, does smack of rather dubious self-justification. Andrew5 points
-
The old Airfix Ford trimotor was a challenge to build, but it is a great subject and has a colourful history. Some of the model's parts were badly moulded especially the engine nacelles. The cockpit canopy was thick and did not fit all that well. Fortunately I am *good* at hiding mistakes so it all turned out OK. I am pleased with it. I wish a new tool kit of this old workhorse would be produced to modern standards. Hats off to Airfix for releasing a 1920's civil airliner/transport non-military subject in the first place. On to the photos -- It has been fun.5 points
-
The legend says that the Norse God Odin. The one eyed King of Asgaard ( Kingdom of the Gods) had two ravens Munin & Hugin which was his eyes and ears. The Royal Danish Air Force RDAF recieved two MAP Gloss sea Blue Catalinas from USA joining the Squadron of otherwise grey and red Catalinas. These two were named after those ravens No.857 Munin & No.858 Hugin. I chose to build 858 Hugin using the 1/72 Academy PBY-5A kit. Decided to scratch the interior in the Cockpit and Blister compartment since the Academy is way off. Here is some shots from the building process Thanks for viewing4 points
-
Excellent Airfix kit with resin cockpit and engine cowling.4 points
-
Could everyone please keep it polite and civil. I can see this thread going south and will close it down if there are any more incriminations banded about. The cork is out of the bottle so there's no need to keep going on about it. If it really was something that Airfix didn't want happening they would have said something to us by now. It just happens to be similar to what they did last year to keep the interest up before the calendar is available. Now lets rejoice in what they are doing and look forwrd to another golden year of new releases.4 points
-
Heller 1/300 Concorde. Build thread.4 points
-
As we're arbitrarily ascribing motives to the Airfix marketing team here's another scenario; The new marketing team (that wasn't with Airfix for last years release) got the Hornby IT team to load images up on the new Airfix website on a non-public area of the website, not thinking that anyone would be so determined to undermine their marketing campaign as to seek out and publicly post their copyright images up en masse on an internet site (which I seem to recall has rules about posting copyright images) without Airfix's knowledge or consent as a spoiler to their campaign. Perhaps Airfix wanted to gradually build excitement and anticipation for the 18th December when they are going to release the details of the entire range with a daily dose of sneak peaks. If they had wanted everything up at once they'd have done it - oh wait they are, on the 18th.... The fact that once they were aware of the spoiler they changed the advent calendar to remove the images and replace it with a holding logo and remove the clues probably shows they'd rather run their advent calendar campaign how they intended. I would imagine it's like fishing, to attract the most fish you don't throw all your chumm in the water in one go, you leave a trail to draw as many fish in to catch them when you throw the baited line in. Everyone is entitled to their own opinions and can choose to justify it how they want, personally I'm disappointed and somewhat dismayed that it happened. Just because you could, doesn't mean you should.4 points
-
Just to give you some inspiration : Same guy also built this one, but in 1/48:4 points
-
Ok, well it does technically have a fin. A big fin! OOB, with the No.33 Squadron markings.3 points
-
Hello fellow modellers! My name is Jeroen and I am from the Netherlands. I do not post a lot but I do watch this forum a lot. I did some Sci-Fi stuff which I posted some time ago but now I did something different, something I used to do 20(!) years ago. And hence: my first fighter jet in 20 years. I wanted to start with something quite simple in a one tone scheme to provide me with some practice so after first filling my closet with a small stash I chose Academy's Polish Airforce Mig-21 MF in 1/48th scale. . Well.. painting didn't turn out to be to real challenge here, but the decals all the more! I came to know the the standard Academy decals were not reacting to decalsetting so well but thank thankfully the ones in this kit were provided by Cartograf. Each swordfish on the jet consists of 11 pieces which took me 1 and a half day to get them on!! Nerve wrecking stuff I can tell you because the kit does not come with spares. I also had my first experience with resin and PE improvements for an airplane kit with this project. I used an Aires cockpit set and Wolfpack wheel bays. But enough said, time for some pictures. (please note that I have very little camera experience so please forgive me if the quality isn't up there). I hope you enjoy the pictures and looking forward to your comments. Have a nice weekend! Jeroen3 points
-
I picked this up from Ali at Telford, and have been working on it since. The aircraft went together really well, and if I'd been painting it one of the "painted" schemes, I'd have been done last week in all probability. As is my wont at the moment though, I chose the tricky scheme over which there's a lot of conjecture and gainsay, with the most reliable 1st hand description being that it was a "yukky green" on the first flight (thanks Edgar!). I was pointed at the AloChrom anodising substitute dip/paint that is still in use these days, and suddenly it all clicked. It's kind of a sour greeny/yellow, and it appealed to me, so I went for it. I also ignored the usual red panel in the chin, mainly because I felt like it The kit goes together very well, and I'd originally intended to pose the canopy open, so I didn't fettle the opener much, but after all that paint and varnish it didn't fit too well over the fixed section. I did a little sanding to improve the fit, but it's not too good I'm afraid. If I'd decided to go with a closed canopy from the outset, I'd have done it differently. No use crying over spilt milk though Painted in Alclad metallics with an overspray of a bespoke mix that I cooked up from their clear range, including green, yellow, and a littl blue, and lots of Aqua Gloss in between. The final finish was muted by their Light Sheen varnish, and some mild weathering done with oils. On with the pics - sorry about the dust, but I missed it after I'd polished the decals, and I'm too tired to re-take the photos again, as my back is killing me Good points: Quick build due to low part count and good fit Helpful instructions, with only the PE parts causing me to scratch my head Lovely detail in the nose area Choice of fit and finish depending on when in its career you want to model it All gear legs and the long pitot probe have metal cores Things to watch out for Wash the resin thoroughly, or your paint won't stick. Key the surface with a very fine sanding stick Fill the grooves in the backs of the gear legs if you aren't using the gear doors Make sure you fettle the canopy if you're posing it closed, and beware of the fit once the layers of paint are on if you intend to leave it open The decals are very thin, and the codes are printed individually, so you have to apply them separately. They can curl up on themselves if you're not quick once they're clear of the backing paper, so it may be an idea to slide them from the film to the model This is a prototype, which changes configuration almost daily, so check the scheme/period you want to model, and find out what was installed where at that point Bad points: Decals have a slight printing pattern in the blues which I suspect are too light Clear resin canopies aren't always the clearest when compared to vacformed alternatives Conclusion: A thoroughly enjoyable build, although mine had a hiatus while I mulled over the colours of the first flight "primer" scheme - whether I'm right or wrong is moot, but I'm quite pleased with the way it came out, although it's no show winner as usual, due to my little slip-ups. The build thread is here, the review here and thanks to Ali for the review sample. Review sample courtesy of3 points
-
Here some pics of my new Wolfpack T-38A Talon. Just OOB apart from the Decals I used the sheet by Caracal Decals.3 points
-
RIP to the poor souls that perished in this tragic accident. My thoughts are with family and friends. One thing that struck me about all the news reports was the extraordinary sense of humanity and camaraderie shown by passers by and those trapped inside. I want to applaud every single person that put their fellow man ahead of their own welfare. You have restore my faith in human nature. The people of Glasgow, I salute you.3 points
-
Sorry, but this whole "Airfix have brought it on themselves/Finders keepers on the internet" argument won't wash. Never mind the rights and wrongs of dishing up someone's marketing campaign or what Airfix might or might not have intended. There is NO difference between posting Airfix's copyright pictures from their public web site here and posting pictures from Airliners.net. No difference at all. And yet we got warned off the latter pretty strongly. Copyright theft is copyright theft, no matter how interesting the topic might be... Bestest, M.3 points
-
So true. I was lucky though, in my local shop Mr Dowling kept a good selection of models at the back of his newsagents shop. He was an enthusiast and a pilot and always ready to chat while smoking his pipe. He was all 'Jolly good show' and all that even if he was Irish. He flew Tiger Moths before he went to work overseas. I took it for granted but now I realise how lucky I was to have access to all sorts of models. When he died, his wife sold the shop; even now I can't go in there without thinking of him and his pipe and all the models he sold.3 points
-
Nice work Dermot, not easy to get a finish like you've achieved. Personally, I would ignore the negative comments of Paul ~@Parkes682Decals, they really annoyed me, (and if I want decals in the future, well enough said). Good work. Regards Chris g3 points
-
I've seen a comments on other builds that there arn't enough F1 builds. Well gentlefolk, get your eyes around this little lot: My F1 design legends trio: Colin Chapman's Lotus 25 (On the bench as we speak) Gordon Murray's McLaren Honda MP4-4 with Top Studio super detail set. Adrian Newey's RedBull RB6 Some other F1 Kits that appealed to me. A tribute build to nights out with my friends, sponsored by.... And a his and hers VW camper's: Hers And mine I don't plan on doing WIPs on all of these, but i will if there is enough demand for a particular model. However i will be doing a WIP with the McLaren Honda MP4-4. The detail kit is immense. Thats all for now, thanks for looking. Comments, critique and abuse are all welcome :-) Love you, bye2 points
-
Type XXVIIB Seehund U-Boat, North Sea, 1944 Revell, 1/72. The Type XXVII Seehund (German for seal), was a successful series of midget submarines created during World War II. Designed in 1944, and operated by two man crews, the submarines were used by the Kriegsmarine during the closing months of the war, sinking 9 merchant vessels and damaging an additional 3, with 35 losses mostly attributed to bad weather. The Seehund was inspired by the daring British X-Craft attacks on the Tirpitz (Operation Source, September 1943) , but instead of explosive charges, the German design carried two G7e homing torpedoes for operation in coastal areas and on the open sea. A total of 285 Seehunds were built, with the last wartime Seehund sorties on 28 April and 2 May 1945, when two special missions were used to resupply the surrounded German garrison at Dunkirk by carrying special food containers (nicknamed "butter torpedoes") instead of torpedoes, and on the return voyage using the containers to carry mail from the Dunkirk garrison. The French navy received four units as war reparations, and commissioned them as S 621, S 622, S 623 and S624. They were used until August 1953. S 622 is preserved and on display at Brest naval museum.[/color] I've wanted to build one of these for a while (although I would prefer an X-Craft!). Originally produced by ICM, Revell have recently issued this kit and last month, Wonderland Models in Edinburgh had it at a very much reduced price. By amazing co-incidence one of the distractions affecting my modelling in September and October was my participation in an international sailing championship based out of Brest, where to my delight I saw French SSNs, NH-90 Caiman helicopters and all manner of French Navy surface ships each day. The final prizegiving for our event took place in Brest Castle (Chateuau?), within the superb Marine National Museum, where one of the only remaining Seehunds sits. And I missed it. Goodness knows how - I must have been standing within a few yards of it (with a camera!), although to be fair it was very dark in the museum grounds and I was probably rather over-enjoying the French hospitality! FredT2 points
-
Matchbox 1/72 Messerschmitt Bf 110C (PK-115) I Gruppe, Zerstorergeschwader 26 Horst Wessel, September 19392 points
-
Hi All, Here’s my first attempt in 1/48 scale, an Italeri Spit IX picked up in a charity shop for the princely sum of £1.99 !!! The MSG uppers are Tamiya and the PRU Blue is Humbrol acrylic(I must have got lucky and got it to spray). Canopy is a bit untidy and I may have overweathered……….again. One major cock up is the belly landing light which I forgot to put in before I closed the fuselage, so it’s inverted. Q1) A question for spit experts: I have seen some a/c with red patched over the outer wing guns, the colour chart on this version indictes none, were the outer guns taken out on this version(32 sqdn, Foggia 1944)?? Q2) Has anybody used Tamiya Flat base? I sprayed the finished model and got a frosting all over it as it driedwhich I had to remove with a cotton wool bud, did I do something wrong? This probably why it looks too weather beaten. Please feel free to comment and critique.2 points
-
Revell 1:72 BV-222 V-2. RAF scheme. One of two "Captured" at end of war and tested by both RAF and USAF. Ours was tested by Eric "Winkle" Brown as written in his biography. I did a complete two tone splinter followed by an overall white which unfortunately all but obscures the splinter!!! This is a cracking kit, the fit is amazing and i understand Revell are 're releasing it. Thanks for the kit Andy.2 points
-
Really great kit, enjoyable to build. Added some PE from Eduard, and kit decals. I need to some more of these, maybe a NMF one or two!2 points
-
This is my first elicopter; Hobby Boss kit isn't, as inrteriors detail, a good kit; then I rebuilt cockpit ad added some little panel on fuselage. I don't know if there is an Italian modeling magazine called "Sky Modeln" in England but in the December there will be my article about this helicopter. Here snowing now ! byeeee Ettore2 points
-
Glaswegians are like that (and that's coming from an Edinburgh man). Remember how they reacted to the terrorist attack at the airport?2 points
-
Cyber Hobby 1/35 StuG III Ausf E in white washed winter camo... quite enjoyed this build, the hairspray technique needs some finessing for a less worn subject but i think with the stowage this does look right..... build thread2 points
-
Here's my latest completed build - Jim Clark's Lotus 25, designed by Colin Chapman. This is build number 1 in my British Design Legends triumvirate. The other two being Gordon Murray's McLaren Honda MP4-4 and Adrian Newey's RedBull RB6. I have built this mainly OOB but i did scratch build some brake lines and added ignition leads. Hope you like it. As always, comments, critique and abuse welcome.2 points
-
Like the Chipmunk thread I'm following this build closely I really like the amount of scratch building you do, plus the way the tread is suddenly shifting track into a completely different direction. Its quite entertaining to read and a very good source of inspiration and motivation. Sir you seem to be the prove that there is no such thing as crappy models out there. Its all about challenge, dedication and craftsmanship combined. Bravo2 points
-
Artiplast 1/50, Avro 504K, H2545 the first airplane to fly in Iceland, 3. september 1919. Link to build2 points
-
This my latest fifties US jet. It is the Revell USA boxing I picked up on a trip to Pittsburgh last year. I used an old Aeromaster sheet to do an F-84G of the 310th FBS, 58th FBW based in Korea in 1952. I reasoned that it would be quite worn in appearance so I tried to make her look like a welll used machine. I used an Eduard masking set and that really helped get the circular access panel as close to circular as I have ever managed. After two Classic Airframes models in a row this fabulous piece of engineering by Revell was just the right thing to get my modelling mojo back on track. I used no filler though the nose ring needed a little filing to get it to conform, the first time it has hapened on the previous three Es and Gs I have assembled. Thanks for looking2 points
-
thanks hes a good mate ...2 points
-
Lets not speculate until the AAIB report comes in.2 points
-
Hi, Another build.. This kit is a real beauty.. Just clicks together making it ideal for an Alclad finish Thanks for looking Guy2 points
-
Finished boxing in the u/c bay. Liquid poly drying now...2 points
-
I stopped buying and subscribing to magazines years ago. As mentioned SAM was great in the Hall era, but that was before the Internet. What prompted me to stop subscribing to both SAM and SAMI was their obsession with featuring Spitfires and 109/190. I'm sure I remember SAM featured a build of some well known pilots Spitfire from the Tamiya kit and then next month did the exact same article but built as some other pilots aircraft. All that differed was the side codes. What a waste. So that and the growing influence of the net decided me. I don't regret it. When editors start producing rubbish like others have mentioned, then I've no sympathy for them if (when?) the magazines ceases. It's a tough world now for the printed word. Editors cannot just expect people to buy their product based on tradition and nostalgia.2 points
-
I've been slowly moving forward doing some unglamorous spade work. The airfix u/c bays are typical of the era - clunky and rather toy like. Also the plastic is soft and the moulding is not very crisp so that most of the edges are a little rounded. The larger squareish section of the u/c bays are actually hidden from view with the gear down because the gear doors close again once the legs are down - but the rest of it needs boxing in and sharpening up. Once again my idiocy in gluing the top and bottom halves of the wings together months ago made things harder. But by dint of some careful grinding and scraping the bays were cleaned up and the toy like u/c leg locating holes removed. The plan is to use the CMR u/c bays as a guide - not least because I may well ditch the airfix u/c and use some CMR onres instead. So far I've got as far as boxing in the tops of the visible section of the bays and boxing in the sides. I've used generous amounts of liquid poly so it's all setting and drying at the moment before I can clean it all up and finish off. I hope that the edges will be a lot sharper and crisper. While its all setting I've tackled an issue with the CMR JP3 At the start of the thread Colin (crobinsonh) pointed out a problem on the undersides of the CMR intakes. The jet has a triangular shaped vent each side - at the bottom of the intake underneath the front half of the wing - that isn't recreated on the kit. This is the vent: And here's the kit. You can see where the wings go and also that CMR have missed the vent in the lower edge of the intake. It's a little chore that I've been ducking for a while and that's chiefly why I haven't got on any further with the JP3. Anyways - done now. I marked the front of the wing in pencil - the vent starts just underneath and behind the leading edge - and proceded with a combination of careful drilling, scribing and scraping - using a combination of needle/tamiya scriber and scalple blades. It wasn't difficult because the resin is so soft - rather the key was not to overdo it and to keep it neat. And after not too long they were pretty much done. Actually, the result is not as good as I was hoping for. CMR haven't fully captured the depth and roundness of the intakes underneath the wings and so the front profile of my vents isn't quite deep enough or round enough - but the only solution would be to re-profile the kit intakes a little at the leading edge of the vents/wings and I think I'll leave that for now and may well not bother at all. I'll see how it looks when the wings are on. Oh well - creeping forward; not so much leaps and bounds as hops and stumbles Steve2 points
-
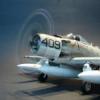
The tank... Being that it is powered by a Wright R-1820, 9 cylinder radial engine, that is a dry-sump, that makes the tank an oil tank. Fairly simple. They would climb up the hole (probably called a hell-hole) with a 10 gallon pail of oil, and fill it from the top. Cheers H. (Helicopter Pilot, but not H-21...!) PS: there is a flying H-21/H44 in California!2 points
-
I am truly stunned by this thread. Just because it's in an unlinked image folder on their website doesn't mean it's 'publicly available'! Sorry, but in my opinion the mods should have shut this down right away. Just my 2p. Rob2 points
-
Nose primed and ready to be moulded and resin cast; (I've popped the EODS on to add context)2 points
-
Heh...Airfix couldn't pay a marketing company to pull off what's happening here for free. What I see as a pear shaped, middle aged American in the Swift is a quirky aircraft, a product laden with character in a general market filled with awful franchised sameness.2 points
-
It appears to be true, I'm half elated, half gutted ! Anyway, got a busy weekend ahead, so took some pics to show where they're upto, light isn't great, but you get the general idea...2 points
-
Here's my Frog Gloster Javelin FAW9 cheers Simon2 points
-
Scale and kit: 1/48 Hasegawa A-4C Built as: Bu.No. 147781, NWC China Lake, 1960's Built using: Two Bobs decals, Quickboost IFR probe, Tamiya, Xtracryllix and Humbrol paints with own mix of International Orange Build thread: http://www.britmodeller.com/forums/index.php?/topic/234947565-148-hasegawa-a-4c-china-lake-finished/2 points
-
Whilst I am in a long lay over in Chicago on the way to Austin I thought I would upload some very slow progress of late (my excuse being that I have spent >50% of my time in the US since August). Please note that the ejection seat and cockpit are far from finished - e.g. I have painted in white all buttons and switches that are a variety of shades of black and gray etc, there is none of the correct striping on the ejector seat pull handles etc. Last but not least none of the instrument dials have the Airscale decals added yet. More to come next week after I return home.2 points
-
Also, seeing as Parkes682decals is such a massively negative pedant, he could do with getting someone to sort out the terrible misuse of apostrophes on his website's text. Just saying Oh and a very nice little heli by the way Dermot!2 points
-
Nice stuff mate......the Merlin would look cool swirled ! Really like the idea behind the sig JEM 20th and the clear acrylic body with 3D internal designs lit using green LEDS ......looks organic...(hmmm wonder where I can get hold of that much clear acrylic and mould holder !)....1 point
-
I feel for you mate. All that work and then it gets a battering on here. As for the copyright issues, I can't see that you've done anything wrong, you bought them in good faith from a third party that's obviously producing them commercially. If anyone's broken the rules, it's them not you. A very nice build by the way.1 point


This leaderboard is set to London/GMT+01:00