
Leaderboard


Popular Content
Showing content with the highest reputation on 22/11/13 in Posts
-
This airplane was based in Boccadifalco airfield ,near Palermo-Sicily; Palermo is the city of my birth and Boccadifalco is the airport where I grew up, this is because my father was president of RC modeling section , then you know very well that the smell of the field grass, of the gasoline is always in my nose. My goal is to make all aircraft based in that airport: Italian, U.S. and Germany. I begin with a Bf 110E of 7./ZG26, tomorrow I'll post an US Spit. Ettore8 points
-
As I promised last afternoon, here another plane based in Palermo Boccadifalco (Boccadifalco: " Mouth hawk"), after Husky Operation in July 1943 This is a Spitfire Mk.VC 4nd FS 52nd FG flown by Major Robert Levine The azure blue is self made with all colors A nice day to all Ettore8 points
-
Hi everyone, I found a few photos taken last year after completing the lovely Airfix GR9, in the Cottesmore special scheme. There's nothing to really report about this kit other than you can pour glue in the box, shake and get a lovely Harrier. Much has been said about the depth of panel lines on Airfix's 1/72 kits. To be honest my opinion is that we already accept so many compromises on such a small scale that the depth of panels lines is less important than accurate outlines. On this kit in particular the undercarriage legs and wheels etc. are very fine and in scale and it looks and 'sits' like a Harrier should. The engineering and design on this model are first class and make for an easy build. I do get a bit stalled when folk complain that (for example) 'those panel lines are a bit deep on the new Airfix spitfire' forgetting that the kit costs less than a fiver! Airfix have an unusual position, unlike most they are making kits aimed at a broad range of modellers and skills, to design highly detailed yet easy to construct kits that end up at pocket money prices is something to be marvelled at. Don't forget Hasegawa are regularly re-releasing 30 year old toolings and asking us to pay £30-£40 for a 1/72 kit. Any way rant over, hope these photos meet approval!7 points
-
this is the first time i post my model in this forum, i'm newbi but i hope onother member like my model, thanks for see and have fun7 points
-
Tamiya's usual quality, but I wanted the flaps up and I think they are designed to fit extended as they where a little tricky to get lined up. Eduard zoom in the cockpit and master radar antenna (from telford as a after thought) these are lovely but a pain to make up, if you get them drill the .3mm holes in the front supports before you fix it, as it's a nightmare after. Model master paints on top, tamiya nato black underneath I don't know where the pre-shading went, or the greys I mixed and sprayed on the black as it all disappered when the gloss and matt varnish went on, so it's ended up looking very clean and I was to scared to try any post shading incase I c--ked the lot up.May go back to it later and try, but for now I just wanted to finish it Thanks for looking Colin6 points
-
Hi, Just joined but posting a few previous builds.. Wingnut kits are exceptional.. Apologies if it's a bit picture heavy! Thanks Guy4 points
-
Hi again, Next up in the completed builds is the good old Spit.. It's a beauty of a kit.. Thanks for looking.. Guy Ps How do I post the emoticons in posts? I've enabled them but can't see them anywhere to select?4 points
-
It's not like we're living in a sci-fi desert. That dark gritty programme for grown-ups could be Ultraviolet, Fringe, Farscape, Continuum... they're just not Dr Who. Dr Who is Dr Who, and it was never intended to be for grown-ups...only. Like they said in An Adventure in Space and Time, it was meant to keep the adult football fans watching after Final Score, and give the kids something to watch before the pop charts. And as for "dumbed it down and aimed it at five year olds"? Tosh. I enjoyed Dr Who from Jon Pertwee to Peter Davison, and I've enjoyed it with my kids from Chris Eccleston to Matt Smith. And I'll go on enjoying it, I'm sure, with Peter Capaldi. And I can assure you*, that if you take off your "everything was better in the old days" Daily Mail issue glasses, there were as many creaky, overblown, incoherent and downright poor episodes and serials in t'old days as there are hyperactive, OTT, fart-joke laden tosh-fests today. But there were truly great stories in vintage Who, and truly great stories in New Who. And for me, personally, "Blink", "Dalek", The Girl in the Fireplace" and "The Doctor's Wife" are among the best Who ever. I re-watched the much-lauded "City of Death" recently and... really? YMMV, obviously. bestest, M. *(NB: that's a generic you, not aimed at anyone in particular...)4 points
-
Doctor Ewe?4 points
-
Back to Thunderbird 1 then. Painting was the next stage, with the rear fuselage/engine section being joined up, fins added and painting undertaken The blue of the fuselage is Tamiya X-14 with a touch of white added to tone it down. The blue stripes are raw X-14. Silver is Alcad semi-matt alumninium. Legs have been assembled with the requisite "splay-footed" appearance and painted Alcad semi-matt alumninium. Nose painted with Tamiya red gloss over Alcad gloss black primer For the main fuselage I originally painted the wings before joining the two halves together. Initially I tried Alcad airframe aluminium on the wings but that came up way too shiny. it looked nice but not like Thunderbird 1! So in the end it got changed to semi-matt aluminium. So the wings then got fitted back into the fuselage and the two halves glued together. I tehn spent several days priming, sanding, filling and priming to eliminate the joint in the fuselage. Once I was happy, it then got sprayed semi-matt aluminium: Yay, looking good! had to rescribe panel lines aroudn the joint but that wasn't too difficult, so now to final assembly: So now onto weathering... uh oh! This is where things almost went disasterously wrong. Once again I forgot to seal it with Klear before using MiG washes. I added a pin wash using MiG Dark wash and then when dry wiped off the excess using a little bit of thinner on the cloth... which of course immediately stripped the paint back to the plastic in the spots I wiped... sigh, schoolboy error! In the end I had to take most of the alcad off, clean it up, mask the rear fuselage with tape and a plastic bad and then repainted using Tamiya Metallic grey instead of Alcad. This time around I remembered to seal the paint with Klear and then add the wash, but this time I used Flory Models black wash, which did the trick just fine. Then Decals were added and finally another thin coat of Klear added. I didn't using matt varnish because I want this to be a bit shiny to give it a FAST look ) In the meantime, cotton wool was added to the acrylic rod and base so the end result looks like this: and here it is on the shelf next to Thunderbird 3: I suppose I'll have to do Thunderbird 2 soon!!4 points
-
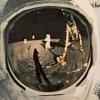
Thanks IGkent, Rudolf and Murdo Appreciate this Nigel. Below are some pics of the two fairings. One has been sanded down (but not yet finished) the other is untouched. Hope the pics help. I'll continue to sand them down but I can bring them along to the next club meet I'm able to attend and we can see what's possible. On that note, I'm afraid I'm going to miss the January meet too February should be okay... Update on the fenestron drive shaft: I think I may be mad but I couldn't resist trying this. Rather than just ending it at the drive shaft, I thought I'd try and detail the (I'm guessing) control wires and hydraulic supply pipe work that runs along the tail boom, underneath the drive shaft. As you can see in my last update I had painted the plastic rod for the driveshaft. Rather premature of me. Removed the paint and scratched some supports for the drive shaft. Here they are below. I used some spares from a super puma etch kit and added the control wire / hydraulic pipe supports along the tail boom. This I where I get rather silly - I've attached 4 strands of hair, donated from my wife's hairbrush (top tip: DON'T TELL YOUR WIFE!!) at the tail fairing / cowling. The 2 strands in the centre have been glued into position all the way along up to the gearbox. Once secured, the drive shaft supports / bearings were glued into position and the drive shaft inserted. The hydraulic pipe work (?) that runs either side of the drive shaft will be glued once things are secured. I've taken some silhouette photos to help you see the details I've added. I never intended to go this far on the tail boom detail; so in hindsight it would have probably been sensible to have done all this prior to painting. Anyway, thanks for looking Cheers Aaron4 points
-
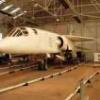
Well after all the excitement and fallout of yet another Telford show I shall be getting back to this little fella. Thanks to the amazing generosity of a few retailers that I've befriended over the years, not to mention a couple of BM'ers I came back loaded with bags full of 'review goodies' designed to distract me from the one true course...but I've resisted so far and will valiantly continue my quest ... The rear turret is one of the few areas of the kit that needs extra work and having spoken to Yuri of Scalemodels.ru it became apparent that major surgery would be needed here if it was to look anything like the real deal. Firstly it's too short as can be seen here, the centre line of the ball turret should line up with the front of the rear glazing...... Please excuse the quality of the photos...cameras been playing up a bit.... Here is where the ball turret should come out to, Here's the real thing, the 3MD at Monino, Also in this shot you can see that the side 'cowls' are longer than portrayed in the kit and need to be extended again in line with the centre of the ball. The upper area needs bulking out a bit too......These aircraft really look like they were hammered together......... This is becoming a separate model in it's own right !! Firstly I cut off the front fairings, top and bottom and added scrap resin to both, The windows should have slightly curved corners but I'll probably do that when it comes to painting the beast..... After these were carved into shape the ball was test fitted, (everything's just pushed together at the moment). A missing feature of the rear windows is the white inner frame which holds the anti flash curtains. This is very visible through the glazing on the real thing and so I made one up from 0.5mm card, a bit fiddly but worth the effort. The windows were tinted light green which I'll do a bit later as will the window frames which will be added using the thin card again. For some reason the glazing looks dirty in this photo...in reality it's crystal clear. Note the finish and fit of panels......flush finish it wasn't...but then subsonic doesn't need to be..... (the square box on top of the rear fairing was unique to the 3M tankers). I decided to totally scratchbuild the ball turret as the details were wrong, (just a sphere with two small holes for the cannons !). I decided to cut out the elevation slots and then add the 'slides' separately . The centre strut is recessed so it was easier to do this before fitting the cannons. The cannons were another matter...just short sticks which were all but useless so I blagged a couple of sets of Quickboost ones that looked appropriate for the task, (JU-88's in fact), which had the correct diameter and length. Extra range finding gear will be added to them later. And fitted together, And the unit fitted together, There's still a lot of work to do as the side shrouds were heat resistant and slightly longer, these will be done with the thin card again...Next will be the top of the fairing running from the radar cap, Amodel completely cocked this bit up, Finally the empty cartridge chutes under the turret, again Amodel got this wrong so I scratchbuilt the unit according to photos, Cheers all, Melchie4 points
-
Hello, here is my recently completed Airfix Mustang IV made from the starter kit. It it took 2 weeks which is incredibly quick for me, it's a great kit with nice detail including a good cockpit with sidewall detail, flap and radiator options. I decided to have a go with Tamiya paints on this one, after painting the cockpit and interior parts such as wheel wells with citadel or Vallejo paints. I gave it the usual coat of klear before weathering with oils, then a coat of Tamiya clear with flat base mixed in. I decided to fill in the wing panels after doing a bit of research and finding out where was filled. I added some belts to the seat from tape, and replaced the aerial kit part which was mismoulded and brittle with plasticard. Here are some pics, hope you like it!3 points
-
Hello all, Just joined, mainly do aircraft, but I've had a dabble in the 1/48 Tamiya kits - love 'em! Thanks for looking Guy3 points
-
Built this car OOB, and used Testors base and a automotive 4 to 1 clear on it. I have always liked these classic muscle cars. Only if I could get a 1:1!3 points
-
Fea - when you set your store out with a controversial subject, don't be surprised if you get some different opinions. I've been watching this thread from the very beginning because I know it'll be a hot topic and prone to the usual flame-outs. Just because they disagree with you, doesn't necessarily make them wrong, as a lot of what you're discussing is subjective and simply their opinion versus yours. You're also expounding some pretty weird points, the oddest being that the BBC TV Centre is somehow tainted by Jimmy Saville's excretions, when it's actually a bricks and mortar building, so inanimate. Their choice to use it before it was demolished probably had more to do with having a ready made set and saving money than venerating that white-haired weirdo. I will agree that British TV is dire at the moment, with endless programmes based on, but bearing no resemblance to "real life", but at the end of the day (or earlier if you prefer), there is a little used switch on almost every TV, and it will be marked OFF or with a little circle with a line through the top edge. That stops the nasty programmes coming through into the magic picture box, and you can wipe your hands of it entirely. If you don't even watch TV on the internet, you could dispatch your TV to landfill, get a large screen monitor (with no TV Tuner) and watch DVDs, Blurays and movies on demand through your computer/Smart device, avoiding having to even play your part in funding this tripe via the license fee. Please keep it civil - I really don't want the dubious honour of separating people arguing over a TV show.3 points
-
P-47D Thunderbolt "Tipsy" 42-76520 510th FS 405th FG Christchurch 1944 Started this last weekend, its the Academy kit and it goes together very well, decals are by Kits World, paint is: Olive Drab Vallejo Neutral Grey Gunze White Vallejo Thanks for looking3 points
-
I'd rather Dr Who had a 50th celebration than some "Reality" effort or a soap! Just found out I'll be seeing it at the cinema with SHMBO & my son in 3-D, so it'll be a real treat. My personal opinion is Matt Smith is a great Dr, but has had some poor stories & was overshadowed by his leggy companion & her p-whipped boyfriend.3 points
-
Hawk T1 RAF Chivenor 1982. Revell 1/32 Hawk back dated seats (before HA ones came out-typical) Tim Perry Practice bomb units, etch cockpit set. Hannants decals. Resin flaps. I decide to rivet the back end as per the real aircraft. All rivets were drilled and added individually, they came from a Russian company which have a UK agent on ebay. It was shown on the Flory table at Telford.3 points
-
Just received this e-mail from the lady behind the petition: As most of you will now be aware, the BBC have recently announced that The Sky at Night will continue from February next year, after a break in January. The BBC's own news website states that this is following this petition (http://www.bbc.co.uk/news/entertainment-arts-24740857) so I just wanted to say an extremely grateful 'Thank You', on behalf of the entire 'Save Sky at Night Team' to each and every one of you who took the time to sign this petition and say how delighted we are that the programme has been saved. We don't yet know what the format will be, or even who will be presenting it, but we feel that we cannot really do anything useful regarding that until the programme has aired a few times and we can gauge whether or not the scientific content has been retained to at least the same standard. As such we have decided to close this petition and 'watch and wait'. Once again thank you very much for your support and well done to all of us! Karen and the Save S@N Team. :yahoo:3 points
-
I would far rather have saturation coverage of Dr Who than say C Factor, I Was a Cebrity or whatever but others would disagree. It's the differences in opinion that are interesting. Grit your teeth it'll be over next week! Trevor3 points
-
Hello to everyone! This is my first attempt at this so forgive me of any mistakes. As a very keen modeller through the late 60’s all the 70’s the one kit I always lusted after but could never afford (or do justice to) was the 1/24th Harrier. An older friend bought one as soon as it was released. He kept getting the box out, looking at the massive sprues and it and put it away again, for years we all kept asking where the Harrier was. That friend unfortunately died a good while ago so in some way this build is to the happy memories of Dave Rodgers. After starting modelling seriously again 3 years ago, I decided that it was time to have a bash and tackle the monster - thanks to a sale on Amazon I picked up the newly boxed GR3 for £36. Even though I enjoy using resin and photo-etch we sometimes seem to be heading toward a world where you needn’t worry about painting skills when you can stick in self adhesive pre-painted details. I remember when building flying models in the 70’s ARTF (Almost Ready to Fly) appeared, buy Saturday - fly Sunday; I railed against that a little too, I’ve always been a builder. My concessions to the modern era are cyano glue and acrylics. I always use Mek as a plastic solvent which costs around £10 for a litre. I buy Isopropanol for around £12 per gallon from Amazon. A great Acrylic thinner is 50% Isopropanol and 50% winter car windscreen wash. Anyroad, the kit still is a cracker and is a superb representation of the early tin-wing Harriers. Anyone who looks closely at a preserved GR1 or GR3 will see Airfix got the surface textures and details spot on. In places the early harriers look almost ‘boilerplate’ in construction. The kits surface detail is one thing - interior detail is another, it’s virtually absent. The design and engineering is typical of the era - even having the novelty folding undercarriage and closing doors etc. I decided to avoid resin and etch and built the whole thing in a true 70’s scratch build style. I haven’t had this much fun in years. Please respect copyright of my photographs. Starting the build. I attacked the cockpit tub first (as tradition dictates) .5mm card was used for the raised riveted plates using the Trumpeter riveting tool to detail. I built some switch panels from plasticard with thin slivers bonded upright to represent toggle switches. I dug out as many reference images as I could but the bulk of the ejector seat obscured much of the view; therefore a little artistic licence was used to give the impression of a busy cockpit. Most of the detail is added from plasticard scraps and stretched sprue. Different thicknesses of solder are always good for detailing. After a few coats of paint, glossing and washing the cockpit tub looks suitably grimy! The decals supplied work very well on the instrument panel and are large enough to cut out individually to fit, I use a set of cheap hole punches. I painted the back of the clear moulded radar/moving map screen then the HUD frame was built from fine brass wire. Shadows were airbrushed in to increase the impression of depth when the cockpit was closed up. At the same time I added detail to the sidewalls using tube, solder, fuse wire and plasticard, I cheated a little and got some ideas for the detail from resin examples I saw for sale at the Huddersfield show… The Seat The kit seat is virtually blank and needs a complete replacement/rebuild especially when everyone peers into the huge cockpit of a 1/24th scale model. To ensure a clean fit in the tub I used the measurements of the kit seat to build one from scratch - only the kit headrest was used. Canopy cutters were added to this and the parachute with its straps and cables were added to form the headbox. The parachute and straps are lead foil. The seat itself was a simple construct of 1mm card with details added from scrap plastic and .5mm brass wire and seat cushions carved polystyrene foam, dipped in PVA to seal the surface before painting. The seat straps and canvas cover are lead foil again. All the separate elements were built, painted and weathered before final assembly. You know, those headbox height adjust bars (red at the moment) are scraps left over from an Aurora biplane model from the late 60's... The straps and canvas cover are all made from lead foil, I found scraps of Eduard etch left over from a Chieftain MK5 build that worked very well for buckles etc. The supplied Airfix decals finish it off very nicely. A quick dry brushing with grey and a coat of matt varnish and it's ready for the straps fitting. My first plan was to build as originally intended and have the whole wing removable to view the engine; however as the build progressed it became obvious that I wouldn’t be able to get a clean fit without large gaps. I did away with this original feature enabling a much more solid build and elimination all those awkward wing joints. a pity though as I'd spent over a week detailing and painting the Pegasus, based on one displayed at Cosford. The Airfix Harrier is big, very big so to avoid damage during construction I replaced all the blade aerials with .5mm brass sheet glued firmly into slots cut deep into the plastic. The slots were filled with thick cyano and sanded, I'm determined to use this method for future builds (of all scales). Bits & Bobs The undercarriage wells on Harriers are quite large voids within the fuselage. In 1974 it was more important for Airfix to compete with other manufacturers and add moving components. Of course moulding technology has moved on in huge leaps since then but the 1/24th Harrier was seen as a wonder in it's day. The wells are nothing more than empty plastic boxes in the kit; I couldn't source any clear images of the inside of these areas so I used my 'Artistic Licence' (mine came from Woolworths for 2/6d) to detail the voids. Only the nosewheel bay is clear on a few internet images I found. It wasn't too difficult to drill plasticard and cut into strips after marking the plastic with a riveting tool and then drilling every second hole with a drill made from a 1mm Hypo Needle. A drill made from a hollow needle gives a very clean cut, I grind the end down to a 30 degree (ish) angle on wet and dry paper. The pressure vessels are 1/72 torpedo bodies from a Nimrod. These areas are well weathered to depict a harrier flown from rough ground. The kit mainwheel well has detail on the backside (in the engine bay) so I invented appropriate looking ribbing, boxes and tubing (I only bought the cheap Artistic License) this was then painted and weathered. It was at this point, when the fuselage was starting to fill up that I could test fit the wing assembly and decided to fix the wing in place. I cut out one access panel to show some engine detail as can be seen on the finished model. All the various vents and intakes on the fuselage were cut out and backed with foil from an old electric razor - the fine mesh was ideal. The nose camera had a similar treatment, a lens was made from scrap sprue, mounted on a bracket in the hole and then blocked with foam until painting was finished. The window was afterwards formed from ‘Clearfix’. The kit vinyl tyres look very realistic after a rub down with wet 800 grade paper, turning them a very accurate dark grey. The undercarriage legs are fairly well detailed, the nose wheel benefits from a small bracket for the lamp, some electrical cabling and hydraulic tubes. These were well weathered to represent the dirt kicked up from rough ground and oil leakage. The fit of the huge fuselage halves proved to be excellent, the little filling necessary required my favourite slurry of cyano and talc. I found that a 1mm hypodermic needle was the same diameter as the Airfix rivets and was used to recreate those lost. I cut square and sharpened a short length of hypo tube and glued it into a paintbrush handle. After drawing lines for the missing rivets this improvised tool was ideal for re-cutting the missing detail, initially easy to do, after completing a few hundred the novelty wears a bit thin. The wingtip ‘puffers’ are not really represented and need cutting out and boxing in before detailing, The same applies to the auxiliaries surrounding the main intakes, these are lightly sprung and drop under gravity on harriers at rest. I cut out the engraved panel lines and constructed a long square tube from 1mm card, cut unto short lengths and bonded in they could easily be sanded flush and filled to neaten the finish. The .5mm plasticard flaps themselves were cut to fit and glued in at appropriate angles. Onto the canopy, this is a very thin and crystal clear moulding, the windshield only lacks the wiper which is easily build from brass wire and a sliver of card for the blade. I traced the outline of the detonation cord on a scrap of balsa and pushed pins where the cord bends, it was relatively easy to wind solder around this and then rest it inside the canopy. Using Pledge floor wax I glued the solder in place. I cut 1mm strips of white decal paper to lay on the inside to form the sealant band and dipped the whole thing in Pledge and covered it to dry for a few days. The canopy was them masked, painted and put away for a few months until needed. The fit of the sealant looks uneven because it's on the inside of the canopy! after masking and painting the camouflage it looks very real. The windshield was masked the wiper added and the whole assembly glued in place with pva, it fits perfectly and needed no other work. The most awkward job proved to be the hot and cold nozzles, the kit ones have a joint in the worst place possible and are smooth all over. The real ones have riveted vanes inside and ribbed plates on the outside (strengthening I assume) these were made from .5mm card, bonded with Mek and then wet sanded to blend them in. These took A LOT of filling, smoothing and fiddling to get them looking something like. I painted them with Tamiya Aluminium, fading into Titanium at the hot end and then thin coats of Tamiya Clear Orange for heat staining. The saving grace is that the moulded exhaust halves are very thin and very nicely contoured. The underwing stores needed some extra detailing, mostly small plates and panels, the pylons however are blank, I made beer can tin templates for the panel lines needing scribing, as eight sides needed detailing this was the best method to achieve consistency. The cut-outs for sway braces were there but I needed to add the braces themselves from 2mm square pieces of plasticard drilled to accept short lengths of .5mm brass wire. As with all the other bits, the pylons, rocket launches, fuel tanks and Aden gun packs were painted, decaled, weathered and put away for use. By now I had a box crammed full of sub assemblies, moving to major works on the airframe was a relief! The overall shape is very good and considering the Harrier is one of those aircraft without a straight line anywhere the Airfix surveyors & drawing office did an amazing job in 73/74. The contours are very well captured and the fit of the fin is so good only a line of thin cyano is needed to hide the joint. The final hurdle, painting the beast. I used a cheap black aerosol car undercoat for the fuselage (it looked great all black!) all the seams were checked and luckily only a few needed filling. On a large scale model I prefer a dark undercoat as I paint the topcoats using a very thin mix and spray at low pressure. In this way I can work closely painting each panel from the centre outward. I find this gives me much better control over a weathered finish and avoids the toy like look of weathering that is even and precise all over. The mixture (mostly Tamiya and Vallejo acrylics) were thinned 50/50. Tamiya thins well with my invented mix mentioned earlier. Vallejo needs water to thin it (or their own thinner). I think Vallejo paint has Polyurethane in the mix and Isopropanol thinners create an instant jelly monster in your airbrush that needs Professor Quatermas to remove it successfully. The paint applied in this manner on a dark ground will look alarmingly patchy, it is also quite fragile. The magic happens with a coat of Pledge floor wax (known as 'Klear' in the colonies). One coat immediately blends the colours and darkens the paint to look like the colours on the tin. It also toughens the finish. Another 3 coats and a polish with a clean dry j-cloth and the monster was ready for decaling! Incidentally, most of the painting on this model was completed with a cheap £25 Chinese airbrush (cheap but beautifully made, sprays anything and is easy to clean). My Badger Renegade Velocity has never lived up to it's macho name and has been completely rebuilt twice in twelve months and was out of action for the third time during this build. I'm afraid the airbrush body is made from a hard anodised but VERY soft brass and the needle mechanism was so badly made Badger themselves described it as 'pants' and sent a replacement. The engineering and build quality is worse than the Chinese £25 special; I'll never buy Badger again... The Airfix Cartograph printed decals are superb, dense, thin and in perfect register. They settled onto every contour and panel line to perfection. Two more coats of Pledge on top and the whole was put away for a week to harden. I weathered and highlighted the panel lines and rivets with Flory Models 'Dark Dirt' wash, this is an absolute pleasure to use and is one of the very few recent products that are genuinely innovative and make finishing simpler. After drying, excess wash was wiped away with a new damped J-Cloth & cotton buds dealt with the tight corners. All those sub assemblies were now added with 5 minute epoxy, cyano and PVA for the canopy before a final post shading with Tamiya smoke thinned with 75% pure Isopropanol. After everything set the whole monster had a couple of coats Windsor and Newton matt varnish, this needs a few days to cure properly but is very matt and very tough. The post shading, dirtying process, paint chips were all completed after decaling. Some of the decals were weathered slightly around the edges to depict paint wear. The dark aircraft grey is a self mix and has a little blue added, if you look at period Harrier images, you will find mixtures of both hard and soft edge camouflage schemes, I like the look of soft demarcation and went for that. I have an old publication from 1982 'The RAF in Colour', there are hard and soft edged camo aircraft from the same squadron in the book! The decals needed only a little softening with dilute acetic acid to settle them onto the Pledge glossed paintwork. And there it is, after 39 years and 7 months I finally built and finished the big harrier. I've always been fascinated by the Harrier it was one of the first aircraft I can remember seeing that seemed to have an 'organic' look to it, no straight lines. Those huge intakes and the pilot seemingly sat in a 'pod' in front of the aircraft had a real 'science fiction' appeal to a youngster brought up on Gerry Anderson programmes. Airfix caught the 'hunkered down' look of the early Harrier to perfection. Oh yes, and all the wheels stood on the ground together when finished. The build was aided by, Radio 3, 4, 4 extra, BBC6 Music, Stuart Maconie's Freak Zone, Amon Duul II, Hawkwind, Faust, Can, Black Sabbath, Falkenbach, Van der Graaf Generator and far too many other unremarkable heroes to mention. The whole experience was an absolute joy and will always rank as a favourite build, it’s also the first model of mine in 40 years to be on a stand!2 points
-
Hi all, First thread here. I've done a few builds on the ww1aircraftmodels.com forum and I thought I would continue on here as I've got a few non WW1 subjects to build.. However, I'm half way through a Salmson so I thought I may as well post this here as well to kick off.. Picked this up at Telford - usually stick to 1/32 for WW1 but I was very impressed by the kit and had to get it! It's really like a 1/32 kit that's been shrunk.. Going for this USAS colour scheme - I just like the top wing markings.. The engine and gun ring - very good in this scale - but very fiddly! Some nice phot etch supplied - decals for individual instruments The fit of parts is exceptional - it really does just fall together.. They supply a very clever cardboard jig for the lower wing fitting.. Well, that's where I'm up to so far, painting up next . If anyone's debating whether to get the kit - I wouldn't - it's lovely.. Thanks for looking Guy Ps I'll post some completed model threads of my previous efforts shortly2 points
-
I have to say Airfix have had such an amazing turnaround of late - this year alone I have bought the Typhoon, 1/48th PR XIX, Gladiator, Swordfish, Harrier, Javelin and what I personally believe is the best yet - Hurricane Mk1. The level of detail supplied as standard for a 1/72nd model is great as is the fit. Please note the Instrument panel is from an old PE set that I had in the spares box. I added some seat belts and cables (that you will not see when the fuselage is closed up!) More anon.2 points
-
Hello all After having not posted anything for a while I though it was time to start something worth doing Recently I visited this years IPMS model show and was inspired to do something a little bit interesting....a16th scale bluethunder scratch build This chopper has always been of inspiration and what better to do it in such a large scale.I Have completed the main moulds vac form and starting work on the cockpit interior to which i am taking to a superior level of detail. Please forgive the speed of my posts as this is my first major scratch build and it takes me some time..please see photos below of work so far ENJOY2 points
-
Dalek Diary - Day 81 There are still some jobs to do, like removing marks like this which I think is a slight smear of epoxy: I am not very happy with the underside of the dome, with the epoxy going off so fast I did not have time to get it how I wanted it. It is a bit of a mess really: For my dinner I fancied a pie so I cooked this along with some nice buttery mashed potato and homemade gravy (anyone want the recipe?): The pie was actually rather nice so I thought you might like to have more information on it: "Beef Steak & London Porter Ale Pie with Shortcrust Pastry" to be exact. I had thought about tidying up the epoxy with more epoxy - using the slow setting stuff from B & Q this time (which I had decided to keep). I even got as far as getting out a mixing vessel and then had a change of heart. The glue that was there was more than adequate from a structural point of view and smearing around more epoxy could be a recipe for disaster so I elected to just tidy things up with some of the bathroom sealant: This was then cleaned up with wet fingers and sponges to this level: Still not the neatest thing in the world but hopefully an improvement. It won't be seen that often anyway. That can harden up overnight and it will be back to the red oxide primer in the morning. Tomorrow is the big day of course, my final deadline, will I get it all done tomorrow? I know the answer of course but you will have to wait and see. Bye for now, Nigel2 points
-
About time it stood on its own two feet: Applied a wash to the removable panels and control surfaces too - still needs finessing a bit before exhaust staining etc and a final matt coat. I must admit it looks terrible. Hopefully a matt coat and little details like unmasking the canopy, pitot tube, wheel covers, lights etc. will transform it in the same way the did for the Spitfire. If not...oh dear!2 points
-
Some quick pics. Headpiece added to the hull, along with the three braces. Those braces are not to strengthen the hull. Rather, they are support for the big deck above. The invariable seam filled. ..... .....And the pour stubs on the bottom of the hull... And ohh yeah, look what the doctor delivered yesterday too! Paints! Again, **GULP** Hope I got enough! Anyway, that's it for now. Tonight, sand the hull down and perhaps put on another layer of red putty. Hope to get the deck on by the end of the weekend!2 points
-
I personally thought Auntie called it right on this, a nerdy documentary - no thanks, Marty...2 points
-
thats everything matted down and the wheels finished.2 points
-
thanks to all2 points
-
This one has been done a few times but I had to have it in the collection. It is the Academy 1:48 scale MkXIVe build OOB except for the Ultracast seat. A few mods such as repositioning the rudder and elevators and an Alclad II Airframe Aluminum finish over a Tamiys Gloss Black base coat (TS-14 decanted into the airbrush) Barney2 points
-
Ahhh, but now we've got Jenna Louise Coleman. Apparently she's in the doghouse for tweeting about the Christmas episode. Lucky dog, I say. And so we'll be weeping into our plum duff at the 'brutal' departure of Matt Smith (according to JLC) on Christmas Day, but then there's the Jock Doc to follow. I've actually never seen The Thick of it, but I really liked a lot of things that Peter Capaldi's been in like Neverwhere and Mrs. Maltadefender took me to the West End to see The Ladykillers in which he was fantastic. Matt Smith plays the 1000 year old soul brilliantly. And he's from Northampton. Funnily enough Tom Baker went to my brother's school in Northampton after they won a competition for a day with the Doctor. He apparently arrived in a helicopter on the sports field, and as he strode out to meet the children he spotted a cute looking blonde boy (my brother) and asked him to hold his big, floppy hat. Looks can be deceiving. My brother was a tearaway - and away he tore... with the hat! It might still be at the school hidden behind the water tank.2 points
-
Yes they are milking it just a bit lots of pointless shows mainly going on the recent stuff and only paying lip service to the earlier pre noughties series, however did enjoy the docudrama last night and the best bit was then watching those first 4 episodes of an unearthy child on BBC4 just afterwards. In fact i would prefer if the BBC had started running the original series on BBC4 as the likes of UK Gold/Dave/Watch (whatever the current name is) dropped the originals once the new series was available and only show token episodes as tributes events now and then.2 points
-
Milk away. David Tennant is my favourite but Christopher Ecclestone's episode 'Dalek' is my all time favourite. Trevor2 points
-
That's superb Aaron! I'm positive that when it's finished, if you take another shot like that it'll be impossible to tell apart from the real thing!! Keith2 points
-
Not sad in the least - the story of how things are created can be very interesting - a hell of a lot more interesting that "who killed this person we've never heard of before and care even less about" which typifies 90% of the police procedurals on TV. Again you go on about the "Dark History" of the BBC - pray tell what is this and what has it got to do with Broadcasting House which to many people has wonderful associations of past Televisual triumphs? As for your repeated question about "milking" - its a business and its got a successful product that has achieve a very enviable milestone. Is Tesco "milking" is stores when they constantly throw adverts at us for phones, DVDs, milk and everything else they sell? Dr Who can only have a 50th Anniversary once, so who can blame them for trying to make as much of it as possible. So the answer to your question is No they haven't milked it too much. IMHO of course.2 points
-
Given that Dr Who (and Python) are among the best known British cultural icons worldwide, I don't think the BBC are overdoing it at all... It's utterly irrelevant whether any of us personally does or doesn't like the new series, or thinks that it was somehow "better" in the Pertwee, Troughton or Tom Baker years: objectively, worldwide, to millions of people, the 50th Anniversary IS a big deal. And using the best possible set for filming a period drama set in the BBC Television Centre? Well, doh! Stu... this is for you: http://www.amazon.co.uk/dp/1405911794 ;-P bestest, M.2 points
-
And you were ready to finish and give it up around page 40. Don't be a slacker, only 43 more pages to go to fame, glory and immortality!!! Isn't AA worth it. I am sure he would be fine with the fame and glory. (Ya know rhymes with gory, death destruction mayhem. Hmmmm. . . seems Daleks are more into mayhem and not so much into pillage and plunder. Without the pillage and plunder, what is the use of mayhem? Pillage and plunder gives a purpose to mayhem and makes it a bit logical. Mayhem alone and by itself seems to be indicative of mental instability. I prefer my world domination characters have some sort of mental stability, rather than just a crazy loon in a hyped up teapot suit creating random mischief with its deadly toilet plunger.)2 points
-
1 What do you mean by “milking”? Merchandise? Well, to some it’s distasteful, to others it’s a necessary evil and it helps pay for the overall operation. But if you think this is milking, you’re clearly overlooking Disney and George Lucas. If you mean “there’s a lot of it about at the moment”, well, yes, but surely it’s understandable. At least it will all be over soon and perhaps it’s keeping some of the more crackpot Kennedy stuff off the screen. And, again, this is amateur stuff compared with a whole year of flogging Benjamin Britten’s centenary, to take a current instance. 2 Last night’s show was filmed between TV Centre being emptied and its being sold. Perhaps you could explain what the BBC should have done to depict the place where the original was made, if you think that our eyes will be pollluted by looking at it? 3 All a matter of opinion, surely, but as a general point, I’d be worried if a character was capable of regeneration and didn’t change from time to time. That would show a thorough lack of creative imagination and would probably have led to its being abandoned a long time ago. 4 Also a matter of opinion, your mileage may vary, anyone expecting his view to be venerated as objective fact should have his typing fingers removed, etc etc.2 points
-
This airplane captured in Piombino Airfield, was transferred at Tangemere during 1945. After without spare parts, was destroyed. I wanted to show the last moments of this horse race, in Tangemere Ths is an old work of 2 years ago, is destroyed after a IPMS contest in Canada after landing in my town. But I got an award! Ettore2 points
-
Hi, My work in progress is britmodel indeed this time:) Lot of work for me and more than three month to build so far, but I still like it and the plane:) This is the fourth model for me to build this year:) BR, Kalle2 points
-
It could perfectly well be argued that it was, for the reasons you've given. But it could also be argued that the ultimate Merlin Spitfire was the Mk VIII, as the purpose-designed two-stage Merlin variant with refinements such as a retractable tailwheel that were lacking in the Mk IX and XVI.2 points
-
I like the incontinent Dalek on a teatowel picture. BTW, Dalek speech patterns are based on Adolf Hitler. Not a lot of people know that. Mostly because I just made it up. Having just heard Daleks on Radio 2. But, Listen to his rallies. It kind of makes sense. Pete (Still on the dried Frog pills)2 points
-
It's much easier to carve it off than add it on! Hopefully when you see him next he'll look a bit more human.....Can't do anything with him at the moment, I've used so much liquid poly & slurry, he's semi molten from the shoulders down. Now.....About that tail-gunner!2 points
-
Thank you all! And Many little things later it is time to rise this bird to his wheels: Thanks for watching, Kk2 points
-
OK, wings attached, belly tank installed, seams cleaned up, etc., etc., and now time to paint. First, a thin coat of Alcald grey primer was applied over the whole thing. Most A32s were solid olive green over a bare metal underside but I like to take the road less traveled so chose an unusual green and blue experimental scheme included on the Maestro decal set. The underside was still bare metal so that's where I started. A base coat of Floquil Old Silver was applied first. After masking off the underside (we'll get to the panel shading later) the first upper color was applied using Humbrol Hu116 US Dark Green. The biggest mistake I made on this model was choosing to use Humbrol enamels. No matter what I tried (various thinner ratios and pressure settings) the resulting finish was rough and required careful wet sanding and rubbing out to get a half decent finish. Oh, and they took days to cure thoroughly. I went with them as research mentioned them as good choices for required colors. Never again. Blu-tack putty worms and tape were used to mask for the second color for which Humbrol Hu77 Navy Blue was used. The only photograph of this particular aircraft to be found was a grainy shot of the left side and gave no clue as to the camo pattern on the right side, wings, or stabs. So, most of what you see is speculative - that is, my best guess! The radome and tail fin tip were masked and painted semi-gloss black and finally underside panels were shaded with a variety of Alclad metalizers. The horizontal stabs were painted separately and attached later. Time to move along to the decal stage. No drama here thanks to the superb quality of Maestro's and the kit decals. The Maestro set provided those needed for the specific scheme while the national markings and stencils came from the kit. All performed well with Micro Set/Sol method. As usual, gloss clear coats were applied before and after decal application. A burnt umber oil wash was used to highlight panel lines while pigments and pastel dust dirtied up the underside aft of the wheel wells as was apparent in numerous Lansen photos. The single photo available of this particular aircraft showed extensive weathering and significant paint peeling but I prefer clean builds as a rule so I kept the weathering effects light. Afer all, the paint job had to have looked fresh at some point in time! Once I was happy with the overall airframe finish, final sub-assemblies including the undercarriage, weapons pylons, and engine were installed. The next installment will highlight a number of miscellaneous points of interest not covered in previous posts. Then I'll wrap up things up with a few more photos of the completed model Cheers, Eric2 points
-
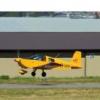
Thanks Aaron, Its not a secret, this is the scheme I would like to exicute: I like the silver and bright colours and Japanese script. Should be fun.2 points
-
When I was in the RAF ANY are that an ac was parked on was referred to as the 'pan'. So, anywhere we were detached, the ac sat on a pan. Just my two pennorth!2 points
-
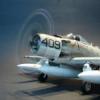
I'm about 98% sure that's painted aluminum. I've never heard of an in-service USAF Sabre in ADC Gray. In fact I've never seen one painted silver either, but here it is. Two words I'm always sure never to use are "never" and "always"1 point


.thumb.jpg.76f12b87ce9ca9929c9aabdcf8f9d2dd.jpg)


This leaderboard is set to London/GMT+01:00