
Leaderboard


Popular Content
Showing content with the highest reputation on 13/10/13 in all areas
-
Well this is my latest build completed, another commission and a very challenging one at that. This is the Stargazer Models 1/144 scale Discovery 1 from 2001/2010, the kit has a total length of 30"+. One of the biggest challenges was making the modifications for the bespoke lighting rig as there are no resin spares so I could not afford to make any mistakes. I was not going to light the engine bells as I thought it was too risky but I gave it a great deal of thought and took the chance. Back to year one apprentice bench fitting and my trusty Tamiya razor saw. The lighting in the Command Module was a challenge too as there is not much space to work with and you need to light the Pod Bay and CM Flight Deck independently. Lastly was the application of the JBOT Decals to the flight deck, this did make my head spin a bit as there is no real useful guidance so I spent a great deal of time looking at on line images. I finally managed to get some additional guidance from a JBOT decals pdf I found for it on line. The finish was done as usual with Tamiya Acrylic as always, XF-01 Mat White with a small amount of XF-19 Sky Grey mixed in to take the edge of the white as a very light grey finish was required. Variation of panels was done with a various mixes of light grey, these were still too dark so I applied a base colour filter over the top to lighten and blend. The model really came to life with the application of a much diluted grey wash, especially on the spine and Reactor Unit. Power is supplied via a 12v DC Outlet that i fitted into the base to keep things nice and neat. Overall I am very happy with the result, this is one I would like to keep myself Danny4 points
-
Another quick build was the new Atlantic Models HMS Leeds castle, I've made a few detail changes to backdate the shiip to her 1982 South Atlantic fit. Whilst not having an embarked helicopter, the ships have a large helicopter deck and were used as fuel stops by helicopters transfering stores between larger ships at South Georgia. This is the new Atlantic models kit and is one of the easiest ship kits I've built - the hull was ready to paint after about 3 hours work, and the superstructure wasn't much longer. Andrew3 points
-
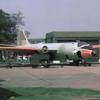
A rather quick build, I always wanted to build a Danish Starfighter, they have at wonderful, weathered look! This is mostly a painting Project, so building will be almost OOB. This is of course Hasegawa´s great Starfighter, so even a OOB build will be rather detailed. Building was trouble-free, almost no filler was required. A few cockpit shots: The only addition is seatbelts. And so the fun begins! More pics will follow soon...I hope! My aim is to finish it to the C4 Open show in Malmö, Sweden, in two weeks...3 points
-
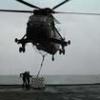
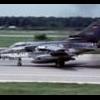
After spending the best part of 5 months building this I am quite pleased with how it's finally turned out. During my time on the 'Junglie Circuit' I cut my engineering teeth on this airframe: ZF121 from 772 Squadron then I met her up again on 846 Squadron. Where I worked with it in Northern Ireland I hope you like her There are more images but didn't want to swamp all the bandwidth hehe3 points
-
I've been taking a break from the Hermes build with a few simpler ships from the stash. This the the WEM HMS Ledbury with a few updates to represent a more current fit for the class. It's a really nice little kit but for a small ship, there's a lot of detail packed in, mostly around the working deck and boat deck. Andrew3 points
-
Hello everyone I've been away for sometime and I just wanted to try and upload some pictures to see I could still remember how to do it? I hope you don't mind.3 points
-
Finally completed with the undercarriage, doors, hook and bombs on. I have to say it's not been an easy build - it's a true short-run kit but it's an unusual subject and I'm pleased with how she turned out! I therefore present BuNo 104595, White 109, VF-41 "Firebirds" Thanks for looking and on with Number Two - the FR-1!3 points
-
Well I could not sleep so I started on some more details. The Nav instrumentation and various boxes and stick are all moulded as 3 simple pieces but it quite 2D in nature. I started by cutting and separating the 2d representation of the Nav stick. Apologies for the crappy photographs. Then whilst I was at it I cut the rest of the panel up - no going back! I then moved on and rebuilt that area and glued into behind the front of the rear panel as it should be. This is were I have gotten to. Some wiring to add etc and needs painting and glueing together. I also added some very prominent cabling that you can see in photo and pilot notes. And I added the rudder pedal straps that were missing.3 points
-
Good afternoon everybody. Hope we are all having a pleasant weekend This is my build of Combrigs Indefatigable class battlecruiser HMAS Australia in 1/700 I think the history of the ship is fairly well known but a brief overview. She joined the newly formed Royal Australian Navy in 1913 as Flagship. Started WW1 in Australian waters conducting operations against German assets in the Pacific before being moved to the UK as part of the Grand Fleets Battlecruiser Squadron. Managed to miss all the fleet actions of the war which with the fates of some of the other battlecruisers, was probably a good thing. Returned to Australia after the war and was decommissioned and scuttled off Sydney Heads as a result of the Washington Naval treaty. Heres a link to to report done on the wreck recently for a bit of interest http://www.environment.nsw.gov.au/resources/heritagebranch/heritage/media/hmasaustraliawreckinspectionrpt.pdf The kit itself is good starting point and I've run a work in progress on it here http://www.britmodeller.com/forums/index.php?/topic/234944212-1700-hmas-australia/ But on with the pics Bit pic heavy sorry, I got a bit carried away. She's not perfect but I have learned a lot building her. Thanks once again for everyones help with the build and I hope you like the finished product. Cheers Callum2 points
-
Well I've been making the most of being stuck inside because of the rain... This is the obsolete Airfix Spitfire Mk.I (old tool ofc) and I had a bash at converting it. I admit, it is some what crude, however, it looks the part Modifications; Sanded all the raised panel lines and filled the panel trenches around the engine, The curved front canopy came from Airfix's XIX, the "un-blown" slidey bit and the rear bit (very technical) were thermoformed, The two blade prop was built from scratch, The rudder was altered, Undercarriage legs from the Heller XVI and the wheels had the spokes filled in, Scratch built tail skid, Cockpit interior had a control column and belts added, Pitot tubes came from bit of metal. Paint; Overall Hu90 after which I blended in various shades of greens and yellows to give the dirty zinc chromate look, Control surfaces painted with Hu11 for aluminium dope, The airscrew was painted with Citadel Snakebite Leather and given and oil wash, The cowl was painted with Citadel Chainmail Decals all came from spares other than the exhausts which were printed by myself (My thanks to Rick Brown for the jpeg). I think thats enough talking... Cheers, Ben.2 points
-
Built OOB, Testors MM paints. Build thread: http://www.zone-five.net/showthread.php?t=247062 points
-
So your plan is to wait until you have proved that aircraft is outdated, then fob off the Navy with it? You weren't part of the Air Ministry in the mid-30s, were you? Joking aside, the FAA already had their own dog of a turret fighter (the Blackburn Roc), which made the Defiant look like an F-16. I doubt they'd have been too interested in another go!2 points
-
Sprayed the boot topping and masked off, then got into building the bridge and funnel. Painted the funnel stripe and cap then masked them off. I've got some more etch to add before the grey can be sprayed, then it's a lot of careful cutting off of the flightdeck netting in prep for the etched parts. Just had to do a quick dry fit to see how big this thing is going to be, Oh yeah, I've also built up the 8" turrets in prep for the fitting of the Master gun barrels.2 points
-
update on Belfast,still tons to do2 points
-
Here she is, my second build completed. Despite the often frustrating fit and the amount of fettling that needed doing it looks pretty good to me. There were mistakes made along the way, some were fixed, some weren't. At times I wished I hadn't started it but in the end it was a very positive experience. Would I make another one? Definately, but not yet, I have to get started on the Mig 15 to go with it. Thanks to all who watched and commented.2 points
-
You're getting the hang of this Seafire lark Col. She's another good'un mate. Hey Beard,a Griffon VI with a Mk.V rudder at the other end of it?,that would be a real handful. I doubt that it'd have anywhere near enough authority for yaw control,the "pointy" was only just enough.2 points
-
Finished the Revell P-26a - build thread here - http://www.britmodeller.com/forums/index.php?/topic/234946388-172-revell-boeing-p-26a-peashooter/page-12 points
-
AFAIK, all the XIIs had pointy rudders, the V based airframes had fixed tail wheels, the VIII based ones had retractable tail wheels. Nice job on the XV Col, theres a lot to like about this, I need to get off my backside & get one of these as I already have the Almark decals & I like that scheme, especially now I've seen it on yours. Steve.2 points
-
My old man gave me one crucial piece of advice..."Never ask, boy. The xxxxxxxx always tell you no". That's been my mantra all my 61 years! Martin2 points
-
Yes please.The Spitfire is for conversion to a Seafire 1b.2 points
-
Saab J29A/B Tunnan 1:72 Tarangus The Saab 29 Tunnan (barrel) was the second jet fighter to enter service with the Swedish Flygvapnet. It followed on from the Saab 21R, which was actually a jet-powered development of a piston-engined design. In common with other jet aircraft developed in the late 1940s, it was originally designed with a straight wing. However, by the time the prototype was in development, captured German research information was available and this convinced the Swedes to adopt a swept wing configuration instead. The Tunnan was powered by a licence built version of the De Havilland Ghost engine used in the British Venom fighter bomber and Comet airliner. Despite its ungainly appearance, the Tunnan enjoyed a reputation as a fast, agile aircraft with good all-round visibility. Following its first flight at the hands of British test pilot Bob Moore in 1948, it enjoyed a long and successful service life, with the final examples remaining in service as target tugs until 1974. As a fighter, it equipped both the Swedish and Austrian air forces and saw combat during UN peacekeeping operations in the Republic of Congo in the 1960s. A total of 661 examples were produced, making it the most widely produced Saab aircraft in history. The Saab Tunnan has been kitted a couple of times before in this scale by Heller and Matchbox. Both kits were of their time, with the Matchbox kit featuring the broad panel lines that (not entirely fairly) defined the brand. Now Swedish aviation enthusiasts and model producers Tarangus have given us a brand new limited-run kit with resin parts. In contrast to the Heller and Matchbox kits, this new kit represents the early model without the notch in the wing that characterised the later Tunnans. The kit is packed into an end-opening box containing 45 parts moulded in glossy grey and clear plastic as well as a handful of resin parts. The kit looks pretty good on the sprue, and although it lacks the spit and polish of a kit from, say, Hasegawa, it reminds me of a kit by one of the Czech manufacturers such as Sword. Surface structures are made up of fine, recessed lines and fasteners. Construction starts with a reasonably well detailed multi-media cockpit, made up of a plastic floor/rear bulkhead, control column, rudder pedals, instrument panel and starboard sidewall. The seat is made of resin and is pretty nicely detailed, but there are no harnesses moulded in place, which is a shame. The instrument panel features raised detail and a separate resin gunsight. The overall impression is of a well detailed and suitably busy cockpit and the only improvement I could suggest would be the addition of a set of photo etched harnesses. Before the fuselage halves can be joined, there is more resin to fiddle with. The large main gear bays are cast in resin and feature some nice raised detail. The engine air intake is also cast in resin, which means no fiddly seams to clean up. The nose gear bay is plastic, as is the jet exhaust. The instructions suggest that nose weight will be a good idea, but not how much. Fortunately there should be enough room in the portly Tunnan's forward fuselage to cram enough weight in. The wings are moulded with separate upper and lower surfaces, with ailerons and flaps are all moulded in place. Nevertheless, surface details are nicely depicted and there are small indentations to help you locate the underwing pylons. The horizontal tail is moulded as a single, solid part which slots onto the vertical tail via a notch which runs from the swept leading edge to the front of the rudder. The landing gear is quite nicely detailed. Each wheel is split vertically and the distinction between wheel and tyre is pretty clear. The only fly in the ointment is the presence of a number of small raise marks which appear to be flaws in the mould. The canopy is moulded in two parts so that it can be posed in the open position if desired. It is thin and clear without much in the way of noticeable diffraction. Ordnance comes in the form of two drop tanks. Separate muzzles for the cannon barrels are provided, although they look as though they might be a little fiddly to fit in place. Three decal options are provided, which is pretty good for a kit of this size: F8 yellow J (serial number 29368) F8 Wing at Barkarby, Stockholm; F22 white G (serial number 29440) F22 wing, Swedish United Nations Forces in Kongo; and F13 red M (serial number 29303) F13 wing, Norrkoping. All aircraft are finished in overall aluminium with various colourful touches. Red M is the most striking of the three schemes as it features distinctive black bands and dayglo orange wingtips. The decals themselves are very nicely printed and feature a full range of stencils as well as the main markings for each aircraft. Conclusion Although this is a limited run kit, provided there are no surprises in terms of fit and finish it should prove to be an improvement on earlier kits of this type. The level of detail is pretty good and it looks accurate to my eye. Overall, this is a nice kit which should build up into a pleasing model. Recommended. Review sample courtesy of1 point
-
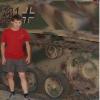
Hi Beautiful people. I managed to finish this fantastic kit from Zvezda finally. Been working on this for too long. I spent quite some time on the net trying to narrow down which colours I should chose. I almost did the one from the box art but I didn't like it and I found myself drawing toward the one I saw on Prime Portal - the one with (NATO??!!)Black , Tan and dark green. The scenario is for this gal to be just dirty on the wheels and lower parts from driving around on the range, either on training or for demonstrations. I didn't even put on black smoke pigments on the gun as well to further emphasis the point it was just driving around. I purposely didn't put on any kind of oil spillage nor chipping as everybody knows vehicles like these are kept very well maintained. I didn't really had any hiccup with this kit however. The kit goes on really well and love every bit of the steps in building it. I'm vary satisfied with what I did, albeit it could look better but stil, I'm happy. But enough chit-chat .... Its time for the photos - And Closing the curtain with a bang - as usual - More Photos and more details on the build can be found on my blog- http://modeller-innovation.blogspot.co.uk/2013/08/135-zvezda-t-90.html I know I still have a long way to go to be classed as one of the masters and I won't stop until I reach that kind of level. Thank you guys for always supporting me. Thank you dear readers Until Next time. Thanks in advance for any feed back you guys might have.1 point
-
Hello !! I show you my AFV vehicles. The kits are from Dragon. Take a look please PZ III H Afrika! Thanks for watching!1 point
-
Hello All, I'm going to be building the Frog Westland Wyvern: The kit has side consoles, floor, seat (or throne?), stick, instrument panel, nice wheels and detail on the inside of the undercarriage doors - pretty fancy for a kit from 1970! However, Trumpeter did a newer and more detailed version recently and the rules is the rules... I am intending to detail the cockpit and wheel wells, do some light scribing and possibly drop the flaps. My main objective is to do a decent paint job and make the Sky/EDSG scheme look less slab-like than it normally does in my hands. The decals are a tad yellowed and I don't think I will see much full sunlight in the next few months, so I may re-print some of the letters and numbers. Well, can't sit here typing - there's modelling to do! Thanks for looking, Adrian1 point
-
Now I'm starving, and will save this recipe for future use. Thank you Nigel . The Dalek's coming along a treat, too!1 point
-
If you go through this thread it should cover most issues, if not drop me a line. The kits are pretty much the same.1 point
-
Stay with it Mish,that's looking the business1 point
-
Thanks for that Dan, that was the one! You have done some amazing work on your build, especially that 1022 radar array. I am apprehensive about that one, but it needs to be done. Safe to say, I forgot to move the main funnel vents over to port, your photo shows they are well over aren't they? My photo of the small vents on my earlier post also showed that one had fallen out, so it has been replaced. My next concern was the catwalks. The kit has some large cut outs where the supplied mouldings go and the fit was pretty good, but etch is a bit thinner than the plastic so there is a large gap if you fit the etch. I was not sure how I was going to tackle this area. My solution was to razor saw off the location tabs for the plastic bits and CA them to the etch, after thinning them a bit. Next up was to remove the bulwarks from the plastic bit and stick them to the etch too. Again I used Glu'n'Glaze first then thin CA and ended up with This fitted quite well into the slots, but did bow downwards a little at first so a little trimming was needed then all was well. I turned Lusty upside down and rested it on a flat area and then fitted the 8 catwalk supports underneath with G'n'G and thin CA. This also helped level the catwalk so more thin CA was fishing lined into the joins and I hope it stays! I am just waiting for some of these catwalks to be accidentally removed during construction as there are quite a lot of them and take up quite a bit of the hull surround. I want to get them on before I do the superstructure as I have a relatively flat flight deck at the moment. I did the stern catwalk first as I thought that doing a small one first would be good practice for the rest. I need to try and tidy up the location points now too, they are a bit rough. The etch does look so much better than the original plastic parts but there is only so much that can be moulded in that medium. I know this is not as good or involved as some of the other builds of Illustrious (or Ark Royal), but thanks again everyone. I am thoroughly enjoying the model now I have got over my earlier issues and still hope to do it justice. All the best, Ray1 point
-
Real modelling. Excellent result. BB1 point
-
Of course, having bought the paint specially for this build, and having lots left over, I suppose I am just going to have to build some more FAA birds just to use it up. [sigh]. Life is hard...1 point
-
Hope so! That looks superb!1 point
-
I agree Stephen. It should be left to the aftermarket fraternity and those with the skill to cut plastic. Got to say that the shots above do suggest this is going to be a cracking kit. Really do think that I'll try and get one of these to do the 57 FIS I'm still planning.1 point
-
A couple of additional pics after adding wing-walks and anti glare panel.1 point
-
definitely the Humbrol red.1 point
-
Well done Russ you've done it again, another very nice build, congratulations. RR1 point
-
Welcome Adrian! I had to look twice, thought the blob in the seat was a pilot....err, no, wait...1 point
-
Ordered two from there and was impressed for the money, just used some sticky foil pieces 10mmx10mm to cover over the fixing screws slots, just to make sure no dust can get in. Colin1 point
-
I never tire of seeing Phantoms, especially well made examples like this. Nice one Russ. Mal1 point
-
Looks very nice, & I see now why the underwing airbrakes are that exact shape...1 point
-
The ground locks were removed once the jets were BF'd and towed onto the line. They were re-fitted once the jet was AF'd ready to be put to bed.1 point
-
Ex-FAAWAFU there's some of that in my Sherpa WIP if its any help to you Not much of a description though, just the odd picture http://www.britmodeller.com/forums/index.php?/topic/234933280-scratching-out-a-sherpa/page-2 and http://www.britmodeller.com/forums/index.php?/topic/234933280-scratching-out-a-sherpa/page-3 Hope this helps Er Steve I dont know if you noticed but we're suffering a trainer drought out here catch up at work? Pshaw... b1 point
-
Thats beautiful work.1 point
-
Curtiss Seamew with the FAA 1944. 1/48 scale, Czech Models kit with scatch built undercarriage markings from the spares box. WIP here http://www.britmodeller.com/forums/index.php?/topic/234945783-faa-curtiss-seamew-148-8thoct-finished/1 point
-
Many thanks for the kind words and interest I've got the flight engineer's rear bulkhead completed this evening. I must confess it's not 100% accurate as the door isn't there on the real aircraft (well, I've done a fair bit of reading and it seems it was there on the very early aircraft but was quickly removed in service.) I didn't want to just leave a gaping hole where the walkway is and have to add shed loads of extra detail to the fuselage interior further back. Call me lazy, but... The chap who gave me the model had made a start on the shape of the bulkhead so I knew the shape was right, and I then added the extra details to bring it to life, once again from Evergreen and plastic card, as well as some items from the spares box. I can't guarantee all details are correct as I couldn't find any pictures of a MkII Halifax in this area - all pictures I found on the net were of the MkIII but I presume they're similar. Here's an 'under construction' picture before paint. The penny gives an idea of the size of the pieces required for a heavy bomber in 1/32nd scale: And after paint and a little light weathering: I made the dials themselves by drilling plastic card, backing it, spraying it black and then scratching the dial detail on with a needle. When I add a drop of PVA to their faces they'll pass just fine. Here is the bulkhead in situ: Total time to make this one piece was about 6 hours... but that's what building models such as this is all about! I'm off to make more interior bulkheads now and if anyone is interested I'll show how I get (reasonably) accurate bulkheads in my next update. Tom1 point
-
oh yeah!!!!! now I think of it imagine if Heinkel had managed to dream up a B-36 size aircraft before the Americans and got it into service!! A Zwilling Grief with 8 engines (in 4 pods, got the twin engine issue sorted out) with extra Junkers Jumo 004's pods mounted on each wingtip for extra power!!!! Loaded with either Hs-293's to take out the convoys as they left the US or A bombs!!! ok think I klnow what i'm building now!!!1 point
-
Yes there is. I have seen these drawings in a P-38 book. They aren't much detailed, but they give you the drawings how the 6 concept would have looked. I don't have it with me at the moment. But it was quite a large book (A3 format) with about 100 pages. The book is from a range of books. I have it bonded with six other type of planes. I believe this is the book. http://www.ebay.com/itm/P-38-Lightning-by-Outlet-Book-Company-Staff-and-Random-House-Value-Publishing-/131012286894#ht_25wt_1142 And I have also found the drawings. take a look here. http://www.secretprojects.co.uk/forum/index.php?topic=1639.30 Cheers,1 point
-
There is hope...1 point
-
I've learned with someone so I think it is fair if I teach what I know! Sometimes it's nice to try some "scratch" but only "sometimes"... Thanks mate! 1/144??? You are crazy... Guys, Stay tuned updates soon...1 point
-
Olivier, Thanks mate! Few updates: I'm pretty happy with the results!!!1 point
-
1 point


.thumb.jpg.7a01d8b1929350b9124abee30c008ca9.jpg)


.thumb.jpg.ba34a9f6ddce411193946dbdcc7b5fe8.jpg)


This leaderboard is set to London/GMT+01:00