
Leaderboard


Popular Content
Showing content with the highest reputation on 09/10/13 in Posts
-
Good evening, trust everyone is well.. Been busy since my last update but only now has any real progress come together. Work started on the centre wing section, I've hit it with some salmon primer as I want to try some worn effects with the salmon peeking through the light grey underside colour in the wheel wells, I've filled the wedge shaped slot on each side with some thick plastic card, this has been trimmed flush now but I still need to mask around it and finish with some super glue filler and a quick sand, On the engine I added some detail to the front cylinders using fuse wire, I wrapped it around a brush handle a few times and simply snipped of sections to fit in the holes I'd drilled, Gear reduction housing with the Barracuda replacement parts placed on top, The front cylinder bank was painted (twice coz I xxxxxx ) Citadel Boltgun metal whilst the rear one on the left was done with Chainmail the idea being that the rear one will maybe just show up a little lurking towards the rear of the cowling, I washed them both with Klear (maybe it's future, I can't remember which we have in the UK and I ain't gettin up to go look) tinted with some black acrylic paint, With push rods added, My original Idea was to wire this ignition harness using fishing line and some 0.5 brass tube in 1mm lengths as little clips like this, Squish the brass tube for this, Nice idea but the lines not thick enough, maybe ill use it in my normal 1/48. I ended up using 5amp fuse wire, too thick to go through my 'clip' but probably still to thin, gonna have to do though, Started, Finished, I'm still undecided on building with open or closed cowl flaps, the back of the open cowls is one area of this kit that could do with extra detail. Thanks for looking chaps and as ever all comments are very welcome, Cheers...4 points
-
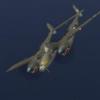
I've spent 2 years in this project. Loads of fun but loads of grey hairs too. For WIP Pics: http://www.britmodeller.com/forums/index.php?/topic/234908155-sea-harrier-fa2-airfix-148/ Please, feel free to comment!3 points
-
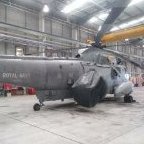
Wessex HAS1 815 Naval Air Squadron, HMS Ark Royal, 1962 Frog / Novo 1/72 kit This one was in the attic for more years than I can remember. What I can remember is buying the Frog kit when I was at school in the mid 60s and rushing home to built it. That one’s long gone now, and this build is based on the Novo version. This was almost an OOB type of build despite the age of the moulds – I decided not to re-scribe for once and to do a very limited interior re-furb. I added a bit of detail to the main and tail rotor hubs but that was about it really. Finish is Extracolour RAF Blue Grey and Humbrol Gloss Yellow over a Halfords white primer base, with a top coat of Humbrol satin varnish. Decals were based on a couple of old Modeldecal sheets, but roundels and ‘Royal Navy’ were replaced with more recent decals as the originals had yellowed just a bit too much to use.3 points
-
This is my Trumpeter 1/48 Westland Wyvern S.4 built for the FAA GB, but since I rarely build an aircraft I thought I'd post it here too. Nice build with few problems that weren't made by me. WIP HERE3 points
-
Here is my 1/72 Revell Bearcat F8F-1. I used a vacu-form canopy and decals by Starfighter. I also replaced the guns with metal ones made from the tubes you get off glue pots. Cheers Ian3 points
-
If you don't like "what-it's", turn back now. I bought this kit not knowing what I wanted to do. I looked at the aftermarket decals but couldn't decide on any so. I decided to throw a curve. With 787's being built here in Charleston now I decided to do kind of a tribute. They share the field with Charleston AFB and the 437th AW so I decided Boeing would give one to them, just had to be taxied across to be delivered. I used the C-17 decals from the Revell kit and the only grey I had. Windows and doors are from Rib Hobby Decals in China and they went on very well. The kit went together well with just minor sanding and putty. A satin clear coat covers everything. So, here's some pics, hope you like it. Chris3 points
-
2 points
-
Hi After my Wing to wing with a Spitfire experience, I decided that I wanted to build a model of MH434 and the Dragon Rapide on which I flew. The Spitfire was a doddle, but the Heller/Airfix Dragon Rapide has fought me and I have decided to call a truce with it, although the rigging is incomplete! I sprayed it Humbrol 15 Midnight Blue and used Xtradecal sheets for the white stripes and registration letters. I used EZ Line and superglue with accelerator for the rigging, but unfortunately, the accelerator reacted with the blue paint, causing a few choice words to be uttered and the towel to be thrown in! I might re-visit it at some stage, but I am sick of the sight of it at the moment! Sorry for the picture quality, but they were taken in low light yesterday morning before heading off to Old Warden.2 points
-
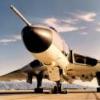
The Scimitar has been taken out of front line service and fully replaced by Scimitar 2 so I thought I would produce one with bar armour before I have a crack at the 2.2 points
-
The question for you Nigel is: can you live with it as it is now, or is it going to insidiously, and unrelentingly, gnaw away, cell by cell, at your very insides, nay, your very essence... - every - second - of - every - minute - of - every - day ? I think I know the answer to that one, oh yes I do!2 points
-
I use the tape as a sort of non-stick surface to roll the Milliput out on, I started doing this ages ago after it kept having problems with it sticking to my cutting mat. I smear a tiny drop of water on the tape so I can remove the milliput easily after cutting and shaping. It's also quick and clean to dispose of afterwards. You'd be amazed at the difference the 15 minutes makes to shaping it. I had a couple of goes right after rolling it out but it just looked like thin grooves in the surface, after letting it sit for a while I got the nice cushioned effect. But you must keep the blade wet and just press it into the surface, if it's dry or you try cutting the grooves the Milliput tends to stick to the blade and it goes very wrong. I must have tried a dozen times before I got it right. I hope this helps.2 points
-
Hi As an antidote to my long-drawn out and frustrating Heller/Airfix Dragon Rapide, I wanted a quick and simple build, so literally threw this little one together last Sunday. The kit was courtesy of Parabat and the decals were courtesy of Dave T - thanks guys! This is the second one I have built and I am much happier with the result (except for my pants masking on the canopy, which even a toothpick couldn't remedy!) Sorry for the picture quality, but I took them in low-light before heading off to Old Warden yesterday.2 points
-
This is the Czech models kit with a scatch built undercarriage. WIP here http://www.britmodeller.com/forums/index.php?/topic/234945783-faa-curtiss-seamew-148-8thoct-finished/ It was like going back to the old days of modelling and very rewarding when finished. Hope you like. Thanks for looking ...........comments are always welcome.2 points
-
Cracking on with my B720…………have to say, it reminds me of a matchbox kit, but without the trenches - much more subtle panel lines on this one…… SD2 points
-
Total entertainment this thread is It has to be one of the best modelling threads on the net........ Well i reckon it is AND it has food pics All we need is some scotch or Gluiness a nude and we have covered all bases Cheers2 points
-
Hi Ho! I have had to rethink my plans owing to life and a deluge of information on the Ansaldo which is going to become a major project. So..... My lovely wife is having to zip off back to the UK on Friday for a week at short notice and to break this bad news to me she came home armed with the latest boxing of Airfix's venerable Grumman Duck (#A30301). So this will be my first entry if Enzo allows it! IIRC it was first released in 1967(?) and has been superseded (if that is the right term) by Pavla. The only problem is that, rivets, legless gunners, flash, ejector pins, etc., it still looks like a rather nice kit. So Enzo, can I? I have been looking through the Mike Grant books and think I will do a small amount of improvement, as illustrated in his books, and leave it at that. I have a lovely wife... Happy modelling, Christian the Married and Exiled to Africa2 points
-
Thank you Gentlemen. The cockpit is ready: More to come.2 points
-
Thanks Stu and Si. More progress made over the last few days. Cockpit is now glued to fuselage side, Tail wheel section and internal detail painted, A couple of pieces at the front end help keep everything fitting perfectly, Fuselage half's together, the next two pictures give a good indication of the fantastic fit of this kit, And this last one with the remaining nose inserts, lovely fit Thanks again for looking and I appreciate any feedback. Till next time, Cheers...2 points
-
Hi whilst i was looking on the internet for new kits to build i came across a 1/18 scale friction powered toy transit van and my mind started thinking, as i work for a tool hire company in hampshire i wondered if i would be able to build the vehicle that i drive for them, a transit flatbed with tail lift, never scratch built anything before so this was a new experience for me. This is what i started with. It offered a few challenges as the wheels on this are not correct and also a flatbed has twin rear wheels with the outside wheels inverted to give a deep dish look. anyway the idea was too totally dismantle this toy down to the bare bones and then start rebuilding by cutting the back away from the cab then building a chassis to the new cab allowing me to start building the flatbed. anyway after 6 months this is what i ended up with. Everything from the cab backwards was hand made from Plasticard,brass and aluminium As i said earlier the wheels offered its own challenge, i managed to find these wheels online and i was very lucky to get them as they are the right size and look and the guy i got them from only had 8 so i bought the 6 i needed, the back of the wheel was flattened down and then 1mm brass nuts where added to get the look i needed. All the lights are hand made as is the towing hook. Displaying the winch and shackle. The toy was originally a left hand hand drive so i converted it over to uk spec. The front wing indicators were added as the standard transit does not have them. The interior was resprayed and seat belts added along with a fire extinguisher. The tail lift was built from the original and the easiest way was to build each component to make it look right. I managed to make the tail lift work but only to fold down not to slide in the runners. Just a few bandstands added. Closeup of the tai lift switch and winch cable connector. Closeup of loading strap. Just to finish it of i had this case custom made and the silver plaque engraved to display it, to my knowledge this is the only one i have ever seen, perhaps i am the first. i hope you all like it as i do i am very proud of what i have managed to achieve. thank you all for looking and any comments are welcome.1 point
-
Hi Beautiful people. I managed to finish this fantastic kit from Zvezda finally. Been working on this for too long. I spent quite some time on the net trying to narrow down which colours I should chose. I almost did the one from the box art but I didn't like it and I found myself drawing toward the one I saw on Prime Portal - the one with (NATO??!!)Black , Tan and dark green. The scenario is for this gal to be just dirty on the wheels and lower parts from driving around on the range, either on training or for demonstrations. I didn't even put on black smoke pigments on the gun as well to further emphasis the point it was just driving around. I purposely didn't put on any kind of oil spillage nor chipping as everybody knows vehicles like these are kept very well maintained. I didn't really had any hiccup with this kit however. The kit goes on really well and love every bit of the steps in building it. I'm vary satisfied with what I did, albeit it could look better but stil, I'm happy. But enough chit-chat .... Its time for the photos - And Closing the curtain with a bang - as usual - More Photos and more details on the build can be found on my blog- http://modeller-innovation.blogspot.co.uk/2013/08/135-zvezda-t-90.html I know I still have a long way to go to be classed as one of the masters and I won't stop until I reach that kind of level. Thank you guys for always supporting me. Thank you dear readers Until Next time. Thanks in advance for any feed back you guys might have.1 point
-
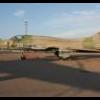
I realise I'm starting this rather late, but time just hasn't been available. Still I'll give it a go. It's the 1:350 USS Saratoga from Trumpeter, and I've added rather a lot of additional aircraft, Master barrels and Toms Modelworks etch set. She will be built as she was in the 30's with her airwing component in yellow wing schemes.1 point
-
- I had shown this model almost finished in WIP, now the things are done...... - It was a tough job,but the bottles in the back ground have helped........1 point
-
To mark the Fifth Anniversary of Freightdog taking over Pegasus Models and Blue Max Productions, I am offering a very special 50% discount on Pegasus and Blue items valid from today until midnight on Friday 11th October. This applies to all Pegasus Models and Blue Max kits or decals on my website, except items that are already discounted in the offers section (so no further discount to what is shown on offer items, but you can stick them in the same order). Minimum order to obtain the discount is £20.00 worth of non-offer items. To access the discount simply add the coupon code 'PEG50' on the payment information page when you check out. Code expires at midnight GMT on Friday. Thanks! Colin http://www.freightdogmodels.co.uk1 point
-
Dalek Diary - Day 39 Going back to this morning I arose bright and early even though it was a work day, if I started early I could then finish early and get more Dalek construction underway: Tonight, after the major rethink on the neck I did a few simple housekeeping jobs. I used an old ships hull from the spares box to better jig the dome in readiness for primer application: With the neck thrown back into the melting pot, the primer ready parts were moved back to standby position: Using narrow masking tape I measuered the neck circumference so that mesh of the correct dimensions could be ordered tomorrow: 325 by 14mm - 3 off, as it happens. I sanded the filler on the top of the neck: The sinkage issue was cured: At 90 deg there was a hollow but it was at least consistent and is good enough for this hidden area: I then had a hunt through the decal spares box looking for a white ring for the eye lens and writing for the on / off switch. There was nothing for that but these candidates could be punched out to make an eye ring: The winning contestant was this set of roundels from the recent Airfx Club Me 109 set: I almost forgot to include a picture of my dinner. Here it is; conchigliette (little shells) pasta with ragu sauce, I was going to use conchiglie (sea shells) pasta as I thought I had some but I did not and this was the nearest substitute to hand I am still thinking about the neck rods, I was not mentally fortified enough tonight to tackle them but I will get the fine mesh on order tomorrow. Bye for now, Nigel1 point
-
The thicker frames go on first, then each of the stringers were cut individually and added between them. Time consuming but worth it. Cheers, Tom1 point
-
Messerschmitt Me 163 climbing under rocker power to intercept US bombers got into a dogfight with a Mosquito FB VI, which it shot down. Can't remember the details, though. Douglas Dauntless engaged two Mitsubishi A6M5's shooting down one and driving the other off. WW1 Sopwith Pup brought down a Zeppelin by dropping bombs onto it after expending all its ammunition. Also in WW1, the leading Bristol Fighter ace crew accounted for 25 and a half enemy machines, including Albatros DV's, Fokker DR1's and I believe, a least one DVII.1 point
-
What a lovely looking model, no sign of any agro. Would be nice to see it along side MH434 Roger1 point
-
Hope your alright spike. Cheers for the help.1 point
-
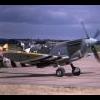
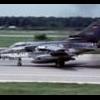
Hi all, Just thought i'd share these latest builds which are all from Trumpeter in 1:48. All were painted with Acrylic paints applied by brush and given a simple wash of Oils. The first is Supermarine's F.1 Attacker. This kit was fairly simple to build with PE parts and basic decals, which apply well. The end result is a great looking kit of an early classic British Jet. The cockpit. Ready for painting. Final pictures. The next offering from Trumpeter is the Supermarine Spiteful. Finally Supermarine Sea Fang. All three kits were great builds although I felt the Spiteful was a little too basic, however it is an essential addition to any collection showing the evolution of either the Spitfire or British Aircraft. Thanks for looking and feel free to leave CC and feedback. Many thanks Tommy1 point
-
Does anyone do a 1/72 decal sheet of this scheme? Fantastic build !1 point
-
Very nice job, will be visiting this thread often as I have started working on the same theme in 1:48. No room or monies for the big brother.1 point
-
really nice enzo good stuff1 point
-
Nice indeed your KINGs!1 point
-
Two new boxing announced - ref. 64103 - Sikorski CH-34 US Army rescue - ref. 64104 - Sikorski HH-34J USAF Combat rescue Source: http://www.modelrectifier.com/all-brands/Gallery-Models.asp V.P.1 point
-
We both think you are a bit of a loony, hearing strange voices in your head and all of that.1 point
-
Seems ludicrous, doesn't it - a government agency responsible for spending (or misspending) millions of the taxpayers' hard-earned quid hassling a decal manufacturer about reproducing artwork that was probably created unofficially by one of the groundcrew, although I suppose things are more closely controlled these days when it comes to aircraft decorations. On the subject of copyright violation, copying decals seems a smaller problem than downloading copyrighted text from on-line sites that specialize in that sort of thing. Maybe I'd feel differently if I was a decal designer, though. John1 point
-
Offffffffffffff-caps to you. Junglies rule the world and beyond.1 point
-
Wow, stunning paint job on the cockpit1 point
-
Your quality never fades Russ!1 point
-
well done, and glad to find you are back doing what you enjoy, you have hit most of the problem areas that all of us have had previously. you are also on the right track in terms of fixing those faults - ask fellow modellers. the best way of finding solutions is to have a go at trying different things, i sometimes get a bit of plasticard and test a theory, costs nothing, but sure is better than wrecking a kit. i'm sure that you will find a solution for your paint supply problem, there must be car shops out where you are. at least you will be warmer spraying out there than it's going to be over here soon.1 point
-
Thanks chaps, Colin................just name the date, my bag's packed !! I also decided to get the worst part of the build out of the way today...cutting out the fuselage bay walls and fitting the bays. Not perfect as a couple of the doors edges chipped but that'll be easily dealt with using the dreaded filler. Cutting through the skin thin resin and then the fibre glass and cloth proved 'interesting' and time consuming. Thankfully the bays fit well...in fact they are a very tight fit...how the Hell you were supposed to assemble and paint all this inside the fuselage is beyond me ! I really must remember to fit the new bomb bay in BEFORE the gear bays as there will be no access to locating it later !!! The scene of the crime........ Ha, just noticed that I've pushed the rear bay in the wrong way around.......pay attention Melchett !!1 point
-
Great start. With regard to the paint bleed I spray over the edge of the masking tape very lightly to seal the edges. Looking forward to seeing this progress. Roger1 point
-
Will, you can't call them robots!!! If there were any serious Gundam fans around they'd possibly explode if you don't refer to them as 'Mecha'. Or is it mobile suits? Seriously though, I used to be quite interested and watched a few movies and series, mainly because I would watch anything Japanese to try and assist my efforts to learn a bit of the language. The mobile suits (robots) are really cool and the fight sequences were usually pretty entertaining too. I liked how it was kind of navies in space. The spaceships were the aircraft carriers and the mobile suits were the aircraft if you like. It was of course aimed at kids but I often felt it could easily have been produced as a more mature sci-fi. Dazz, I'm afraid you've lost me with the Ka bit, so I don't know. If I get chance to dig out the kit I'll take a look.1 point
-
Well I just can't help myself finally heres Australia with her teeth Still a couple more details and a clear matt coat but the next time you see her will be in Ready For Inspection. Thanks to everyone whos followed me and offered advice and encourage. My posts are warts an all and some of you must just shake your heads at some of the pics, but the warts bring comments and PM'S that point out to ways fix mistakes. So a big thank you to everybody, please keep it coming as it won't be long and I'll be trying my hand at scratchbuilding But before that, once Australia vacates the top of the paints jars I have a lady in waiting who I have very badly neglected. I know Stevehnz is pretty keen to be seeing her again. The big C is comin mate, I promise and no guitar, lost in the post masts( I have about 20 of the damm things now) is gonna stop me from finishing. Best regards Callum1 point
-
This is looking nigh on perfect fab work on all the etch stuff of course but the extras make it extra special thanks for sharing the build, I loved it b1 point
-
Thanks for the comments folks, work proceeds as ever! I trim the lines off, and cover the holes with Milliput; Then sand it down and smooth it all off (and wreck my lozenge painting!. Should have left it until later to paint it). Spray over the dark green on the outer panels, and then start doing new lozenges; Then blend it all back in. I think I went a touch darker that I would have liked, but you only get 1 chance to do it; Finally we get to do the outer wing lozenge decals; Now for the last bit, the gun and flare racks.I'm going to paint all 3 racks and choose the one I like best as they add a dash of colour. The gun has an etched metal jacket and Wingnuts provide a nice liitle piece to roll it around. It's very simple and makes the job a doddle; Not far to go to completion now. Thanks for looking. John1 point
-
Thank you so much for making us aware. I had a PM from Ronnie out of the blue on the 1st August, basically because he and I had exchanged a few conversations in the past, often when he was disposing of his collection and if I thought he might have got his prices out of phase with 'the market' and I had a dig around first to see what this or that was being sold for so that he could adjust his price if he thought he should. Prior to that we had a couple of exchanges on various matters when he had been selling bits and pieces. I was quite moved that he should go to the trouble to contact me and I replied in as positive a way as I could but he was obviously very well aware of his situation but said that he would continue to keep his eye on all of use here. So its sad when his journey comes to an end but, as I said to him, 'Blue Skies' and we can be grateful that he has been part of our hobby. Simon1 point
-
And in the absence of any personal modelling progress on this GB (I plan to start at the weekend, honest!) here are some more 1/72md oldies of mine: Revell Ju88C-6 nachtjager Heller Spitfire Mk XVI Airfix 'Grand Slam' Lancaster Matchbox Spitfire Mk IX Matchbox Mosquito PR.XVI The last two are what's been preventing me from participating on this GB thus far! regards, Martin1 point
-
I am currently (actually this weekend) designing decals for BOAC Hudsons and Lodestars. This is however for the aircraft that operated on the service to Sweden. The Special Hobby kit has a fairly good fuselage for the Lodestar, but it has wings for the Hudson. A set of photo etched wing extensions to convert the wings to Lodestar wings are included, but these don't really work. For my next model (I have built the SH kit once) I will use wings from the Academy Ventura, but with engine nacelles and wheel wells from the SH Lodestar/Hudson. Nils1 point
-
Thank you guys for your comments! Hi all! After spending more than 40 days looking for information and constructing the Akagi admiral bridge is finally done..Far from being spacious, the bridge could hardly hold 6-7 officers back in 1941..Very little will be seen after the roof will be cemented but as in aeroplane cockpits this is also the case with this cramped little space!... Cheers to all! Panagiotis.1 point


This leaderboard is set to London/GMT+01:00