
Leaderboard


Popular Content
Showing content with the highest reputation on 09/10/13 in all areas
-
Good evening, trust everyone is well.. Been busy since my last update but only now has any real progress come together. Work started on the centre wing section, I've hit it with some salmon primer as I want to try some worn effects with the salmon peeking through the light grey underside colour in the wheel wells, I've filled the wedge shaped slot on each side with some thick plastic card, this has been trimmed flush now but I still need to mask around it and finish with some super glue filler and a quick sand, On the engine I added some detail to the front cylinders using fuse wire, I wrapped it around a brush handle a few times and simply snipped of sections to fit in the holes I'd drilled, Gear reduction housing with the Barracuda replacement parts placed on top, The front cylinder bank was painted (twice coz I xxxxxx ) Citadel Boltgun metal whilst the rear one on the left was done with Chainmail the idea being that the rear one will maybe just show up a little lurking towards the rear of the cowling, I washed them both with Klear (maybe it's future, I can't remember which we have in the UK and I ain't gettin up to go look) tinted with some black acrylic paint, With push rods added, My original Idea was to wire this ignition harness using fishing line and some 0.5 brass tube in 1mm lengths as little clips like this, Squish the brass tube for this, Nice idea but the lines not thick enough, maybe ill use it in my normal 1/48. I ended up using 5amp fuse wire, too thick to go through my 'clip' but probably still to thin, gonna have to do though, Started, Finished, I'm still undecided on building with open or closed cowl flaps, the back of the open cowls is one area of this kit that could do with extra detail. Thanks for looking chaps and as ever all comments are very welcome, Cheers...4 points
-
I've spent 2 years in this project. Loads of fun but loads of grey hairs too. For WIP Pics: http://www.britmodeller.com/forums/index.php?/topic/234908155-sea-harrier-fa2-airfix-148/ Please, feel free to comment!3 points
-
Wessex HAS1 815 Naval Air Squadron, HMS Ark Royal, 1962 Frog / Novo 1/72 kit This one was in the attic for more years than I can remember. What I can remember is buying the Frog kit when I was at school in the mid 60s and rushing home to built it. That one’s long gone now, and this build is based on the Novo version. This was almost an OOB type of build despite the age of the moulds – I decided not to re-scribe for once and to do a very limited interior re-furb. I added a bit of detail to the main and tail rotor hubs but that was about it really. Finish is Extracolour RAF Blue Grey and Humbrol Gloss Yellow over a Halfords white primer base, with a top coat of Humbrol satin varnish. Decals were based on a couple of old Modeldecal sheets, but roundels and ‘Royal Navy’ were replaced with more recent decals as the originals had yellowed just a bit too much to use.3 points
-
This is my Trumpeter 1/48 Westland Wyvern S.4 built for the FAA GB, but since I rarely build an aircraft I thought I'd post it here too. Nice build with few problems that weren't made by me. WIP HERE3 points
-
Here is my 1/72 Revell Bearcat F8F-1. I used a vacu-form canopy and decals by Starfighter. I also replaced the guns with metal ones made from the tubes you get off glue pots. Cheers Ian3 points
-
If you don't like "what-it's", turn back now. I bought this kit not knowing what I wanted to do. I looked at the aftermarket decals but couldn't decide on any so. I decided to throw a curve. With 787's being built here in Charleston now I decided to do kind of a tribute. They share the field with Charleston AFB and the 437th AW so I decided Boeing would give one to them, just had to be taxied across to be delivered. I used the C-17 decals from the Revell kit and the only grey I had. Windows and doors are from Rib Hobby Decals in China and they went on very well. The kit went together well with just minor sanding and putty. A satin clear coat covers everything. So, here's some pics, hope you like it. Chris3 points
-
2 points
-
Hi After my Wing to wing with a Spitfire experience, I decided that I wanted to build a model of MH434 and the Dragon Rapide on which I flew. The Spitfire was a doddle, but the Heller/Airfix Dragon Rapide has fought me and I have decided to call a truce with it, although the rigging is incomplete! I sprayed it Humbrol 15 Midnight Blue and used Xtradecal sheets for the white stripes and registration letters. I used EZ Line and superglue with accelerator for the rigging, but unfortunately, the accelerator reacted with the blue paint, causing a few choice words to be uttered and the towel to be thrown in! I might re-visit it at some stage, but I am sick of the sight of it at the moment! Sorry for the picture quality, but they were taken in low light yesterday morning before heading off to Old Warden.2 points
-
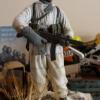
The Scimitar has been taken out of front line service and fully replaced by Scimitar 2 so I thought I would produce one with bar armour before I have a crack at the 2.2 points
-
The question for you Nigel is: can you live with it as it is now, or is it going to insidiously, and unrelentingly, gnaw away, cell by cell, at your very insides, nay, your very essence... - every - second - of - every - minute - of - every - day ? I think I know the answer to that one, oh yes I do!2 points
-
I use the tape as a sort of non-stick surface to roll the Milliput out on, I started doing this ages ago after it kept having problems with it sticking to my cutting mat. I smear a tiny drop of water on the tape so I can remove the milliput easily after cutting and shaping. It's also quick and clean to dispose of afterwards. You'd be amazed at the difference the 15 minutes makes to shaping it. I had a couple of goes right after rolling it out but it just looked like thin grooves in the surface, after letting it sit for a while I got the nice cushioned effect. But you must keep the blade wet and just press it into the surface, if it's dry or you try cutting the grooves the Milliput tends to stick to the blade and it goes very wrong. I must have tried a dozen times before I got it right. I hope this helps.2 points
-
Hi As an antidote to my long-drawn out and frustrating Heller/Airfix Dragon Rapide, I wanted a quick and simple build, so literally threw this little one together last Sunday. The kit was courtesy of Parabat and the decals were courtesy of Dave T - thanks guys! This is the second one I have built and I am much happier with the result (except for my pants masking on the canopy, which even a toothpick couldn't remedy!) Sorry for the picture quality, but I took them in low-light before heading off to Old Warden yesterday.2 points
-
This is the Czech models kit with a scatch built undercarriage. WIP here http://www.britmodeller.com/forums/index.php?/topic/234945783-faa-curtiss-seamew-148-8thoct-finished/ It was like going back to the old days of modelling and very rewarding when finished. Hope you like. Thanks for looking ...........comments are always welcome.2 points
-
Cracking on with my B720…………have to say, it reminds me of a matchbox kit, but without the trenches - much more subtle panel lines on this one…… SD2 points
-
Total entertainment this thread is It has to be one of the best modelling threads on the net........ Well i reckon it is AND it has food pics All we need is some scotch or Gluiness a nude and we have covered all bases Cheers2 points
-
Hi Ho! I have had to rethink my plans owing to life and a deluge of information on the Ansaldo which is going to become a major project. So..... My lovely wife is having to zip off back to the UK on Friday for a week at short notice and to break this bad news to me she came home armed with the latest boxing of Airfix's venerable Grumman Duck (#A30301). So this will be my first entry if Enzo allows it! IIRC it was first released in 1967(?) and has been superseded (if that is the right term) by Pavla. The only problem is that, rivets, legless gunners, flash, ejector pins, etc., it still looks like a rather nice kit. So Enzo, can I? I have been looking through the Mike Grant books and think I will do a small amount of improvement, as illustrated in his books, and leave it at that. I have a lovely wife... Happy modelling, Christian the Married and Exiled to Africa2 points
-
Thank you Gentlemen. The cockpit is ready: More to come.2 points
-
Thanks Stu and Si. More progress made over the last few days. Cockpit is now glued to fuselage side, Tail wheel section and internal detail painted, A couple of pieces at the front end help keep everything fitting perfectly, Fuselage half's together, the next two pictures give a good indication of the fantastic fit of this kit, And this last one with the remaining nose inserts, lovely fit Thanks again for looking and I appreciate any feedback. Till next time, Cheers...2 points
-
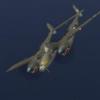
T4284 joined 58 Sqn in November 1940 but its front line operational time was quite short. It suffered a landing accident on its return from a mission on the 23rd December of that year in poor visibility when it undershot on approach to Linton-On Ouse. Following repairs, it was moved to 10 OTU based at Abingdon and given the codes ZG-E as it is represented here. From there, it moved to 19 OTU based at Kinloss where it seen it's flying time out before becoming a ground instructional airframe. The only picture I've managed to find of it is this one (courtesy of www.luchtoorlog.be): I decided to build the Frog kit as oppose to the Fly one as neither have particularly good clear parts. As my skills making new transparancies is quite limited, the Falcon set for the Frog kit swung it for me. I've tried to make most of the corrections known, although I didn't touch the wing root trailing edges. Big thanks to John Aero for the replacement props and General Melchie (Andy) for the Revell Lancaster rear turret which was fettled to look like an FN4 found on the Whitley. Really enjoyed the build and whilst not perfect, I'm happy with what I've achieved. If you've not seen the build, you can see it HERE if you have the patience ! The decals are part of the Xtradecal set which whilst they went on well, the colours are somewhat suspect. The MSG codes were actually light grey so they had to be touched up. The white in the fuselage roundel should probably be darker too, I might tackle this with a black pastel brushing. Enough waffling, here's the pics ! Thanks for looking. Neil1 point
-
Hasegawa : SH-3H SeaKing US Navy : 1/48 Scale Build link : http://genessis-models.websitetoolbox.com/post/hasegawa-sh3h-seaking-us-navy-148-scale-6520776?trail=15#8 Final Reveals link : http://www.genessis-models.co.uk/gallery/seaking.html1 point
-
Hi all, a couple of Twin Seat "Twin Tails" Brian.1 point
-
Could you dremel off the misaligned bar to a flat surface and then create a new one from plasticard/strip or resin?1 point
-
No need to appologise for your English skills Rudolf as I can find no fault with it. I hope your son makes a full recovery and I'm glad you are able to model as a break from such a stressful situation.1 point
-
Hi all, Some of you may have followed my build in the work in progress forum. If not have a look to see how this model progressed, it's under the same title name as this post, sorry not sure how to add links. Anyway it was the Airfix 1-24 Spitfire Mk Vb pretty much out of the box, apart from some random wire rammed in the engine! Upon reflection I now see how this could have been a little more realistic. I do have another 2 of these to build and so they may get better treatment! Overall though I have loved EVERY moment of making this kit and hope you have enjoyed it too. Added 15 May 2012: I forgot to add this information assuming people would have seen it on the WIP thread, but incase you didn't I think it is quite important and the reason I choose the a/c I did: I have chosen to depict a Mk5b in D-Day invasion markings, after starting to research this I reaslised it was going to prove difficult to find any pictures of any Mk 5b's with these markings, apart from 1 or 2 examples. Wanting to make my life more difficult I didn't want to do those! After much researching I have found a donor which will represent and be in memory to F/O Ernest Russell Lyon of 234 Sqn who flew Spitfire Mk 5b serial number AR343, coded AZ-W. As far as I can make out this had the pointer of the 2 Spit propeller cones and does'nt appear to have the armoured windscreen. It wore D-Day stripes and was lost on 27 July 1944 after being hit by flak over Lorrient and seen to crash near Ploemeur, the pilot was reported missing presumed dead. Info on F/O Ernest Russell Lyon can be found at: http://en.wikipedia.org/wiki/Ernest_Russell_Lyon . If any of my research appears incorrect to any of you, please feel free to correct me. Now for the pictures, which incidentally I have enjoyed as much as the build. Some have been photoshopped but only adding borders or making them B&W, no changes have been made to the model which appears as it is sat infront of me. Luckily it was sunny today so I got some good pictures. Many thanks for your time and feel free to leave comments etc. Tommy1 point
-
HMS Daring in Melbourne Australia for the 100th Anniversary of the Royal Australian Navy. Pics thanks to Norman.1 point
-
I say go for it Davros err i mean Nigel Just stay up a bit longer at night Cheers mate Wots for tea this evening ?1 point
-
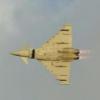
The Typhoon is workman like and effective , and the Tempest is beautiful.. that is all!1 point
-
Well... I didn't think this topic could get any more over-the-top and ridiculous than the initial posts, but it has... and it's so much the better for it1 point
-
He/she/it (is gender applicable?) without a doubt will be the best Dalek in the universe. With due respect to all other Daleks !1 point
-
Colin, I suspect you may be a fellow evil genius, we should hook up for lunch sometime and discuss schemes.1 point
-
To me this is still a visible area. As you say it will only be visible when the dome is off but in the Nigey scheme of things it should still recieve (almost) as much loving care and attention as the true exterior.1 point
-
1 point
-
Herewith my 3, primed and ready for the paintshop. In order, I'll do Olympic (my favourite B720 scheme), Monarch and probably Ariana, but undecided about that one. Will try for some better shots when the light improves, to give a better idea of the detail. SD1 point
-
Last few, These next few were actually in the car park, with more across a dividing fence. And finally the enterance. This really is an interesting museum and there are several building in which there are exhibits which although some are unusual the lighting in them is not so good to take pictures in. Behind what the museum calls the main exhibition hangar is a shed that is full of engines from WW1 right through to modern day jets. Although my wife and I only spent a morning there it is possible that more time could be spent there, discovering much more. Thanks for looking and any comments are gratefully received.1 point
-
That masking (in the size the canopy appears on my screen) is just beautiful. Knowing it´s magnified at least 4x it becomes incredible! And you´re doing two of these kits? V-P1 point
-
The engine ready, made of more than 100 parts scratched and some "borrowed" from spare box:1 point
-
Hehe, my mistake, the big machines aren't robots in the strict sense of being autonomous. But they do have some robot-like features - don't the mobile suits have a sort of learning combat computer which interprets the pilots wishes? So not fully autonomous, but not fully pilot-controlled either. I dunno, big metal men duff up other big metal men while the pilots shout excitingly stilted dialogue. IN SPACE! Fun times practically guaranteed. Will1 point
-
It is rumour control, but... Although there's the obvious point that 12 is not, traditionally, a fighter squadron, the rules for numberplates being assigned come into play. Yes, they have been rather abused over the years - the Grob squadrons should not, for instance, have reserve numberplates assigned to them, and nor should the Tucano squadrons (now squadron) have been granted reserve numberplates - but they do have a great deal of relevance still. Put simply, when the GR4 goes, 12 becomes the most senior numberplate not assigned to a squadron. The rules are clear that the most senior available numberplate will be assigned to the next squadron formed which requires a numberplate. So if 12 disbands on the GR4 before the next Typhoon squadron forms, then 12 should be the assigned numberplate. Although 4 Sqn's numberplate is assigned to a reserve unit, it is deemed to be in use (under the way things are currently done), so won't go to the Typhoon squadron unless the approach adopted is changed. As I've observed before, the complicating factor may be 2 Squadron, which is the RAF's most senior unit. If it appears to the Air Force Board that the RAF is unlikely to form a second RAF-numberplated F-35 squadron for some time after the withdrawal of the GR4, then I suspect that they will rejig things to re-equip 2 with the Typhoon so as to ensure its continued existence. Even allowing for the doom and gloom about the F-35, though, I suspect that at some point in the next four or five years, we'll have the announcement that another batch of F-35s is to be bought, and some of these will go to replace the GR4 with 2 Sqn. As this question seems to crop up quite frequently - the twelve most senior numberplates on the most recently available list (i.e. released into the public domain), in order are: 2, 1, 6, 4, 14, 24, 8, 60, 5, 12, 70 and 3. 60's time as the Reserve 'plate for DHFS will have pushed it down the list, though, and a rough calculation suggests that it'll be no higher than 12th on the latest list, and possibly have gone down a little more, possibly as low as the mid-20s. The first numberplate traditionally associated with the fighter role that is dormant is 25 (13th in the list) followed by 20, 23, 111, 43,19 and 74 (although I have a feeling that 20 and 23 may have swapped places thanks to the former's time as the Harrier OCU which won't count towards the accumulated service which makes up almost all of the consideration of seniority). 92 Squadron is currently in reserve, without aircraft, but might - at a push - be considered not to be in use, in which case it gets in ahead of 74 but behind 19 in that list - which, I hasten to add, is not the most up-to-date one, but an extrapolation from the one most recently released into the public domain. I strongly suspect that unless the RAF tinkers with the size of squadrons (making them smaller to increase the number of squadrons, probably with a Sqn Ldr in command as part of a restructured Expeditionary Air Wing were that to happen), then we are unlikely to see the re-emergence of any of the above noted fighter numberplates. Although often talked about, the administrative issues associated with increasing the number of flying squadrons to achieve the return of more historic numberplates seems - as far as I can tell - to be an interesting idea that is also unlikely to happen in the near future.1 point
-
Great build Russ, and a superb paint job, Sean1 point
-
Nicely painted cockpit, will stay tuned. Cheers...1 point
-
Amazing job done here! Looks great for me. Nice finish!1 point
-
Get thee behind me, Satan! SWMBO is just about buying into an Ark model which is a couple of feet long... 2 metres is a question I am not even going to ask! But I wish you the best of luck with it! The hull is together. Warping not TOO horrible, though I had to use several feet of tape, a number of clamps and a lot of brute force to get it that way! Having had it recommended by a friend, I am using Slaters Mek-Pak liquid poly cement for the plastic bits of this build, for the first time, and I have to say so far it is the business; easy to apply with a brush, flows / capillaries (if that's a word!) well, and really grips, and quickly - and it the last point which is key with this beast. The acid test is whether the flight deck fits, and after some dry testing it looks OK (though it too is going to need yards of tape and a lot of patience, especially to remove the final bends from the starboard side. The stern / transom fits perfectly, though, and the hull sits pretty happily on the underwater section (which I am not planning to use), so the general shape is not too far off now. Starboard warping visible in this shot (the sides definitely shouldn't bend outwards just by the forward-most hull cut-out!). Note also the beginnings of a (dry-fitted) fo'c'sle deck, gradually being fettled into shape before detailing.1 point
-
I spoke to Hannants once about some 1/48 Bentwaters Hog decals they produced, and asked if they were planning to scale them up to 1/32? The reply was no. I asked if I could scale them up myself and print a set for my own use. The answer was yes. A polite request sometimes provides the required answer. I still haven't done it, but if needs be when I build the, kit, at least I have the go ahead.1 point
-
No aplogies necessary. Yes, the radiators are bigger. I took them from the relevant Griffon-engined kits. In fact there is a thread on BM about this. I bent the truth a little when I said "just built", as they are all still awaiting finishing touches. I'll probably apply those as part of the KUTA GB. But the thread will give the gist of the build. http://www.britmodeller.com/forums/index.php?/topic/234936590-theres-more-than-one-way-to-skin-a-cat/1 point
-
That looks great,...looking forward to seeing more photos of the finished model, Cheers Tony O1 point
-
The hasegawa skyhawks are great little kits Russ. Lovely job Bruce1 point
-
DSG is about right, and the Admiralty had put a stop to the black & white checks on the tails and would only allow black ones..... We (801) had one or two little mishaps on that trip, this was one of them....The Pilot claimed the ship had moved to Stbd as he was landing, (yeah, right!).....Notice the Roo' under the cockpit... Perhaps you may like to have one of these onboard as well.......... Would make a change from the overall grey of our cabs................. Smudge PS Are you coming to the VL show??1 point
-
Sorry to hear this. I had the briefest of contacts with Ronnie when I bought a couple of kits from him. He showed real generosity with the extras he included for nothing to someone he didn't know. Nice bloke, this is how I'll remember him Chris1 point
-
HI, Thought you might need a russian injection to spice up your modelling,so to go with the missile platform,and the energia stack ,heres one of the versions by anigrand,of the soviet test shuttles,so heres a quick look at the kit bits... the contents.... not a great deal of bits... came with 2 sets of decals, the tiles are in sections the instruction bits... small cockpit assembly,doubt you would be able to see much through the windows? engines options for struts to attach to the stack kit,or a wheels down version... to the bits well the payload comes in one bit,but it can be split and open,and comes with the two arms... the wings,and reveals for the wheels.... as you can see the payload bay has a bit of detail in it,so you can display it open? a rough idea of what it will look like? little bits of detail,engine bells,wheels etc windows tail fin a bit of detail etched on... cockpit section,scope for putting a bit of detail in? side engines... engines and attachment struts... dont know wether you can see,there is a bit of detail on the leading edges etc the back,you can see the difference between this and the us one alongside the revell shuttle for comparison... and if your really adventurous,you could try it on the anigrand stack,here for a look... thanks for looking,what russian space kit next? cheers Don1 point
-
yeah, I remember my Uncle telling me that they used to do that when they were in Malaya ( during the crisis, not when they were on holiday ) I guess you could say it was p*****g down! whats the story with the loo roles?1 point


This leaderboard is set to London/GMT+01:00