
Leaderboard


Popular Content
Showing content with the highest reputation on 02/10/13 in Posts
-
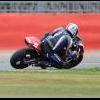
Well the epic build is over - this took forever ( 6 months ), with a 3 month break while I had to source a replacement canopy. Built using the Kit decals (which weren't great being honest), Aires Cockpit which is nice and fits, Eduard External etch set which has some great bits and some pointless bits, Orion vinyl MDC cord which is great if very fiddly and finally HGW Fabric Remove Before Flight tags which are nice. It's a nice kit, but is very fiddly in parts and a bit of a pain to assemble. It's a nice size for a 1/32nd Jet though, not too big. Painted with Gunze Aqueous throughout, weathered with oils and true-earth and pigments. build thread is available here Comments welcomed as always Peter3 points
-
As featured in this month's edition of Scale Aircraft Modelling. Cheers3 points
-
This is based on the Model Airways kit, with a lot of scratch built updates. The kit doesn't have a metal cowling, or the 'hump' over the guns that gives the aircraft it's name, so I designed these in 3dsMax, and had them printed out. All the rigging points and cockpit instruments were designed in Photoshop and then made into a photo etch sheet. It took me about 10 month in total, and I'll admit to rushing some things towards the end. But I had fun making it, and I'll probably make another some day. The work in progress thread is here: http://www.britmodeller.com/forums/index.php?/topic/234925788-116-sopwith-camel/2 points
-
I have not put much on recently, but I thought I would submit this. It is a conversion using the 1980’s Airfix Lancaster and the DB Lincoln conversion in resin and vacform. I cannot remember what year I bought the conversion, but it must have been in the mid 80’s, so I thought I ought to get round to building it. In the conversion there are new wingtips, engines and nose in resin. A vacformed fuselage extension and outer engine nacelles with clear vacformed mid upper and rear gun turrets, bomb aimers transparency and H2S radome are also provided. The props had to be sourced separately if I recall and came from Aeroclub. Anything else had to be scratch built. This conversion turned out to be a bit of a challenge, partly of my own making. Most of the resin parts fit quite well, but apart from the wing tips everything is a butt joint and I used epoxy resin adhesives and for some parts I used P38 car body filler to fill joints for added strength. I had problems with two areas. The vacformed plug to extend the fuselage is too long (Guess how I found that out!) and the plastic on the outer engine nacelles is very thin. I used the original engine nacelles as a support for the resin engine nacelles and ended up using quite a lot of scrap plastic and filler to give some strength to vacform nacelles. The rudders were kit items with extensions from plastic card and the gun turrets had scratch built interiors suggestive of the real thing. Aeroclub provided the 20mm cannon and the rear 0.5 Brownings came from a Revell B17 being built as a RAF 100 Group Fortress III. The interior had detail added and as so much of the exterior detail was sanded off, a fair amount of secribing of panel lines etc was done. The new taller astrodome was plug moulded and Colin at Freightdog released his treaded Lancaster/Lincoln wheels at jus the right time. They fit well and I think were the easiest part of the build. The markings are from a Kits at War sheet for a 57 Sqn aircraft in 1950 finished in Medium Ses Grey and Black. Apparently at that time nose guns were not fitted (seems to be supported by the photos). The model lacks the exhaust stains which are always present on any photo of Lincolns and will be added shortly.2 points
-
Hi everyone, Seeing as I`ve finished shifts this week, thought I`d show you some pic`s I`ve took today of a build I did a while back HiPMs 1/48 Mig-19 OOB build except for some work in the undercarriage bays which I detailed with some bits of copper wire as they were completely blank in the kit also carved quite a bit off the rear canopy fairing to get the open canopy to sit better quite a bit of Araldite and filler went into this one but I`m happy with the result Always liked the `Buck Rogers` comic strip look of these and might give the Trumpeter one a go one day Hope you enjoy, Thanks for looking, Russ2 points
-
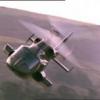
Two linked models leaving the bench this month, both Vought Corsairs, both Hasegawa 1/72, but also very different: The first is a Chance Vought F-4U Corsair Mk.1, from the British Delegation at Roosevelt Field, New York in the late summer of 1943. and alongside the rest of my growing fleet of Corsairs: The second is the A-7A Corsair, as used by VA153 US Navy onboard the USS ORISKANY on Yankee Station in the Gulf of Tonkin toward the end of the Vietnam war. And alongside the Crusader that I built last month: FredT2 points
-
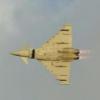
Hey folks, this is the Airfix kit built with few modifications (shortened legs, replaced scissor links, wheels, cannon barrels, added spent ammo chutes and ammo boxes, FuG16/25 antennas, etc.); a build report should appear soon in Model Airplane Int. Cheers Libor2 points
-
Hi everyone! Well, three and a half days of work and my latest model is ready to be used in a new book that will be released by ADH. As you can see, I elected to build the excellent Tamiya 1/72 Mosquito FB.VI, creating a full, step by step guide to it's construction and painting, along the way. Normally, I wouldn't have spent so little time on a model, but I needed a 1/72 build and so had to tackle this one at the last minute. These are some teaser shots that give some idea of the finish that I've applied to this model and the quality of the other models that will feature in what I hope will be, a very exciting addition to ADH's roster of modelling titles. I hope you like it! Spence2 points
-
2 points
-
Hi The Boeing 767 is a nice plane, especially in the British Airways livery! Revell released there 767 in the 1990's, they included RB211's as an extra sprue. They released one of there kits with British Airways decals, the Gulf Air boxing. The Revell 767 has been out of production for a while now, but it's still knocking about. Your best bet to do a British Airways Boeing 767-300 is finding one of the Revell 767's as they have the correct engines, RB211's. The zvezda boxing doesn't have RB211's, it has CF6's. These power nearly every other 767 in the sky! So your choices are buying a revell 767 and building it out of the box or buying the Zvezda kit and after market engines. Braz models have released 1/144 RB211's for the 767. They are solid resin and will need a bit of work, but they are RB211's. You cant use or even mod the engines from the Zvezda, they are completely different! The RB211's on the 747-400 have different pylons i think. If you can get a set of Revell 767 RB211's you can use them on the zvezda kit, just fill the pylon gap on the wing and glue it on! Anyone who has built a Revell 767 with CF6's will have a spare set of RB211's. The Engines CF6's RB211's The engines are different shapes. The Kits Revell Boxing's Ace Models Boxing Zvezda Boxing Braz Engines http://www.hannants.co.uk/product/BZ4006 Liveries You have plenty of choice when it comes to doing a British Airways Boeing 767-300. You have the Landor, ethnic and chatham tails. Chatham The Current Livery The current livery (with the crest) The Crest - RichW will supply them Ethnic Tails Old Livery Landor Old Livery The Decals Several decal makers have provided the decals for you. If you want the Chatham livery you have a choice between Two Six and RichW. If you want the Landor livery you have Two Six again. Two Six - http://www.twosixdecals.co.uk/epages/62035508.sf/en_GB/?ObjectPath=/Shops/62035508/Products/STS44178 & http://www.twosixdecals.co.uk/epages/62035508.sf/en_GB/?ObjectPath=/Shops/62035508/Products/STS44186 RichW - http://www.britmodeller.com/forums/index.php?/user/7216-richw/ Boeing 767-200! For a short period in the 1990's US Airways operated a couple 767-200's in British Airways livery, these have the CF6 engines, so the engines in the Zvezda and Revell kit will be okay. Although it will require you to shorten the fuselage. The instructions are available on Draw Decals website. The decals for the 767-200 are also available by Draw Decals Draw Decals - http://www.shopdrawdecal.com/ProductDetails.asp?ProductCode=44-767-36 Other RB211 767 Options If you decide against doing a British Airways bird there are a couple other 767 operators who have RB211's. These are China Yunnan, China Eastern, Mongolian Airlines, Orient Thai, Saudi Arabian (Leased) and Qantas. Hope this all helps! Thanks Bradley2 points
-
I greet all. This is my last model, set Eduard 1/48 profipack. Fast and simple job.2 points
-
Moi? Mistreat a Dalek? Only starved when it came on board. Well treated since...2 points
-
If you had not guessed already I am planning to fill the neck with resin and again I want to reduce the amount of resin used by partially filling the cavities with old sprue. Here is most of my collection: I did a fit check and found the boxing round the switch was fouling the next section. The easiest way to fix this was to razor saw throught the stepped sector here and scribe and cut out the sides: After the long side was scribed through the surplus could be clicked off: This white hexagonal section sprue does not find many other uses and having flat sides should help it nest together so I chose to use that for the prefilling operation: About an hour and a half later I had had a lot of fun and created this amazing 3D sprue jigsaw: I could then glue on the next neck segment: I used superglue, with hindsight I wished I had used epoxy. One of the main reasons for filling with resin is to get this depression round the neck ring filled solid to better match reality. The other big reason is the stabilise the socket, giving it great strength: After about 20 minutes I checked the joint and it was not quite coming together and the glue was still quite liquid. I have to confess that I had slightly overfilled with sprue and it was preventing the segments form coming together (epoxy would have set by now and it would have sorted the issue). So I placed four milk bottle tops in the centre of the top segment to act as packers and applied this insane clamping arrangement: Incredibly it actually worked. With the glue set I did some electrical continuity tests and marked up what wires were for which LED: You will be relieved to hear that on the electrical front all was fine. In readyness for the forthcoming resin operation this flexible tripod system was devised: I had thought I was out of disposable containers but in court I remembered I had these plastic cups in the kitchen oddments drawer, ideal: There then followed the now routine resin mixing operation. I did not use too much filler to ensure the resin was nice and runny. I mixed exactly the same quantity as for the second base and dome filling affair, one scoup of resin to half a scoup of hardener: I then filled using one of my disposable syringes. When the resin was all used up it had just started to appear round the cut out for the switch box. If I mixed and added any more it would start to overflow so this is a good place to stop resin type operations for the day: Here you can make out the level of the dark resin: And no leaks, I think this is a good result. Here you can see the resin just starting to make an appearance around the socket: Looking for other jobs to do, I filled the dome pivot tube with black Milliput, I was going to make it flat but decided that a pan headed profile would look better, I will sand this to a better shape when it is set: The surplus Milliput (rule of modelling - there is always surplus Milliput) was used to make a better seal around the switch wires: My current thinking is that I should get a small tube of silicone sealant for all those potential leak paths before resin operations resume tomorrow. I did quite a bit of electronic work as well but the photos seem to have disappeared, you have had a lucky escape there. Bye for now, Nigel2 points
-
Glad you liked the Halibag model fella`s and cheers for saying so,.....it probably looks better on a photo than `in the flesh'! I also meant to mention the Airborne Forces Halifax glider tugs from 38 Group which deployed to North Africa for the invasion of Sicily as these had Mid Stone and Dark Earth upper surfaces too. Some had Tollerton Fairings and some had the new clear nose cone,.....and off the top of my head some may have had faired over nose gun turrets too? Compared to the Airborne Halibags used a year later, the Sicily ones were quite a rag tag bunch with different mods and most if not all had the triangular fins. I love the desert scheme on a bomber, such as the Wimpey seen here; and have plans to build a Ventura Mk.I in this scheme for a magazine article,....having found a lovely photo! All the best Tony O2 points
-
Hello Folks, Here is my second Hudson finished! Built straight from the box apart from the decals as the codes seemed incorrect and were replaced by some from the spares box instead. I have a feeling that the serial A16-123 my have been proved incorrect for this machine too, I`m still looking into it. Just like my recent RAF Hudson,.....this has to be one of the hardest kits that I have ever built and the eagle eyed amongst you will realise that some of the flap runners are missing,........the model has been sat on and off the shelf of doom for a couple of years and during that time these fragile parts have succumbed to the carpet monster who is unfortunately very prevalent in my house at the moment,,..or is it just my butter fingers? Anyway enough blurb,......it isn`t one of my best but here it is, warts and all,...my Aussie Hudson; [/url] I hope you like it and next up will be a couple of Vengeances,.....which I must crack on and finish, Cheers Tony O PS- Just realised that I lied,.....it isn`t straight from the box as the mid upper turret came from the Revell Halifax kit because it is a more accurate shape than the Italeri turret!2 points
-
Hi mates, Having not gained any additional common sense from my last resin build, I decided to jump head first into another! This time it's the oft-neglected subject of the Supermarine Scimitar in glorious 1:72 scale, courtesy of the master craftsmen from the Czech Republic, CMR. The Scimitar, of course, was the last fighter to wear the Supermarine name, and the direct descendent of the legendary Walrus, er, Spitfire from WWII. Project: Supermarine Scimitar F.1 Kit: Czech Master Resin (CMR) Supermarine Scimitar F.1 (kit number 221) Scale: 1:72 (The Gentleman's Scale - then why am I here?) Decals: From the kit, representing XD324, 158-R, aboard H.M.S. Ark Royal in June of 1965 Photoetch: Included with the kit, primarily for the cockpit, air brakes, antennae, and wing fold area Vacuform: Two copies included with the kit, and for once I only needed one! Paint: Gunze H333 Extra Dark Sea Grey, H331 Dark Sea Grey, H339 Engine Grey FS16081;Testors 2143 RLM 21 Semi-gloss White, 2038 FS36492, 1168 Flat White; Alclad 101 Aluminum, 115 Stainless Steel, 314 Klear Kote Flat, and a bunch I forgot about. Weathering: Primarily post shading to simulate paint fading and wear, and the assorted stains and hydraulic fluid/oil streaks. I applied a light gray wash to the white underside, and black to the EDSG topside. Improvements/Corrections Just to fix ham-fisted mistakes from bone-headed modeller. Build thread: Link Now that all that nonsense is over, let's see some photos! Edit: The eagle-eyed amongst us will now doubt notice that I've had a bit of a nap and forgotten to add the port wing probe! Yikes! Please read through all the comments towards the end of the thread, and you'll find a photo showing the mysterious appearance of said probe, in its proper place on the port wing. No, not a bit of Photoshop magic, just the silly modeller fixing his mistake! I shot the underside before adding the outer wings and wing braces, since I didn't think I could figure out a way to prop it up when everything was finished! I couldn't resist some shots with her FAA stablemates and with her wing probe attached (in the photo with the Gannet). These photos were originally added in response to posts in this thread, but I figured while I was editing this (to replace the links to Photobucket) I would include them up front as well. It's back to normal (i.e. plastic) for my next build, if you call trying to build a B-24 kit from 1965 normal. Have a look in the Obsolete Kit Group Build every now and then and see how it used to be. You'll never complain about a missing rivet again! Cheers, Bill1 point
-
Just finished a Gazelle I picked up cheap on fleabay, I've put a little detailing on such as the 'H' antenna - although the ventral anteena has fallen off !! First attempt at some scratch seat belts as well, quite enjoyed doing this I think helo's can be more challenging than fixed wing at times......all that glazing and masking !!! The grey camo colour may be a bit light as I had some difficulties with humbrol acrylics 127 - so used a tamiya MSG I had to hand(fading perhaps?) Main thing is I managed to put in enough lead to stop it tail sitting!!1 point
-
Ok, those of us of a certain age will remember the Space 1999 series of the mid seventies, and no doubt clamoured after the Dinky toy Eagle Transporter from the series. I certainly did, as it was and still is my all time favourite science fiction spacecraft. I was mildly surprised to find that the Dinky version was a lurid metallic green as opposed to the more conventional white of the prototype, but that didn't stop this seven year old having a whale of a time in the playground with it. A friend had the Eagle Freighter, which for some reason WAS white, and I was unsuccessful in getting him to swap his Freighter body for my Transporter body. A few years later when I started painting models, I gave my poor old Dinky toy a badly brushed coat of white Airfix enamel in an attempt to bring it closer to the TV version. Eventually it went west as did all my toys from my childhood, and I can't remember who it was passed on to. Fast forward a few decades, and idly perusing ebay one day I found quite a few Dinky Eagles for sale for spares or repair, and thought "why not?" From a couple of auctions I managed to gather enough useable parts to rebuid one Eagle. I actually had the idea of building a better replica with scratchbuilt parts, but as I've recently acquired an Airfix Eagle for an extortionate amount (and guess what's being reissued by Round 2 next month?!) I decided to leave the scratchbuilding for that. I decided to just refurbish a Dinky Eagle instead, but just like the one I wanted as a kid, rather than had. So, I started off with a pile of bits: Which I then soaked in Fairy Power Spray to get rid of the old chipped paint: Good stuff, eh? I gave the metal parts a good going over with white Halford's primer, and then a liberal coating of Halford's Appliance White, as I've heard good things about it and wanted to try it out: Remember I'm not going for accuracy here, or even originality - just giving it a good coating like it would have had in the factory: The engine cluster was given a spray of Plasticote Chrome from an aerosol can, which resembled the original chrome plating on these parts: The passenger pod was given a coat of Appliance White on top: ...and Halford's Satin Black on the underside, as per spec. All this so far and I haven't used my airbrush, only spray cans: With all the red plastic hardware added, it looked pretty original: The main body was then reassembled, as I couldn't resist seeing how it looked: But then I had to do a bit of masking for the cockpit windows: ...and I thought using the airbrush would be easiest for this: After that, the engine bells were added, and the refurb was complete: Ahh, that takes me back... Now, what's next..? Cheers, Dean1 point
-
http://www.dailymail.co.uk/news/article-2441319/The-man-keeps-Harrier-Jump-Jet-garden-Builder-spends-years-10-000-restoring-Falklands-plane-bought-eBay-telling-wife-first.html1 point
-
Hi all This is my first post on here and I have just got back into modelling after a 35 year break, due to my illness which keeps me firmly at home. The last time I actually built a model I didn't use any paint and was quite happy just gluing and putting the "stickers" on. I was only 10 at the time and didn't know any better I recently received a 1/24 scale Spitfire (Airfix) as a present but after inspecting the kit and seeing the amount of flash on it, I simply had to email Airfix and complain. As a result of this email, they kindly sent me a 1/48 BF109 kit and I was told it has been made using brand new tooling. So I decided to use this kit as a get to know my new airbrush and old skills and hoped they were still there. I tried out a whole bunch of new things, mainly from reading this forum and trolling Youtube. I used Micro Set and Sol for the first time, weathering using Pastels, Panel Line wash using oils, used my new Airbrush for the first time, you get the picture. The kit was totally free of flash and the fit was brilliant with only a hint of sanding required. After reading previous horror stories about Airfix kits and the state of the 1/24 kit in the loft, I expected the worst. Although there are a few things I could have done better and have learnt from my mistakes, overall I am pleased with my fist try using so many new skills. I am currently building a Hasegawa P-51D 1/32 and will show this in a week or so, hopefully my skills will have improved somewhat. All criticism and tips are welcome as I have firmly got the bug again and need to brush up on my skills.1 point
-
That's a very comprehensive response to a question Bradley. Nice to see someone going the extra mile to help out a fellow modeller. Well done Fella. Chris.1 point
-
acrylics would be easier to use ..1 point
-
Looks like a cool scheme. I will be watching your build with interest1 point
-
The Aircraft is RF 517, from what little infromation I have it was one of the aircraft detached to Tengah, Singapore for duties in connection with Firedog between March and July 1950 from Waddington1 point
-
Here are the pictures. Patrick1 point
-
US Navy MHU-191/M Munitions Transporter 1:32 VideoAviation The MHU-191/M is a bomb trolley used by the US Navy to transport two GBU-38 JDAMs from arsenal to the aircraft that are intending to use them. This kit is available in 1:32 at present, but I'm hopeful it will find its way to 1:48 in due course. Included in the white card box are three bags of resin and another containing a small decal sheet (not pictured). The bomb truck is built up from flesh coloured resin and should include two sets of wheels. My review sample however has a pair missing, so please check your package before stashing it. The lower bomb is cradled on a curved bracket, with a similar one completing the oval and permitting another to sit on top. Each part has rollers placed in recesses that support the bombs and stop them from rolling sideways, which would be no fun for anyone. The two cradles attach to the ladder chassis, and an L-shaped pull handle is attached to the front of the chassis. A bumper sits at the end of the handle, and two grab-handles and a brake lever form a T with the upright portion. A pair of figures are included with the set, and it's surprising how large they look compared to the more familiar (to me) 1:35. They are very well sculpted and have separate arms, all of which is in the same creamy flesh coloured resin. One is pulling, while the other pushes the trolley, and the instructions show them painted red, presumably for danger! Happily you also get a pair of bombs to fill your trolley, which some producers might not have included. They are nicely detailed and the dangerous part is covered with the rough ablative coating used on carriers that slows down the cook-off rate of the warheads in the event of a fire. The bombs have separate tail sections, GPS Antennae, and if you elect to use them, a DSU-33 Radar proximity sensor, which requires you to slice off the very tip of the nose. A separate diagram covers the painting of the bombs, and shows where the rings that show live (Yellow) or training (blue) round should go. The small decal sheet is designed for the trolley, and adds a large number of yellow markings that are dotted around the frame, as well as the serial number and some data plates on the handle. The trolley is painted gloss white with black handles, with orange or yellow rollers, but would undoubtedly become quite worn very quickly. Plenty of scope for weathering there! Conclusion A cool addition to any deck-side diorama, or just to have next to your 1:32 USN aircraft in the cabinet. You get a lot for your money, and hopefully yours will have all four wheels! Very highly recommended. Review sample courtesy of1 point
-
Nice work, particularly well finished.1 point
-
Thanks Val, much appreciated.1 point
-
Hello everyone! Okay, so this is the first model I've ever made and pretty much the first thing I've painted since I was 16.. It's the Airfix 1/72 starter spitfire kit. The model is brush painted since i don't have an airbrush. I was terrified at the prospect of painting a camo, but I'm pretty happy with the result. It's not been weathered since i couldn't find clear coat anywhere here. Wondering if i can do an oil wash over acrylic paint without giving it a clear coat. Anyway, on with the pics.. hope you guys like it. P.S.- still need to add the antenna wire.. That's about it.. All criticism is much appreciated..1 point
-
sure it wasnt the commander not the tank your interested in mate.. he he...1 point
-
fantastic build russ,looks great very nice paint and scheme and nice weathering1 point
-
Next year marks the 75th anniversary of the start of WW2 and the 100th anniversary of WW1. Whilst there are undoubtedly a number of modellers who are interested in the aircraft used in both conflicts, I don't think that, except for the 'icons' and regular 'good sellers' the is a huge market for the lesser known types in the wider community, and probably not in most of today's youth. I think that Airfix will continue to upgrade classics in 1/72, sadly this may exclude most of the lesser known types such as the Defiant, Blenheim, or even the Whitley. Anyone know how well the Revell Halifax sold? IMHO They will concentrate on popular types from this era. Moving onto larger scales they seem to have found a ready market in Cold War aircraft which will appeal to modellers of a certain age, and who remember seeing these at numerous air shows of 50s and 60s. They will also see a market for some of these in the smallest scales where colourful markings mean that Dad will persuade little Johnny not to have the £ mega bucks large scale version, but the cheaper smaller version -after all it is the same aircraft. I think we'll see some more early-mid Cold War jets in 1/48 and 1/72, and some models moved up and down scales -such as the Vampire T11 into 1/48, the Javelin into 1/72 (in bright RAE colours), and they might test the larger scale market with a Meteor - probably a Mk8. Peter1 point
-
Very nice Marauder and great scheme !1 point
-
Hi Pip, Yes definitely best removed! They represent a small flap that popped open to allow the flap actuators sufficient room to deploy the flaps and then closed back down once the flaps were selected up, flush to the surface of the wing. The actual structure is a flat metal plate that is hinged to rotate up and away from the actuator, so really nothing like the little cheese wedge supplied by Airfix! If you look in the same place on the XII you will see these panels engraved. As leaving the flaps down resulted in a CO's interview (i.e. bollocking) and a stiff financial penalty (buying a round in the mess), it was rare to see them open unless, i.e. the airframe was undergoing maintenance on the flaps or immediate area, etc. It always amuses me to see just how many wonderfully made models of the Spitfires have their flaps deployed but not the actuator or its little flap! Happy modelling, Christian the Married and Exiled to Africa (but today it is not raining!)1 point
-
I think I might make do with a broomstick and some duct tape for now1 point
-
But with RAF roundels...See - http://www.spyflight.co.uk/yar.htm which has one photo of an 'RAF' B-45. Also: http://i957.photobucket.com/albums/ae59/VIProds/RAFCrewsRB-45Cs.jpg1 point
-
....Nuff Said.1 point
-
OK, it's been a while since the last update. That's not to say I haven't been working on the ship. It goes with the territory that sometimes you look at a part you just made and know it could be better...happens a lot actually, but hey you learn, eh? Here's the binnacle. Not sure if it'll do...bit like a starved Dalek... I've also made a pair of 'elm tree pumps' haven't shot them yet. One thing you need a lot of on a ship is ringbolts. At this scale they're pretty small. So this is one way of making them. I've started working on the masts and the bowsprit/jib boom, lots of bits, lots of ringbolts. In this pic they-re being checked for the look of it and a reminder of the overall size of the model ...and here-s the mast top for the foremast. Came out pretty much as I'd hoped. The 'slats' are CA reinforced watercolour paper . easier to cut tiny strips from than wood! Ta for looking!1 point
-
Nick, that is amazing . I know for a fact that my wife will be overjoyed* when I tell her I know what I want to get for Christmas. What did the certification entail? * Not1 point
-
Oh yes, I need one NOW! Could you down size the tech to produce one that finds bits of models the carpet monster grabbed? Rick.1 point
-
I added the straps on the seat.1 point
-
You do realise, I trust, that in a few months they'll turn up on a Russian (or French) website as authentic WWII airframes and colour schemes?1 point
-
Yep! Looks awesome. Build is great...finish is great and the photos are great! Very well done1 point
-
Shoot ! Really got bogged down with this build. Still asking myself if I really needed to try and build three of them at the same time ? Did I really need to prove to myself that I can't multi-task ? Anyway, got a bit fed up with staring at three white fuselages on the work-bench, so I decided to give myself a KUTA and test drive my home-made decals on the CargOman -55 : Now I know where the demarcation line needs to go on the lower fuselage, I'll strip the decals off and put the replacements on when the paintwork is finished. Onward and upward, hey ? mike1 point
-
coming along beautifully Kev, I love this new kinda modelling Never tackled anything resin cast except the few bits I knocked up to make the Sherpas engines and sponsons from plastic padding b1 point
-
1/72 sentinel R1 .. thomas1 point
-
few in progress shots tonight. almost finished with weathering and about to start on the final details like glass and the radar array. i found out that the actual plane was based some miles from where i grew up, so that gives a nice touch to it. thanks for looking jw1 point
-
Thanks Hythe. I remember brush painting from when I was a kid. And the obligatory poly cement finger print on the canopy also.1 point
-
Finished1 point
-
Finished her this afternoon in the markings of WW150 “353/O” of 890 NAS on board HMS Ark Royal in 1956 More pictures, info and build thread here1 point


.thumb.jpg.d17ff607fc7e89ed057e63fcb6f2a888.jpg)


This leaderboard is set to London/GMT+01:00