
Leaderboard


Popular Content
Showing content with the highest reputation on 26/07/13 in all areas
-
Here is the final model in the wonderful current Airfix 1/48 Operation Herrick quartet - the Supcat HMT600 "Coyote" Tactical Support Vehicle (Light). I enjoyed this kit as much as the the other three. In my opinion, the only drawbacks with this kit are the inaccurate tyres and the working Jerry can holders, which suffered from some very obvious molding faults (some of the "cross-bars" are missing, requiring fabrication) and the extremely fiddly construction process that allow them to swing down. That aside, the construction process is straightforward and swift. I added towing eyes from the spares box and Jerry cans, oil drums and personal kit from the Tamiya Jerry Cans set . I used Tamiya tape for the towing strop, mud-guards and the webbing straps behind the front doors retaining the day-sacks. I primed the model with Alclad Black and used Humbrol #237 Acrylic as the top coat. After applying the minimal decals, I sprayed Winsor & Newton Matt Varnish, followed by a W&N Raw Umber Wash. Once the wash had dried, I applied a slurry of Mig Gulf War Pigment to the tyres and underside and then a dusting of pigment to other parts of the vehicle and load. In summary - well done Airfix! And finally, the quartet united!3 points
-
well this is a brief in progress tread, so far the airplane is almost done with the alclad, just need to finish the underside of the wings, then a will go on with the small details, here are a few pictures of how is turning out3 points
-
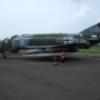
Greetings One and All Another one of my recent completed ones. This is the ICM 1.144 TU144. This was a nice kit with nice engraved external detail. The plastic was a bit bizzare as to me it resembled bacalite! From what I can remember it went together well but attention does need to be paid to the instructions! It was painted with Halfords appliance white and Halfords Polar grey which were recommended by other BMers and it seems to look ok to my untrained eye. The paints were accidently smuggled out of the UK in my shipping container when I moved from the UK to NS but I think I got away with it!! The one downside was the decals. They were pants, and crumbled when hit with water. The first cheat stripe on the rear was a mess and i ended up brush painting it. The other decals were treated to a coating of decal fix and they behaved after that. So here is my effort! And the offending decal area Cheers now Bob3 points
-
Hello again , recently arrived back from Mallorca to finish off this little kit. I received this kit for my 15th birthday in may and it has been sitting around for a while ,so i decided to build it (the obvious thing for me to do on a rainy day!) Unfortunatley the kit only took me 4 days to complete so i was not occupied for a huge amount of time . The paints are a mixture really , a humbrol white spray for the fuselage followed by the revell 'red' that was suggested in the kit. I decided to use acrylics for the wings (dont ask me why ! ) and masked by photocopying the decals. The kit had no fit issues and literally fell together , a bit of overweathering here and there but oh well.. it adds to the end effect, anyway on with the pictures ... messy fingers Cheers Tom2 points
-
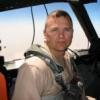
Hi Everyone Thought I`d take the opportunity to show you my very latest effort; Italeris 1/48 scale UH-1N Twin-Huey Finished to represent a Huey from the 20th Special Operations Squadron, The Green Hornets Who operated under the illusion of being a Psy-War Squadron but in fact dropped and supported Studies and Observation Group Commandos in Vietnam and often `Over the Fence` in Laos and Cambodia. The actual kit airframe is built mostly OOB with just some reworked aerial positions but added; CMK Miniguns with scratch built mounts and rocket pods from a Roden T-28 kit with modified kit gun mounts Sort of enjoy not having to bother with decals on these `Special Ops` subjects ( or just getting lazy ) Hope you enjoy looking at Cheers Russ2 points
-
Having now received the kit I can answer my own question and the answer is "No". I've got mixed feelings about this. I'm a little put out that the instructions tell me that if I want to a bomb load then I can buy the Support Set (which I have). But what about those people who wish to add the bombs but don't want, or have, a need for the vehicles? It's a pretty expensive do! I'll be doing a BI/III from the Dambuster kit as well, if I didn't already have some stuff in the loft to use then I'd be looking at either no bombs or having to buy another Support Set. Going down that route I'd have a set of vehicles, etc that would, probably, be no use to me. If Airfix are going to continue down this route Then I think they need to consider selling "weapons sets" i.e. just the bombs, etc. I envisage these might cost considerably less than the Support Set. I mean, when we get a new Wellington, Halifax and Stirling we are going to need an awful lot of bombs!2 points
-
That was my first thought too. It looks right. Bang on.2 points
-
Paint going on! underside finished and a coat of humbrol clear for decals,patchy effect will go when final spray of matt is applied only 1 coat of brown applied I have another hurricane with the second coat applied and I am pleased with the finish,I am trying out vallajio acrylics suitably thinned and brushed on,thanks for looking.2 points
-
here is a brief explanation on how i apply alclad II on my model, i used this alclad tones polished aluminum, duraluminum, airframe aluminum , dark aluminum and stainless steel for the engine area in the fuselage, for the burnt zone in the aft of the fuselage is hotmetal blue, hotmetal violet and transparent yellow, as for the base primer i used Mr surfacer 1200, wet sanded with a 8000 grid sand paper till you get a smooth finish, then model master enamel gloss black, after it cured it was sanded with 12000 grid sand paper for a smooth finish then you play with all the alclad tones normally i airbrushed the hole airplane with polished aluminum, after that i started paneling the airplane with the other metal tones as for the burnt zone of the tail, i used a fine tip on the airbrush and started doing some fine stripes with the blue, the the surounding areas of the blue was airbrushed with the violet after you get the finis you want i sprayed the trasparen yellow diluted 2 to 1 and in light layers because the yellow is to strong in color2 points
-
2 points
-
By all means! I don't claim that my build is 100% accurate by any means, nor any of my other work for that matter. Besides, for me building models is more about art than accuracy. Like my riveting method, for example. I do follow blueprints for the rivet pattern, but I'm no rivet counter and I don't "fully rivet" the plane, but rather create an artistic representation of them for more interest. I do like for my models to look realistic and accurate, but I don't dwell on every little thing. I may have gone off on a tangent there, but you get the idea For example, the old invasion stripe argument. If I were to build a model of this bird, my stripes would be perfectly masked and clean despite this photographic evidence to the contrary:2 points
-
Final pair for this week. My Williams Bros. Boeing 247. Pennsylvania Central Airlines. 1/72nd The red was Compucolor Red Arrows red and Microscale decals. Built this about late 1970s1 point
-
I hope you don’t mind yet another blast from the past, this model being from circa 1985. Currently I have a big project going that is taking up most of my modeling time. Built basically OOB from the Williams Bothers kit in 1/72. I wanted a different aircraft than offered by the kit supplied decals so registration markings were pieced together by cutting up the kit decals. The early United Air Lines logo was made by hand painting the outline of the United States in the center of the later company emblem from the kit decal sheet. The finish was the challenge on this model. The 247s were built from anodized panels, each having a very slightly different silvery grey appearance. A base coat of silver gray was sprayed, then selected panels were masked and over sprayed with a drop of grey or sliver added to the paint cup. A very subtle effect was achieved. A homemade base with a snazzy (well...at least it was 28 years ago! ) Dymo label completed the display!1 point
-
Just one for now though, I was out the house by 03:00am, and back in by 9pm so I am quite tired still! Long day and 4766 photos....! Will pick out a good handful tonight and get the rest up. Thanks for looking All flying shots taken with a Sigma 150-500 + Canon 1D Mk2 Mig-29 @ RIAT 2013 by Rainbow 1984, on Flickr1 point
-
Final ones for today. Both 1/72nd. Airfix Sopwith Pup and Blue rider decals. Made this one around the 80s I think. Matchbox Stranraer. Another oldie from me around the 80's. Nose gun has been 'taken away for maintainence'1 point
-
The porsche got his shoes,or something like that! The doors are put into place,but needs some more attention. The rear was cut out and also needs some work to do. I changed the style of the rims a bit.The center was a bit bigger than the inlet from the 935 porsche i used.So i made some improvement to it. My mistake was to make make everything in one piece.I put the wheel nut onto the rim and make my mold.But that was a mistake.The whee nut needs a other color than the rim and with one part i must mask it.Thats not the way i want it.So i changed the mold and glue the wheel nut onto the rim after the paint job. Thats better. regards Chrstian1 point
-
It was worth it for me forgetting that I got a free ticket I would of still paid the fee if I had to, I haven't been for a few years now and being the aviation nut that I am, anything goes. Really great to spend a whole day looking, listening and photographing all different types of aircraft and helicopters regardless of no USAF, a kick in the teeth yes, but with the way the world is we should be lucky that we still get a great show every year like it. If you haven't already seen, some of my photos here - http://www.britmodeller.com/forums/index.php?/topic/234943469-my-riat-2013-page-2-update/ (still being updated) A favourite moment for me, the Spartan doing loop the loops!1 point
-
Evening, all... I spent five days at Fairford last week, so I guess I'm a little biased on the "pro" side. While I appreciated that RIAT is nowhere near the size that it used to be 10 or 15 years ago, I'm of the opinion that it will NEVER get back to those kind of aircraft-participation levels. But the likelihood is... no air-show ever will, regardless of its location. I think that you have to look at the positives when it comes to Fairford. Even at a reduced size, it is STILL easily the biggest show, with the greatest variety of aircraft you will see in the UK (if not Europe). I'm sure that other Euro shows would love to have half the stuff that came to Fairford this year. Last year was a bumper year by modern standards, but was handicapped by some fairly unpleasant weather. I understand why people hark back to the "golden days" so regularly, but those days are simply over. We need to make the best of what we get now. On the subject of cost, I've been told that to STAND UP in a grand-stand for several hours at the British Formula One race will cost you nearly 100 quid these days... by comparison, Fairford seems like VERY good value for money to me. What does anyone else think? Cheers. Chris. PS: There was no Yank hardware this year due to massive US government budget cuts, resulting in a banning of serving aircraft appearing at shows (apparently it's called "sequestration"). This has lead to a number of American air-shows having been cancelled.1 point
-
Nay idea fit yer blethering on aboot!1 point
-
Depends what the air defences are like...1 point
-
I have this model and was taken back with how large it is. Don't have the space to display it if i was to build it presently. Nice job. Roy1 point
-
Nothing wrong with those cheapie guns. I still keep an old one myself. It's useful for the odd quick job when I can't be bothered (or need) using my "posh" kit.1 point
-
I'll expect the thing to be fully airworthy at this rate..........1 point
-
Tom, I'm sitting in one of our A320 and your weathering is almost spot on...LOL Cheers, Alex @Daniel...C Check? I'm in TXL :-)1 point
-
If you're talking about the tank (not the space rock....), then yes, they were used in Korea. Sean1 point
-
Well I thought it was a good day out...worth it? Not sure overall (I went Saturday) Plus points: We were parked and in the place by 0810 after leaving my house at 0700, which is a record for me (usually 1.5hrs minimum) I liked the food stations idea this year rather than having them dotted all over the place Great displays by the Swedish Gripen, Rafale, Typhoon(s), MiG29, C-27, Frecce Tricolore. Also nice to see (and hear) the Red Bull B-25/F4U. 2 minutes to get out car park at 1830 - some heavy traffic back to Blunsdon/Highworth but very good Picked up some kits from Wonderland and Modelsforsale! Minus points: Pretty much nothing worth seeing in the static park compared to last year's bumper collection (IMO) except for that gorgeous Breitling Connie My missus said she felt the display dragged a bit almost as though they were trying to fill gaps (Air Rescue demo/Wing-walkers) and I agree - too many fillers. No US a/c - they make the show truly international and I missed the B-2/F-15/F-18/C-130/C-5/V-22 etc The creeping corporatism of the whole thing - too many special viewing areas (with their premium prices) - the Spitfire Lawn was smack in the middle of where I sat last year It's pricey, but you get to see a whole day of flying, can take some up-close pics of 'planes and enjoy aviation-related stuff. At that price though, it compares well with Premier League, Wimbledon, Twickenham or the Open.1 point
-
very nice ,looks great good job1 point
-
Really nice build Si1 point
-
Good to see this on the go again, Sir! "The mills of God grind slow, but exceedingly fine."1 point
-
And a few with the hull upside down - there's a lot of detail in the overhangs that's not visble otherwise. The the lattice work under the lift is primarily 0.3mm square plastic rod and remarkably strong now it's all together. I'm close to finishing the portside now, stern, then starboard side next. I've also built the basics of the Island and drilled and pegged through the flight deck to make that job easier later:1 point
-
Graham, don't know but they are obviously designed to be there as they have detailing on them. I can't find any good contrast photos of the front end of a Lanc BII anywhere to check though. No Gary, no weapons, but they have supplied the weapon braces. The instructions state that suitable weapons are available in the Bomber Support Set - sneaky Airfix, very sneaky! dogsbody. You are correct the kit comes with the standard three plus an option to fit the ventral remote controlled turret.1 point
-
Bit of PE achieved today1 point
-
Find an Airfix kit [the dambusters boxing with the Lancaster has them for definite]. Throw away the 'plane and keep the tanks for a better kit... ;-)1 point
-
Lol, was just thinking the same :-)1 point
-
Nice, yes. But above all, it looks just right. And that, in my book, is the ultimate praise. Excellent work! Kind regards, Joachim1 point
-
If you mean Russ in Clapham, they seem to have closed a few months ago.1 point
-
I'd probably buy a Botha also. Awful aeroplanes need a little love too. Regards, Jason1 point
-
1 point
-
Giorgio, that would be like trying to load a Glock with a musket ball! FErnando1 point
-
Thanks for watching! small update.The spout.( is this the right word in english?) Next will be the air in and outtake fro the rear brakes. Now i quickly drink a coffee and than back to the workbench. regards Christian1 point
-
and it goes on with the back pack The air intakes on the top and on the left are done.I need to make the spout air intake for the right side. Next will be the rear wing and than i glue all the body parts together. regards Christian1 point
-
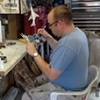
Hi, the last step i made are the rims. The rsr had 14" rims and the 934 used 15" rims. First i wanted to make my own 14" rims,but i had some new ones from th e934 at home.After some measurement i found out the the tamiya 934 had some wrong diameters.So i decided to use those 15" onto the rsr. I take the 5 spoke from the 935 and glued it into the rims from the 934. At the end i got my 5-stars wheels for the rsr. So no rivet counting on this from my side.I choose the way with less work. Next step will be the tires.I make it from ureol and glue it onto the rims.Than i made a silicon mold for it because i need some wheels for other porsche projects sometime. The body got his portion putty. The back window of the original car was a bit higher than the 934 window.So i glued it onto the right place and closed the inner side with sheet.Than a lot of putty and even more sanding to do. This will be more free shaping the body than correct measurement. But the result should look like the pics from the real car. regards Christian1 point
-
Totally agree! And a 1/72 VC-10!! . You DO realise of course that it's a Merlin engine Beaufighter Mk II that's REALLY needed! Not one of the Hercules engine variants!! Now, before ANYBODY sounds off about it "being a little known variant with only a small production run", I would just like to point out that the Lancaster Mk II was also a relatively unknown variant with only a small production run................. And yet we have a lovely new kit due soon! It also goes without saying that the Beau MUST be in 1/48!! Worth a try! ps - I'd STILL rather have a SU-7/17/22/9/11, MiG 17/19/23/25/27/31 than a Tornado/Typhoon!! pps A new Tempest might be nice. Sabre or Centaurus engine!! I don't mind! ppps Did I mention a brand new , state of the art DC-3/C-47 and C-130 at all? Yours (even MORE optimistically!) Allan1 point
-
If you zoom over the image of the back of the box, it says 'Please note that either the MWC or the MWD version of the Bedford can be built from the parts in this kit' (their use of bold type). Simon1 point
-
Today I was lucky enough to see the fist two CV-22B on their delivery flight to the 352nd SOG at RAF Mildenhall. These are the first of the type to be permanently based in Europe and today heralds the start of a two year build up during which 13 Ospreys will eventually be assigned to the 7 SOS. You can certainly hear 'em coming! Mark1 point
-
Thanks guys ;-) ... white stripes...1 point
-
All the cockpit area bits were now painted & glued in place, including a few more knobs and switches I'd forgotten to add to the I.P. There are some sidewall instruments that I decided not to bother with - frankly they would be invisible anyway... The nose was then attached & further metal skinning begun... I also had to attach the top turret permanently - there was no possibility of adding it after I'd glued on the cockpit roof... As I was working from the nose backwards, the next part I got to that needed addressing was the wing root area on each side. When the wings are removed, there is still a substantial protruding bit that blends into the fuselage. Luckily I had saved the bits I removed way back at the start of the build - I modified the front and rear pieces and stuck them on around the wing root: Here's the real deal: I could then build up the pewter panels around them like this: After that I carried on skinning the front half of the plane...I referred to my reference pics to get the panel lines and rivet patterns as accurate as possible....I'm not saying it's 100% correct but unless you are an actual rivet counter, how will you know? It looks OK to me & I'm happy. Purists will argue that the rivets are too heavy - I disagree. But thats just me - I think this particular aircraft merits raised rivets, even in 1/32....what do you think? The underside will be completely invisible, therefore I didn't bother with riveting these panels: Now here we have a comparison - my model vs the HK Models kit. At first glance, they are similar in length, give or take a few mm. My kit is much more 'bulky' if that's the right word. The HK kit is somewhat 'delicate' to my eyes - mind you, better minds than mine have designed this kit. In certain areas I have certainly overestimated the size of things - windows, the astrodome openingetc...Here are some pics so you can see for yourselves: HK kit has narrower roof, smaller astrodome opening, smaller windscreen and larger cockpit roof windows. (regarding the latter point, I think HK have it right - I was debating for some time whether to make my roof windows longer to the rear - however, due to the way I've scratched the interior, I have over / under estimated in some respects, therefore larger windows extending further to the rear weren't viable) I've also either made my waist gun windows far too large, or the HK kit has them far too small. It would be a lot of effort to change mine now so I'll leave them - unless someone physically puts the two side by side, I don't think it'll be a problem in terms of authenticity. I honestly think the vac kit is engineered a bit bigger and fatter than the HK kit, hence the need for slightly larger openings. One thing I think that HK has definitely got right is the shape of the fuselage cross section at the nose end - it should be like a 'U' with flared sides. I mentioned this in earlier posts & decided not to add this feature to mine as I'd already gone too far with construction. Once the nose transparency is on, I don't think it'll be that noticeable. Here's the HK one: and mine: Finally for this update, here's a few shots of the battle damage area behind the cockpit. I left this area until last on this side of the plane as I need to add some stringers & ribs to the inside of the blown out panels. To simulate blown rivets, I used the riveting tool as usual & then used a dentist's tool (basically a sharp spike) to poke through each one from the rear - I then removed excess metal on the front with a sharp scalpel blade. To simulate ripped metal, I attacked the edges with some needle nosed pliers. Once the model is finished, I'll be able to decide on the final position of the blown out panels. But here's very roughly what it'll look like: the panel on the roof surrounding the top turret has been left loose for now as I need to do further work on it... and here it is test fitted: that's it for now - any comments or questions gratefully accepted! Rich1 point
-
As ever Graham you're trying to make an argument out of thin air - if I was to place a 1/76 Jeep in a diorama with a 1/72 aircraft, and perhaps some other vehicles of mixed scale, I'd suggest that, unless folk recognise the provenance of the kits or are the most tedious pedants, the discrepancy would be virtually impossible to detect. In fact I'm willing to back that up with some photos.1 point
-
Found the website. http://www.airfieldinformationexchange.org/community/forumdisplay.php?33-Airfield-Vehicles1 point
-
Put me down to one of these sets! i like the idea of the incendiary load for a Lancaster.1 point


.thumb.jpg.d17ff607fc7e89ed057e63fcb6f2a888.jpg)


.thumb.JPG.3498f40362ff13ebfc4b2e45abbd545e.JPG)


This leaderboard is set to London/GMT+01:00