
Leaderboard


Popular Content
Showing content with the highest reputation on 13/07/13 in all areas
-
Inspired by Artur's miniature I decided to build my own Su-22. I used Eduard's kit (in fact KP with some etched parts and resin cockpit interior). OOB, without any modifications,except decals for polish aircraft ..and a few pics from the building:4 points
-
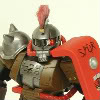
Russian Udaloy Class Destroyer The Vice-Admiral Kulakov, pics thanks to Panzer Vor.4 points
-
Desert Snake Hi mates, here are some pictures of my last year finished Airacobra from Eduard. I`ve used the old but great Profipack with photoetched parts, Express Masks and no less than 6 different variants of paint shemes. Additional I used both CMK accessories for engine compartment and front armarment. The model you see represents an aircraft of 346. FS, 12.AF, Noth Africa.The 346. was the last USAF unit using the P-39 in Europe. Only used as an attack aircraft, as this type didn`t rocks as dogfighter against german fighter ! The built was pure fun and gone straight forward! Only minor mods are necessary to convert this model to a L-1-BE type. A wonderful source with all necessary informations is Book No. 6129 of MMP`s Yellow Serie. [/url]4 points
-
Oookay, finally calling it done. (Though now I look at my photos, it truly does needs the nav lights at the wingtips.....one final doddle. But no more pics - it's safely in the cat-proof Detolf now!) Lee, thanks a million for the great idea!!3 points
-
Operation Harmattan Libya 2011 Revell 1/48th kit [/url]2 points
-
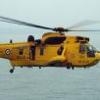
Hello Folks, I`ve always wanted to build a model of the earliest Wessex `Junglie' version which were specially stripped out HAS.1 anti sub versions that were painted overall Light Stone and rushed out to Borneo to replace the Whirlwind Mk.7 `Junglie`s' which were operating from primitive jungle heli pads. My original intention was to use the Revell Wessex HAS.3 kit but when Italeri announced that they were doing the same version I held out for one of these instead and here is the result, backdated to HAS.1 status and depicting XP142/J `Mr. Jinks' of 845 NAS, which was later converted to HAS.3 status and went on to become the famous `Humprey' of Falklands fame and now resides in the Fleet Air Arm Museum! Here is the build thread; http://www.britmodeller.com/forums/index.php?/topic/234942543-48th-scale-wessex-has1-junglie/ The `Mr Jink`s' artwork inside the red circle on the nose is hand painted, as is the 845 NAS insignia although a very kind Britmodeller (Dave!) has done me some decal replacements which are on their way from the USA,...what a kind bloke! Two of the emergency escape windows have been opened up to let a bit of cool air in and a `Gimpy' GPMG from the Airfix Lynx kit has been mounted in one of them. Anyway enough blurb,...here is the model; And here is it again with my next Junglie lurking behind, the Italeri Wessex HU.5! Hope you like it, All the best Tony O2 points
-
Just finished the build this week. I used the canopy and gear legs from the Heritage Aviation kit, Quickboost wheels and exauhsts, Aeroscale decals for the markings and custom decals for the prop:2 points
-
Built from the box with the exception of a Wolfpack MB Mk4 ejection seat. I think this is Kinetic's best so far although the instructions are still lacking in places. I can't wait for a C.1 especially as Furball Aero have a sheet for USN/USMC F-21's coming out. Stephen2 points
-
OK , this is a prime example of what I did a rant about earlier in the year. Why some people feel it is so necessary to boost their own ego's by pointing out a inadequacy on someones build that isn't even the fault of the builder is beyond me. Why would it be necessary to anybody's benefit to say the tail wheel is 5 degrees off ? Only the most anal of builders would even know or even come close to caring. All this type of so called accuracy information does is detract from an otherwise AWESOME build. It behooves no one to point out these flaws in open forum on someone else's build. If you want to point out inaccuries then build it yourself and review your own build to point out the flaws. Great build Dave! It certainly doesn't need to be detracted from by anal-ytical B.S.2 points
-
[/url]2 points
-
Hi all, Esci 1/48 Saab Viggen. Back end of the 80's I paid £1.98 at Poundstretcher for the kit and its been stashed for almost 26 years so decided to build it. A tin of paint today cost me £1.60 and the ejector seat £6. Brian.2 points
-
I rattled this together in between the paint passes on my Fokker D.XXI. I painted it in the variant that the old tool Zero was supplied in as I had those decals spare from an old Techmod sheet. However, these decals were so fragile that they started breaking apart just if I looked at them the wrong way, so I had to resort to painting the Hinomarus (no big deal - a red circle) as well as the blue stripes. The fuselage sash was the tricky one and it ain't perfect by a long shot, but it'll do. It'll have to! My only gripe with this kit is the canopy framing. Not only is the framing too thick, but it has large radius curves in the corners making it impossible to mask properly unless you have a pre-cut mask, like Eduard's - which I did. Other than that, a great little fun kit!2 points
-
My best wishes to all the staff, hope they all find employment soon, it must have been a difficult few weeks for them all.2 points
-
T4284 joined 58 Sqn in November 1940 but its front line operational time was quite short. It suffered a landing accident on its return from a mission on the 23rd December of that year in poor visibility when it undershot on approach to Linton-On Ouse. Following repairs, it was moved to 10 OTU based at Abingdon and given the codes ZG-E as it is represented here. From there, it moved to 19 OTU based at Kinloss where it seen it's flying time out before becoming a ground instructional airframe. The only picture I've managed to find of it is this one (courtesy of www.luchtoorlog.be): I decided to build the Frog kit as oppose to the Fly one as neither have particularly good clear parts. As my skills making new transparancies is quite limited, the Falcon set for the Frog kit swung it for me. I've tried to make most of the corrections known, although I didn't touch the wing root trailing edges. Big thanks to John Aero for the replacement props and General Melchie (Andy) for the Revell Lancaster rear turret which was fettled to look like an FN4 found on the Whitley. Really enjoyed the build and whilst not perfect, I'm happy with what I've achieved. If you've not seen the build, you can see it HERE if you have the patience ! The decals are part of the Xtradecal set which whilst they went on well, the colours are somewhat suspect. The MSG codes were actually light grey so they had to be touched up. The white in the fuselage roundel should probably be darker too, I might tackle this with a black pastel brushing. Enough waffling, here's the pics ! Thanks for looking. Neil1 point
-
After my Spitfire build I though of continuing my WW2, 1/48 theme. I am hoping for a less stressful build and less mistakes. For that I will try to be less adventurous and more patient. The starting point is Tamiya's kit, Aires Cockpit, Master gun tips and since I took the photo below added the Eduard FE205 (to compensate for an accident I had with the photo-etched of the Aires set) and an excellent decal sheet from Lifelike Decals (48-018). After the Spit I am a bit scared of the Tamiya decals and I want to experiment a bit, once I get my hands on some suitable solvents. Being an airbrush novice I am going for the standard RLM71/02/65 which is easy to handle and building the aircraft of Maj. Ernst Freiherr von Berg (Kdr. III/JG26) Started with the cockpit but I could not resist myself and added a few bits and bobs... a And airbrushed with a custom mix of RLM02 that seemed ok... One thing I wanted to do was add a bit of character in the cockpit. Going past the confusion with the colours (gray floors, tan floors) which at the moment I have limited resources to clarify I decided to add some padding on the seat, much like the one from Cutting Edge in their 1/32 replacement. I just loved it when I saw it. I made the padding from some led foil. Some paint chipping on the top will be sorted later... I have added the harness and instrument panel from Eduard as the one from Aires got damaged (don't ask...) Cockpit painted, weathered, dry-brushed and approved by my wife... Comments and suggestions welcomed as always...1 point
-
I picked up this at the weekend as a distraction from review builds and reviews, as it's ages since I've built anything just for my own pleasure. This is a Cyber Hobby Orange boxing of the Dragon (Trimaster?) kit of the proposed Bomber Destroyer that was fitted with a 50mm Bordkanone 5 in the nose. Only two prototypes were finished before the end of hostilities, and the box top artwork shows a drab RLM 81 with RLM82 spinter pattern on the wings, over RLM76. That late in the war, I'd have thought that a bare metal finish under the wings would be more likely, but what do I know? I'm in the market for a more interesting colour scheme, as the 262 is one of my favourite looking of the early jets. Putting a big fat cannon on the front of it just appeals to my sense of "wrong", so I treated it to one of Master's excellent turned brass and aluminium examples off eBay. I also had a cheapo Zoom! set of Eduard PE that was meant for a nachtjager, so I pressed the front half of that into service. I also killed two birds with one cannon shell and built up a set of the new Eduard "fabric" seatbelts, which took a while, but paid off. It allowed me to write the review with more conviction into the bargain, which is nice The cockpit of this ageing kit is a little rough and not very ready. The tub is nothing more than a section of tube with front and rear bulkheads built in, and some very sketchy detail moulded in. There were tooling marks and ejector pin marks all over the show, and the bases for the side consoles were a bit narrow, so I skinned those with some 0.1mm styrene sheet patterned from a masking tape template. The floor was also given a little extra care & attention, plus a new cross-board in front of the rudder pedals, which were replaced with some early LionRoar examples from the stash. Some of the detail was removed to accomodate the PE, which was pre-painted a not especially convincing colour. Once I'd painted the cockpit I touched in the grey with my shade, so it blends in better (I think?). I also added some lead wire to the rear of the instruments, which has been largely a waste of time and effort, after seeing the part in place I squished the control column's grip and have carved a new one from styrene rod, which is sitting beside me now waiting for the glue to cure, after which it will be painted up... again The nose gear bay had some tricky looking ejector pin marks, so those were filled with punched styrene circles and sanded flush (enough) before being painted. The kit includes a couple of PE sheets in some tough ferric blend of metal that really doesn't like to be cut or bent. Curiously enough, most of that is used in constructing the main gear bay, so that was built up after some seriously aggressive clean-up of the styrene parts, which were 'orrible. They were glued in the lower wing, primed, painted, varnished and washed, then matted down. I also built up the nacelles for the engines, electing not to use the extra sprues of Jumo engines for the stripped down option that's included with the kit along with a couple of mechanics and a stepped platform. The fit of these parts wasn't the best, but it's nothing that some CA and sanding sticks can't sort out, although some minor rescribing looks to be on the cards. These are currently setting up with CA in the joints, waiting for me to create a haze of styrene dusk at some point in the near future. I'm considering riveting the entire airframe once I've built up the fuselage, as there's not a massive amount of surface detail on the kit, as it's quite an old one. It's also got some horrible rubbery tyres and quite nice styrene hubs, which I'm trying not to use, but I'm also trying not to spend much money on it, as it's an old kit. If anyone's got any good ones that they have no need for, I'd be happy to negotiate their release I've added a few tabs to strengthen the obvious underside seams of the fuselage, and the wing joints, but these are going to need some adjustment, as the wall thickness is extremely variable all over the kit due to the old skool techniques used for tooling back then. Enough waffle - here's a pic of everything sat together. Looking forward, I think I've still got a lot of work to do, as the inspection panel covering the cannon breech fits where it touches. I think the guy that tooled the part was told there was a kit being tooled, but not about the dimensions. The landing gear could be interesting, but I'm sure I'll manage. Then there's the colour scheme - I'd prefer not to do the kit scheme, so if anyone's got any ideas, I'm all ears I guess it would have been easier to just buy the newer Hobby Boss kit, but this was just staring at me from the shelf, looking all forlorn with its partially crushed box and simple artwork. "buy me a cannon" it said, and I did. I'm impressionable like that1 point
-
The Vickers 'Bullet' is one of those Great War machines which has been largely forgotten, some might say deservedly so, as its actual service record was far from distinguished. It has, however, points of interest about it, beyond the attraction of its obscurity for those who like the 'odd ducks' of early aviation. When it first took to the air, in its earliest iteration, its performance was extraordinary, and the type provides an excellent illustration of the difference between a good flying machine and a good fighting machine. It was employed in areas which were, at the time, viewed as backwaters of little importance, but which would prove of great significance in final stages of the war, and take on even greater importance once the war ended. The genesis of the type was a design of the chief test pilot for Vickers, Mr. Barnwell, and 'Barnwell's Bullet' was built without the company's approval in the autumn of 1914. Mr. Barnwell was a better pilot than he was a designer, and his machine broke on its first usage. Mr. Pearson, a designer for Vickers, saw some promise in the design, however, and re-worked it into the E. S. 1 (Experimental Scout 1), which flew first in August, 1915. It had a top speed of 114 mph, and extraordinary aerobatic ability. When this machine was sent to France for service trials at the end of 1915, however, pilots reported they had a very restricted view from the cockpit, owing to the width and round section of the fuselage, and the placement of the unstaggered wings. Six were ordered for further experiment, and eventually fitted with Clerget motors and a Vickers gun synchronized with the Vickers-Challenger gear; further service trials in May of 1916 received bad marks from pilots who much preferred the Dh 2 pusher scout in combat. In the summer of 1916, Vickers attempted to put things right with the design, reducing the width of the fuselage by leaving it flat-sided for most of its length. Now denominated F. B. 19, this was offered to the R.F.C. and foreign air services. Czarist Russia ordered fifty of this model, with deliveries beginning at the end of the year. Several were taken on by the R.F.C., and fetched up on Home Defense duty. Vickers further revised the design, giving the wings pronounced stagger. This F.B. 19 Mk II version did attract some interest from the R.F.C., as it appeared just as the German Albatros fighters were coming into service, and whatever its faults in pilot vision, the 'Bullet' was faster than the Albatros. The first example of the latest version, inexplicably, used the same wings as those of the un-staggered version, with the result that its wing ribs cracked in service trials during November. A dozen had already been ordered, but the need of redesigning the wings' structure delayed their delivery into spring of 1917, and that was the limit of the delivery of the F.B. 19 Mk II to the R.F.C.. It was decided to send these on to the Middle East, where English forces had suffered reverses at Gaza, and expansion of the fighting in Balkans loomed with the impending entry of Romania into the war. The 'Bullets' arrived in June of 1917, with several being sent on to Macedonia, assigned to No. 47 Squadron, and the rest being retained in Egypt, taken on strength.by No. 14 Squadron. They were used as escorts and interceptors, serving alongside such types as the Dh 2, the Martinsyde Elephant, the Bristol Monoplane, and the B.E. 2c and B.E. 12, opposing Albatros single-seaters and Rumpler and A.E.G. two-seaters. In Egypt, the 'Bullets' were passed on from No. 14 Squadron to a newly formed unit, No. 111 Squadron, in August, 1917. The problem of poor visibilty remained, and short range added a further handicap in these theaters, and only a handful of victory claims (and these only of the 'down out of control' variety) were ever posted up by pilots of the "Bullet' in the R.F.C. When more modern types reached the Middle East command, the 'Bullets', along with the rest of the former grab-bag equipment, was retired from combat, with several lingering on as trainers till the end of the war, and possibly even shortly after. This machine, A5231, is one of those retained in Egypt. It was assigned first to No. 14, and passed on to No. 111. It flew from Dier el Balah, not far south of Gaza City, and the lines the Turks had held against Gen. Murray in the spring of 1917, but which were broken by Gen. Allenby that autumn. The model is a scratch-build, and it is hardly surprising that is necessary to get a model of this type. My interest in it was sparked long ago, when I learned of its existence in my old Harleyford 'Fighters, 1914-1918' volume. A series of pictures of No.111 Squadron's equipment in an issue of Cross and Cockade bought a good while back included an identifiable picture of A5231, which got me thinking a model could be built, and when the Windsock people put out a monograph dedicated to the type, it seemed the time was right to start cutting plastic. It was an interesting project, and the first small scratch-build I have done in a while. An account of the build can be found here: http://www.greatwaraviation.com/forum/index.php/topic,5210.0.html1 point
-
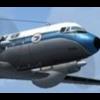
After a long time, here is the finished Heron. I only added the antenna wire since the last post. I hope you enjoy. Cheers, Marcos.1 point
-
Hi Here are a few shots from a roasting Duxford today. My favourite act was The Horsemen in the three Spitfires. Thanks for looking.1 point
-
It's a little bit late, but here are some pictures from the Phantom Pharewell event at Wittmund air base, Germany on June 29. Luckily, the rainy, cold and miserable weather started to clear just that day. Cheers Jeffrey1 point
-
Hello, here is the latest model form the Workshop of Gerd. The new Revell 1:32 Messerschmitt BF-109 testshot. Pictures are as always from me. if you would like see more: bulding report in German Modellfan Magazine Issue 9, 2013. Greetings Hans, Gerd1 point
-
At last it's done. You can see the wip herehttp://www.britmodeller.com/forums/index.php?/topic/234919531-english-electric-p1/. As a modeller of some years standing, there comes a time that you have to do something like this. It makes you better for it. I'm glad I did it but I shan't rush into something like this again anytime soon. It's nowhere near competition standard, but please have a perusal at the pics.1 point
-
I'll say they judder and vibrate Steve,I've heard the pilots on the scanner. They usually sound like a Dalek on acid . Check your PM's Aaron. Sten,any chance of a picture of that etch for the '47?1 point
-
1 point
-
Looks like one for the to do list. Very nice build1 point
-
Before: After drybrush and wash(dry fitted in upper fuselage) :1 point
-
Great looking Kfir. Going to get mine started soon.1 point
-
Looks the Mutt's to me. Was just looking at this and the Seafang in the Big 'H' today but decided against it. Too much stuff already, and I wouldn't make as good a job of it as you have.1 point
-
Whatever the kit's issues may be (I don't have enough interest invested in the Spiteful, so wouldn't have a clue on it's inacurracies ), I think you've turned out a nice looking model there. Top hole, ole chap.1 point
-
Hello ! Finished yesterday. Tamiya paints, starting from a Kagero profil. Markings AMD and airbrushed for codes. Heavy weathering, cant manage to make different stuff !!!! Bye and thanks for looking. AE.1 point
-
Hi sorry i've not posted much as far as the build process goes but I have really cracked on with this one. I have filled it, primed it, painted it, sprayed a coat of Klear applied the decals and as you can see they have set nicely into the recess panel lines. Now I have sprayed another coat of Klear over the decals and now once this is dry I will apply the wash. Pretty happy with the outcome so far as it's my first WW2 aircraft. Really enjoyed building this wee beauty. Thanks for looking Comments welcome Jammur1 point
-
??????????? Nowt wrong with the build! Stunning seat & (no doubt) brilliant use of Zero paints. ATB..........1 point
-
About time, now I can build a model of HMS Campbeltown as I helped build the real one! Julien (Happy, now where is my 1.350 Upholder Class Submarine?)1 point
-
Those are some amazing pictures. So much NMF all in one place, even the prototypes thrown in too. The Marine FJ-3 Fury with folding wings is really interesting.1 point
-
Very nice start, but I think you made a cock up with the drivers name1 point
-
Latest of the bench and, yes another Spitfire..... (I like them OK....is that a problem........do I need to get help??.......[52 made so far and rising]) Saw this scheme in Combat Colours No. 8. So out came the Hasegawa kit, a few decals from the spares box and this is the end result. Hope you like it. Comments are welcome as always Thanks for looking.1 point
-
Stunner, great job!1 point
-
Cool cool... It is worth getting these kits just for the LGB's, you get 2 x GBU-12's and 4 x GBU-10's per store sprue (or the other way around). I got about 8 of the buggers now. You also get some nifty SLAM-ER's and AIM-9X's, always handy to have. Yeah it is pretty cool, but it's annoying when you get to a boring/hard part and you then realise you've gotta do it 3 more times. Or if I pull my finger out, 7 more times... Still it gets the work done. The assembly line diorama is a cool idea, always makes me think of B-24's or Shermans for some reason. Can you imagine making a line of 1/144 B-24's?! let alone 1/72 or even bigger... hhmm... Cheers Dave Thank you Houston, they will be getting some more work done to them really soon. I apologise for the lack of work thus far, I have been going to college at night-time, so my days where starting at 04:30am and finishing at 22:00 pm... long days. Anyhow I have passed my course now so I am free!!! woohoo!! (I was doing a CCNA incase anyone cared). Thank you for the encouragement all. Kind Regards, Dazz1 point
-
Well... if you're going to climb up a ladder, on the runway threshold... you DESERVE to be sued by the MoD for FOD... Surely this should be in the "Airshow Annoyances..." thread... Not much sympathy here... bestest, M.1 point
-
Thanks chaps. Rod. I love those photographs of the chipmunks breaking. What a way to spend a weekend.... As ever I've had a busy week first week back at work after leave. But have manged to spend a bit of time with my own chipmunk. Not quite as exciting as Rod's though. First the modified propeller. I had to think of a way of attaching the blades to the new spinner and came up with this (the blades are cut from the original propellor and have been refined a bit further): After a coat or two of white here is a profile view of the new propeller for comparison. To my eyes the more pointed new spinner is more accurate and captures the aircraft's lines better: I also got some work done on the canopy. First - it was easy enough to apply the relevant Airfix decals and dip it again in Klear. I've also shaped the bottom of the rear of the canopy slightly. I sanded a slight reverse curve to hint at the shape of the real thing. The Airfix canopy I used as the master is the wrong shape. I haven't been able to recreate it completely - but it's a nod in the right direction. Next - Rod highlighted the internal support structure. You can see it well in this photo (probably one of Rod's): Actually - I've a feeling of deja vu about this. I started some internal structure for my original abortive canopy (many pages ago) but had to junk it. Anyways. Version two started like this: The large flat piece of card taped to the rod is a make shift jig to help me glue the little crescent shaped piece at the cooorrect angle to the rod. As here: And a coat of black: And gluing it into position with Formula 560 canopy glue (thabnks to Bill for the reccomendation): First bit done: And both bits in. Phew..... And just rested in position for a sneak preview: My eyes need a rest after that. So a glass or three of white wine is in order - hopefully a bit more to be done over the weekend. Getting there. Glacially - but getting there. Steve1 point
-
Having been told the news yesterday and working for Model Zone at the Bromley store in London, for anyone on here who has been in there and possibly who i may have met over the last few years, would like to say thanks for the support and contributions, its been good, enjoyable experience and i've learnt alot.1 point
-
Hi all you may remember that nearly all my other posts are Bomber Command a/c, well these two aint, F106 Delta Dart, 148th Monogram from box but Aeromaster decals. Didn't go on too well or like Klear by the look of it. Good job the picture ain't a close up EE Lightning F1a, 56Sqdn. 1/48th Airfix, from box including decals. Not a good idea, would have changed for after market if time allowed. Regards Paul1 point
-
Amen Jonners... big chains removing any last vestige of individuality from the high street is not going to save them from becoming ghost towns.1 point
-
Good luck to the staff. Regardless of how good we perceive them to be or not to be - losing your job is crap. Lets hope the locations arent bought up by Costalotta Bucks coffee or some other "do we really need another brand seling exactly the same as the others" chain. Jonners1 point
-
Finished for the Modelling Madness 'whif' for Canadian types what could have been or should be. Italeri 1/72nd kit. Leading Edge decals. I have depicted mine as in use with the AETE at Cold Lake, Alta., with a 'zap' by 441(Silver Fox) Squadron on the fin. And making use of some of the many unused decals from the Combat Hornet set and finished in Hornet greys.1 point
-
Here are some pictures of my canberra. I will upload some shots of her top later but as you can see, there is quite a nice scheme on her. I do believe that this mk of the canberra didn't have this scheme but at the end of the day, it looks nice.1 point
-
I didn't ponder too long, as that way leads to a shelved model. I added some Signalbraun and a little white to the basic Lifecolor pot to give it a browner hue, and I think it's kind of worked... it doesn't look as green as it did before anyway I also masked off the wing-roots to get a nice clean demarcation, and also masked off the nose, which I sprayed later, trying to give it a slightly different "style" of edge, to infer the grafting on and subsequent painting of the cannon nose. I tried to keep it subtle though, as no painter would intentionally misalign the edges if you see what I mean I'll play around with the base shade a bit, and then put the RLM82 splinter on the wings & tail. Would they really have been hard-edge, or more likely soft-edged at this stage of the proceedings? Thanks for the effort John Meanwhile the tiny terror has been in the workshop, and the Xtracrylix RLM81 bottle has done a Lord Lucan. I've been trying to find it by looking at the workshop from the perspective of someone that's around 3'4", but haven't turned anything up yet, so it kind of forced my hand. Kids! EDIT: Just found it, and it wasn't the boy - I was maligning him unfairly based upon past performance!1 point
-
Now that the wind has abated for all of five minutes, I have managed to get outside to prime the model. Halford's Red Primer was used to prime the entire tank, then once dry the barrel was gently slid out from position and coated in Humbrol Tank Grey aerosol to replicate the factory heat resistant primer used on the real vehicles. A coat of hairspray will ffollow then I will apply the camo via airbrush.1 point
-
Hi All, Here is my latest build, which I am happy to say was terrific fun from start to finish. In fact it was such fun that I didn’t even bother to photograph the sprues (absent the fuselage halves which a previous owner had untidily liberated from those same sprues). The fun was so great that I also didn’t bother to take any work in progress shots either, since it was a simple “Matchbox”® kit from a 1973 boxing, which saw it built rather rapidly. Now that it’s complete I can share my musings on this kit, which I first experienced through a 1974/75-style boxing as a child of 8. Although I no longer have any of the many kits I built as a child, I have been fortunate enough to acquire a number of old “Matchbox”® kits, many which I built as a child as well as a few that my father built which I couldn’t help but covet at the time. If this keeps up though I can see myself ending up with some old Airfix, Crown, Otaki, and Hasegawa kits as well which is fine of course as long as I build them. Anyway onto the kit I have decided that the best way to review it as such is to list the kits advantages counterpointed by its disadvantages to give a more comprehensive picture of what is on offer as follows below. Advantages This kit offers a little something for everyone, since it has various features from a variety of F4U Corsair sub types. If you like the F4U-4 you get a terrific port wing with quite accomplished renderings of its details like the gun panels, three machine gun ejection ports, recognition lights and more. All of this is represented by recessed panel lines that are equal to the state of the art from Airfix® today. If you like the early F4U-4 or the F4U-1D, the canopy has you and the pilot figure covered there. As to pilot figures this kit has one which is better than having none since it is not unreasonable for a modeller to be given the option to glue someone’s bum to a seat if they are so inclined. The cockpit is floorless which is also perfect for the all F4U aircraft except the F2G and F4U-4 and beyond of course. Then there’s the cowling if you like the F4U-4 it features the chin carburettor intake while if you like the F4U-1D or FG-1D the lower cowling is round instead of flattened like on the F4U-4. As a bonus if the F4U-4B or F4U-5 amongst others is more to your tastes you get the wing-mounted 20mm canons to stick on the front of the wings. Although the pitot tube with a dongle on the end and aft fuselage upper antenna mast is provided. You don’t have to bother with IFF, radio altimeter antennas, pylons or any other appendages, which would only get broken if one used such things, so that right there is a terrific feature amongst many! Disadvantages This kit offers a little something for everyone, since it has various features from a variety of F4U Corsair sub types. This can be a bit disappointing if you were after something more representative of the type listed on the box. One could note the fact that the port starboard wing is a copy of the port wing down to its recognition lights. Or otherwise spot the fact that recessed panel lines represent the flap footstep on both wings instead of featuring a cut out on the starboard wing only. Not to mention all of the other features that may not be your cup of tea if you have Kinzey’s, Sullivan’s, Maki’s Yamada’s, Kuroki’s, Hards’, and others work on the Corsair. Advantages The tail plane and elevators features recessed details that represent quite well albeit heavily the details found on the real thing. Disadvantages Those same tail planes and elevators feature the above-mentioned details upon the upper surfaces only. This is in error since the details should be present on the port side upper surfaces and starboard side lower surfaces only. The trim tab control rods have also been omitted. Advantages The transfers, considering in this instance are circa 40 years old performed admirably well. To the point where they conformed quite well, which is not bad considering scissors then tweezers, plus hot water in a teacup and tissue paper were the only aids used. Disadvantages The fuselage "Marines" markings were somewhat oversize in this instance, which if I recall correctly was never a problem in my first build of this kit in 1979. Advantages According to “Matchbox”® no painting is necessary which is terrific if you like clean builds. Disadvantages According to “Matchbox”® no painting is necessary which is disappointing if you like the smell of enamel paint and were wanting to have dark blue fingers. Advantages It comes with a stand that features a ball and socket assembly, which cleverly allows the modeller to display their work in a variety of dramatic attitudes. Disadvantages The socket that comes with the stand is a bit too agricultural in appearance for such enlightened times. Advantages This kit has 41 part if you include the display stand which allows one to undertake a timely build which will allow you to fly it around the house under control of course, while terrorising the cat (please note: that no cats were permanently harmed during this build). Not to mention it’s great for a beginner to cut his or her teeth on and can also be fun to build again, for someone who had the pleasure a long time ago. Disadvantages It’s not the “Matchbox”® Zero-Sen kit which has 32 parts including the display stand! Advantages The kit is moulded with oxford and azure blue plastic, which is terrific since it, looks quite fetching in combination with the willow green transfers that feature in one of the build options. Disadvantages The kit is molded with oxford and azure blue plastic, which can be a bit disappointing if one, wants to paint the kit more easily in order to make it look even more splendid. Advantages It is a 1-72nd scale kit, which is considered by some to be the perfect scale for aeroplane kits. It is also ideally sized to allow more to fit on the shelf or if one is really interested in displaying their model at its best. It also allows more to be hung from the ceiling with some fishing line to roar over ones bedroom by day and night. Disadvantages It is a 1-72nd scale kit, which is considered by some to be too small for an aeroplane kit. What were “Matchbox”® thinking? Did they not realize that the optically challenged might have to don ridiculous implements like glasses or heaven forbid even an optiVISOR in order to glue the bits together! Advantages If you assemble it right the propeller can spin! Disadvantages If you assemble it wrong the propeller won’t spin! Advantages It is made in England; it says so on the box, on the instructions and even on the sprues as well. Disadvantages It was made in England; so now it isn’t anymore. That doesn’t mean that things aren’t still made in England! Fortunately Lancashire Cheese is still made in England. Unfortunately you can’t get it in a small Australian town on the edge of the outback where I type this review. Or for that matter even the largest Australian city where I used to live or anywhere else in Australia, this apparently has something to do with customs and dairy imports! Advantages It’s not Lancashire Cheese! Disadvantages It’s not Lancashire Cheese! Advantages It is a perfect companion for the before mentioned “Matchbox”® 1-72nd scale Mitsubishi Zero-Sen kit which was molded in a splendid orange and white combination which made it ideal for the occasional aerial encounter while watching Black Sheep Squadron on’tele. Disadvantages It isn’t a perfect companion for that Zero-Sen kit in the occasional aerial encounter while watching Victory at Sea on’tele, something about them both doesn’t look quite right. Summary The “Matchbox”® 1/72nd scale F4U-4 Corsair is a terrific kit to build and I would heartily recommend it to the beginner for a great introduction and the advanced builder alike for a fun diversion. I still think it’s a shame these kits aren’t still in circulation in the style they once were with all that lovely coloured plastic inside a box that let you peak inside at the back while a dramatic scene on the top inspired one to give it a go. Though it’s great Airfix is revamping its range I can’t help but wonder what will happen to those more simple kits that provided the best training for those wanting to learn the hobby of plastic model kit assembly. Matchbox were very good at providing kits for the newcomer that were easy enough to keep one keen while generally assembling much more easily than most other brands in the 1970’s. Not to mention I still like the subjects they chose. Unfortunately though there weren’t enough of us to keep it going. Even I moved on to better things via Otaki, Hasegawa, Tamiya and many others. If you have any Matchbox kits I encourage you to have fun and build one or if you know someone you’d like to introduce to the hobby get them to have a go at one. Who knows they might even like it, like my wife Jo (who has built a Hellcat) my son Aeddan (who has built a Zero-Sen) and daughter Isabella (who has built a Mustang “Doolybird”) did. As to what’s next, shown above is my personal Matchbox to do pile, I intend to get them all done this year and will even paint some of them along the way. So whichever I pick next I will share some of my progress from start to finish here on Britmodeller, so till then… Cheers, Daniel. P.S. If anyone is looking to undertake a Matchbox group build on Britmodeller, please count me in as well as my family. References: Fighter Bomber Team, Air Ace, Picture Library, All Action, Holiday Special, IPC Magazines Ltd., 1980. “Matchbox”® 1/72nd scale F4U-4 Corsair Instructions, Lesney Products & Co. Ltd., 1972. All images Copyright ©2013 Daniel Cox.1 point
-
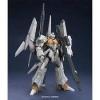
Supermarine Victor Mk XIV What if the Rolls-Royce Vulture engine had been successful and so RR abandoned development of the Griffon? The Supermarine Victor is a Spitfire with a Napier Sabre engine. Build thread here.1 point


.thumb.JPG.3498f40362ff13ebfc4b2e45abbd545e.JPG)


This leaderboard is set to London/GMT+01:00