
Leaderboard


Popular Content
Showing content with the highest reputation on 09/07/13 in all areas
-
Hi folks I know there's been a few of these posted since it was launched but I'd like to add mine to the line up if I may. I know (now) that some of the decals are wrongly sized and my post-shading might be a little heavy for some tastes, but it looks great on my display shelves amongst all the greys, greens and browns; and I really enjoyed doing it, which is the whole point isn't it? Thanks for looking J A3 points
-
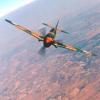
This is the Tamiya 1/48 scale A-1H Skyraider. It represents Spad 577 VA 25 attached to the USS Midway and flown by LT. Clinton B. Johnson. Lt. Johnson shared a kill with LT. J.G. Charles W. Hartman when they downed a MiG-17 with 20 mm guns on June 20, 1965.2 points
-
HobbyBoss 1/32, model realized mainly OOB apart from the roundels and black numbers made with my Graphtec plotter, completed the bomb trolley with figure of my production http://www.videoaviation.com/ground-support/132-bomb-trolley-with-figure/2 points
-
This is a 1/48 scale Monogram model of the sleek and missile-like F-104 Starfighter. Back in the mid to late 1950's when this astonishing interceptor-fighter first appeared, it certainly looked like a spacecraft from the future, ready to blast off to defend the planet from Ming the Merciless or anyone. It most definitely was my favorite jet fighter when I was a small kid ! Here, it's in a bit later F-104C form with a camo finish which generally succeeded it's initial gleaming silver form. Of course, the Starfighter also served with several air forces and had great capabilities at low-level as a powerful strike fighter. Edited to add a P.S. : After I accidentally broke off the Starfighter's nose pitot tube when taking some snapshots, I painstakingly fabricated a detailed custom one from specially-alloyed aluminum. Ummm, in other words, I cut a length from a paper clip and super-glued it on to act as a stand-in !2 points
-
Hello again, Well, I must have been absent minded and thought I had posted that one already; it's the old Tamiya kit, straight from the box, except for the tracks, which are Trumpy ones. I've been told since then that they were the wrong type, but they are a huge addition to the kit' ones. Plus, the track link angle at the front wheel (don't know the english name of it - traction wheel ?) is not good. Oh, well, you learn and improve, don't you ? Comment and remarks, most welcome as usual, Best, Stef (#6)2 points
-
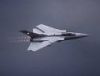
-Thisis one of the last Trumpeter issues in 48 Scale.The MF is made of Rub'n Buff. http://i690.photobucket.com/albums/vv270/IPMS19/MIG%2021%20F-13/025_zps1e71cd0c.jpg http://i690.photobucket.com/albums/vv270/IPMS19/MIG%2021%20F-13/024_zpsd87a02e3.jpg http://i690.photobucket.com/albums/vv270/IPMS19/MIG%2021%20F-13/023_zps33c27798.jpg2 points
-
Following on, I added the wings and fitted the gear doors. I also started to add ECM blisters and the camera and boom mounts. I have filled a few cabin windows that are not present on the actual aircraft. That is how it stands at the moment. I hit it with a primer coat and found a few issues around the base of the fin that need attention as well as a few panel lines to rescribe.2 points
-
2 points
-
Hello every ,one so disparaged at its exit, that curiosity pushed me to assemble ..... 3 specimensof them!!!!! and I was not disappointed… Except fora a little marked riveting (but just on its site!!!!) therest is more than correct within sight of theinvestment of this limps!!!!!! up to three times less expensive than certain competitions, then if youwant a P51D correct, you deprive!!!!!!! first is withthe colors of the 352FS of Raydon in 1945 ...... second with the colors of the P51D “pétie3” of JohnMEYER of 352th FG based has BODNEY and finally third is a personal decoration inspiredof the US warbird “Quick Silver” which I find “selectvery”!!!! good weekend1 point
-
Hi folks Long time lurker first WIP poster on this forum. Apologies if this first post is a bit picture hungry and further apologies for the quality of my pictures (some are a bit blurry). Anyway; I've given myself a project in which I intend to recreate aircraft my dad has worked on over his years as a helicopter engineer. I'm hoping, once they are all complete, I can present them to him as a retirement gift. The first aircraft I'm working on, as the title suggests, is a gazelle. He worked on these in middle wallop and in Celle around the 1970s during his time in the REMEs (73 workshop), Below are a collection of in progress pics (which appear on another forum) followed by the current state of the build. You might be able to guess by the above that I'll be finishing the kit 'doors open' and will be scratch building new ones. I'll also attempt to scratch the engine and associated components with the covers in the open position too. Above are some of the details added the the interior. I made new bulkheads, although the one in this pic was too small so I have since made a new one. Seat cushions made from milliput. The new bulkhead I mentioned, with the cushions in place. And the photos below show her in the current state. Above was a dry fitting of the rear harnesses. I'm using Eduards pre painted set for the 1/72 HAS. 2 S.A. If you're wondering why one cushion is blue: well, I found a reference shot where one cushion was different. I kinda liked the idea and thought it would bring some character to the finished kit. I'm hoping that it doesn't end up looking like I picked up the wrong paint pot!!?? I've started scratch building details for the roof. Still need to make the air brake, throttle etc and then curl up some copper wire for the radio cables. Anyway, thanks for stopping by. Comments, critiques, tips and advice all welcome Oh, and any references on uk military gazelles based in Celle Germany around the 1970s (registration numbers, colours etc) would be greatly appreciated I hope you can understand that I'm wanting to keep this project under the radar from my dad, so I can't really ask him... Thanks and regards Aaron1 point
-
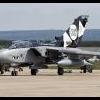
German Tornado with NeOmega cockpit, Paragon wheels and exhaustst and Master pitot tube:1 point
-
Hello friend After a couple of AFV i finished another aircraft, and as you can see another italian one. This time my costumer ask me for a display base so i did it! I hope you like it. Thank you for looking. Best regards from Portugal Vitor Costa1 point
-
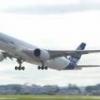
I have been working on this one for a while on and off. Got the bug again. I am using a Revell A330-300 kit and a Hamilton Hobbies conversion set along with a Southern Sky decal sheet to build a a RAAF KC-30A. I started by cutting up the fuselage to bring it down to -200 length. The Hamilton Hobbies set comes with replacement tail, though this is not the correct one for a RAAF (or QANTAS aircraft). So i cut a few mm form the top, did a bit of rescribing and built up the reinforcing fairings at the base of the tail. The Hamilton Hobbies set also comes with the tanker specific parts Though again the refueling hose reel units are not the correct shape and these will have to be modified down the track. After rescribing most of the lost detail from reassembling the fuselage I added the tail. The resin fin had a few pin holes that required attention.1 point
-
Not usually my scale, but I have a soft spot for the Lancaster, and having seen Airfix's latest offering I couldn't resist As I'm sure you know the kit comes as a BIII Special 'Dambuster' but there are all the parts necessary to complete the kit as a 'standard' BI/BIII. All that was needed was to obtain an aftermarket decal sheet, which I duly did from Sky Models. I have completed mine as a BIII of 463 Squadron, RAAF based at Waddington, Lincolnshire towards the close of the war. The level of detail on this kit is exquisite - right down to the oil tanks in the main landing gear bays. As this is a 'Dambuster' kit, there was no payload provided, but all the racks are present to add bombs when Airfix release their payload set. Much has been said about the panel lines being too heavy, but in my personal opinion once they are under a coat of paint they are fine - a fair compromise between breaking up an otherwise blank surface and looking realistic. The fit was ok - the tolerances are so fine in the interior that it is essential everything is lined up perfectly to get the fuselage halves together without problems. I had to remove the paint from the edges of the interior bulkheads to ensure the halves closed perfectly. The only other modifications I made were to the windscreen de-icer units in front of the windshield as Airfix has these placed too close together, and the small bomb aimer's windows on the sides of the nose were replaced with clear acetate as I felt the kit items were a little thick. All in all a fantastic kit, and as far as I'm concerned the best 1/72nd scale Lancaster on the market by quite some margin - bravo Airfix! I'm looking forward to the BII. Tom1 point
-
This is a Tamiya kit that I did about 6 or so years ago. I had forgotten that I had taken photos of it and found them when cleaning out the computer this morning. I thought I would share it with the forum so here it is. Try not to laugh too hard at the boxed in photo booth . I didn't know any better at the time. LOL!1 point
-
Hello all, Here is my two latest models. The Tempest is the academy kit, very nice to build. The Typhoon is the new Airfix. Really nice kit that went together great. May have to invest in a few more. Rivet counters beware, i started with the one scheme but forgot i needed to decal the underside before fixing the rocket rails, doh Cheers now, Dave1 point
-
All done now and ready for it's new owner Oli Payne whos name is that on the front cockpit sill. Hope he likes it! decals had to be home made and, although not perfect, look good enough. Thanks for looking in.1 point
-
Hi Everyone, whilst I`m between builds, I thought I`d take the chance to show you the last of my Air Apache Strafers Revells boxing of Monograms 1/48 B-25J, done in the markings of the 499th BS, 345th BG AKA `the Bats Outa Hell` based in the Philippines, 1944 99% OOB with just some seat armour, belts and bits of wire here and there Messed up the nose markings first attempt as the instructions were misleading (or I misread them, more like) but luckily had the set left over from doing `Lazy Daisy` from the previous build Hope you enjoy looking at, Russ1 point
-
Last lot....departure day, unfortunately the Viggen and Tunnan left Sunday night but otherwise most of the stuff departed today. The weather didn't play ball sadly with low clag spoiling the light but hey ho....still worth watching. Firstly this absolutely beautiful Cessna 195 businessliner.... Not a sight you see every day ! two delta ladies.................oh for the good old days, when I first started coming up here.1 point
-
I tend to agree, never had a problem working on either but I still prefer to work on a British design, I always found them easier to work on.1 point
-
Very nice,its got a "Giger" look about it1 point
-
Don't know about Humbrol but the Tamiya paints are best airbrushed.1 point
-
Now that is bloody good modelling,what a beauty............nice one there Johnny1 point
-
...which is why you don't 'request' a go around/missed approach, you just tell people that you are doing it. News reports in California are saying that the aircraft was low and slow, on "idle power". When the NTSB report is published, we may learn why. Kirk1 point
-
And the Monogram kit has from time to time been incorrectly labelled as 1/72, so that actually acts in its favour in this regard. A kit being the wrong scale compared to what it says on the box gives it strong Murdo's Law credentials if you ask me.1 point
-
HI, MIKE,EVERYTHING OK,well if it can make an extension to my cave all the better? what do you mean lying round,they are all vertical? cheers Don1 point
-
On the upside, we all now know how to produce a cracked paint effect.1 point
-
LOL... Enzo I have only grouped all the kits/accessories/conversions part together in preperation for their build... I do intend to build both at the same time but I am comitted to at least 4 other build (club GB's) before I can commit to the IAC double.... But I will keep the forum posted when I do start... photos and all.1 point
-
Somehow I always leave Telford with something that when I get home I wonder why I bought it. So last year it was this little beauty, not my scale or even my subject, it languished in the stash until the hot weather allowed me a little light modelling in the garden. It is an absolute cracking little kit and I enjoyed every minute of building it. I made an attempt at rigging thought it is pure abstract, no need to point out all the ommissions. The radio aerial still has to be trimmed as well. Now if only the redoubtable Mr Adams would do the decent thing and issue the 1/48th scale one he has been working on for years, preferably with a set of NZ markings.1 point
-
Latest update,....almost done now; The GPMG has been fitted along with the winch with the fast rope attached, the rotors are on and the weathering is almost complete but I`m still struggling with the 845 NAS badge, however my mate Paul who is currently serving in the USA has very kindly offered to come to my rescue with some home made decals,.. .cheers mate,... it is really good of you! All the best for now, Tony O1 point
-
Can I just back up what John (Canberra Kid) has written. All Canberras refurbished for the South American market were required, contractually, to be finished in paints to FS595 standards as stated on the drawings for the FAV aircraft:- "Colours and Finish above to American Federal Standards No 595 including White for Ident Markings (White No 37875)". Interesting enough, the colours quoted are a mix of Matt (3 - prefix) and Gloss (1 - prefix). HTH Dennis1 point
-
Cor that is nice, makes me want to get the kit.1 point
-
That looks rather tidy, thanks for sharing your pics. Colin1 point
-
If you already know airwar.ru, then I don't think any of the other sites come close to that one. However I might have something to comment on the words "accurate technical drawings" ! These sites contain collections of drawings coming from many different sources, with books and magazines being the majority. These drawings vary wildly in quality and accuracy, with some being very good and others being very poor. Not only the original drawings do vary in quality, but the scanning process can easily distort the drawings so that the accuracy of whatever you find on these sites must be checked properly before using the drawing. Not to mention that some rescaling is often needed. There's another important thing to keep in mind: these drawings are the result of the work of someone and have been originally been published by someone else. Those who upload these drawings do not usually ask any permission to use the drawings, therefore all these sites commit an act of piracy in making the drawings available. Each of us will have different views on the moral implications of this and will behave accordingly1 point
-
When did the Airfix offering come out? BTW I seem to recall that Monigram's was 'box size' rather than 1/72? Trevor1 point
-
A fine looking Wessex. Looks spot on to me. I intend to do one in the same scheme.1 point
-
Nice model! and good to see it here. We can't have too many Wessex. Martin1 point
-
Hunters used during the Suez campaign were all F.5s. This might have been due to the engine problems that the initial Avon powered aircrafts suffered when using the guns, problems that were fully cured with the later F.6 variant. The Sapphire powered aircrafts did not have these problems. Re. the Mirage III, Heller made back in the late '70s what has been until very recently the best 1/72 kit of the type. With Heller's present situation quite unclear, I would not bet anything on them preparing a new mould. Of course the HiPlanes kit is available and very good, but it's also quite expensive1 point
-
Now thats nice, great scheme as well. cheers Simon1 point
-
Looks superb Johnny, I like the weathering1 point
-
Another relatively easy build is the Revell or Zvedza 787 Dreamliner. The kits is nicely moulded and doesn't have a lot of flash.1 point
-
I think I used about 3 cans in total. Thanks Woody! I didn't take any pictures when I was building it unfortunately as I wasn't a member here then. However, from what I can remember: The fuselage hull is molded as one piece, with the small cockpit top being a separate injection molded piece. There was a complete flight deck and passenger seats provided and detail was excellent here. The wings were also molded as one piece solid sections, and these had to be attached to the top of fuselage by interlocking tabs. The fit here was terrible and required me putting them on a metal grinder in my work shed to file them enough to get them to fit properly. Copious amounts of plastic card and filler were then used to fill the joins - this was by far the worst part of the build. The tail, stabilisers and elevators etc were all fibreglass resin and fitted without problems. Engines and props were injection molded, aad the fit and detail was excellent - all the cowl flaps were separate and if memory serves me correctly there were 128 individual exhaust parts! I painted the model with Halfords' enamel silver as the aircraft was painted in silver in real life. As I said earlier it took 3 large cans to cover the model. Decals (all four of them!) were the kits, but they were very thick and took a lot of settling. It took about 5 months to build. Hope that helps, and thanks for the interest, Rob1 point
-
Thats a great shot of the woman in red shorts .....the Herc aint bad too Andy1 point
-
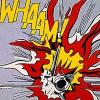
2nd finish this week. Hasegawa 1/48 Mitsubishi T-2.Wonder if SEPECAT ever considered suing for copyright theft?1 point
-
100% agree. Simply incredible build. Worthy of a place in any museum, let alone a display shelf. Ian1 point
-
I think that is the best model of this airplane I have ever seen. The finish is superb.1 point
-
90% of the external lumps bumps etc added so now primed.RN version ready for final coat,WG needs another base coat and I need to mix top coat then try not to mess up white underside,also little bit of filling sanding on both kits.1 point
-
Well after a few days tied up with other stuff, I finally managed to get this one finished. I gave the aircraft, canopy and drop tank a couple of coats of Tamiya matt clear before removing the canopy masking. Really happy with the result, some nice crisp lines using Tamiya tape and a little Maskol. I glued the tank and arrestor hook on and then used a little Kristal Klear for the canopy. So there you have it, my first ever group build completed. I've enjoyed the build, I love the markings and I'm happy with the result. I hope everyone who has given advice and commented has enjoyed it too, more photos in the gallery section. Speedman.1 point
-
I have finished these fellows now. Nowhere near the work shown on the box, however these are only my second attempt at figures of this size. Thanks for looking. Cheers, Michael1 point


.thumb.jpg.d17ff607fc7e89ed057e63fcb6f2a888.jpg)


This leaderboard is set to London/GMT+01:00