
Leaderboard


Popular Content
Showing content with the highest reputation on 07/06/13 in all areas
-
Hello friends After some time away from the bench here it is, the last one just finished. I hope you like it Thank you for looking Regards from Portugal Vitor Costa3 points
-
North American F-86D Sabre "Dog", Yugoslav Air Force No.14094/094, Revell 1/48, LiftHere decals "U.S. JETS IN YUGOSLAV AIR FORCE". Collors Revell, wash Flory Models Dark Dirt and pastels KOH-I-NOR. The aircraft is natural metal. The anti-glare panel is black with unpainted radome. Unit amblem, attacking vulture, about 1966. ...and, three cowboys with red star...3 points
-
This was finished back in October of last year. Built OOB from the latest boxing, apart from some Resin Art wheels, which are soooo much better than the kit ones. Painted using a Tamiya Gunship Grey Rattle Can and varnish is Humbrol Acrylic Satin Spray can. Comments and criticism welcome. Sean3 points
-
Hello everyone together. I would like today my friend Gerd Schindler has this built to show a model. The Heinkel was built for the German “Model Fan” magazine. Gerd and I do this together, he builds the model and I write the text and make the pictures. The model is a Testshot and was built within 6 weeks. Have fun for looking the pictures. Cheers Hans and Gerd3 points
-
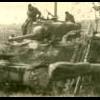
Hi my friends We are in the middle of the morning ,06 june 1944,off the normandy coast.Naval fire support was stopped and the Hms Nelson move at slow speed ,the crew begins to re invest the main deck and the DCA teams quicly regain their guns.A LCT pass near the huge ship carrying with it a Churchill Avre tank unit to support the advancing troops already landed on Sword,Gold and Juno and have started to rise inside the land... See you soon Rémy2 points
-
Hi, I seem to remember this kit came in for a certain amount of negative comment when it was released. Apart from the "matchbox" panel lines there were evidently other issues depending on which review you were looking at. What they did agree on was that it was looked be a straightforward build. And it was. Built out-of-the-box with the kit decals the only addition was some very basic tape belts. There were no real issues putting the thing together and my only problem was masking the canopy. Partly due to my own laziness in not ensuring the masking was burnished down well some primer leaked under the edges, quite obviously in places. The canopy framing is also a tad vague, for me at least, so I resorted to tape framing. Finished using Tamiya paints I tried a bit of pre-shading (again!) and was moderately pleased at the result this time. As a model it'll never win any prizes but won't look bad on the back of Club stand and I enjoyed building it which was the point in the first place - wasn't it............ Cheers Stu2 points
-
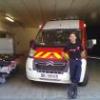
Good evening These dakota served as a flying classroom for electronics and mechanics of naval aviation from 1964 to 1983 on the BAN of Nîmes garons, 56S flotilla The revell model is not perfect. It in particular must resume the windshield block that the model lacks height, cover made with plexiglass. The nose of the model is too fine also, it must be resumed by adding a strip of plasticards por expand especially ason end. Peculiarity of the 56S, the astronomical radome aircraft is moved from the radio compartment to the "classroom". I also Redid the propellers. The aircraft construction has this time was especially layered coating and rivets (generously!)apparent... the rivets countersunk the laminar wing of the mustang were not yet very common... I used as usual from the Rub is buff and a mixture of daygloo testor and revell, not easy to switch to the brush... Finally to you to judge2 points
-
Bought this Russian Project An-26 when it first came out, long before the A-Model kit was released and recently dug it out of the stash. Whilst it was a bit crude and rough in places it didn't give me any surprises or headaches! Spent ages trying to decide on a colour scheme as the kit options were fairly uninspiring and remembered this Slovak AF one that was at one of the IATs. All markings are my own decals and it's painted with a mixture of Halfords, Humbrol and Xtracolor enamels. Anyway here it is, C&C welcome...... Thanks for looking. Steve2 points
-
Well ive been quiet since tuesday due to my final exam then drinking some what. Anyway, heres a visual SitRep. Spent a while sorting out the nose Damn landing gear wouldnt sit straight Just waoting for the u/c to dry before i sort out any odd painting and whack on the decals. Once the decals have dried im going to gloss varnish it before weathering followed by matt varnish. Ben.2 points
-
Ok, here's another completed last year. This is the Tamiya kit, Eduard photo etch set, White Ensign 20mm upgrade set, and L'Arsenal figures. Anyone in the IPMS Battleship SIG may be familiar with this model, and she has been out to three or four shows in the last year.1 point
-
Now for a real British classic. Hope you like the result /Robert Lundin1 point
-
Hi Folks,here are the Meteors that got lost on a previous post,all are painted with Xtracolor HSS and are dressed in Xtradecals.they are the Classic Airfframes 1/48 kits.I did not have the difficulties a lot of people had building these in fact I quite enjoyed them.1 point
-
I've been wanting to do one of these for a while, and here's the result. I found this scheme while trawling the net for inspiration, and thought it looked the part.1 point
-
Needed a quick build project so........1 point
-
Hi, here is my entry, never built a helicopter before1 point
-
The SB2A-3 Buccaneer was a contemporary of the Curtiss SB2C Helldiver but never achieved the latter's success. It served mostly as an training aircraft for the US Navy and also served in the RAF as the "Bermuda". This is the 1/72 Special Hobby built out of the box. It went together very well after the interior was trimmed a little to fit.1 point
-
I built this as fast as I could, since I was deploying and ony had about a week and a half. But here she is, OOB. Wonderful, wonderful kit!1 point
-
This my latest completed model: a Hasegawa's 1/48th Saab Draken. Built it almost oob, except for a Eduard's zoom set for instrument panel and seat belts. Painted with Gunze's acrylic colors (H51, H5, H55) hope you like it! ciao Ale1 point
-
Good evening model special hobby released a few years ago and picked up today by... revell!Even if the installation is not "easy", it has the merit to exist on this scale, so let us enjoy! I represented the Lt Donald Mc Gee of the 36Th FG unit in Port Moresby in June 1942... heavenly place, except for the camos with salinity, the white sand and the Sun, and which thus found themselves with a camouflage any referencing in fede1 point
-
Nice little kit from Dragon - started this ages ago - finally got round to finishing it1 point
-
ZJ138/X No.28 (AC) Squadron 1419 Flight Joint Helicopter Force (Afghanistan) Camp Bastion Afghanistan 2010 Got the beast finished today [/url]1 point
-
Here's my little Tonka, finished it in March but just got around to get some pics. Finished using Humbrol Desert Sand, and Model Alliance Gulf War decals. As always comments and criticism welcome. Sean1 point
-
A trip to the modelshop in the next town mean I now HAVE HAVE HAVE and I'm a very happy camper The kit looks incredibly fresh and new and yummy1 point
-
.......and some older stuff, some not in the best of health: Vampire Magister on the dump.... no photo but next to these derelicts was a Link type trainer. Also, in one of the hangars laying unregarded was a spinner and prop from either a Seafire III or Spitfire Tr.9. Happy days! I hope you like the pix. Trevor1 point
-
Beaufighter!1 point
-
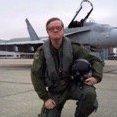
That's really nice, made and even better because of the personal connection.1 point
-
Get the Tamiya 1/48 P-47. The best out there. Everything else falls far short. BTW, love the Emirates A-380. If you got the spend 13 hours in an aircraft, might as well spend it at the bar in buusiness class.1 point
-
Any progress on this build,am running low on popcorn1 point
-
Thanks for looking! It was just out of interest. I am not really desperate for this piece of information. Thanks guys! Laurent1 point
-
Haven't been able to do much lately. But here is a small update. The canopy is in. Used a resin one. Was loads of work and still some cleaning up to do. The bottom of the fuse has been sanded and the extra depth is more accurate and the bottom fuse edges have a corrected rounder radius. The resin tailplane is on after much fettle. Long way to go yet but hopefully I'll have more time soon. Thanks for looking folks. Back in a bit.1 point
-
what are you saying Arnold lol Les1 point
-
Very nice job, don't see many 'Dan Dare' planes......... Dave1 point
-
Looks like you have been busy Bradley. Nice work on what I have seen today!1 point
-
They are injected plastic. I had to drill all of the holes and a little sanding to thin them and clean them up. The photo-etch in the kit is for seat belts plus some cockpit, undercarriage and bomb rack details.Thanks. Cheers Bill! Bill..1 point
-
Araldited the engine in place after a bit more fettling. It took a lot of work to get it sitting - more or less - correctly in three planes: I used a tiny M1.1 die to get the face of the header tank shround perpendicular to the propeller shaft while the glue set. The header tank casting is nice - it includes the faceted armour plating and a separate lower water pipe. If matched the frame mounted water pipe surprisingly well: Here it is with the propeller back plate and blades test fitted: Next job on the engine is maybe to adda few extra wires, and then the most difficult bit - the fillament like engine cover framework. Will the exhausts then fit in the barely big enough rectangular gap in the frames? Who knows? Anyway, here's state of play after this evening's session: Next job will be decals, which I'm really looking forward to doing.1 point
-
I included a link in the instruction sheet to the customer comment/contact section of their web site. I encourage everyone to write to them and request just that. They need to do 301 jet pipes and the Blue Steel. I think the kit is set up for it, so perhaps it's just a matter of time, but a letter writing campaign can't hurt Also, we've run into a potential small technical snag. It is now likely that the detailed squadron crests will be printed separately from the silkscreen portion of the decal so that we can do them in as great detail as possible within the fiscal constraints we're living under. I think they'll look great on the model though. My first choice would be to print this project with Cartograf and have the crests in-situ, but the price they quoted was stratospheric, and WAY outside our budget. J1 point
-
Really clever & effective. (But would they be as faded under the wings, which wouldn't get as much sun...?) <Exits left, running>1 point
-
Hiya Jonners, I hadn`t noticed that but yes there does appear to be something which may be artwork,......looks like two figures which could be a man and a woman with a dress on and it is certainly in the right place as other Hellcat NF.II`s also carried artwork in this position. During the 1945 these Hellcats had B Type upper wing roundels, even during their carrier work up but they were in the process of being converted to C Type by adding a white ring to them and by 1946 I would say that all of them now had C Type upper wing roundels. When I first started looking into the RN Hellcat NF.II`s a few years or so ago I thought that the fuselage codes might have been red when they wore the full O5+ codes, but since I`ve been looking into them more closely I`d now say that they were white, but when the single codes were in use they could well have been light blue, like the Corsair in the FAAM? Here are my 1/72nd scale models of 892 NAS Hellcat NF.II`s, although I`ve a 1/32nd scale one planned too; All the best Tony O1 point
-
Not really, that's an escape capsule. An F-111 gently drifting back down to earth at the end of a parachute really would have been something.1 point
-
Right then have made some progress on this one. I've used parts of the eduard etch set but etch is sooooo frustrating to work with i doubt ill be using it all.1 point
-
very nice ian1 point
-
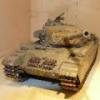
This is Zvezda excellent T90. A bit over engineered in places but a cracking kit non the less, quality bodes well for zvezda future releases. Painted with Vallejo model air and weathered with Mig pigments. There seems to be a real diversity in camo patterns and this one seems a bit to contrasty but am building another with a slightly more subtle camo pattern.1 point
-
One of these I expect.1 point
-
Evening all Well that's the decaling done! All I have left is the under carriage, canopy, antenna, tail wheel and a little light weathering. I'm busy over the next few days so I wont be able to any work on her, but as soon as she's done I'll post pictures in the RFI section. I apologize for the quality of the photos I used my phone to take them. Anyway cheers everyone Yours aye Iain1 point
-
I thought I'd add a few photos of the now blue XF10F as she continues to cure. The model was dry enough to pick it and put it in the photo booth, but I know that gloss enamels take a long time to fully cure. So Jaggy ain't dry enough yet to have me go and mask off the gear bays, leading edge surfaces, etc. Maybe this weekend. So here she is, curing away: Cheers, Bill PS. Thanks Tommy for the link - never saw a picture of the spin test model before, that was great. I've been thinking about a way to add the paddle spoilers, but these were sealed up for Flight 17, the first with the horsals and speed brakes. The spoilers were unsealed for Flight 24, but this also had a "Larger Balanced Tail" of which I know nothing about. Flights 27 and 28 could be candidates, as the original smaller tail was reinstalled, the spoilers were unsealed, whilst the horsals were not removed until Fight 29. But if I can't figure out a way to make the paddle spoilers then it's moot anyway!1 point
-
Today's spray-a-thon - first the grey Then the sand The green And finally the brown With some lightening sprayed randomly, then on with the Klear And unmasking the tanks Peter1 point
-
Ok so I think this is one of my favourite builds so far this year and since I got back in to the hobby in 2012. It is the Academy kit - OOB with no extras and although its far from perfect I really like it. It was an easy build with no real issues and I used Tamiya paints for the camo, Alcald for the exhaust and wing pylons and Model master for the cockpit colour. I used Alcad Matte varnish to finish it off and I have to say I am becoming a big fan of their varnishes. Most of the build went according to plan although I some paint got inside the canopy (causing a lot of bad language!) and I am sure you will spot the other blunders. Overall though it is a great kit and I love this particular colour scheme. As ever i sought advice from BM during the build so thanks to those for the help/input This formed one of my Cold War 'triple build' challenge that I decided to embark on at Christmas - the others being the Airfix 1:48 Lightning and Italeri Hunter - both of which can be seen in the photo's! I consider myself a keen rookie so happy for criticism in whatever form! Chris1 point
-
Upated May 271 point
-
I think that the reality is, the good old 'hobby shop' is almost a thing of the past. Various reasons: 1: Online shopping and big chains such as Modelzone (not their fault) has killed the small 'family business' that was the core of most real hobby shops. 2: There are less and less people interested in 'making things' than there used to be. Talk to most kids these days and they only have use for their thumbs - operating games controllers. Build a model? Set up a model railway? They will sneer, laugh, and tell you it's 'sad' or 'boring'. I once had a chat with a class of kids (I'm a soon-to-retire teacher) about computer games..... They said that the only reason I was 'bored' by them and never played them was because they weren't around when I was young. I replied by saying that I played 'Call of Duty' before they were born! Only difference was, when I was young, we played it for REAL! We went out into the park or woods, with sticks as guns and had something kids these days don't comprehend - IMAGINATION. Unfortunately, imagination, along with model making etc is becoming a thing of the past. Ask any (few remaining) model/hobby shop proprietors..... The VAST majority of customers is old fogeys like me - 58 years old. There aren't enough young people coming into the hobby to make it viable for small shops. Model making, hobbies, crafts and skills? - Old hat! Sad, but a fact. Roy.1 point


This leaderboard is set to London/GMT+01:00