
Leaderboard


Popular Content
Showing content with the highest reputation on 17/05/13 in all areas
-
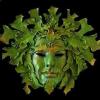
-This another of Mr Paul COUDEYRETTE model, the Monogramm 1/48 old B 58 kit, He is spenting a few holidays in Spain but he have seen your comments about his F 100, he thanks gratfully everybody for their comments on his model . Now the Hustler...... -Enjoy...5 points
-
The performance properties of coatings cannot be generalised. For example lead pigmented paints darken with exposure to atmospheric sulfides. Ruths of Hamburg reported their belief that the artificial resins manufactured by W&B used sulphur in the process which was efficacious in improving their adherence to metal alloys. The use of such resins might have been catalytic to darkening paint and as a result revised pigments, intended to offset these effects, introduced. The only way to truly understand what nachdunkelnden implied would be to read the output report of the scientific analysis of the phenomenon by the paint technicians concerned which led to the change - if that has survived. It might be possible to get some clues from an understanding of the constituents of the paints concerned but even that is fraught with difficulties. Some W&B formulae have been published but that for 1942 RLM 70, for example, lists pigments only by generic colour and (presumably) a catalogue or stores number - 'Blue 1152', 'Green 719', 'Black 1297', 'Yellow 420' - with no indication as to their actual chemical composition. RLM 71 contained Chromium Yellow (a lead chromate) which does darken significantly when exposed to hydrogen sulfide in the atmosphere. Colour is only one attribute of paint coatings and there is a tendency for modellers to discuss that attribute in the one-dimensional visual terms of apparent appearance with such generalisations as 'fading', 'UV', etc., as though these were a constant. This is not surprising as the different types of damage typical of UV, light, and IR result from their different photon energies. The photochemistry that underlies much of the disintegration of materials and the production of yellow by-products typical of UV exposure requires energies greater than about 3 eV, whereas the photochemistry typical of colourant fading, as well as the operation of our retina, occurs in a range between about 2 eV and 3 eV. We are fated to see in the same band as that where sensitive colours fade or degrade, given the related photochemical phenomena. However, the constituents of the paint film, including pigment, may react to environmental or exposure factors in different and divergent ways and not always consistently. "Coatings fail because of irreversable changes which occur in the film as a result of exposure to a variety of possible stresses. The changes in a coating leading to failure are almost exclusively physical and may include phenomena such as gloss loss, colour change, dirt retention, chalking, cracking, delamination, blistering, fouling and corrosion. The stresses that give rise to failure may be large and short lived (e.g. impact) or small and long lived, often cyclic in nature. Moreover, the changes in physical properties of the coating are often a consequence of underlying chemical processes occurring in the coating." (The Chemistry and Physics of Coatings by A R Marrion (RSC 2004)) Nick4 points
-
Finally got this one finished. Airfix 1/48 B-57 with a CMK cockpit and Two-Mikes corrected tail.3 points
-
Well i have stepped away from my usual 1/32 comfort zone and delving into the smaller scale of 1/48 , specifically the 1/48 Testors YF-12A I bought this kit about 6 years ago and it was pretty rare then but you can not accurately turn the standard SR-71 into a YF-12A, there are too many differences in contour and shape in the forward fuselage section alone. I have to admit this it was with some reservation I broke the sealing film on the box as there is no way back then. I could hear the collectors cries from my study, I calmed myself with the knowledge I buy models to build not to horde in an impossible stash. The only extras for the kit would be the Afterburner decal sets, True Details wheels and Cockpit Set. Considering the many changes made to the airframes and the fact that many bits where removed and spurious bits added before they were taken to the museums makes fact a dubious area indeed for these planes . The plan was to lightly sand all the raised panel lines so they are not quite so pronounced, leaving just a trace of them that will show through the gloss black undercoat. From there I can spray an overall Titanium finish Tamiya X-32 then mask individual panels and alter the shades of titanium to give it some depth. the Chines will be finished in Tamiya black, German Grey and Nato black as the black surfaces didnt stay that way for long. No specific Metalizer paints, I have done quite well with the Tamiya Metallic paint in the past. From my own Titanium Bike exhausts I have had over the years I know that Titanium does not polish up like Chrome or Aluminium, It has a dull finish so I think the Metalizers would be wasted here. 2 weeks to complete, finished mid March 2013, also completed recently my A-12, http://www.britmodeller.com/forums/index.php?/topic/234938133-lockheed-a-12-oxcart/ Regards Danny Attree2 points
-
Pro 3532, 1/350 Vickers 0.5" Quad Machine Gun is now available, priced at £4.55 for a pack of 4 mounts. Resin castings plus PE, and the usual clear instructions by Peter Hall. Order now: https://www.whiteensignmodels.com/p/WEM+1350+Royal+Navy+Vickers+Mk3+05+Quad+Machine+Gun+x4+Pro+3532/19227/#.UZVYKcpQ2Hg2 points
-
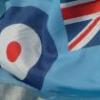
Hi all, here my Swiss Tiger in 1:48. Its from the AFV Club F-5E. Added the Aires cockpit and some PP`s by Eduard. The Decals are out of the box (be carfull with them)2 points
-
Thought id upload my latest aircraft. The kit went together with no problems however the fit of the canopy caused a bit of trouble. Its not my best model but im fairly happy with it as i had a few problems with the gloss coat being a little bit patchy in some places. Painted with Tamiya Acrylics, humbrol acrylic clear sprays and weathered using humbrols new black weathering powders. Any thoughts welcome. Cheers2 points
-
Lublin completed. WIP here: http://www.britmodeller.com/forums/index.php?/topic/234937416-lublin-r-xiii-d-mirage-hobby-148/2 points
-
The old Airfix Gladiator is awful, so I threw it away without putting glue to plastic. I did keep the decals and used them on the Revell Gladiator... ...and only then did someone remind me that Airfix were releasing a new tool Gladys. D'oh! And in a sudden change of direction... No it's not Barry White dressed in Evel Knievel's jumpsuit. It's a rather butch looking Melody Angel2 points
-
Brilliant Idea! I will look forward to the imminent release of the Tamiya Spey Engined Toom in 1:32 that will be announced within 8 hours of you breaking the back of your build odyssey!2 points
-
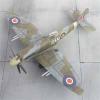
Hi! Here is my last build. The buils was fast forward. Almost no improvments. But the Revell model would need some extra work to stick to reality, because it lacks some details. Hope you enjoy it! Cheers Romain1 point
-
Hi all, I have spoilt myself lately.. I have bought these kits.... I see them for sale at a good price and can't help myself!! The Sherman was a good deal, £399 all in including the Tamiya CD rom on the Tiger 1. The latest purchase was the Leopard, and boy what a bargain!! Less than £450 from the guy I bought the Pershing off, he wanted it "out of the way" I will say, £1150 retail is rediculous, even for a kit this good!! Anyway, what do you get in the massive box.. well, do a search on the 'net and you'll see plenty of reviews. I don't have a table big enough to spread it all out on!! sorry... On with the build, we start with the Differentials, yes, in this kit you get to build the big beautiful gearbox... Parts for the Centre Diff.. Built up... You get two tubes of Ceramic grease in the box. Now on to the side Differentials, there are two of these... Built up.. Finally, I would like to show you a small mod, as recommended by Dodoslovensko on Youtube. He has kindly put up a lot of film on how he built his leopard and modified it. One of his mods was to put epoxy in the two slots in the driving flats of the MG8 Output gears. It's difficult to photograph, but hopefully you can see it.. The blue marks are from the blu-tack I used as a barrier while the epoxy cured. Anyway, that's all for now.1 point
-
Hi, this is my first attempt at a post so please accept my appologies if all doesn't go to plan. It's also one of my first attempts at modelling from a nearly 20 year break. Anyway, here is my interpretation of an 81 Squadron Spitfire VIII flown by F/Lt. Alan Peart DFC. The kit is the ICM 1/48 Spitfire VIII with Ventura decals.... Thanks for looking.1 point
-
Neil @ HK Models has sent me a shot of their latest CAD drawings of this highly anticipated model, which I thought I'd pass on ASAP: The original file is over 2mb, and around 7,000 x 5,000 pixels, allowing you to zoom in to your heart's content. So it doesn't play havoc with the forum software, you can download a copy here. You can see some more here. They are actively looking for comments on the B.I for shape and accuracy, as well as assistance with other variants through to the Grand Slam and Dambusters "specials". If anyone thinks they know enough to help, and are conversent with the internet, email & so forth, please drop me your contact details to pass on to HK. I mention the internet purely because time is of the essence, and any delays may push back the release of this behemoth. We don't want that, do we?1 point
-
Hello, here is my Copersucar Fittipaldi FD-04, GP Brazil 1977, the kit is from Iritani in scale 1/20th. John-w1 point
-
Hi just found this so thought I'd post it up, no daft background music to spoil things either. Tim.1 point
-
Finished this one last week, just now getting around to post the pics. Built OOB.1 point
-
Hi all, these are my Moto GP Bikes, i do love these kits, decals can be a challenge but thank god for Microset. A bit of a Colin Edwards Fan. Regards Danny Attree1 point
-
Hello Folks, Moving back onto some Fleet Air Arm subjects, here is a Hasegawa TBM-3 Avenger kit built as Avenger Mk.III KE461/066 of 703 NAS based at RNAS Ford using the Freightdog Brits at Sea decal sheet. Unlike the later AS.4/5/6 versions which were delivered Post War under the Mutual Aid Defence Budget, the Mk.III`s were ordered under wartime Lend Lease contracts and therefore retained the wartime bubble windows on the side of the fuselage. These came from an old Academy kit which betray this kits original lineage to Frog, who released their kit as a solely British boxing. Anyway enough waffle, here is the model; As usual the model was brush painted using Humbrols old, but good (and lamented) 181 Sea Blue Gloss enamel which was polished using an old rag with Humbrol enamel gloss varnish used to seal in the decals. As the real aircraft was well used and looked rather the worse for wear, I tried to streak the paintwork and gave it a watercolour wash to highlight the panel lines slightly, Hope you like it? All the best Tony O1 point
-
1/48 monogram harrier gr1 to gr3 Monogram kit converted with heritage aviation parts including , nose, inlets, cockpit eduard etch HL-10 supplied the tail , tanks and sneb rocket pods xtradecals falklands sheet paints are tamiya with vallejo matte varnish build thread is here http://www.britmodeller.com/forums/index.php?/topic/234923394-multi-harriers-part-2-gr3/page-2?hl=harrier multi harrriers1 point
-
Good morning, here is my Itelari 1/48 Avenger in the FAA service. W.I.P is here: http://www.britmodeller.com/forums/index.php?/topic/234939034-avenger-mkii/ Thanks for looking.1 point
-
OK here is the finished article. WIP thread can be found here1 point
-
Maybe white punks on dope...1 point
-
Lovely little MIG, well done1 point
-
T-28 Super Heavy Tank Update Set 1:35 ET Model The T-28 from Dragon is a monster kit, and includes some nice detail from the box, not to mention a LOT of wheels! This set is designed to capitalise on that detail and improve it to give a more realistic depiction of various aspects. It comprises three sheets of Photo-Etch (PE) brass, sized 14.5cm x9.5cm, 9.5cm2, and 9.5cm x 5.8cm, the square sheet being of a thicker gauge to the others. Additionally, there is a replacement mantlet for the kit part, with a more realistic depiction of the cast texture, and six smaller resin parts that build up into a .50cal Browning M2 for the commander's cupola. The PE sheets contain parts for a complete replacement set of tie-downs on the vehicle, including all of the pioneer tools, which will need their chunky moulded on tie-downs cut away and sanded back before use. The spare track links also get a new rack, with tie-downs for each of the links, and various brackets on the hull and sponsons are replaced with PE alternatives. The light-cluster is covered with a PE cage, and various lifting lugs are added on the rear deck. The periscopes are all upgraded with PE detail parts, and the commander's M2 machine gun is replaced completely with a resin barrel, breech and cooling jacket, which is augmented with a PE mount and a highly detailed ammo box with sections of link included, plus the bracket into which the box is mounted. There are even short lengths of PE chain attached to the retaining pins, and a pair of handles for the gun, with one spare in case you lose one. The mechanism attaching it to the C-shaped rail is complex, and replicates the mechanism faithfully. On the large removable additional track sponsons that are used to spread the immense weight of the T-28 when it is on soft ground, sets of stowage boxes are built from PE sheets, with hinge and handle detail included. On the underside of the sponsons, a large box is added, which will improve the look of the sponsons if they are to be modelled detached for transport, which allowed the tank to get places that it otherwise wouldn't be able. In order to remove these sponsons, the crew used a pair of mini-cranes that were attached to the hull at the front and rear and could be moved around six points on the tank as the need dictated. These are supplied with the kit as 6-part assemblies, but are replaced entirely by a mixture of PE and short lengths of rod. The frame of the crane is built up from parts on the thicker gauge fret, with the block and tackle laminated from a number of linked circles to give the required thickness and the impression of the cable-ways build into the rollers. The use of rod is crucial to the task here, so don't assume you'll be able to muddle through, and I'd suggest investing in some brass rod to give the assembly some extra strength. A pair of scrap diagrams show how the cable is routed, and as only tow cable is provided in the kit, you'll need to source some braided cable of a suitable thickness from somewhere - perhaps some picture framing wire? Some spare 0.2mm, 03mm, 0.5mm, 0.6mm, and 1mm rod or wire will be required to complete some of the assemblies, so make sure that you have some to hand before starting, and as mentioned above, perhaps some brass rod would be advisable. Conclusion Another great set from ET Model, who continue to produce fabulous looking sets remarkably soon after the release of new kits. The green instruction booklets are sometimes a little difficult to fathom (I hate that word), but with a short scan of the kit parts, instructions and kit instructions, it all falls into place soon enough. You will need skill with the folding and gluing of PE parts to be able to do this set justice, but the quality of the resin cast parts is almost enough to warrant the entry price alone. The texture on the mantlet part is highly realistic. Highly recommended. Available soon from White Ensign Models in the UK. Review Sample courtesy of1 point
-
PM sent also Regards1 point
-
The `what if` in this case being..., what if 617 had asked me to design this years special anniversary aircraft scheme for them. A couple without the dio base. It`s a 1/48 Revell kit, base is from the old 1/72 airfix dambusters dio kit. Sorry for the piccie quality, it`s just a point and shoot.1 point
-
Looking good Arnie, saw one of these listed on Ebay earlier and wondered what they build up like. Share your sentiments about doing a Tamiya kit next time, they seem like they are worth the extra money for the pain you save in getting them together - looks like youve got this one well beaten into submission though. Cheers, Stu1 point
-
Very nicely done!!!1 point
-
Good Job Mish!1 point
-
Mr Airfix, I hope you are listening regarding a 1/48 whirlwind? Hehe!1 point
-
It's a subjective opinion and I'm not claiming to be right but if I were modelling it, I would go with insignia blue for the cowl band. The logical case for black is a good one and I would certainly not criticise anyone for choosing black, but to me the contrast with the prop blades and fin band, and the similarity of the nose band to the blue in the fuselage national marking, suggests that blue is slightly more likely than black. In cases where no-one actually knows for sure, and there are no other known sources of information, then the best advice is always to go with your personal gut feel, otherwise every time you look at the model you will feel you should have done it differently.1 point
-
Eta June? Ah nuts, I'll be at cosford ... what to do if one appears there, in a very large box? Would it even fit in the back of a panda?? May have to leave my mate behind , or sell him to pay for it I think that's the kind of model that really would be a labour of love. Usually my level of interest lasts a max of two months, after that I just want the damn thing finished. However, if someone took a year to super detail one of these, it would certainly look impressive, and no doubt a knighthood would soon follow ( services to the plastic adhesive and enamel paint industry )! Mind you, I'd love to see a built up one for sale on evilbay, postage = airdrop from a Herc1 point
-
Currently working on the Revell/Matchbox Hawker Fury Mk1. And because life ain't interesting enough, I treated myself to the Eduard Weekend Airco DH2 (1/48 for a change). What gauge line should I use for the rigging, d'you think?1 point
-
Come on guys, calm down and lets just celebrate that fact that Tamiya are releasing another great aircraft kit. It may not be everyones cup of tea, but as has been said, if it sells well they just might release something you are interested in.1 point
-
She looks great, I do like the undersides. Just a shame the 48th one is hard to find . I have toes for fingers and can't get away with 72nd.1 point
-
An excellent job on this Trojan, Russ ! It's presented ideally here, especially against the background greenery. A very solid-looking and capable aircraft. Mike1 point
-
Been doing some domestic negotiating in preparation for when it's out. Told her that she can move out of she doesn't like it !!!!!!1 point
-
Looking good now Brian.1 point
-
Great batch of birds. Looks like I'll have to break down and buy Humbrol if I want EDSG. Been looking for it now almost 2 years in my favorite brand of enamels with no luck. Keep up the great work.1 point
-
Wow that's a great model, loved the weathered metal finish, brilliant!1 point
-
You can use Model Master Intermediate Blue or Gunze Color No.72 (Intermediate Blue).1 point
-
I use PRU Blue for what looks like a close match. Cheers, Roy1 point
-
Thank you Brian & Jason, nice to know you're finding inspiration from this one, go for it on the Aeronavale Seafires as I for one will enjoy seeing them. Right, progress to date, made a stand. Lump of clear plastic that once served as a display for sunglasses covered in rumppled tinfoil and painted a couple shades of blue. A bladed bicycle spoke will hold the model aloft; Canopy sorted for detail and glued on; Then the hook glued into place; The photo I found showed I had the wing root colour demarcation wrong so that was carefully masked and corrected. A bit of weathering to blend it in again then I'm pretty much done;1 point
-
Looking good Stu1 point
-
I still get huge fun for building the Matchbox kits. Admittedly some are complete pants but some are real good starting points and most of all, they're nostalgic1 point
-
Here's my final build thread for today. I've started on the 540 motors... I checked the mesh of the pinion gear with the spur gear, before assembling the gearbox halves,because Tamiya state 14mm from the end of the gear to the motor casing, but one of them needs to be more like 16mm to mesh correctly . The gearbox, fully assembled is quite a lump and weighs in at no less than 0.7 Kg!! These parts go to make up the output shafts, they drive the sprockets and bolt on the outside of the hull. Assembled... This kit is typically Tamiya quality. This has been a pleasure to build, complex enough to be interesting and simple enough for anyone to have a go at!! See y'all tomorrow. Nige1 point
-
Correct Joe,Geoff Wellum certainly flew K. I'm pretty certain though that by the time X4591/QJ*B was knocking about with 92, Bob Tuck had left to command 257. The only reference that I can come up with for her HL,is that Alan Wright flew her once whilst his usual steed, QJ*S,was being serviced. Not a bad thing,Alan Wright was one of 92's aces but scored all his kills on just three Mk1/1a Spits which were all coded "S".1 point
-
I know what you mean, but those steel arms are so expensive!! I think the pivots should also be replaced. I guess this one needs to stay on the carpet? So, on with the gearbox build... Here's the parts for the mainshaft... Here's the shaft all built up.. I've glued the bearings into the gears as they are not a tight fit, and it would be catastrophic if they spun in the gear.. don't ask me how I know... On to step 4 of the manual and we are building the layshaft.. Once again, all put together... Spur gears. These are driven by the motors and transfer the power to the gearbox. Finally, we can see the gears in the lower half of the gearbox casing. the casing is made of glass reinforced styrene. Very strong!! Check out Tamiya's website for details on this 'box works... very clever!! http://www.tamiya.com/english/products/56020leopard/ Bottom of page. Thanks for looking in Nige1 point
-
OK, the wings were fitted to the fuselages. And the F-4. I decided that, given the work I was puting into the rest of the model, I should really do something about the slats as used on the F-4S, which seem to differ from those on the Air Force versions. I used some lengths of airfoil shaped styrene strips glued underneath the leading edges of the wings and blended them in. They're a bit difficult to see but I hope they look the part. you can also see in the above photos that I have added some extra styrene to the inboard ends of the outboard slats. This was to give them the extension that takes the real ones past the wing fence and can be seen more clearly here. A look at how the ailerons came up. They're still not actually glued into a specific position yet. and some miscellaneous bits and pieces. Re-scribing the F-4's inner pylons. and after assembly. and the A-4's tanks and pylons. and that's how they stayed for a while. Cheers, Motty. The first real delay was because I really didn't feel like the next step which was fitting the etched cockpit sills and details supplied in the Hi-Grade F-4 kit. I finally had a short burst of enthusiasm and got them done a while ago. and painted. Note that between the unpainted and painted shots that I also got rid of the chunky, kit supplied HUD and have replaced it with the etched one from the airwaves set (I forgot it was on there). plus I summoned the courage to add the etched frames to the windscreen and center pillar. and, again, that was where they stayed for a very long time. Cheers, Motty. Soooo, what have I done lately? Well, the next big disincentives were; 1/ That I needed to mask the interior of the A-4's canopy (that internal framing was going to be just too visible to "rough" it), and I finally found some enthusiasm for it. with some of the internals fitted, including those four, tiny mirrors. and the outside done too. and 2/ The really big disincentive was the need to apply the Hi-Grade etched canopy frames to the inside of the F-4 canopies. Super glue and clear parts? Yuck! It wasn't going to be made any easier by the fact that the frames were made of separate parts and not just folded into shape. I thought it might be easier if I could sub-assemble parts of them off the canopies first, so I glued them together with a small piece of styrene strip to help reinforce the joint. I then had to thin these strips down so that the pieces would fit against the angled sides of the kit parts. There were also some white-metal parts to be added to the rear of both canopies too. Although it mostly went ok, I did end up with some super glue on the inside of one of the canopies so i had to sand and polish it out. But I think they came up ok. and then, of course, they had to be masked too. And here's everything after painting. The A-4 canopy with the internal masking removed and the center support assembly fitted along with two small instrument clusters at the front and middle of the top beam. and the F-4 canopies with their internal masking removed and a bit of dry brushing to highlight the details. And that's where I'm at right now. Let's see if I can keep it going for a bit longer? Cheers, Motty.1 point


This leaderboard is set to London/GMT+01:00