
Leaderboard


Popular Content
Showing content with the highest reputation on 11/04/13 in all areas
-
Hello everyone, Here is my recently finished EF-18C, from the Spanish Air force, as seen at the 2007 Artic tiger meet held in Norway. This is the Excellent Hasegawa kit in 1/48th scale, and i used the Aires resin cockpit, and the decals come fron Model Alliance. I had wanted to do this scheme for quite a while, but finding a Hasegawa F-18 proved difficult, but got there in the end, and finally got the model ive always wanted. Anyway enough waffling and on with the pics......... And a few detailed shots...... So there ya go, hope you all like her, and so sorry for all the pics. Thanks for taking a look All the best, Martin4 points
-
Something a bit outside my norm, but a fun build4 points
-
This is my recently completed Dragon Jagdpanzer IV, snapped up for a bargain price at the HaMeX model show at Hanslope last year. Finished with Tamiya acrylics, Humbrol Clear and a mixture of Mig and Humbrol weathering powders. The ivy wrapped around the front of the tank is from Eduard.3 points
-
A recent finish, Revell/Monogram 1/48 F-105D. An old kit, but a lot of fun.3 points
-
Hi Here she is my Malta Spitfire I started last summer. This is BP962 coded at the time 2/R of No 603 Squadron. The upper colour is White Ensign USN WWII 5-N Sea Blue and for the WIP you can jump to http://www.britmodeller.com/forums/index.php?/topic/234923064-172-sword-spitfire-mk-vc/ Patrick3 points
-
Completions have been a little slow this spring in 72 Land, but I did get another done this week. I'm not really one for F-4s, but sometimes there are markings schemes that I can't resist. I had a Fujimi F-4K (which is externally the same as an FG1) and Modeldecal #72. It turns out that there are some minor mods required for the specific aircraft used by the A&AEE: a flattened radome underside and a small doppler panel. After some asking around, Grant Matsuoka was kind enough to send me a leftover radome parts and decals from a Fujimi boxing specifically for this aircraft. Many thanks to Grant. Like most Fujimi kits, the construction phase went smoothly, but since it was a raspberry ripple scheme the painting phase was long and complex. I still don't think the red stripes are exactly right, but I'm not remasking after all that! Sometime soon I'll take a shot of this model with its stablemate, the Alcock & Brown scheme. But it turns out the earlier model needs some cleaning and repair before it gets in front of the camera. This is completed model #425 (#6 for the year), completed in April of 2013.3 points
-
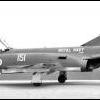
Straight form the box. 84 Squadron, Akrotiri, Cyprus 1987. XS518 made from old "scrap" decals hence the size is to big.2 points
-
These may help those who wish to dig out the venerable Airfix kit and do some detailing. I took these shots at Point Cook RAAF Museum just out of Melbourne last weekend. A lot of work had gone into making the Bloodhhound look "spick 'n span" but sadly it is located outside exposed to the coastal elements.2 points
-
This is the 1/72 Trumpeter kit. I built it four years ago. I understand the kit has a few variances from being 100% accurate but I really enjoyed building it and I love looking at it. Note that the nose cone has been repainted to radome green since these photos were taken. Cheers!2 points
-
Another motivational subject for the Seaplane GB. BroPlan vacform kit. Decals from Tauro national insignia and the red sunburst markings by decal striping trimmed to shape!! I built this some years back for a SAMI review.2 points
-
The Soviet Union in the late 50s and early 60s was faced with the possibility of its airspace being susceptible to the supersonic bombers being developed in America, namely the B-58 Hustler and B-70 Valkyrie escorted by supersonic F-108 Rapier fighters. To counter this threat the Mikoyan-Gurevich design bureau designed and developed the Mig 25, which was given the reporting name Foxbat by NATO. Whilst the F108 and B70 were cancelled due to the improved accuracy of air to ground missiles, the Mig 25 continued to be developed and it first flew in 1964, it subsequently establish a number of records and NATO analysts accredited the design with numerous abilities which got the alarm bells ringing in the west. The ultimate result of this concern was the F-15 Eagle. However, a young Russian pilot who was already beginning to question to himself the propaganda he received from the establishment. Had this further questioned when he received a briefing on the capabilities of the latest fighter to enter service with the supposedly inferior west (the F-14 Tomcat) and it was plainly superior to the latest plane he was flying. That pilot was Lieutenant Viktor Belenko of the 513th Fighter Regiment, 11th Air Army, Soviet Air Defence Forces based in Chuguyevka Primorsky Krai. He formulated a plan to defect to the west and awaited until the conditions to do so were favourable. That happened on the 6th September 1976 and he flew his Foxbat to the civilian airport of Khofodate in Japan, the plane overran the runway and slightly damaged its landing gear but was otherwise intact. Although initially reluctant to allow them to do so, the Japanese authorities allowed the US to inspect the airframe, which they did in great detail, so much so it was actually returned to Russia in thirty crates. The super planes secrets were revealed to be not as special as expected. The structure was mainly steel with Titanium only being used where absolutely necessary. The Radar used vacuum tube technology which I remember being held up for ridicule in the press at the time, neglecting to mention that this equipment was better suited to extreme temperature changes and more resistant to Electro Magnetic Pulse. So here is my attempt at making Lieutenant Belenkos Mig 25 Foxbat made from the Revell 1:48 kit (5860) and Begemot aftermarket decal set 48-010. Viktor Belenko insisted he did not so much steal the plane but amended the flight plan whilst in the air without authorisation.2 points
-
Hello all, Here is my recently finished Tamiya P-51D Mustang in the markings of the 100th FS, 332nd FG, the 'Tuskegee Airmen' Kit is OOB except the addition of a True Details seat. Build thread is here 'Duchess Arlene' was piloted by Captain Robert W. Williams who was one of the first American Airmen to down a ME262 over Germany and went on to complete 50 missions. He was later awarded the Distinguished Flying Cross. My fledging Tamiya P-51 collection: Comments welcome, thanks for looking. Dave2 points
-
Heres something else a little different. Another of my 72nd civilian subjects and a kit that isn't so easy to find. Its one I built probably in the late 70's. Originally finished overall bare metal and USN markings from various Microscale generic decal sheets, portraying a Blue Angels support aircraft. The Blue Angels badge coming froma a Hasegawa Panther. But after many years of neglect and some minor damge I restored it. Inspired by Canadian aviation and the Whiskey jack decals that had a short lifespan on dealers stock, I went for the one you see here. Fortunately I kept the 3 blade props and swapped them for the 4 bladers that were fitted originally. So, here I presnt you the Curtiss C-46 Commando, CF-NAE of Nordair. Sometime in the 1950's or 60's(?). Model finished with Whiskey jack decals. I'll add a couple more photos later in week or over weekend. PS: I forgot to mention for the benefit of those who would like to know, the kit was by Williams Bros.2 points
-
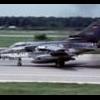
Well it is finished, saying that there is always a load of tinkering you can do afterwards but overall I'm happy with it. Took a while and I must say a huge thanks to Ray Charles at TwoSix Decals for going the extra mile in providing the decals and they are tremendous decals. I spent 9 years on VC10s in the 70's and 80's and we did spend some time robbing stuff of 809 when it slowly disintegrated at Kemble. I do have some small bits of airframe from it and thought it would make a nice model subject. Not easy with the Airfix kit but with a fair bit of messing, particularly in the stub wing area, and area I know intimately from spending so much time in, on and around the engines. Hope you like it. Thanks for looking Mike2 points
-
Hello all, Only joined BM a couple of weeks ago - found the site whilst researching tips for the big Mossie Mrs Card got me for Christmas. It's very close to completion now, so I thought I'd post a couple of pics of where I am and what I've learnt on my return to the habit after a long break. Here's the beast as is (astute observers will spot the bit I've left to do - more later): I really wanted the AEAF stripes, and spotted the Xtradecal scheme at Hannants, so I've followed that. I'll post some build pics later on. Lessons learned: 1) The cost of the kit is about 1/3rd of what I spent in total (starting from scratch, you understand). I now have paints galore, an airbrush, brushes by the dozen, files, masking tape etc etc. 2) The internet is the second best thing you can use for a build. This site, amongst others, has provided a mine of hints, tips and tricks. 3) Cocktail sticks are the best thing. From fiddly repositioning to decal placement to getting paint out of that hole to cleaning transparencies to chewing vigourously when my patience is running thin - they're my new best friends. 4) Don't just test positions before gluing for the step you're on. Mispositioning can throw out steps a long way further on (I'm talking about the MG adjusters in particular here). 5) Probably most frustrating - Humbrol Decalfix works beautifully on the Airfix decals. Got the 'Keep Off' decal to hug all the rivets which amazed me. Using it on Xtradecal decals made them disintegrate. Hence the missing 'W' and shiny patch on the port side - gold star if you spotted it. New set ordered and will be applied at the weekend. 6) Xtracrylic paints do not like Isopropyl alcohol. I now have a tub of blue & yellow cake mix where I tried to thin their 'Sky' colour for the underside. Lots of other things that I'm sure all the vets here have all been through. I am now looking for an old shop display stand to put the thing in (dimensions: 75cm x 60cm x 15cm at least to hold the thing). I'll post on Ready for Inspection when complete. Enjoy Si M...2 points
-
Bit of a 'Lazarus" build this one.....started some years ago (I thought that I'd started to post on here, but couldn't find it!). Its Hasegawa's superb Phantom FG1. Not sure which markings to finish her off in yet.... A few reasons for the stall....one... the kit came without FG1 slotted stabs (Can't really blame Mr B for that - he did give me the kit for nowt!! ) , two....a House move or two and three..problems with my computer and downloading pics.. I've used Aires resin 'FGR1(sic)!' cockpit. Now I believe that this is more akin to an F4J than a true representation of an FG1 'pit - especially at the rear, but I'll use what I have and try to amend it as I go along. These are all of the photo's of progress up until the kits resurrection.... First off the Aires set.. .to their normal high standard of moulding.... Painted... To accept Aires resin..Mr Dremmel is your best mate!! The resin 'pit ready for shoe-horning in... Squeezed in one side... And the fuselage halves joined - and yes...quite a bit of remedial work will be required on the cockpit sill- not sure if that was me being over enthusiastic with Mr Dremmel or not..... Thats all for now..2 points
-
Just finished this 1/6 scale Darth Vader figure, kit is a Far Eastern re-mould I picked up off ebay with a couple of other SW figure kits. Moulding isn't fantastic but with a bit of cutting, carving and several hot water baths it wasn't too bad. The kits lightsabre was a cast resin lump so I used some plastic tube instead. Painted using various manufacturers blacks including Vallejo Air, Vallejo Colour and Xtracrylic. Then finished off with various varnishes. All comments welcome. Thanks for looking. Cheers, Warren1 point
-
Hello all, since MPM ist preparing more V2 related stuff in 1/72 I ve uploaded some scale drawings (however in 1/76) I made a while ago to share, for everyone interested: https://www.box.com/s/mwq6e9px1lj1mpvivz3x They are about the pump trailer for the B-Stoff (alcohol), the T-Stoff preheater trailer (used at cold weather conditions), and the big 2axle cable carrier trailer. All this trailers were never released in kit form, they would have been all at the firing postion around or near the rocket. Enjoy! Regards, Juergen Kurz from Salzburg, Austria1 point
-
The following two planes where built for "The Battle for the Third Reich" Group Build, they where done totally out of box and I am fully aware that the grey on top is too dark, I was following Vallejo's colours for it. Live and learn eh? Please be gentle as this is my first RFI thread North American P-51 B Mustang III No. 316 (Polish) Squadron, Royal Air Force Friston, UK, August 1944 and No. 112 Squadron, Royal Air Force, Tantarella, Italy, 1944. Kit: Revell 04133 and Revell 04137 Scale: 1:72 Paint: Vallejo Model Air and Model Color Extras: Lots of swearing... and shamelessly stealing Mish's format Build thread: Linky Clicky Here... Thank you for looking, Kind Regards, Dazz1 point
-
Is this the first Academy Phantom finished on BM? Overview. This is one kick-bottom kit from Academy. Detailing is superb all round and there are bags of weapons to fit if so desired. That it has some inaccuracies is a given, what kit doesn't? However, they're nothing some filler and a re-scribe won't cure. Yes there were lots of aftermarket added, this is perhaps the second only Phantom I've ever built as it's not a favourite of mine, so I figured to detail it as the chances of building another are few and far between. I did see an illustration a few years ago of VF-51s CAG bird and have always wanted to build that example. Who could resist the multi-coloured eagle feathers? My advice to anyone contemplating building this kit is..........Go for it. It knocks spots of the Hasegawa kit on price alone. Do not use Aires' cockpit set unless you're a total masochist. It looks great but is a PITA to fit. Limit yourself to some nice bang seats and your good to go. The seamless intakes needed some fettling to fit, but that's expected. They're well worth the price. Eduards Jet pipes look fantastic and again, well worth the money. I'm 50/50 with the tailerons and perhaps would leave the kit ones on unless needing slatted ones. They do correct the incorrect panel lines on the kit ones though.The a/c intakes are a nice correction to have too. The Furball decals are top notch. I can't recommend them enough. Cartograf printed them and the kit decals which are just as good. Absolutely no problems with them at all. Anyway, here it is in all it's glory. And yes, I noticed the sponge in the intakes, it's gone now. W1 point
-
I think the biggest problem for RIAT is that it suffers from history and expectation. The current financial restrictions on flying, plus the reduction in aircraft numbers in all air-arms and especially the incredible reduction in different types and colours will of course have a negative effect on all air displays but for RIAT with it's years of Bears and Blackbirds and endless lines of Hercs, Tornados, Phantoms and Falcons etc is just that it has seen the most dramatic downsizing of all. Waddington and Yeovilton won't be 80's style spectaculars either but they were never the RIAT. I wonder if it went biennial it would help. Maybe only pestering the worlds air forces every other year could help reduce the number of knock backs. And improve turnouts?1 point
-
That's a pretty poor model they have in Cosford, from the look of the photos - some of the parts don't fit well and look like afterthoughts, the rivets on the tailplane aren't in straight lines, the jet pipes aren't even round and the surfaces need more sanding to get rid of the blemishes...1 point
-
Thanks for those links Mike, but as far as the front end goes, I think I've got it covered?? This is the Tamiya 1/16 sprue, copied with some whitetack covered in talc. And here is the resin, setting... I thought i'd take these pics now, then you can all laugh at me if it doesn't work I'm gonna go and cut out those bulges now. Once the tamiya parts are dry, I can check the angles.1 point
-
If you've got me doing their Barracuda, the least you can do is the Firefly..................1 point
-
And it's good that you defend RIAT - the folks that pull it together do a superb job - quite often, it appears, against the odds. They can't help changes in military budgets and planning - but I do suspect that attendances may be on the decline now... Reason I haven't gone last two years hasn't so much been price - more a case of not a lot that interests me these days. I seem to remember RIAT constituting something like the equivalent of the World's fourth largest airforce in terms of numbers and equipment types - there were so many current military types on one airfield for the show. Can anyone confirm that? Iain EDIT - wonder it the Brietling team would let me get some close up detail shots for my looooooooooooooooong term project? May just have to drop them a line...1 point
-
http://www.airtattoo.com/airshow/aircraft/aircraft-in-the-spotlight/breitling-super-constellation - it's true! You're right about the 'glory days' being over - Russian Bears and Czech hind display teams are long gone, along with dozens of Tornados, KC-135s and Hercs in the static park...! It's a shame the Kemble shows of a couple years ago are gone - the Hunter meet was fantastic, and similar to the Flying legends-type shows you mention. I do wonder though how long will there be people who can afford to run complex warbirds? What will be left then? I will be milking every last bit of value out of my dosh though...as I said, it's the only show I will be able to make, and for the price of a couple of decent kits, still worth it for me. You'll have to excuse me if I seem a little defensive of RIAT!1 point
-
Bit more done. Upper surfaces all tidied up and smoothed: Undersides cleaned up and all the camera lenses masked to protect them from scratches: You can see the sheer amount of filler needed for the join between upper and lower halves. I have lost some panel lines, but nothing major. My references show them to be quite hard to see anyway. Also added the engines and a few bits of scrap etch for good measure: Added some lead wire to the barren front wheel well: Overall shot, and to give an indication of size: Next up is to tidy up the remaining filler and add a few more detail parts. Hoping to get primer on by Saturday. More to come. Dave1 point
-
Hi Juergen, thank you very much for posting your drawings; I'm sure that they will be very helpful. I like to scratchbuild vehicles in 1:144 scale and I hope to use your plans to make a little diorama. Can I ask if you have any other drawings for this type of subject? Best Wishes Mike1 point
-
nice build,love Luft'46 jobs,looks like a 262 on steroids!1 point
-
No, that's cheap, tawdry, and trashy (it *is* New Jersey, after all)1 point
-
No THIS is KC-135 bling Julien1 point
-
That is inspiring ! Superb !1 point
-
A fantastic looking diorama.1 point
-
Once the parts have been cut out and prepared, a vac kit is no more difficult than any other model. The real trick to doing vacs is in preparing the parts for assembly. One of my favourite techniques is to spray the sheet in overall dark grey before scoring and snapping the parts out. This lets me clearly see how much plastic I need to remove. Aha! Now that my pictures have come back, I can post examples. Now you see it Now you don't1 point
-
Hi Roland This was pointed out to me previously and of course my defence is that we are seeing the pilot CORRECTING his bank to starboard - ahem Since the photos were taken, I've adjusted the ailerons so that the deflection isn't so violent and is in the "correct" direction1 point
-
Great! I'm getting back into my Bristol Freighter MK.1B from the Argentine Air Force 1949 I have used the Magna conversion kit - I have a much better edition (w/o the chickenpox divots ) however the "nose" is equally wrong... As it is REALLY thick I think some judicious sanding with an orbital sander is going to do the trick... After much consulting of scale drawings and pictures I'm going to use the Airfix Stirling cowlings since they seem to have the right size AND form (parallel sides - it's a MK.1!). Your project has given me the push I needed to complete my Bristol Frightener Cheers!1 point
-
HI Everyone, I've slowly been putting the kit together, there are a few issues with fit, mostly to do with the Aires stuff but I'm getting there. I did some tests with Alclad on an old Hawk kit. I'm quite pleaseed with the result. I used Tamiya fine white primer for the base, rubbed down and washed with soap and water. Then a fine mist coat of Alclad gloss black, rubbed down with micromesh, then washed.. then two wet coats both rubbed down and washed between coats. I then experimented with varios mix's of Alclad, including polished aluminium, chrome with hot blue and without.. also mixed with dark ali,pale burnt metal. I also tried spraying at different distances using about 12psi. It seems to work best spraying very light mist coats and buldinh up.. the more you spray on the less reflective it becomes... I put the part with some kitchen utensils which I think shows how good it looks! Some pics of the aircraft.... lots of seams to fill! the fit of the Aires wheelbay wasn't great.. so will fill it when I spray and fit the jet intakes....1 point
-
Amazing work Vitor, this is going to be beautiful when it's finished Chris1 point
-
Looks great, I like the trolley. Nigel1 point
-
Very nice. That trolley is amazing...1 point
-
Very nice indeed, love the trolley, I did my Hawk kit as a US Navy Loon, bit more colourful than the standard ones. Thanks for sharing your pics. Colin1 point
-
Very nice work, the scratched dolly is class with the weathering you've done to it. Great looking V1 too, painting is superb, really awesome work.1 point
-
Really nice that, mate! Been after one of these for a while - I just fancied building one1 point
-
It's really not that hard (otherwise I wouldn't be tackling it myself!) and you learn as you go along - learnt many things from my E build that I've taken forward. If you can solder wires, you're pretty much set - the rest is just modelling skills! So here's another quick update. Finished off the upper hull lighting - couple of pics for your viewing pleasure: Next, I'll be finishing off the lighting and initial construction of the battle head...watch this space! Cheers!1 point
-
Thanks mate. Made a bit of a start today by adding the pilots' coaming and side consoles, both of which seemed to be a good fit after a bit of play and some dry fitting: The cockpit itself is very detailed. A chunk of resin had to be removed from the bottom of both tubs. Once done I gave the parts a prime then their coat of grey, ready for all the panels & switches to be detailed. While that was drying, I added the upper tail portion to the fuselage, and took this quick size comparison snap: Yep...going to be big! Tail section. The fit is, well, awful! I then dry-fitted the upper and lower sections and found that the tail section did not sit correctly and 'sunk' slightly in the middle. So I removed it and glued the two rear most parts together as well as adding a piece of styrene tube for support. I will let it set and attach as a separate piece: I then moved on and attached the two fuselage portions, minus the tail section. That's all for now, but i did take a shot of the lovely true details seats: And the not so lovely moulding on the upper fuselage: Next up is to detail the cockpit and hopefully get that section closed up. More to come. Dave1 point
-
Another quick update. Been working on the upper hull - lighting the grids at the back. I used a small red LED strip (just 3 LEDs) and place these in the middle of the grids. Used some clear red plastic I had lying around and glued these to the inside. Then got some styrene sheet, cut to size, painted matt white on the inside to disperse the light a bit better, and black on the outside, as a light block. The overall effect is that this area glows red - it looks 'redder' in reality than in these pics. It is a bit too bright for my liking so I will be adding a resistor to dull it down a bit. I plan to use the same technique for the engine 'discs' along the upper hull with blue LED strips. Cheers1 point
-
Hey guys...quick update. Finished off the lighting in the lower hull half. Used red LED strips and styrene strips as reflectors to diffuse the light through the bussard scoops. I also installed 4 yellow LEDs with 1mm FO for the pulse phaser cannons - these will be linked to a flasher board. SO now working on the upper hull and I noticed that the model doesn't come with quantum torpedo launchers...arguably, there are three, two on each side of the top hull in where the targeting sensors are, and one below the deflector. That's what I want to go for - these will also be linked to a flasher board There is a hole in the deflector dish where I can put a 1mm FO attached to a white LED but nothing for the others so have decided to scratch build these launchers...I'll let you know how I get on in my next update1 point
-
Quick update - been working on the lights in the lower hull - here's a few pics of the build: The way I've done this means that there is no direct light through the windows - it's all reflected off the pieces of styrene card I'v used as reflectors. Must say, it looks excellent when lit up! I also made a small alteration to include registry lighting using a piece of styrene tube and a tiny 1.8mm LED: Cheers1 point
-
I'd certainly be interested in getting a couple John, it looks like a little cracker. I was nevre aware that it had been produced. I built your 1/48 Rapide several years ago, its was a lovely kit. I fitted it out with a full interior & engine. John1 point


.thumb.JPG.3498f40362ff13ebfc4b2e45abbd545e.JPG)


This leaderboard is set to London/GMT+01:00