
Leaderboard

.thumb.JPG.3498f40362ff13ebfc4b2e45abbd545e.JPG)

Popular Content
Showing content with the highest reputation on 09/04/13 in all areas
-
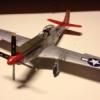
Hi there, Here are some pics of the revell 1\72 Condor that i completed last year. Unfortunately which is always the case with me, just when all was nearly done i got a small spillage of something on the fuselage when i was fixing the aerial wire, then broke the antenna in a moment of panic. i really enjoyed putting this kit together, the fit of the parts was on the whole was very good . Built out of the box I reckon its one of the best value kits on the market today. Hope you like it .3 points
-
There was build just 11 marine reconnaissance planes of Ju.290a-5 (# # 0170-0180). This instance, the model of which I try to build, had a serial number 290110172. If we believe to “Revell”, this board had to take part in the operation "Eisenhammer", which included the bombing of the 12 largest power generation centers on the USSR. Due to lack of bombers and fuel, as well as other technical issues "Operation "Eisenhammer" has been postponed several times. In February 1945, the operation was still prepared - was allocated 200 reconnaissance planes and about 100 "Mistel" who were based near Berlin and waiting for favorable weather. However, after a raid by U.S. aircraft were destroyed on the ground 18 "Mistel" plan has been postponed again, and the war had already ended. However, in his book «Vom Original zum Modell Junkers Ju-290-390" Karl-Heinz Regnata indicated that the board with serial number 290 110 172 first flew in November 1943, had the original board code KR + LC, the military code 9V + BH and WAS LOST!!! in August 1944. This model from Revell is a pretty nice set with good detail. However, the assembly was used set of etched parts from Extratech, which, in my opinion, very well all the basic set. Scheme RLM74/75/65/83. Paints - Tamiya. Varnishes - Futura and Tikurilla. REFERENCES: 1. Monogram Close-Up 03_Junkers 290 2. Schiffer Military History - Junkers Ju 290, Ju 390 etc. 3. Vom_Original_zum_Modell_Junkers_Ju_290-3903 points
-
Finished a model for a change!! Due to work & family not done much as I'de like lately!! Anyway, here's my F-35, built OOB. Was'nt best kit to build as some people know! Model will now go on display at the FAA museum in our forthcoming new carrier display. Hope you like? Dave3 points
-
Out of the box, painted with a mix of Tamiya and Vallejo and weathered with post-shading, AK interactive pigments and PM wash. Nice kit to build, as usual I got stencil fatigue and called it a day! Thanks for looking3 points
-
Hi guys, This is what I was up to with my RAAF F-111 build. New IP as the kit is a decal only. Intake trunking Cut the pilots canopy open to show off the work inside. New throttles...actually the kit doesn't have any to replace. All dressed up and ready for the canopy. Will have these... ...hanging off these Main wheel well...the central ducting has been repainted black as the red is incorrect...thanks Pappy. Over wing seal from Tamiya tape. Verlinden boarding ladder Primed First round of colour went down over the weekend. Gunze Acrylics thinned with Mr Color Lacquer thinner....nice and smoooze! Touch ups have since been applied but I'm really happy with how the paint went down. Such a shame to have them gone. I'd always look skywards whenever the distant rumble of a TF-30 shook the landscape around Ippy. Hope you like her. Cheers Mick2 points
-
MPM kit, The kit was originally released as a Northrop A-?? and re issued with a lot of different parts to make this Swedish adaption of the airframe. It included the bigger engine and skis in resin plus lots of etch, of which I only used some.2 points
-
Just catching up with this thread. IIRC the grading course was about 10-15 hours - I'd have to look in my log book to be sure. I was lucky, because I did my grading in the summer so the weather was good - plus I did mine from a sea job so got to stay the full 3 weeks whether I'd finished grading or not (if you were short service you did it from Dartmouth, and the moment they'd made their mind up about you they sent you straight back to the joys of BRNC). So yes, I did solo on my course; the weather was good so we'd done the official bit in a couple of weeks, but Boxer was at sea so i couldn't rejoin her, so I just stayed on for the extra week and flew - couple of NAVEXs, some extra aeros, and the first solo. Happy days - though (and this is probably sacrilege!) I actually preferred flying the Bulldog, which is what we progressed to next (at Topcliffe / Linton-on-Ouse). I never exactly nailed landings in a fixed-wing tail-dragger, so moving to an aircraft with a tricycle undercarriage was probably a blessing for my instructors as well! No doubt I'd have got the hang of it in the Chippy in due course. [Mind you, landing a tail-dragger was nothing to the fun of the early hovering trips in a Gazelle. Good job Predannack is a big airfield, cos I reckon I explored every inch of it in my laughable attempts at staying still!]2 points
-
Well, I literally had to blow the cobwebs off to get back to this, but yes, Hood is once again in #1 Graving dock for some attention, had to spent most of yesterday just trying to clean the blighter without breaking too much lol Gonna make a big push, and see if i can get this thing done (yes yes i know you've heard it all before blah blah) so basicly after cleaning, i need to re-make the cage antennas which im doing now, and decided to scrap the pier, I just really wasnt happy with the sea, looked too rough for shallow water, and really didnt want to face having to weather is and everything, so thats removed, might use it for Repulse, havent decided yet but here are a couple of pics of todays work primarily on the sea base I had to repaint the entire hull insitue which was a BALLACHE since the airbrush spat a load of paint while i was doing the sea, but managed to get it all done and looking more or less shipshape worth noting that this model has now taken longer to build, than the actual ship till next time2 points
-
Nice job again Russ.2 points
-
Gathered all me bits for this ('cept decals) so will be starting in earnest. Meanwhile I need to stay here https://www.airbnb.co.uk/rooms/289282 points
-
Hi all, So, I managed to get some paint down over the weekend; only primer and pre-shading, lots of work but she's gradually taking shape!! Here are some pics: So, that's about it for the mo, please jump in with comments and tips, they will be warmly received!! Thanks, Val2 points
-
Just received an e-mail from HLJ re Tmiya's next 32nd kit , and yes its the Corsair as Jenning and others speculated it might be , they're starting with the 1 Birdcage version , a version that has never been kitted before - the HLJ pre order price suggest roughly the same on street price as the Spit/Mustang .. Life for the followers fo the One True Scale is looking pretty good! Details such as they are http://www.hlj.com/product/TAM60324/Air I have to assume that the -1D and other varients are also one the cards !1 point
-
Oldies and built some years ago. But a taster of more light aviation types in my collection. They're not brilliant so be kind as I did build these when I was 'Little'( ) Airfix Islander in Humber Airways markings. I don't recall when I got these, but on the sheet it was printed exactly as per Airfix decals of the day but never seen in the kit!! And was bought for 20p in a model shop at the bottom of Reigate Hill (Pigsty, you may remember it?)No packaging or any thing, just the decals. The Piper Cub is the KP kit and French civvy(authentic) reg with a bit of fiction for the fin badge. F-BETI appeared on the Brish Civvy register as G-AXHR I think. Next the PA28-140 Cherokee is the Aurora kit.The reg,G-ATUM, again, is authentic and I based it on speculation as to its appearance under ownership of the BA Flying Club. A bit 'maybe' finish I'd call it.1 point
-
This is the Adolf Galland edition of Hasegawa's Fw190A6. I had a mishap with the chevrons so had to have a go at printing my own which was a first for me, the "2" was printed too as the Hasegawa decals were very yellowed and were all replaced. gun barrels and the pitot were replaced with brass tube. There are a couple of mistakes that I'm now aware of but I'm happy with the overall look. I didn't add too much weathering as I figured that his machine would have been kept fairly clean and not have seen the type of use that front line aircraft had. And with some friends... I hope you like them Duncan B1 point
-
After battling with various vacform builds and getting a little bogged down with endless scratch-building etc. I fancied building something 'out of the box', and after treating myself to this a few months back I decided it was just what I needed for a 'refresh'. This is the first large scale Luftwaffe aircraft I have built, and although not usually my topic of choice, having seen the real thing in Washington last year I fell in love with the 'ugliness' of this aircraft and the sinister look it possesses. This kit has been built 'as it comes' from Revell, and I must say it has been a very enjoyable and trouble free build. It has taken about two weeks from start to finish. The mouldings are beautiful, with very fine panel detail and plenty of internal detail too, including individual decals for the flight instruments. I have made no additions to this kit, apart from some seat-belt buckles from the spares box - a closed canopy and careful painting has been sufficient to represent the seat-belts. I did also modify the undercarriage slightly as it Revell have produced the gear as un-weighted, so I shortened the oleos by 2mm on the mains and 3mm on the nose and re-attached them after drilling them and adding some wire. This has captured the sit of real aircraft well I think. I found the fit of the parts excellent on the whole, with only a small bit of filling needed where the nacelles join the wing just forward of the leading edge. Everything else literally falls together. The radar aerials are very finely moulded and although there are aftermarket replacements available, I didn't see the need. Decals were equally superb, going on without issue - even the spinner decals! I raided the spares box for the tail fin swastikas, but other than that it's as they come. Painting was completed with Xtracolour enamels from Hannants using a Badger 200 airbrush. I sprayed the RLM76 as a base coat, then added 'blotches' of the darker RLM75. These were then blended together with a further application of RLM76 between the blotches to achieve the lattice-like pattern of the camouflage. The undersides were then sprayed 'Night black'. Finally, a couple of coats of Humbrol Matt varnish finished the job. I haven't seen many of these built with the black undersides yet; I think it adds to the overall 'sinister effect' of the aircraft. One word of warning with this kit though - add as much nose weight as possible! Revell suggest 70g in the nose and 25g in each engine nacelle - I added approx. 80g in the front and 30g to each engine and it only just sits on it's nose wheel... be warned! On to the photo's: Heinkel He219A-2 of 1./NJG 1, Sylt, Germany, April 1945. (Yes I know - I need to paint the 'flat spots' on the tyres! My advice: if you haven't got this kit yet then buy it, and if you have it in your stash then build it! Tom1 point
-
Hello all, Here is my recently finished Revell/Promodeller F-15E Strike Eagle in the markings of the 492nd FS based at Lakenheath, but on deployment to Afghanistan 2006/2007. Build thread is here Parts used included Afterburner decals, Pavla seats, TwoMikes cover set, Wolfpack designs OIF update set and Eduard Remove Before Flight tags. Weapons came from the spares and are in the shape of the standard CAS load at the time, consisting of 3x GBU-38, 2x GBU-12, 1x GBU-31, 1x AIM-9, 1x AIM-120, 2x Fuel tanks and SNIPER pod. Weathering ideas came from various pictures of Afghan jets in several publications. 97-0221 dropped a staggering 102 bombs during the 06/07 deployment. All three GB entries together: Comments welcome, thanks for looking. Dave1 point
-
Well, new to the museum. More pics here: www.panzerwerk-schulz.de Mike.1 point
-
Found my old Airfix Chippie; it's still in one piece!! Sadly the paint on my hand painted FSS marking hasn't survived Blue colours have all faded Still maybe an excuse to do another one and try and replicate some of what you have achieved with your build. I did find some old pictures in my logbook taken in the FSS hangar at Swinderby which does confirm that the FSS logo was on both sides of the fuselage though if that helps.1 point
-
I finished the hurricane ..... it's awful ..... I was on vacation a few days, and I always leave with something that happens, it's like losing the momentum and I forget what I had to do ... for that reason always ended so fast all kits .... after retouch it a bit for the final photos (when all 4 be ready) the next , i think , is going to be the heinkel 1111 point
-
Hi folks, tahnk you for the compliments but this won't be special, I am just trying a few things out and (mostly) having fun. I did a bit more work today. The tailwheel was basic and didn't look much like the real thing, so I did a few bits with the same wire as I used to support the ailerons. The shock absorber is just some Tamiya tape. It looks OK, not great, but OK: I did the tubes on the cabin roof too. The little bits under the engine nacelles are representative oil coolers. The lower ones are by the main undercarriage angle struts, and are all but hidden, so I haven't put those on. Well, that's my excuse as they were darn difficult to fit!: The upper wing has pipes and, errr... , something else, over the fuel tanks; the pipes running back to the trailing edge of the wing. I did the 'something else' with shaped strip and the pipes with lead wire. They look like this: I have primed the model and now I have to pluck up the courage to set about it with four or five shades of silver!1 point
-
From the information I have, it's looks like it's going to have to be an October 1943 machine as there is no track toolbox provided and also no exhaust stack flap (that I can see in the pics); both were removed that Month. This would also fit in with having no gun travel lock, as that wasn't fitted until November 1943. Just follow the instructions as to where things go, they would represent a mid of October 1943, not sure about the rest of the tank though Mike D.1 point
-
Lovely build and collection.1 point
-
What ho chaps and chapesses, After a short interlude off to Australia im back and finally finished off my MG-REX model Decided to paint it in a Digital Camo pattern which was an absolute BALLACHE! but the end result is actually really sweet and im very happy with it. Added some decals, mostly from a 1/72 F-22 Kit of course the problem with low-vis Grey markings on a grey model is some of them really dont stand out very well, but i suspect thats the whole point of low-vis markings in the first place I also weathers the model with a mixture of an oil-wash, some Promodeller Dark Dirt, and some cMK Star Dust which gave a great effect, i tried to keep the dust confined to the lower parts of the legs and the underside of the model where i guess the dust would be kicked up. now unfortunately something has literally eaten away at some of the plastic, I had a couple of parts literally crumble away while i was moving the mode, so i decided to post id and reinforce with glue the joints, so it really isnt re-posable now, im not sure if it was poor plastic being use int he modelling, or a reaction to something i painted with (but that was just acrylics, an oil wash and a spray of Halfords clear) so just be careful if your making this kit, but otherwise very happy witht he end result thanks for looking, hope you like it1 point
-
The hairspray technique is when you build your model singing along to the musical...... No, its a method for achieving a realistic paint chip effect. It can be used to chip models only slightly, or for heavy weathering as is the case here. Basically in this case, I painted the base camo scheme (the brown and green) as per normal with my airbrush, and washed the panel lines etc as normal. You then just take some hairspray (living with a girl suddenly has its advantages beyond the obvious!) and cover the model in a layer. I then just airbrushed a layer of white over the model. You then take a stiff brush, damp with water and just gently scrub away at the areas you want chipping, and the top layer of paint will come away. Be careful to go gentle though, its very easy I found to end up removing more than you may wish. Its actually very simple, this was the first time I had tried it.1 point
-
Thanks to all who have taken time to reply / leave comments for this build. I have being busy the last couple of months and I haven't had time for much building. Anyhow, the riviting is finished ( Roughly translated, that means I ain't doing any more enough is enough) Heres a couple of pics before I slap some paint on her, and add the photo etch portholes and the decks (wood engraving removed with stanley knife and sanding blocks) Cheers Martyn.1 point
-
I am having one of these.Ok two then hahah.1 point
-
Very nice! thanks Mike1 point
-
Ouf! Here they are! And sorry, it's an early C1.1 point
-
Been looking for Earth for years............ .................Smudge1 point
-
Hi Andy. Great to see another of your 'Kiwi' builds mate. Trust me, get brave and weather it to 'hell'!!!!!!!!! Cheers, Pete M.1 point
-
You could try asking Airfix for a replacement hull - there would be a delay, but could you work around that while waiting?1 point
-
Nice job Richard for such an old kit, I think the chipping is a little over done. Overall finish is great thought. How long did a Ju88 last in the BoB days? But as you say you have learned from this build and I am sure your work is improving. You will notice the newer kits put up less of a struggle when building them . I have been building models for some time and still am scared to weather my models. So good on you for having a go!1 point
-
Looks nice to me, mate! Good job! Regards, Jason1 point
-
2 more potential schemes drawn up Winter splinter: And a normal winter: Any comments on them? (Apart from pics being crap!) Sean1 point
-
Very nice model matey!!1 point
-
Blimey Russ, you knock out some lovely models! Cheers John1 point
-
Very neat Andy. You're right, the digital cammo looks great on Rex. I also like the neat touches like the slime lights. Those, along with the AK codes give the mech a realistic, contemporary feel. Good job.1 point
-
The Landing Stage by the look of it....Ferries, Passenger Liners etc Does look good!1 point
-
Just as Simon says, it's a fantastic set! I'd get another one. John John1 point
-
That's a good question! If it isn't kitted, it ought to be! F1 point
-
It certainly took me by surprise. The detail looks amazing, imagine if they were to do a range of dock sections or a drydock, that would make for one stunning diorama. My fingers are crossed !!1 point
-
Gary You could go over the silver chips with a pencil and tone the areas down a pit !!!!!!! Would also vary the chipping !!!!!!!!! Nige1 point
-
Very nice.1 point
-
1 point
-
Thank you very much everyone! All your advice is greatly appreciated. Houston: Nige: I haven't sealed it yet so I'll give it another go this afternoon. And thank you for the less is more tip. Jonas_415 : yes, flory washes are acrylic. And I will take my time next time. I did a small area and was so wowed by the efect that I practically bathed the vehicle in wash over the next hour or so This was a good learning curve though. The other thing I've noticed is that the silver showing under the 'chipped paint' (I used the salt method ... and overdid it a bit) looks too silver under the 'dust'. I'm guessing that that's just a case of taking my time and getting a small brush and treating each chip with some rust pigment/wash ... and maybe using slightly darkened silver next time. (?) Once again, thanks for the help. Cheers Gary1 point
-
Nice one! love the finish.1 point
-
More pictures: Eric1 point
-
As to the kit, it looks like the real difference between the boxings will be the wings (ie the cannon bulge and shell chutes). The other basic differences are already present (both rudders, both intakes, IIRC both elevators). I doubt they will tool the different cowling panels for the early Vc-derived cowling. This is consistent with how they handled the Bf109E, with wings specific to the boxed variant and the necessary other bits already present.1 point
-
Thanks for the compliments everyone. It gives me that confidence to carry on, just as the eyes are straining and the old hands begin shaking etc! I'll try to do a bit more this evening. Thanks again Mike1 point
-
Hi Bill No need to change anything except the one little panel line for a 14.19,21 (to be 100%). It's the shape of the 18 and FR14e rudders which is always drawn wrong. Tommy Atkins (Metal kits) did explain to me once (he flew 21's with No 1 Sqn), why the contras were fitted with the larger rudder . Apparently propeller gyroscopic force is eliminated but torque is not and on take-off at low air speeds a dropped wing is recovered with the rudder, as coarse use of the aileron to lift the wing introduces induced drag compounding the problem. Here is my old 21 from 1 Sqn days I fitted the four slot wheels as the BB flight stole the 3 slots for their 19's. Please note that the 14 rudder tip in my original sketch is slightly too high. Arthur Bentley and I are close but not totally in agreement over some shape aspects of the 14/18 rudder differences but the drawings I have of Arthurs are preliminaries. John1 point


.thumb.jpg.158e2e086d45b8f96b7d93b8bee8dc21.jpg)


This leaderboard is set to London/GMT+01:00