
Leaderboard


Popular Content
Showing content with the highest reputation on 21/03/13 in Posts
-
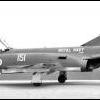
Hi folks, Finally managed to get this one done, after failing miserably to finish it for the VC-10 GB many moons ago; Two-Six transfers of course, which weren't as forgiving as I'd hoped they'd be, doing the compund curves around the nose were a nightmare! Hope you like it.4 points
-
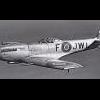
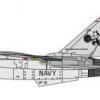
Well this is the second one of 2013. I have always loved the Italian Starfighters, but especially in their last years of operational service. I searched for this kit for year a couple of years and then out of the blue one came into my local model shop and the owner put it aside for me for a bargin price of 20 Pounds. The last Starfighters became very dirty and weathered towards the end, and i tried to replicate this. The weapons load (Sidewinder aquistion round, and Air data pod) are scratch built. Anyway, enough waffling on and on with the photos.... Sorry for all the pictures, but i do like an italian starfighter :-)3 points
-
Hi all, Revells B-52 in 1/144 Scale. The tail gun shouldn't be there on the real thing. Sprayed with Xtracolour Enamem "Gunshit Grey" Brian2 points
-
Hi Guys after a lot of faffing about I've decided to call time on this build. 148th Classic Airframes kit, not particularly difficult to build but not for a beginner either. Xtra colour paint and decals from the spares box. I could only find squadron codes for this a/c and had to make a decision to use an X for the a/c letter as nobody has any information for sure, now it's finished I expect someone will now come forward. The props were a pain, the Blenheim props turned ant clockwise and so the angle to the airflow is the opposite to what you'd expect, not only does it look odd but I knocked them off numerous times and they didn't like being refitted. The kit left me with the desire to build a Mk.I but I'll go for the Sanger kit. It can't be any harder. There is a story behind the aircraft I chose to build. I work for Her Majesty at HMP Wealstun near Boston Spa, Yorkshire. Across the road from the jail is a farmers field with a wacking great electricity pylon in the middle. N3538, suffering from engine trouble was looking for a safe place to put down but unfortunately for the 22 year old pilot, Sgt. William Curlet at 09.27hrs on the 13th March 1942 he collided with the high tension cables carried by the pylon and crashed into a field 100 yards East of the Church at Thorp Arch, about half a mile along the road from where I work. Also killed were P/O John McColl, aged 20 and Wop/AG Sgt. Eric Johnson, age unknown at present. When the weather gets better the farmer has given me permission to look about the field, p'raps I can find some part to display with the kit. The Church at Thorpe Arch The High Tension cables, the jail is behind the trees directly behind the pole on the left. The Blenheim landed right in the middle of this picture. Last picture is of the Blenheim and seven Dambuster Lancasters. I know, you can't see them but you will eventually. There is an eighth on top you cannot see. Regards Paul2 points
-
Hi, I decided to give an overhaul to all my older kits within the next few weeks or so. I will be introducing them to you one by one always when I finish the overhaul. Finally the long promised D.H.53. Build from the Choroszy Modelbud resin kit as J7273 of (most probably) CFS, summer 1924, it should have been the first of my de Havilland trainers for overhaul. However when I started cleaning the kit, the rudder stripes decals (together with the rudder serials) peeled of instantly. I decided to hand paint the rudder stripes but when I applied the white enamel base over the silver dope, the silver started seeping through in rather too artistic way for my taste. So then it was about stripping all the paints from the rudder, cleaning it thoroughly, two new coats of white, one coat of red and blue and then the serials back on again. At the same time I decided to replace the fuselage serials too in order to keep the fonts identical. Hand brushed with Revell and Humbrol enamel paints. Markings as supplied with the kit, serials by Modeldecal. Warning – the kit on the photos appears to be far larger than in reality. Thank you for looking and for your comments. Patrik2 points
-
bestest, M.1 point
-
I built this earlier last year and thought I had placed it here. Well heres the finished article, hope you like. Heres some of the pictures.1 point
-
Hi all, Here is my first attempt at the four wheeled kind :-) having posted my first two builds on here of the flying kind my daughter bought me this for Christmas and I have only just finished it due to being back at work. Any pointers would be great as I have only just started this new hobby and I am really enjoying it. Only had one main issue which was I applied the decals onto the tyres before fitting the wheels....whoops! most of the decals detached themselves from the tyres when fitting the wheel hubs :-( we learn from our mistakes. Thanks for looking and for any advice. Pip1 point
-
Finished this one off a day or so ago. As I said im my build thread, this is a very underrated old Revell kit that can be had at cheap money on Ebay if you watch out for it. I gather it was the old Protar kit that was re-boxed by Revell. Excellent detail, lots of included wiring and plumbing (far more than on any Tamiya kit I've built) and well fitting parts. The tyres are typical Revell shiny vinyl rubbish but with a bit of harsh sanding I managed to remove most of the gigantic seam line around the centre of the treads. I couldn't get rid of all of it, as the remaining line is an indentation in the surface that would really need filling. The decals are good but being old, they needed a lot of Microsol to get them to even bend over even a fairly gently curve. You can see a gap between the upper red cowl and the lower black side pods - that's because the upper body is meant to be screwed down with four minute screws leaving the car with loads of hidden internal detail unless you spend an age with a tiny screwdriver and a magnifying glass to get it apart. I just made up four little wire tags that are a dog-leg shape inside, to hold the car together. They aren't a tight fit, meaning it's easy to take them out to expose the car innards, but hence the gap. I'll live with it. All in all a fun build. Roy.1 point
-
In hindsight..... I don't think a Sea Harrier FRS1 was such a good choice for a third build since my 30 year modelling 'holiday'. Why? Because too many people around here know too much about them! So building one of these as a test of new to me materials and techniques possibly wasn't such a good idea. So.. You are all going to have to forgive me for using a little artistic licence when I built and painted this. Mostly based on and inspired by this aircraft ( http://www.abpic.co.uk/popup.php?q=1055311 ) on its return to the U.K. after the Falklands conflict (I was in my early teens at the time). I have taken some liberties based on my lack of experience and just tried to get a presentable model, rather than a totally accurate presentation... Could be too much of the 'what ifs' about me. So please excuse the lack of tilted tail plane, the port side tank I should have weathered differently, the lack of 'distressed' sidewinder rail and a hundred and one other little 'errors'. So.... This was built from a second hand Esci kit that sadly had suffered somewhat in its slightly squished box and some of the main parts were somewhat warped. Cue careful bending back into shape in a bowl of hot water. I should have taken that as a warning because THIS build fought me every inch of the way with many little things going wrong. Trying resin parts AND some limited brass all at the same time was almost taking on too much. A bit of a challenge for this inexperienced soul I say, but I had to have those gorgeous Pavla gun pods, nozzles and intakes, as well as give brass a try with a little Airwaves set. I also had a bunch of decals from back in 1982, and a part used Modeldecal sheet that would allow me to create this aircraft without buying any other aftermarket sheets. Sadly, the Esci kit stencil set was pretty awful and didn't respond to Microsol at all. With no decent stencils I decided to replace the whole lot with the excellent Extradecal Falklands Anniversary sheet. Oh, and finished off with the Master pitot and angle of attack tube. I'm totally sold on these, they're great! The brass not so much. So here it is. I'm sort of pleased with it, it's a million miles away from my Matchbox rendition when I was in school, but.. My next model is going to be an out of the box build me thinks... Maybe practice my NMF and weathering a bit and not bother with all those bells and whistles... This time. And before I let you get on and look at my images... One last thing. I will eventually stop banging on about how I haven't done this for 30 years since I left school but I want everyone to know where I'm coming from and... well... erm... be more kind. SeaHarrier03 by IrritableRabbit, on Flickr SeaHarrier01 by IrritableRabbit, on Flickr SeaHarrier04 by IrritableRabbit, on Flickr SeaHarrier05 by IrritableRabbit, on Flickr SeaHarrier06 by IrritableRabbit, on Flickr SeaHarrier07 by IrritableRabbit, on Flickr1 point
-
Last year I got given the model as a birthday present, nothing new in that I guess, but it had been 30 odd years since I last made a model. It seemed a daunting task at first, what with all the new paints and equipment available nowadays, so off I went and bought an airbrush kit from EBay, thinking that it would do a good job of the model, especially the bigger size of 1:48, always used to do 1:72 kits. Down to my local model shop to get the paints required, and bearing in mind I had nothing at this stage, ended up with quite an outlay, but got all the colours required, boy the prices have increased a lot since my last efforts. Had a quick play with the airbrushes and some mixed paints, just to get used to it all and found it was a lot more difficult than I had imagined, and a lot of practise was needed. In retrospect, I should have bought a compressor and tank, to make life easier. The model took shape slowly, I was determined that this was not going to get messed up. Using the new to me,Revell liquid cement, was a joy, no more messy joints like the old days with tube glues, and with the fine steel tube applicator a darn site more accurate. The kit was better than I first thought, when dry fitting the parts together, only one or two joints needing filler when the assembly was finally stuck together. I made the mistake of not using a primer, something I have learned about from reading through model builds on the forum and will do in future models. Airbrushing of course was a disaster, and I also needed much more time learning how to use it properly. Somehow managed to get what paint I had applied, washed off and decided that I would use the good old fashioned brush method for now and relegated the airbrush to its box. It took me a month or two to get what I thought was a good model completed and rekindled my interest in model making. I have lots to learn for sure, but the whole experience was enjoyable.1 point
-
Hi All This is my first submission in well over a year. Fresh off the workbench (dining table!) is this Academy P-47D, which I sarted well over a year ago. The kit is the nose art boxing which I bought of e-bay and included Verlinden and Eduard detail sets, not bad for under ten quid!! However, both details sets were made for the Hasegawa kit but with a bit of persistance and surgery I managed to utilise the Verlinden cockpit and some of the Eduard PE bits. Not having an airbrush I decided to try BareMetalFoil, which went down really well, taking my time. That was in December 2011, and the kit got consigned to the garage over Christmas 2011. Upon retreiving it last Spring the BMF looked more like an Aero Bar with bubbles all over the place and I decided to abandon the project and left it in the garage for another year. However, I took the bull by the horns earlier this year and started to rescue the foil job. I replaced some of the foil panels and with the assistance of a very fine hypodermic needle, I pierced the bubbles on the others and smoothed them down. Job eventually done! But then the Academy decals just would not settle on to the foil and came off in my hands to the lightest touch, with the exception of the nose art - wiered but thankfull!! But I had a set of national insignia from Sky Decals, I made the codes up from various other decal spares and stencils from Crazy Modeller which all went down fine. It's not perfect, but I'm still quite new to this and have learned lots in doing the kit that I can apply to my next challenge. A good thing about the P-47 is that a lot of your hard work to complete the cockpit is still visible after you close the fuselage up and attach the canopy. I'll certainly be watching e-bay for another one!! Enjoy the pics! Adam1 point
-
Hello, here is my latest build, the Dragon 1/72 T-34. I hope you will like it. Thanks for looking.1 point
-
Just had a look through the stash and looks like the Hellenic boxing is suitable as they are both block 52+ (P&W nozzle, NS Inlet). As for the Tamiya kit, it's more expensive but the aggressor boxing contains both nozzles and both intakes. The Wolfpack parabrake housing is too small and it would be better to try and get hold of a spare kinetic one. Sean1 point
-
This was originally built as part of a group build on another forum, but then got put on the back burner ..... took me 3 attempts to get going on it and get it finished, it's the Fujimi Enthusiast kit, and not the easiest one I have built, needed a lot of modifactions to get the thing to fit together, but I wasn't given up on it, it's painted in Porsche white gold basecoat and then clearcoated using single pack acrylic lacquer and then polished The body was broken when I got the kit, the windsheild frame was snapped in two and the quarter light windows were all broken off , I decided to try and fix the body, which turned out o.k,1 point
-
Simple answer..........................................NO End of an ERA1 point
-
Sniff. Miss them. The most beautiful looking passenger aircraft EVER. When I was a kid any passenger plane I drew looked like the VC10 without me ever seeing one at the time! At least I can say I actually worked on them for a few years before I left. Weird thing was, most of my mates hated them to work on. I loved them! Sad days, wonder if the new stuff will have the same affect on people when they retire? Rick.1 point
-
UPDATE 4: Hey, Did a bit more on the MGB today.. The engine and wheels before extra painting, as well as the first test fit of the interior and shell. I also decided to have a go at sorting out the flashy grill.. I'm kind of annoyed that the seats have no back to them. Didn't realise it until I'd finished spraying them. I think I'll scratch-build some backing for them over the weekend.. Here's the grill before treatment... ...and after... still needs a fair bit more tidying up but it's better than it was (slightly)... After the gearbox and various bits of the engine were painted, I weathered it with a bit of Paynes Grey oil paint.. Came out quite well for an OOTB attempt.. Steering wheel painted up a bit, wheels dry-brushed (my own method - don't know how else you're supposed to do spokes, unless you take hours and paint them by hand). Unfortunately I screwed up a couple of them and the paint went where I didn't want it.. have to redo those patches and then do some extra touch-ups. The engine will also need some more work done, as will the grill. That's it for now. More work to be done on this one over the weekend, including spraying the body hopefully. I'm weighing up between Racing Green, the classic red or possibly Teal. Even though my own MGB GT was English white, it's quite hard to do a white paint job well, so I'm steering (no pun intended) away from that option. Thanks, as always, for looking, Andy.1 point
-
Looking on Air Britain (go on try it for yourself... ...you know you want to)! Most of those parked with their wings folded have their flaps lowered but, this picture shows one with the wings folded and flaps up! http://www.abpic.co.uk/popup.php?q=1358420 Here's a (the?) Bucc' at Bruntingthorpe - wings folded flaps up too! http://www.abpic.co.uk/popup.php?q=1263783 And this one in service... http://www.abpic.co.uk/popup.php?q=1159380 So it would appear that most of the time the flaps were deployed on the ground (wings folded or otherwise), but it was possible to have the wings folded and the flaps up. The question is, did the ailerons (on the folded part of the wing), always deflect outwards on both sides with the wings folded? Wez Edit: Added more links to Air Britain1 point
-
Ah, what a thoroughly enjoyable read. Thanks for sharing your recollections Steve. cheers.1 point
-
Very nice. Didn't know there was a 'gunshit grey' Dave1 point
-
Not necessarily: the standard boxes with the PE parts will be more expensive for sure, but the weekend edition boxes that will follow are likely to be priced similarly. The Fw.190D weekend edition can be found around £12 so I'd expect the Spitfire will sell for a similar figure. Still, buying both is the right way to go: one can never have too many Spitfires !1 point
-
spot on!1 point
-
Looks stunning Sir!1 point
-
CF-188 actually, if you care to get picky.1 point
-
This is the last I recall hearing on this issue: http://falkeeins.blogspot.com/2010/06/hartmanns-last-109s.html Curiously enough, I thought it was Hartmann himself who figured out that the tulip marking on the nose was actually working against him as the Russians started trying to avoid him and his scoring took a noticeable dive... so he started flying others machines and supposedly quit painting the tulip on subsequent machines assigned to him and started racking up kills again. I know there's at least one photo out there of him late in the war in front of what is supposed to be his machine and it didn't have the tulip painting (but the rest of the machine can't be seen either)... so when the supposed G10 photos at the link above surfaced... it really makes one wonder what was really going on. As far as I know, the definitive aircraft with picture proof of the tulip are White 1 and the white painted machine used for a short period with JG.53 There's another part of the above blog that mentions the possibility of one of those G10 photos being photo-shopped with the tulip because of pixel differences.1 point
-
Top build! John1 point
-
Stunning build well done and your photos do it justice something that I can ever manage so great stuff !!!1 point
-
Some really nice big scale work happening here! Nice to see some variety in the markings too! Cheers,1 point
-
In many ways it is a VERY GOOD kit; the shape is pretty reliable, the shortcomings in this area are fairly easily addressed and its styrene-for-buck ratio is ridiculously good. I think of it as a high-quality vac-form type kit with a huge potential to add as much detail as you want. High on my personal list was to address the lack of framework/panels around the nozzle openings, closely followed by the ducts on the engine access panels. Then got dragged into improving the cockpit, then the auxilary intakes then the fuel metering unit, then the slippery slope. I've been stalled (for years - lterally) on the nitrogen bottles in the main landing gear bay. I admire your restraint and look forward to your completion of a very nice build. Kirk1 point
-
Very nice....1 point
-
You call these old things?? They look superb!!!!!! My opinion is, that they belong to a museum. I don't dare to ask what you do with the rest of your models. Cheers Sernak1 point
-
Nice work so far in building and painting. One thing though, and i am saying it constructively, is that the Harrier didn't look quite right for some reason. Looking closer I am wondering if it is sitting a little high at the nose and if so is it because the nose wheel seems elongated by not having enough flex at the scissor (?) joint? http://www.milairpix.com/PLANES/GR7_4.HTM This picture may help1 point
-
Very nice indeed which camera?1 point
-
Awsome Shar, fantastic work, looks great. All the best Chris1 point
-
Fantastic !! Really Nice1 point
-
That is a very nice Harrier, good job.1 point
-
I like that a lot, well built, nicely finished and photographed beautifully1 point
-
That is one fine kit, I love the finish.1 point
-
Very nice indeed!1 point
-
Very, very, very nice. The finish is superb. Very restrained and very believable. Andrew1 point
-
Really nice build and you would never know that your last build was 30 years ago. Particularly like the even sheen, not too glossy. It also shows what a great little kits the ESCI early Harrier series is, when built with care like this.1 point
-
I think it looks absolutely great! Well done! I love the shiny finish and the decals look good! I take it it is one of those where the white in the roundels was painted over? How did you find those resin-parts? I am about to order them for my Airfix Sea Harrier.. Already have the brass pitot-tube..1 point
-
Now that's beautiful, great pictures too. It's making me want to dig my Fujimi one out now1 point
-
1/72 nd the true scale !1 point
-
Hi, Well done!! Great build of that Great Formula 1! Pascal1 point
-
Nice, was looking to add the minicraft ac-130 to my stash so will watch this with interest.1 point
-
Is rudeness uplifting? The vast majority, on here, manage to put their views across, without calling into question other members mental capacity.1 point
-
Three cheers for Welkin! Huzza! "Lance" (... can I call you Lance?) I don't really like the "sad facebook-ish" contagion either, but I confess I have begun to occasionally use this option (Liking) when I don't have anything in particular to say about a post, but want the poster to know that I appreciated it. And I have to admit, I'm always a little pleased to see that someone has liked one of mine. As for the converse, I completely agree with your sentiment. Steven, I believe that the references to "fat" fuselages were all thinking of "too tall", rather than wide. Thanks for the measurements and observations! bob1 point
-
Because it still lurks behind most discussions about this aeroplane. When you don't have an easy access to the real thing (I have 300 km to the PR Mk.XIX in Linköping, and 400 km to the Mk.IX in Stauning in Western Jutland, and to get there I have to pay for crossing two big bridges, intogether about 100£), it will be the case to find the best drawings, and--something I recommended shortly--select you set of drawings and follow them. It could be the MAP set by Peter Cooke and others, or it could be the Clint drawings in Bracken (doubled up, as they are in 1:96). Montforton's is only of the Mk.IX & XVI. I haven't had time to study the new drawings in Kagero's Topdrawings. We should also remember Monforton's words that no Spitfire is alike, and he based this on his study of five existing Mk.IXs. Or we could forget all about dimension and just make the models including Hasegawa, Academy, you name it. But few would be satisfird with that solution. If any mission, it is directed against what you "hear": This version is too fat, this is too long, this is too short, etc. etc. In my daily work verification (rather falsification) of a thesis is what it is all about. Thus I have objected against the easy dismissal of Tamiya's 1:48 Mk.I & V, and against the alomost automatical dismissal of Special Hobby's meny different Spitfires as too small. We should always ask for documentation. It would be possible to write a whole book about these matters (or a library of books), but Airfix, Tamiya, Hasegawa, Special Hoby, etc. etc., will hardly survive if books are written and models left in the attic. NP1 point


.thumb.jpg.d17ff607fc7e89ed057e63fcb6f2a888.jpg)


(180x150).jpg.0223c7ea462c153da03d37b196b7bf27.thumb.jpg.784a2d75278bee0f05cc5725e120575b.jpg)


This leaderboard is set to London/GMT+01:00