
Leaderboard


Popular Content
Showing content with the highest reputation on 07/03/13 in Posts
-
No.3 Squadron, RAF Coningsby 2005/6 Finished her of today ">http:// ">http://2 points
-
Hi all, another Monogram classic @ £4.99 and classic aircraft... F-105G 'Thunderchief' Built straight from the box apart from adding new decals and fitting a couple of Aires seats. Paints used Xtracolour Gloss Enamels. Brian.2 points
-
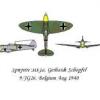
Bf 109E-7 W.Nr Unbekannt (tail number is not known), the pilot - Franz Elles 2./JG27 The set is very good. Assembly – is a pleasure. But I bought to this gorgeous set - the new cab and alloy wheels from “Aires”, landing flaps from “Quickbust” and the turned barrels from the Polish “Aber”. Antenna cable – is a nylon thread. Painted: Top basic is the Humbrol 63 Sand, stain Tamiya 58, bottom Humbrol 65. Rapid identification band is Akan. Color RLM 78/79/80. Weathering - Tamiya. Washing - MIG. Lacquers - Futura, Tikurilla. References: 1. Wydawnictwo_Militaria_105_Messerschmitt_Bf-109_in_Color 2. Aces of the Luftwaffe, Pilots Bf109 on the eastern front (air war number 9) 3. Betriebs und Rüstanleitung Me 109 (manual) 4. Flugzeug Profile 46 - Messerschmitt Bf 109 E Varianten 5. Scale Aircraft Modelling Colours Combat Colours 1 Bf 109E 6. Squadron - Aircraft # 1044 Messerschmitt Bf-109 (Part1) 7. Squadron - Aircraft # 1044 Messerschmitt Bf-109 (Part2) 8. Me-109E_walkaround_photos_by_Dean_Large 9. Aero_Detail_01_Bf-109E 10. AJ-Press - Monografie lotnicze. # 042 Messerschmitt Bf109 11. Bf-109 B-E Colour files 12. Walkaround Messerschmitt Bf 109E Modelart2 points
-
Just been going through my 2012 airshow photo collection and thought people might like to see some. Stunning paint job on the Belgian F-16 from the Duxford spring show. French Navy Rafale arrives at Yeovilton Sea King and Apache from the role demo at Yeovilton Korean Black Eagles team at RIAT 6 sqn Typhoon taking off from Farnborough Super Hornet at Farnborough in an amazing blue sky! MV-22 Osprey lands at farnborough The Reds return to Bournemouth A couple of beauties at Flying legends Thanks for looking! There's more if anybodies interested.2 points
-
Picked one of these up at Modelzone last week. Well what a disappointment! I've been modelling for damn near 55 years and Airfix still can't get it right! Invisible turbine front is invisible, huge panel lines clearly visible through the magnifier, nose wheel bulge in the floor is all wrong. I spent hours shaking it and shouting at it but to no avail. It flatly refused to build and paint itself into a perfect replica exact in every detail. It was with a sigh of resignation that I accepted that I was going to have to employ the modelling skills gathered from many years of passion for my hobby. Well to cut a not very long story short, a few sessions at the bench, it's finished and I have to admit it looks like just like a T11! Who'd have thought? Chill guys. It's just a model and it's just a hobby. Nobody died!2 points
-
I scanned one of these a few weeks ago so I thought I may as well scan the others from this display at Fairford, 1997:1 point
-
Seeing how the latest buzz is about the newly released Airfix 1/48 Lynx, I thought it would be prudent to have a central database for those interested/confused/bewildered by all the various versions of Lynx. This first post will be dedicated to naval versions with a (smaller) post dedicated to Army versions. So, here goes then. For simplicity, I have put together a table that describes what version has what bits. In essence, Westlands did a 'mix and match' to make up the various different marks dependant on the customers requirement so despite there being over 35 different variants, there is a sort of common theme. Basically speaking you have 4 or 5 'core' versions with subtle differences (depending on year and modification standard). These can be broken down in to Nose, Engines, Main rotors, Tail boom, Sponsons and Tail rotor. With a selection of each of those parts, you can make pretty much any version you wish. What I'm not going to do right now is go in to the differences in cockpits, roles, interiors and the various different antennas, aerials and other random protuberances that can be found. I'll cover cockpits later on. This is really designed to give you an initial idea of which versions you can make out the box from the Airfix 1/48 naval Lynx and what mods you'd need to carry out if you wish to make other versions. Quick run through for the table. Table 1 refers to each part type and has a number assigned to it. In the main table, it will tell you if that version has that part. For ease, on the main table, the versions in green can be built OOB from the Naval Airfix kit (not included decals etc, just the fact that the parts will allow it). The pictures show you the breakdown of the differences from table 1. Table 1 Table 2 (amended v1.1) Nose HAS2/3 style nose HMA8 nose (this forms the basis of most other style of noses with radar/FLIR but the PID is unique to the HMA8) Mk88A with radar but no FLIR. Some German versions have a FLIR South Korean Mk99A with FLIR. Note: its a different FLIR thats used by Germany. Main rotor Blades. Older versions used the 'steel blades'. Same length as the CMRB (Composite Main Rotor Blades or commonly known as BERP 3). Point to note if you decide to convert the kit CMRBs in to steel blades. Obvious diffence is the 'paddle tips' but there are several other differences. For example, the blade root trailing edge is a more acute angle on CMRBS. If any one wishes to convert to old blades, let me know and I'll go through all the differences. RN HAS2 RN HAS3 Engines. Older Lynx had the RR Gem 2 engines. Intakes and exhausts remain the same for all naval versions (some have intake grills - removable). The main external differences between the older engines and the later Gem 42's is the 'Cowhorns' on top front of the cowlings ( Norwegian Air Force Mk86 with older Gem 2 engines. German Mk88A. Note the extra side intake on top/front of cowling just behind intake grill. The cover above it goes across the top of the engine bays and is the improved cooling duct for the main rotor gearbox cooler. Norwegian Mk86 with older Gem 2 engines. Note the simpler square intake ducts. Rear view of a Mk7 (same as HMA8). Youll notice the 'Bonk' on top of the rotor head. This is the MRHVA (Main rotor head vibration absorber). Some customers have it, others dont. It can be removed so you may see some with it fitted and some not fitted. Rear view of a German Mk88A. Note the Cowhorns to the front of the cowlings and the extra smaller lumps midway and to the right of each engine cowl. Point of note. Gem engines aren't 'handed' so the various lumps, intakes/outlets appear to be offset. Engines can be fitted either side. Sponsons. Older sponsons didnt have any form of DAS (Defensive Aids Suite - RWR receivers) so appear to be smoother and faired to the rear. Some of the newer RWR sponsons may or may not have the receivers fitted and can be blanked off. Tail Boom. Two types. Folding variety or non folding variety (same as Army versions) Mk95 Portugese. Note the grill (Intermediate Gearbox cooking grill) Norwegian Mk86 non folding tail. Tail rotor. Two types of tail rotor. The older tail rotor that rotates anti-clockwise (when viewed from the left) and the newer version that rotates clockwise. The older type of tail rotor was pants due to it rotating in the same direction as the downwash from the main rotor therefore reducing the amount of thrust it could provide (especially important at low speed where high power settings are required and more tail rotor authority is required). The newer tail rotor gains due to it getting more velocity from the downwash therefore more 'lift/thrust for the same rotational speed. Lynx with the older tail rotor (such as the HAS3) have a distinctive noise and can be heard from miles away. HAS3. (the red bit on the centre of the tail rotor hub is a gust lock. This is (usually!!!) removed before flight and the main spider and pitch change is the same for both tail rotors. Mk88A Tail stabiliser. Simple rule of thumb here. If the aircraft has older steel blades fitted, it will have the older longer horizontal tail stab. CMRB equipped aircraft will have the slightly short one with the gurney flap fitted on its trailing edge. Due to the tip properties of the CMRBs, the older longer stab had a larger surface area and created pitch issues. To overcome this, it was shortened and given a gurney flap to reduce surface area but keep the same lift properties. French HAS2(FN). Note length of horizontal stab German Mk88A. Note that the end of the stab is now flat as opposed to rounded on older version. Another point of note regarding the tail rotor. The newer clockwise tail rotor has a lump on top and to the right of the fairing. This houses the 'reverse' gearing for the tail rotor gearbox. Gurney flap on a rare Pakistani HAS3 (EX RN) Lynx So there we go. Lynx explained in one easy post To give you a bit of background, I am a serving Army pilot (20 years) with about 4000 hours on Lynx and am currently on the Army team bringing the AW159 Wildcat in to service and a self confessed 'Lynx-a-holic'. I've got about 25 unbuild Lynx dotted around the house as well as a highly modified Belcher Bits 1/48 Lynx (converted to AH9A) and a completed Airfix AH7 with a HMA8 3/4 finshed (another test shot from Airfix for another review) Completed Airfix 1/48 Lynx AH7 (built OOB for review) Converted Belcher Bits 1/48 Lynx to AH9A Airfix 1/48 HMA8 (scratch building lots of bits to add detail) Tune in next time for a break down on the Army versions (a lot shorter!!!)1 point
-
This monster has been in my to do pile for a few years now, but having just returned from a trip to the USA, I have finally been given the inspiration I need to get started. First up, I came face to face with Enola Gay: Then Bocks Car: And most impressive of them all was seeing FIFI at the Thunder Over Michigan Airshow: Even better, I got to go inside her: ...and whilst holding that iconic Boeing control column I decided there and then that when I got home this was going to be my next long term, vacform project. The kit itself is enormous, I've not seen one bigger, although I think the 1/48th B-52 also from ID Models could well pip it to the post. Here is the fuselage at a whopping 36" - the 'small' fuselage next to it is the Monogram 1/48th B-29: And the wings - a quick measure gives a span of approx. 54". Again, the 'small' wings are the Monogram 1/48th kit: This was a very old unwanted kit at some point and the stabilsers are missing; instead I have a spare set from a Combal Models 1/32nd B-17 which with some modification will substitue nicely: The transparencies were also missing in my kit, so Tigger WIlkes (who has the molds for these now) kindly made me a new set - they are beautifully clear too! Again a nice size comparison - here is a 1/48th cowling compared to 1/32nd: As I'm sure you can see from the photo's this is a very basic kit indeed. Altough very accurate shapewise, the kit is devoid of any panel detail, interior, undercarriage, wheel bays, propellers and engines - it's certainly going to be a challenge! The Monogram kit will be used as a guide for scribing and the interior parts. I plan to have a fully detailed interior, wheel bays and open bomb-bays which will all need to be built from scratch. As for the undercarriage, engines and propellers... well I'll cross those bridges as I come to them! Having built Combat Models' B-17 and B-24 in 1/32nd scale and ID's 1/32nd Lancaster too, I know from experience that something usually turns up, and if not... improvise! I've always got a few projects on the go so this one will probably be picked up and put down as with long term builds like this you often need a break and a freshen up! I've pretty much got all the references I need to get started on the flightdeck, so hopefully I'll be able to cut some plastic soon. Tom1 point
-
Well.... It seems that my 30 year break from making model aircraft was preceded by a slow returning interest to visit a few airshows. Something I haven't done much of since leaving the air cadets a zillion billion years ago. But even now, increasing demands on my diminishing funds and time means I'm not likely to travel too far from home so it looks like Duxford and Sywell airshows are going to continue to be the ones I attend. Also, I do that old photography thing, so going out for the day and just shooting what's appears in front of me, without worrying about the lighting set-up, the equipment, the styling and so on is a blessed relief because if I get home and want to delete the whole lot I can. No pressure at all. So partly a celebration for myself in coming back to the modelling fold, (and partly because I'm an attention seeker) here's a few random images from a few recent Duxford and Sywell shows. Nothing special, but I hope some enjoyment can be had from them as I had taking and processing them. Duxford2012-5 by IrritableRabbit, on Flickr Duxford2012-12 by IrritableRabbit, on Flickr Sywell2012 by IrritableRabbit, on Flickr Duxford2012-20 by IrritableRabbit, on Flickr Duxford2012-43 by IrritableRabbit, on Flickr Duxford2012-14 by IrritableRabbit, on Flickr Duxford2012-29 by IrritableRabbit, on Flickr Duxford2012-42 by IrritableRabbit, on Flickr Duxford2012-11 by IrritableRabbit, on Flickr1 point
-
OK here are some pics of my first build for a long time. I haven't built any models for about 10 years. This model seems a lot better than the ones I remember in terms of putting it together, fit and finish etc. Really enjoying the model so far. It is pretty detailed and I am taking my time. I don't think that it will win any prizes for accuracy as I am painting it how I think it should be.1 point
-
Hi all! just fineshed the work on my Kitty Hawk Jaguar A in scale 1:48. I fixed it straight out of the box without any products by the after marked. Showing off a well worn desert camoflage, that was typical for the French Jaguars. Hope you like it! Greetings from Germany, Matthias1 point
-
Finished at last! This is my second model and it was quite a tough build for one so inexperiemced! Anyway, I'm quite pleased with the result. I made quite a few mistakes, but I don't think they notice too much - for anyone 'not in the know!' Thanks for all the help on the WIP thread... I really enjoyed it.1 point
-
I have bit of a thing for the old Hawker Hunter, mainly due to the fact I was born at Chivenor and my dad had a long career sticking ordanance on them. So over the last few years I have built one or two and as I was having a cabinet re-shuffle I though I would give them a thread of their own. These are all 1/72, I have 2 1/48 ones in the cabinet as well. Pics are a bit grainy as I had to lighten them a bit, very dull here today! Anyway, here they are in no particular order: Revell F6 converted to 4 Squadron F4 with Freightdog conversion. Revell F6 145 Squadron 229 OCU Revell F6 converted to T7 - O&O Conversion 229 OCU Revell F6 - 79 Squadron 229 OCU Revell FGA9 done as Chilean export FG71 Xtrakit FAA T8 Matchbox T7 - 74 Squadron A couple of Chivenor F6's Cheers Simon1 point
-
You can see some information about this aircraft on this: http://en.wikipedia.org/wiki/Blohm_%26_Voss_BV_138 This model is the repacking of “Revel” from “Supermodel”. I spent more than 100 hours of labor for assembling this set. The main difficulty - is cutting from rough external lines of joining panels to delicate internal lines. I was added and anew produced many small parts from my own stock materials. Assembling process can to see here: http://scalemania.ru/forum/viewtopic.php?f=11&t=390 Blohm und Voss Bv 138 C-1 Code: K6 + AK Serial number: 0310158 Department: 2.Staffel Küsten Flieger Gruppe 406, coast of Norway, 1943 crew: 1. Oblt.Ludwig Schönherr, 2. Ltn.Günther Behr 3. Uffz.Heinz Kitzmann 4. Uffz.Reinhold Zwanzig 5. Obw. Ernst Neumann References: 1. Wydawnictwо Militaria Bv-138; 2. Bv-138_[WaffenArsenal_54]_(Der_Fliegende_Holzschuh) 3. Schiffer Military History - Blohm & Voss Bv 1381 point
-
Latest completions for the wifes growing collection. She has a thing for the old stuff, so if she spots a kit she thinks looks 'nice', she buys it and I have to build it! Anyhow, Airfix 1/48 Spitfire XII and Italeri 1/48 Spitfire FR.Mk.IX1 point
-
Hi there I wanted to try something a little different with the photos I took at Fairford. While on holiday, I started to have a play around with Windows Moviemaker and used it to create an animated slideshow of my favourite pictures. The finished film - complete with AC/DC soundtrack (switch on your PC speakers!) - can be viewed on YouTube. Click on the link below: Or search on YouTube for RIAT 2012 rocks to AC/DC. All aerial shots were taken with a Nikon F4 300mm lens. For the first time I managed to get some crossover shots of the Breitling display team and the Red Arrows. Cheers Richard C1 point
-
Here's my latest - The Airfix 1/24 Mosquito done up as the night-fighter version! Enjoy I've had to leave off some very small pieces at the front of the undercarriage as they broke as I was sniping them off the sprues! so this is as is!1 point
-
Whether Airfix still has the CAD data generated for the 1/48 Lightnings is open to question. The 1/72 TSR2 has considerably better shapes than the later 1/48 kit of the same subject, both of which were some years after the Lightnings. Given the massive upheaval at the company since the Lightnings were done, it would be rash to assume that the data is available. Of course this is moot with the new 1/72 Lightning on the way; either the original research is available, or new research has been done already. That doesn't get around the fact that Airfix doesn't do aircraft in 1/32.... Cheers, Bill.1 point
-
Max Decals in sheet 72-001, as I mentioned a few pages ago in this same thread.Over on the Irishscalemodeller forum some oen contacted Joe Maxwell and he confirmed he will be be bringing out a revised IAC set including the Vampire.. I already have his first set but good news all the same1 point
-
Would this be limited to 'modern' F1 or could it possibly include Grand Prix cars from before the Ecclestone dynasty. In truth, I have had zero interest in F1 since the late 80's but do have quite a stash of GP cars from the early 70's back to the 30's. Regards, Steve.1 point
-
Irritable Rabbit, Those are EXQUISITE, STUNNING, SHARP photos.. I think I am definitely gonna have to take a trip to DUXFORD. 'FEROCIOUS FRANKIE' is simply GORGEOUS ... Your eye for detail a d steady focus on taking and processing the photographs Are SUPERB.1 point
-
Dont bother it looks S##t.! Get an Echelon one if you can find one then get down to Bruntingthorpe to see them in action. They will even let you sit it one !1 point
-
Pictures to be proud of! Andrew1 point
-
Wow! They're so crisp they look like box art work! Very nice. Can I recommend Little Gransden in August? Fabulous show with 200 old cars too. Martin1 point
-
Here are the modified patterns for my proposed new Canberra B2/6 conversion for the Airfix Canberra B(I).8. I plan to use the kit nose glazing or I may mould the other two noses in the picture in clear plastic with one the bomber nose and the other doubling as an early PR or T.4. Note the nose contours of the Canberra are the same unless the nose has a radical change (T.11). There are a few other bits. The nosewheel bay in the picture is the Airfix one which will be used from the kit slightly modified. The break chosen is the frame at which allCanberra special noses are fitted ie T.17,T.19 etc. John1 point
-
This morning I carefully glued the booms to the tailplane, making sure to keep everything perpendicular. When dry I glued the boom assembly to the top wing. Airfix have made the job of getting everything square pretty much idiot proof: well I managed to get it right so the rest of you should have no trouble! The one aspect of the kit that I am not that happy about is the way Airfix would have one glue the main undervarriage legs in place early in the build. This is due to a web of plastic spanning the area of the weel wells where the leg would retract into. As far as I can see this would stop the undercarriage retracting in real life and is a reciepe for a breakage anyway. So it was away with these and the undercarriage can now be fitted at a much more convenient stage and be detailed off the airframe. A dry fit seems to indicate that there will be a small amount of filliing needed,especially in the lower wing roots. This though, looks like it will be a lot less than is usually required on an aeroplane of this configuration. And so to the pictures, thanks for looking Martin1 point
-
Love the Ships Boats! how much extra detail is on them, aside from the WEM railings? & can i ask, who's & what colours are you using for the camo?1 point
-
Thanks for your kind offer Bill. Sounds like the same vintage as the decals I tried using here. But I think I'll go ahead with my 'invented scheme'. Plans in my head ready to get on with it this evening.1 point
-
Update Managed to get on the finer bit and fine sand and preshade and done the orange bits......duno if can be see but they are faded....... Masking the lines Orange on......and camo line drawn......next is to mask and paint..... On track for the weekend completion.....if all goes well.....anyone know British Standards for Gunze paints.......Planning 302 Gunze and the RAF colour set Dark Green and Dark Earth.... Rgds Mr b1 point
-
Isn't the new unbuildable Airfix Hawker Typhoon due to be released shortly?1 point
-
Problem with these both are resin, and the Magna one is just a rip off of the Airways vacform kit even has the same faults1 point
-
Looks great to me.1 point
-
That'll be Griffon noises mate1 point
-
Is that altitude ranging from 3' on the table to 6' flying round my head with accompanying merlin noises?1 point
-
Baa...... you bad girl you glad to see you are working on getting this off the shelves down under That will mean I have to buy more of these "unbuildable" kits Julien1 point
-
At least you weren't working in your lap, like one gent I heard tell of. No, it wasn't me. I just cut my thumb every time I start pulling parts off sprues, most recently last night initiating a Hasegawa Hurricane IIC (or was it initiating me?) bob p.s. There was a small silver spot on the bedroom carpet for quite a while of my childhood. I don't think Mom or Dad ever said a thing, bless 'em!1 point
-
I've done my best to rid the world of this travesty, unfortunately I've only been able to get one. To make matters worst it only came with sheep f........... sorry.... Kiwi decals1 point
-
I SECOND THAT!!!! Larry1 point
-
I've never looked deeply into the Revell Foxbat. I've got one in the stash and I knew it wasn't great but is it really as bad as you say? I guess ironically that it may have just shot up my build list as I am still learning the trade and maybe it now qualifies as a good kit for practising on without fear. I've never seen either of the Foxhound kits that you guys mentioned. It sounds like they are rare, expensive and probably also pretty inaccurate then. I'll add this to the list of kits I'm especially looking forward to adding to the stash throughout this year. It's getting absolutely crazy at the moment; Foxbat, Viggen, Alpha Jet, Mirage F1, Jaguar (KH and/or Italeri), Tornado (new Revell tool), YF-23 from HobbyBoss. Could this be the greatest period ever for the 1/48 cold war era aircraft modeller? It seems that the last few years has seen new kits coming thick and fast and the pace seems to be picking up!!1 point
-
If you choose not to decide, you still have made a choice.1 point
-
Well tis a small tank and there are still a few around. Its armour was the best then but for its main gun. It could take a lot of punishment but the 88mm was to have the upper hand. But in its use in the pacific with the Austalians it proved more than a match for most things.1 point
-
New compressor turned up got her varnished with Vallejo matt air just a couple of photo's before she is totally finished hope you like. Thanks for all your comments really appreciated.1 point
-
Thanks Chewitt mate. Well hope you get your wish on 1/700 lol. Moved on a tad with QE. Some pictures. Some of the smaller parts in progress. Have added shields to the pom poms and brass booms plus radar on. Main hull near completion and will be full hull for this build. Boats all finished Thats it so far.1 point
-
It is very bigggggger, i spend all my money to build it..1 point
-
Then perhaps a GB will help you get it back1 point
-
The silver finish is a bit of a mix, first off primed with Tamiya's finest surface primer, always lays down a nice cote, then a very very thin layer of Tamiya X-11 Chrome silver, then a very water down black wash for it the subtle dark panel lines, and then for the finale (everyone will now be thinking how strange after this) but a tin of spray from Halfords which is actualy a shade of silver for a Nissan car and then a few cotes of the magic stuff called Johnsons Klear then decals plus anoter cote of Klear, it's alot but worth it in the end1 point
-
Hi Folks Got an update......managed to put all parts on ....to make it aeroplane like......just two rounds of surfacer.....one and one more after some repair work.... Next it will be ready for colour......all bits are also on only for the acutators which I will put on later...... final smooth sand and then off to the paint shop ..... I really liked the idea of giving an option of clear parts for the tank nav lights or molded plastic if one wanted that option.....so far the kit is not too bad .....but could be better is some areas..... Rgds to all Mr b1 point
-
Lovely Mustang Mish1 point
-
I did a test on whether or not I could make the missing rivets on the tailsection myself but I gave up on that. There are just too many any it's a very BORING job which is also is not easy. I think Italeri's (left) will do better, especially since thinned.. sidewalls with mig pigment dirtied up locally.. last time without sidewalls.. pitots on the seat.. not a perfect fit, but could be worse I guess.. windshield a bit too narrow.. Canopy is soaked in Future and now drying safely..1 point
-
Thanks for posting SNS. IMHO 'oddball' = 'brilliant' and 'between-the wars oddball' = 'bl***y brilliant'! I look forward to your next one. Cliff1 point


.thumb.JPG.3498f40362ff13ebfc4b2e45abbd545e.JPG)


This leaderboard is set to London/GMT+01:00