
Leaderboard


Popular Content
Showing content with the highest reputation on 03/03/13 in all areas
-
For a 25 year or so old kit it really stands up well in a number of areas whilst also showing it's age in others. The detail in the cockpit, weapons bay and wheel bays is as good as any new release that has come out in the past year or so; however the fit of the parts is very 1970's and the panel lines are raised. Rather than rescribe the kit I built this old gal in the manner of the day when she was released and built up any panel lines that had been lost during the sanding of the not to well fitting parts. Construction was completely out of the box, which just showed hoe well detailed this kit is. The main colour was finished in Lifecolor UA041 FS16473 ADC Grey and I am very happy with their rendition of this somewhat elusive colour. The Eaqle Strike decals performed flawlessly with Microset and just a little Microsol being needed over some of the more prominent raised panel lines. Weathering was kept to an absolute minimum with just a light highlighting of some of the panel lines and minor fading to some of the panels as the F-106's were quite possibly THE best maintained planes ever to have served in the US Air Force. So here we are, hope you enjoy the pictures... Thanks for looking.5 points
-
This is the second of my many adversary TA-4s. It has been a WIP for a long time but I finished it last week. And with its "sister": Jens4 points
-
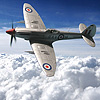
Just finished Airfix's latest, and what a superb little kit it turned out to be. No fit issues, a little filler required here and there, a nice cockpit and a wonderfully thin canopy. It captures the sit-up-and-beg look of the real Vampire T.11 perfectly, and the method for attaching the wings and booms has banished all memories of misaligned tailbooms on other Vampire kits permanently. It will not be the last Airfix Vampire that crosses my bench, that's for sure. Hmm... Norway... Kit built out of the box with addition of masking tape seatbelts. Painted with Vallejo Model Air (first time- very impressed) Aluminium and varnished with Alclad matt clear lacquer. Decals by Bright Spark.4 points
-
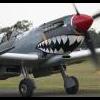
44-13691, G4-A "Passion Wagon". Pilot: 1st Lt. Arval J. "Robby" Roberson (6 kills), 362 Fighter Squadron, 357 Fighter Group, September 1944. Aircraft painted with British paints Dark Green and Medium Sea Grey. After Roberson left 357 FG "Passion Wagon" was flown by his wingman, 1st Lt. Charles E. ‘Chuck’ Weaver, who added another two kill markings to the fuselage side. Later the airplane got a fin fillet and was reassigned to 364 FS and coded C5-V with name changed to "Gypsy", but still with Roberson's pin-up girl. Kit: Airfix, 1/72. Fin fillet removed. Drop tanks from Revell P-51C, decals: Kits World.4 points
-
My latest work, excelent and acurate model. Link to WIP pictures http://www.maketarskikutak.com/index.php/topic,15521.0.html. I hope you like it .4 points
-
I've just finished this on Friday after getting it at Telford 2012. I had no idea this was on the market or due out so was very pleased to see a pile of them and a built one on display on that stand. Like a western gun draw the cash was out and I was well chuffed. Anyway I got started straight after the Heritage JP3 build whilst in the groove. I was quite impressed by the cockpit although there are a couple of anomalies but hey ho its a 1/48 JP5 that's mass produced, I really didn't like the side panels I'd prefer it if it was molded rather than a separate panel. The kit itself fly's together and I had no real issues at all, except the canopy was quite cloudy but came up nicely with Klear, I nearly took the plunge to polish it but it didn't need it. I had a big issue with one wing join, one was fine the other was miles out standing proud and took a lot of sanding then rescribing. The seats are a very tight fit together when you get them in and with the throttle box as well it's all very snug (probably like the real thing) and you have to be careful that when the seats are drying that they don't get encouraged to point inwards towards each other before the glue is set. I've now found out the instrument cowling is wrong for an RAF version but this can easily be addressed if you want. I hand wrote (with my artist pen) the MDC on then Kleared it to seal it in. Gloss appliance white and Revell aqua red and Xtracrylix LAG with a blob of metalcote for the exhaust. I think the MLG is way too big as compared to the Heritage JP3 they are a million miles apart and the Heritage one looks right with comparison with photo's. I'd like to measure the JP5's real wheels and tyres to see what they should be. I did cut 1mm off all 3 legs as otherwise it looks like its on stilts. I put in the nose lights with the crystal jobbies from LittleCars but then the clear bit wouldn't fit from the kit, so in the mean time I've put some clearfix on it but I'm coming back to fit the lens. The seats are ok and you obviously cut off the extra bit from the headbox if you want an RAF version. Walk panels matted off and I left off the air intake one as its way out of proportion, so painted it instead, apart from all this I enjoyed it.3 points
-
Right my swear box is full on this one... but for £18 (thanks Debanhams) wasent so bad real *cough* ive tried to add more details on the interior but i fell there should be more its just sooooo big and my patience started to flag. so here it is in all her glory... Introducing my Spitfire Vb. Thanks for looking3 points
-
I would like present to community my latest finished model. Model was inspired by photo of pink-coloured Spit of No.16 Sqn. This is "light" conversion of ICM Spitfire Mk.VII. Short list of additions and corrections: - camera window was cut out, camera immitation was made and installed inside; - rivets was added; - locks on engine compartment panels was rescribed, as there was missing a lot; - elevator "dropped down" as it should be when control stick is not locked; - exhaust pipes sustituted for halvanically grown from REXx aftermarket company. Model painted with two tones of pink color, with following postshading, wash and weathering with artists oils and AK-Interactive.3 points
-
hi guys!! this fw 190 d-9 "Red 3" of the "Jagdverband 44" was flown by hauptmann waldemar wübke at ainring airfield as a member of the famous "sachsenbergschwarm" in april 1945. the "doras"where delegated as "platzschutzstaffel" to protect the taking off an landing phase of the me 262 jetfighters at munich-riem airfield. to make the d-9 clearly visible to the ground crews of the aa-gun protection the planes where manually painted to have a red underside with white stripes. the platzschutzstaffel of jv44 is also known as "galland's flying circus". it's a great kit and it was really fun to build this model. Best regards Stefan3 points
-
Latest of the bench is the new Airfix 1/48 Spitfire PR XIX. This is a peach of a kit .....totally shake and bake. It's OOB except for the decals which are MA (the codes were a bit miss registered so I had to go to the spares box) and the addition of a boat antenna under the rear fuselage. A big thanks to Gingerbob and Miggers for their help with the dreaded cockpit colours. It's meant to have 4 spoke wheel hubs but these are not included in the kit. ( WWII machines had both the 4 spoke wheel hubs and boat antenna ..... why did Airfix not include them like wise the wing black walkway lines???? ) A really enjoyable build...... so much I bought another two to do. Hope you like. Please feel free to comment in any way Thanks for looking.2 points
-
Here she is, finished over two months, which puts me on target to complete 6 models this year.... There are some things I'm not happy with, but rather than correct them I am going to make sure I overcome them in the next build, whatever that might be........2 points
-
This one is almost straight from the box apart from the addition of some of the CMK resin set which replaced the gun bays, cockpit and nose gear retraction leg. Other than that it was pretty much straight out of the box including the decals, which represent the subject of the box art, F-84G Thunderjet FS-271 of 508th SFW based at Turner AFB in 1956. I know that the gun bay cover should be hinged at the front, but for the purposes of the photos this was left unattached and I think that the ladder should be zinc chromate yellow, which I'll re paint at some stage before she goes into the display cabinet. Other than that I am quite happy with the way she's turned out and welcome any comments, good, bad or down right ugly!2 points
-
Let me present to you the next model from my series of soviet aircraft of World War II. I consider it necessary to note that this aircraft (prototype I-200) was actually the brainchild of a talented air constructor Nikolay Polikarpov (not only Mikoyan and Gurevich). In 1939 Polikarpov was sent on a mission to Germany. In his absence, the plant manager Pavel Voronin and chief engineer P. Dementyev separated from the part of CB (Constructors Bureau) units and top designers (including Mikhail Gurevich), and organized a new experimental design department, and in fact - the new CB, under the leadership of Artem Mikoyan. Remarkable is also the fact that Artem Mikoyan agreed to become the head of the new Bureau only on condition that his deputy will be Mikhail I. Gurevich, who unlike Mikoyan, almost the only "advantage" which was consanguinity with Anastas Mikoyan, was indeed a competent professional designer. Kit from Hobby Boss is typical "easy kit" with very poor cabine detailing. But this kit is better at this moment among other MiG-3 in 1/72 scale. I had to mill the entire cabin and primitive imitation to acceptable thickness of wall less than 1 mm. Cabin made entirely of an additional set of resin parts from "Goffy Model". Also used rubber chassis from the "Elf" company. Shields chassis also is resin. Added wiring rack, re-did the pitot tube, rods chassis plates, indicators of the harvest, guns and exhaust pipes. I distinguished the landing flaps, hatch radiator. Dashed off a fairly long riveting. Wasted a lot of holes of air intakes. Antenna cable out of the nylon thread. Sliding canopy - squeezed again (because the native canopy has nonscale thickness). Landing light - is rhinestones. The navigation lights on the tail made from stretched clear sprue. Stabilizers of rockets (named “RS”) was made more thin. The prototype is selected from "air war" № 115. HB offers another aircraft of the same IAP and boring "white five" owned russian ace Alexander Pokryshkin. Colored with acrylic Tamiya, varnishes Tamiya X-21 and X-22. Washing with MIG. The numbers on the tail fin painted in black marker by hand. REFERENCES: 1. War in the Air 115 - MiG-3 2. MiG-3. The first high-altitude tactical fighter (Bear A. Khazanov, DB) 3. "Soviet fighters" (Voronin, P.Kolesnikov) 4. Samolot Mysliwski MIG-3 (Piotr Bartoszewski) 5. Magazine "Wings" № 8 M-Hobby2 points
-
Hi all, Some 56 Squadron added, more to add later. Brian.2 points
-
Latest completions for the wifes growing collection. She has a thing for the old stuff, so if she spots a kit she thinks looks 'nice', she buys it and I have to build it! Anyhow, Airfix 1/48 Spitfire XII and Italeri 1/48 Spitfire FR.Mk.IX2 points
-
Was delivered 20/02, started building 22/02 and finished today. Bit of a record for me! The model almost builds itself. As I was building it with the lid closed, I used an antique set of Extratech belts. The cockpit is more than adequate if closed up. Regardless of what Brett says on HS, you cannot pose it canopy open using the kit canopy unless you do a bit of excavating to the inside of the canopy. That's what I did when I built the Mk XII. I drilled out the exhausts replaced the air scoop with one made from sheet copper and fitted a monofilament whip aerial and that was about it. The MSG was Gunze and the PRU was a hombrew of 4 parts XL18 Medium Blue + 1 part XL66 Light Grey plus a couple of drops of Tamiya clear blue and clear gloss was added to brace it. http://img10.imageshack.us/i/p1110017h.jpg/'> Dave2 points
-
Hi all!! Here comes my Bf 109 E-7 "Trop" from Revell....but actually it's a Hasegawa-Kit. My model shows the "Yellow 13" flown by Hans-Joachim Marseille at the beginning of his participation on the africa campaign. Later he flew the famous "Yellow 14". The fit was great so the assembly was easy. For painting I used colors from Gunze and Revell. The camouflage spots on the top of the wings and the fuselage I made with a paper template. The antenne wire is made of pulled sprue. At last everything was sealed with matte clear coat. Hope you like my "Emil"?!2 points
-
Hello all Thought I would share with you my experiences of the new Airfix Vampire. First, it is a good kit with some lovely detail and panel lines that although seem a little deep actually look fine under a little paint. I built it pretty much OOB except for adding some seat harnesses from lead foil, seat top ejection pull handles and a few antennae around the place. After finishing it I saw some pics of the Duxford machine on which my chosen scheme seems to be based and found I had the wrong configuration of pull-handle so don't go copying me! Construction wise it's a little smasher with almost self jigging boom alignment - be sure to follow the assembly sequence though otherwise you'll never get the booms into the wing. I chose (in my infinite wisdom!) to leave the main gear legs off until after painting then found out why Airfix suggest fitting them when they do! In the end it was all recovered by a little careful trimming of the locating blocks at the top of the legs - no harm done! Airfix mould a number of protuberances onto one half of an assembly which presents challenges to not knock them off during the rest of the process. I managed to keep them all there until part way through the decalling I managed to remove the fin mounted pitot. I replaced with a small section of stainless tube. In retrospect I should have just removed it at the off and planned to replace it anyway - but I like a challenge! I painted it with Alclad Aluminium and Precision Paints Fluorescent Red-Orange and yes, it fluoresces! Decals are fine with stencils aplenty and all behaved well with a little Sol. I would love to build another and when I find a scheme that does it for me I'll have another on the bench! Anyway, enough waffle, here she is, I hope you like her!Sorry about the picture quality but I seem to have mislaid my tripod in the move so these are hand-held so no depth of field. Comments and critique very welcome. Cheers all Rick2 points
-
Hi Guys, Here is my first helicopter for many years, Italeri's superb 1/48 Wessex. I managed to acquire all 3 of the Revell offerings but never built one as they really don't capture the look of the Wessex. This kit however does justice to the Wessex, the long serving workhorse of the Royal Navy. Construction was pretty much from the box. The PE provided a good touch but I did find the guide pins for mesh round the main rotor were too low when using the PE. I built them up with some thin strips of plasticard which worked well. I lined the interior cabin with tissue coated in dilute PVA to represent the waterproof bag used on the rescue machines and added a few red first aid rescue bags and some wiring in the cabin roof. A few other bits were added to the cockpit and cabin. I used the kit decals and found them good. Only 2 'RESCUE' signs are too small and a walkway for the tail is too big, otherwise they were OK and went on well. Aerial wires were done with Aeroclub elastic Eze-line. Overall it took less than 2 weeks and was a very satisfying build. Cheers Colin W2 points
-
Finished her off this afternoon, complete with NI fit armour and Night Sun... Built totally OOB with the only addition of the antenna wires... Build thread is here2 points
-
Yeah, i could put it in the lounge and look at it when I get made to sleep on the sofa2 points
-
LOL... seven pages on a £8 1/72 kit... I've not bought one yet but intend to at Southern Expo... I will have fun building it and will happily display it at shows and won't give a thought about accuracy... IMO, there is no such thing anyway at least not at these prices. I love when some builders buy a kit then buy resin cockpits/intakes/etc, PE parts. vacform canopies, white metal undercarriges and after market decal sets..spending twice what the original kit cost.... they do make for wonderfully insightful WIP's... long may such model builders continue... but it's not for me personally... but is someone wants to super detail an £8 Airfix Vampire kit I will be the first to cheer them on. Our hobby needs all extremes of modeller from the novice to the master, so less bickering and more building is what we really need...2 points
-
I thought this was BritMODELLER so use your skills and don't expect perfection from an £8 kit. If you can't use your skills to overcome the alleged faults perhaps it time you took up another hobby. From my point of view its a little cracker and well done to Airfix for it.(The last one I built with my Father was chunks of balsa and a plan in the 1950's) Not really a rant but just to show you how far we have come in our hobby.2 points
-
Here's my progress so far on my 1/72 Italeri Westland Wessex. She's a RAN 31A with a scratchbuilt tailfold and folded rotors. I've also added a window to the starboard door and cut away the nose intake and replaced it with some interior detail and mesh taken from a bit of fabric ribbon. I built a contraption on the port side which may be to do with sonar as I've also seen what looks like a dipping device attached. Despite a lot of googling, I can't actually find a name and description of what his is for so any help appreciated here. It was easy to cut the rotor blades off, but getting them back folded is another matter. I decided to build a mini "hinge" and hope that will be strong enough when supported on the fuselage braces which I'm yet to complete. Paint scheme will be oxford blue with white upper surfaces. I have a lot of reference photos I've taken of 3 different RAN Wessex helicopters on my photo site that have helped immensely: http://abat.smugmug.com/Fleet-Air-Arm/WestlandWessex This is a slow build but I'll post progress when it happens! Andrew1 point
-
Hello, colleagues. I present to you my latest model. I have not any problems with assembly. I used the set of etched parts from Eduard intended for a similar model from “Dragon”. I must say, the set came in like a glove, very little has been reduced in the cabin section and cut a pair of projections. Plastic was hard, like Hasegawa’s plastic. I'd add the antenna cable from nylon thread, wing lights from colored plastic and hydro supply to the chassis from copper wire. Drilled shafts of machine guns on the hood. Colored with Alclad and Tamiya. Lacquers – Pledge Futura and Tikurilla.1 point
-
After the Panther wanted something simple so picked out the Ace P-51. This is the early cannon armed Allison Engined Mustang. The ACE kit is a Korean boxing of the Accurate Miniatures kit, and is nice and simple As is normal work starts with the cockpit - first the instrument panel Then built up the cockpit and sidewalls Fitted the fuselage halves together then slotted the instrument panel in from the front Finally fitted the Allison engine nose, and filled the small gaps with some Mr Dissolved Putty, then sanded back Peter1 point
-
If it's an accurate representation of most examples of the II then all you will have to do is sand off the Coffman starter bulge and possibly change the prop: hardly difficult. The most recent 1/32 Revell II kit, the one that provided the Hasegawa kit with a new A wing, came with both props, so maybe this one will too.1 point
-
Superb scooters, adversary jets are my favourite after living near Alconbury from the mid 70's and saw the aggressor F-5's everyday. Pity the RAF didn't do similar paint jobs on a few Hawks or similar!1 point
-
Despite it's faults, I love this old kit. Looking forward to this build. Martin1 point
-
And finally, where I plan to cut the hole where the radiator will go. Regards, Jason P.S. Just as a sort of revelation, looking at photographs of the South African museum Hartbees, I won't have to cut away the coaming between the pilot and the gunner. P.P.S. As should be obvious from the preceding blurry photographs, I did not use my Christmas money to buy a new camera (instead I bought a rather large piece of an Il-2 rudder, believe it or not!).1 point
-
A great looking pair....of aggressors.1 point
-
Thanks for the comments! I only build for my pleasure and no-one else. My wife wouldn't know any different, and none of my family would - so it doesn't really matter what finish it gets, I don't spend 6 months building a cockpit or interior that no-one will see, or spend a year building a model for a competition in such a way that you can only see the inside with a dentists mirror. No - I build simply for my pleasure - if I like the look of something I have built, then that is the only opinion that counts. The only reason I posted this particular kit on here, is that I had not seen any in the night fighter variant - bombers yes - fighters no - so I thought that people may enjoy seeing it. Clearly, I was wrong to a certain extent. If the only comments people can make, are negative, and ridicule them about ignoring research (which again, I don't bother with - I build out of the box and limit aftermarket to photo-etch and masking) then I will simply stop posting, and keep all my builds to myself. I have only been back in the game for about 18 months and thankfully have quite a thick skin. Other people may just stop altogether because of comments. Encourage don't discourage. My final comments are these, the finish is for a reason. Due to limited funds, I cant go out and buy several airbrushes, one for fine work, one for coarse work or one that would cover a large area easily. This is a massive kit, and the only aerosols I could find from modelzone or Hobbycraft (my ONLY local hobby shops) was satin black - there was NO matt black available. And this photo shows what happened the last time I followed "advice" on gloss or matt finishes.1 point
-
Great job Rob. I like it a lot. Cheers,1 point
-
Nice praying then!1 point
-
A couple of great looking A-4s there Jens!1 point
-
very,very nice glyn1 point
-
This morning I completed the stencils. and tanker view Thisfternoon I painted the wheelwells and undercarriage parts1 point
-
Very nice couple of aggressors. Patrick1 point
-
Kit: Italeri 1/35 Demag 10 with PaK 38 Details: unknown unit, Russia 19441 point
-
Hi Mike, these might help, took them when we visited Duxford in 2010. Cheers Den1 point
-
1 point
-
Here we go again with the casual insults ... perhaps I am incompetent, but at least I know how to spell "incompetent". The position in the States isn't exactly about their having run out of money. It's more the result of a long-standing difference of view, shall we say, over whether the Government ought to borrow more money to keep federal services going. There are no close parallels with the position here because our political process is different. The chances of something similar affecting UK practice are therefore slim-to-nothing, and anyone using this as a pretext to complain about MoD funding is barking up the wrong red herring.1 point
-
Hi Matt The work you have done is excellent, especially considering MY kit is still in the box, getting pulled out to hmm and haa over.... [i'm not set up to butcher plastic but I will be soon, no model space until I finish the DIY, model space last...] The site can be a bit of a maze, it took me 10 mins to find the post where I'd listed the glitches and I knew what i as looking for!! if you has seen the links you could easily have fallen into the paralysed by research trap... I've been a Huricane buff since age 6 or 7, scarily that's 40 years so i should know a bit, to be honest I have learnt A LOT since since my rekindled interest in modelling, like the use of alumnium for much of the inside and the two types of De Havilland propeller fitted, and the wing panel arrangements on the MkIV etc etc Bear in mind you can always ask for information on a kit and it's pitfalls in the relevant section, if nothing esle folks can point you in the direction of previous postings Also, the site search certainly was not great,[it might have got better] and I get better results using google, add 'britmodller' ito your search term. I was hesitant to add the links, but as other folks were interested in the kit I hoped it would be of use if they wishes to make some tweaks. There would have been a lot more wailing and gnashing of teeth if this was a Spitfire! I'm glad you found them of interest. Italeri seem to be a bit schizophrenic with their models, some really good parts combined with sloppy research.. plus the RRP is a bit steep! keep up the great work cheers T1 point
-
MMMMMMmmmmmmm seems we have a rubbishy kit.........glareing engine blades which when built cannot be seen and are the wrong type; .........panel lines as deep as the somme trenches, wrong bulge on nose, tut tut disgusting, especially at the exorbident cost of £7.....unheard of.... ................................. In Model Railways and Armour modelling we have "rivet counters", they are not content to admire the hard work and effort put into the making of somebodies work of art but instead they spend hours looking ato find fault, be it paint shade, dimensions, spacing between components and even the settings of dioramas. Here we have Airfix filling a gap in history of an aircraft long awaited for. Why not pick flies with other manufacturers attempts at vampires...............there are many, double the price far worse with hardly any panel lines, some wavy, cockpit glazing 3 times thicker than Airfix's, some with no decals, others with twisted or distorted resin parts, no cockpit detail. Everytime a new kit comes out, the "rivet counters" are over it like a shot. The only shortfall with this kit is that there are not enough of them!!! As fast as they reach the shops they are sold.......they rarely reach the shelves..........Same thing happened with the Vixen, Valiant, New Lightning.......the "River Counters" cant wait to shoot them down. Best thing is, if you have noticed, they find fault with it, then they say that its really a good kit and most the faults can be ignored!!!! Whats that all about? Why fault the kit then say its a really good kit. The keen modeller will find few faults, those he does find he will work around or add to..............is this what modellings about? having fun, testing your mind, searching forums for answers, googling for details and color schemes, improving your skills, conferring with one another and at the end, ending up with your own scale built replica aircraft that you never expected to build as no kit manufacturer would commit funds to a project as risky as modelling.............after all its all x-box, Wii now Good of Airfix to take the risk..........dont forget, the VAmpire T11 is also the Sea VAmpire T22.......look at the variations already unfolding.........watch the rivet counters now suddenly jump on me stating the vast difference between the 2 marks Rant over...................please enjoy the modelling................I am still looking for my mojo, but I do like to read about ppls kit builds and the fun and difficulties they are having Raymond1 point
-
Good job.1 point
-
Very nice indeed1 point
-
Very nice, like the variation in the nmf you achieved1 point
-
More done Today - the Ace rebox is'nt quite as well molded as the normal AM boxing was so it's needing a bit more work. However got the wings on, and masked and fitted the cockpit Then a few passes of filler on the underside Before paint - first primer, then a rub down, followed by the Neutral grey ( with some random lightening) Then the Olive Drab, again with some lightening Ready for some more post shading tomorrow Peter1 point
-
The monster build continues. There’s nothing particularly difficult about this, there’s just a bloody lot of it. Nick1 point


This leaderboard is set to London/GMT+01:00