
Leaderboard


Popular Content
Showing content with the highest reputation on 01/03/13 in all areas
-
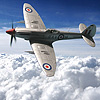
Latest of the bench is the new Airfix 1/48 Spitfire PR XIX. This is a peach of a kit .....totally shake and bake. It's OOB except for the decals which are MA (the codes were a bit miss registered so I had to go to the spares box) and the addition of a boat antenna under the rear fuselage. A big thanks to Gingerbob and Miggers for their help with the dreaded cockpit colours. It's meant to have 4 spoke wheel hubs but these are not included in the kit. ( WWII machines had both the 4 spoke wheel hubs and boat antenna ..... why did Airfix not include them like wise the wing black walkway lines???? ) A really enjoyable build...... so much I bought another two to do. Hope you like. Please feel free to comment in any way Thanks for looking.6 points
-
Here's my latest - The Airfix 1/24 Mosquito done up as the night-fighter version! Enjoy I've had to leave off some very small pieces at the front of the undercarriage as they broke as I was sniping them off the sprues! so this is as is!4 points
-
MATCHBOX SEA VENOM 1/32 Here is my recently completed Sea Venom. It’s the old original 1980’s Matchbox tri-colour offering, not the newer Revell boxing. Kindly donated to me by Airfix Andy (he originally got it part started from Kit Rescue with some wing assembly done on one side). Unfortunately when doing a parts inventory, I discovered it was missing one air intake & the cockpit interior sides. Decals were also almost completely shot with water damage, these were kindly replaced by Dean Flyer, who had a near full set, coupled with a few lucky saves from the originals I made up a full set. Most of the additional work has been to scratch build new cockpit sides, extend the floor forward of the instruments panel & box in, add pedals (very hard to see) add electrical wiring/boxes behind seats & below rear canopy, scratch build more reasonable bang seats, add new instrument panel, canopy release, one intake, improve the dodgy wheels & add new cowl vent ‘ears’ over the engine & a bit of panel scribing. If anyone is building the Revell re-pop, the whites of the decal roundels are very opaque, I painted over them carefully when dry with thin washes of white to build them up, then applied the red centres, ( if I had realised before I would have painted in the white on the wings & booms before decaling but alas! ) The rest of the kit went together very well, with not much filler & was fun build. Anyway on with the images, any questions just fire away. Big thanks to Andy & Dean! Paints were from Vallejo, varnished with a Humbrol acrylic rattle can. Cheers Mac3 points
-
My latest finished kit is the Kittyhawk F-94C Starfire. It is a nice kit for a first product though the plastic is not easy to work with. I modified the undercarriage to give it a better stance and replaced theseat but I don't think I'd bother if I did a second one. I used the very nice Caracal decals for the type and found tht they bedded down over the compound curves with a bit of Klear and plenty of patience. i did use a few of the kit decals as well and they were very good. thanks for looking.3 points
-
Well here she is. Finished. Base Kit - Revell 1/32 Westland Lynx Mk88A Paints - Mr Hobby grey primer Grey - Tamiya grey primer Green - Mixture of Vallejo Air - 094, 096 (35%/35%), 010 (15%), 016 (15%) Blades - Tamiya AS06 spray Tamiya gloss and flat varnishes. Flory black and dart dirt washes. Figure - base figure from ADV/Azimut-Modell, head from Hornet. Modyfied to represent British Army Air Corps. Scratched helmet, nav bag and 'go-pack bergen' (milliput). Scratch built (predominantly moulded and resin cast using Sylmasta products): Nose, Skids, Exhausts, Interior (seats, instrument panel, rear 6 man seat, rear bulk head, harnesses plus all the other gubbins inside), GPMG mount, Fast rope Frame and mount, mesh intake guards, various antennas. Enhanced detail on IRJ, main and tail rotors, cockpit and cabin doors and a few other bits and bobs. And not forgetting the thousands of Archer rivets I applied! Build thread here. Without further ado; Yep, that is a scale map of South Armagh! Main head detail including 'Bonk', bonding leads (yellow), spectacles on lower blade root and bonding strips on blade roots. (All these bits are on the upcoming Eduard PE sheet release thankfully) Fast Rope Frame made from bits of alloy tube and plastic strips. Rope is a scale tow rope copper thing. Perfect scale and nice and flexible. I think my weathing of the nose panel lines is a bit too heavy so may wipe some of it away to reduce. BriteStar IR lamp and footstep fitted to right skid. Made using plastic strips and bits of PE. Enhanced tail rotor detail with teeny tiny little bolts fitted to the root of each blade and bonding straps at the blade roots made from tiny bits of wire. Intermediate gearbox area drilled out, gearbox scratch built and placed inside then mesh covers applied. Cant really see the gearbox but I know its there.... I made my own decal sheet as some of the markings weren't on the main Revell sheet. I'm quite happy with how the 655 Sqn crest has come out. Scratch built the ice accretion meter (black prongs just under cockpit door) then realised the Revell kit actually has it. Having looked at them, I'm glad I made my own. Scratch built armoured seats and weapons on the side of the seats. Incorrect for the period this model is set. Late 90s NI 655 Sqn aircraft in 'Role 1' for duty down South Armagh. At that time we actually carried HK53's and not the SA80 Carbines as I've fitted here. I made the seats and weapons for my InAccurate Armour Lynx before I lost interest in that bag of crap. I drilled out the hydraulic reservoir inspection windows and build little reservoirs inside then right at the end of the build, used Humbrol clearfix to create windows over the holes. Excellent GPMG from Live Resin Yep, they really are that dirty. If Lynx aren't leaking, there is something wrong and the fluids are empty... Get your bloody beret off on dispersal!!! "Yep, 1, 2, 3, 4 blades, good to go......." The full gambit of scales. L to R: Fujimi 1/144 (WiP), Corgi 1/72, Airfix 1/48, Revell conversion 1/32. Now, whos going to release a 1/24? This is my second Revell Lynx and it really is a very nice kit with very few vices. My dream kit has always been a good large scale Lynx. AA failed drastically at that but it was the only player in town until Revell released their kit. This conversion was quite straight forward once I'd overcome making the various masters for nose and skids etc. You may be pleased to know that I'm in discussion with a renowned company who wish to make this conversion set. Lets hope we can get something out in the near future. As I mentioned a bit earlier on, Eduard are about to release a whole host of PE sheets for the interior and exterior. Quite a lot of common detail can be used on most versions of Lynx and I'm looking forward to receiving it. Thanks for looking Tony2 points
-
Hello, colleagues. I present to you my latest model. I have not any problems with assembly. I used the set of etched parts from Eduard intended for a similar model from “Dragon”. I must say, the set came in like a glove, very little has been reduced in the cabin section and cut a pair of projections. Plastic was hard, like Hasegawa’s plastic. I'd add the antenna cable from nylon thread, wing lights from colored plastic and hydro supply to the chassis from copper wire. Drilled shafts of machine guns on the hood. Colored with Alclad and Tamiya. Lacquers – Pledge Futura and Tikurilla.2 points
-
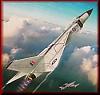
Sweedish Draken reconnaissance version in Danish markings. Added Aires cockpit and brassin AIM-L.2 points
-
This is the 1/48 scale Revell F-86D Sabre Dog. I think it turned out ok even though it suffered a near fatal chemical spill on the right front of the finished build.2 points
-
Model of pre-war British fighter prototype, built by A.Riedel & M.Pfeifer, it is full resin kit Planet Model PLT252 More photos here: http://www.britmodeller.net/forums/index.php?/topic/234935604-martin-baker-mb2-planet-model-plt252-172/ http://www.cmkkits.com/en/aircraft/martin-baker-mb-2-british-fighter-prototype/2 points
-
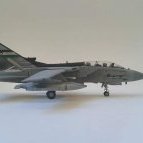
I'd have felt dirty if I had built a French Jag.2 points
-
thanks guys - I only just saw your replies! *update 05/02/13* Hi - here's my latest update. First off, I've managed to glue the fuselage halves together - this meant fixing the ball turret in place. The real thing has bolts all around the rim, so I glue the turret into its mounting & made the bolts from plastic rod: Next I decided to concentrate on the wing / fuselage joins - once the wings are removed there is a wealth of detail revealed on each side of the plane - the left is different from the right. Here are some photos of the left side - all photos are courtesy of David Whitworth / Bomberflight on the Warbirdinformationexchange.org forum and here's mine - there's a little bit of artistic license as I didn't have clear shots of everything...but you get the gist of it. The aircraft skin will wrap around it just like the real thing. The right side is similar in some respects, but it also has the hugely complicated system of pipes for the wing de-icer system. The de-icer boots themselves were removed from combat B-17s because if damaged, they would flap around and get wrap around the control surfaces - however the pipework remained. Here's the real deal, both pre and post-restoration: And here's mine - plastic sheet, strip and rod. I added some extra realism with Aber 1/24 photo etched cable ties - these are designed for model cars but work perfectly well in 1/32 finally here is a photo of the underside of the aircraft - at extreme left is the ball turret, front of aircraft is towards the right - you can see how I've used plastic rod supports to make sure everything is square on to the fuselage side. These will also help when skinning the aircraft to create the 'base' of the wing joins. that's it for now - next up I might tackle the nose area :-) comments & feedback welcomed as always Rich2 points
-
Hi well finished this two year build. Its a full hull with made up base. I only completed it when I got a wood deck and PE fret upgrade, before that it was in storage. Some pictures. This ship depicts its years the near end of hostilities with the Japanese . Added some figures.1 point
-
Started this yesterday and I have to say I'm actually disappointed with the kit. It's very thick brittle plastic with very large attachements to the sprue: extreme care needed when taking bits of. The cockpit & engines are very simple and plain, the undercarrige looks just awful and I've decided immediatly on an in-flight display. The stand is nice and the overall lines of this space fighter are fantastic: I just need to do a good paint job to redeem some of the other features. Top & bottom: Engines: I'll probable add some of my own piping Cockpit: I've added to scaps of plastic to the side walls where decals go just to give them some dimension The pilot fiure is also quite nice. There are plenty of decals which should make it look better but it's going to really depend on the paint job to look decent1 point
-
Second completion of 3 1/48 scale B-17's. Revell B-17F "salvage queen" rebuild. Enjoy.1 point
-
Hi, I hope you like. I finally finished the Dragon Iron Man Mk VII thats in my WIP Build here. Mostly Alclad painted, Clear Red over Gold undercoat and I think it came out quite close to the original idea. I had a few snags, dont we all, but in the end Im really happy with it. Its a great kit, falls together and is all about the painting in the end isnt it? Critique is welcomed as usual, every day is a learning day . J.1 point
-
Hi all, 74 Squadron. Brian1 point
-
1 point
-
Hi all, just thought I`d show you some pic`s of my very latest effort: Hasegawas RF-4 Phantom in 1/48 Built from the RF-4B kit, as I couldn`t find a `C` version and done as `Snoopy War`s Hell` from the 11th TRS, 432nd TRW, Udorn, Thailand circa 1969 Apart from after-market decals it`s mostly OOB exceptions being; home made seat belts , rear view mirrors, detail on rear cockpit stbd side and ECM pod from Hasegawa weapons set Had to cut a few lumps and bumps off the kit but most of the `C` bits were on the sprues took a while to get finally finished for some reason. Hope you enjoy looking at Cheers Russ1 point
-
Hi, I decided to give an overhaul to all my older kits within the next few weeks or so. I will be introducing them to you one by one always when I finish the overhaul. With the D.H.53 still on the workbench, Pavla 1/72 D.H.82 Tiger Moth is once again faster here. The kit is built more or less OOB as K2583 of No. 24 Squadron, ca. 1934. Hand brushed with Revell and Humbrol enamel paints. Decals by Modeldecal. The squadron number on the fuselage was either red or black according to various sources. As my decal dungeon failed to produce red numerals in acceptable size, black was the obvious choice for me. As usual - no rigging. Thank you for looking and for your comments. Patrik1 point
-
Just finished this build. Tamiya 1/48 P-51D built with a resin "early" model tail conversion. Marked for Major George Preddy's "Cripes A Mighty 3rd". Late summer of 1944. Hope you like.1 point
-
Made OOB and drybrushed in various MM and Vallejo metalizers. Made just for fun and uniqeness. Josip1 point
-
With the ancient Microscale Aloha Airlines decal.1 point
-
Tamiya is horrible to paint by brush, and it stinks. Its fine for small areas though. Got the Klear on tonight, ready for decals tomorrow:1 point
-
Yep sorry prowler0000. I moved the pictures to an album, not realiseing that they would not appear on forums. Have put them back and hope you can see them now.1 point
-
Painted the gun areas red, and did some slight touching up. Hope to get this clear coated tonight, ready for decals tomorrow.1 point
-
Great looking Starfire!1 point
-
Very nicely done, I never get bored of seeing these early jets1 point
-
Yes - a stinson L-5 for example with decals for "Intesive care" and that gorgeous reclining nude nose art (no clue about the other markings - see here http://www.ebay.de/itm/Photo-Nose-Art-L-5-Flying-Jeep-Recon-Plane-WWII-/380460881002?pt=LH_DefaultDomain_0&hash=item58953c546a)1 point
-
I'd rather flip my lid than get in a flap about it. Chris.1 point
-
Thanks folks, Keef old fruit, why are you even up at that time of night ??............should be tucked up with your cocoa and a hot water bottle.. Jessica, yes in the same way that the Austin Allegro and Mick Jagger are both typically 'British'.................. Aesthetically challenged design over function is a point of national pride with we Brits ! Joseph, I've seen the Chris Sayer models, rather nice but a bit too wee for my taste. As most of our stuff in Bomber Command is 1/72nd this one rather fits the bill., though personally I prefer 1/48th but hey ho...... Managed to outline the parts this morning, And then cut them all out using two new scalpel blades !!...did I mention that the placcy is rather solid ! Now the fun bit...wet sanding...lots of wet sanding !! Melch1 point
-
don't mention the top opening box!!! Some people don't care!!!1 point
-
Lovely build and nice finish. i love the look of all the lift bodies, but as you say this is probably the nicest.1 point
-
Now that's one you don't see every day, "the six million dollar man"...they don't make em like that any more...... "blade runner" doesn't even come close!1 point
-
Good evening all At long last, BMF seems to be back up and running! Hopefully, they have fixed the server stability issue Time for some pictures of where I am up to on this ship. As you can see, I am still on the top section of the head with a lot more work to do yet! Work and family commitments have been taking their fair share of my time lately but I do try and squeeze in an hour or 3 when I can. Subsequently there is never much done between updates - or so it seems. I’m working with much smaller and thinner chips than the Venator and cutting and aligning them just so is very time consuming. My left nut for a 3D printer…. Anyway, enough excuses, time for the pics: To kick things off, I have removed that weird little circle thing from the front as it is completely the wrong shape. However, I think I may have slightly over-sized my version, but I am not going to do it over again: I scratch made the detail in the center of the hole with a lot of cursing and swearing. The little radar domes are all made from stretched sprue and is very fiddly. This was my third attempt at it and I am happy with how it finally looks: I have scribed in a lot of missing panel lines on the top and a few on the sides. My scribing results do leave a lot to be desired – but this is my first ever crack at scribing a model, so go easy I am surprised at how much raised detail is on this side as opposed to the other. Definitely not uniform – which is good because I doubt very much any ship would be exactly the same on each side – that’d be pointless I am most likely going to change the side guns to something else. I am not happy with those ones as look rather like the original molded on ones and that's just not right. I am currently trialling a new gun so I'll post some pictures later to get an open opinion from you all Since taking these photos, I have finished doing the sides and am about to start on the nose section. Will post pics of that once it's done. Then it’s onto the middle box section then time to tackle the lower section. Well, that’s all from me. See you all again soon Thanks for stopping by MH1 point
-
Getting close to the finish line now. I have finished the underside, although I am considering a bit more weathering in few select places. I weathered the bombs a bit. There was discussion on this on Hyperscale a few months back and I agree with those who believe that World War II bombs were rarely pristine. These were then fitted into the bomb bay Using thinned enamels I applied some exhaust staining, The initial colour was a mixture of black and brown. I then applied some grey down the centre. Not sure how accurate this is bit I like the effect. The beauty of using Enamels over Dullcoate is you can easily remove it if you don't like by simply wiping it off with white sprits. I had about a dozen goes on one side before I got the pattern I was after Next was the bomb days. Now I know why I ahven't seen a build with these open. They were a bit of pain to fit. After about an 30 minutes I managed to get the lower doors on - why is it that super glue only bonds fingers in seconds, and not the bits you want to stick? The trick I found was to removed the triangle shaped bit that you glue to the centre hinge and attach it after the lower doors are on. I moved onto the upper doors but after an hour of struggling I really hadn't made some progress so I took the rest of the night off. The next day things went a bit better and the upper doors went on OK. to ensure alignment I had to tack them in a few places with CA. Again the slow drying CA proved annoying. Finally I inserted the main gear legs, these were a doddle to fit. However the doors were a bit bit more painful. I used CA gel here as it provided some working time but was tacky enough to hold the doors in place. The tail wheel assembly was inserted and and main wheels added. A bit of finagling was needed to ensure the wheels were aligned correctly. The lights were painted and the pitot probe added. Then I set it aside to dry overnight..1 point
-
Almost ready to prime now. I've added the aileron and flap actuators underneath the wings: And the stall warning strips on the front of the wings: And the little pipe gizmos on top of the wings behind the fuel filler cap: And stuck the scratch built undercarriage on: Later today I hope to get a coat of primer on and see if any of the canopies I moulded will fit and are useable and then.... and then... Steve1 point
-
Man, if that's a taste of 1974, I wish I had a time machine. Great work pal.1 point
-
Yes, but not free of small errors. For example, take a look at photos of KM112 PD-D. The "D" letters are not the same, you see? But in the decals they are the same. Strange - photos are clear, artwork is correct, and the decals are wrong. You can use also Techmod decals (they have a few sets for Polish Mustangs) and the ones from Kagero TopColors #1 book. Sure. From my website: 20+ years old Polish vacuform. Maybe I should not show it here... In the 1980s it was not known that there were 3 Horbaczewski's Mustangs coded PK-G. Artworks form that period were mix of three aircraft: Serial from FB166, used before June 1944; Invasion stripes from FB382; Mission and kill markings from FB387, used in August 1944. Revell with Techmod decals (recommended): HobbyBoss with out-of-the-box decals (not recommended because of wrong colors and dimensions of markings): The fourth one is Mustang Mk.I AM214 "C" completed few days ago and not photographed yet. Markings from spare decals (Techmod, Tally-Ho) based on "Polish Mustangs Units" book. Converted P-51 of Academy. I hope to have weather for photos on the weekend. Planned are: FB382 PK-G, KM112 PD-D and a different Mk.III, not chosen yet (316 Sqn preferred because of red-white noses and fin fillet on some aircraft). BTW. I used to live (and my parent still live) at Horbaczewski Street in Wroclaw, Poland. Therefore Dziubek is my favourite pilot.1 point
-
Very nice indeed.1 point
-
Thanks Jason. Yes they are Berna clamps and I got them from Paul at Little Cars, they work great.1 point
-
It was publically unveiled a couple of weeks after the annoucemnet at Farnborough 1968 on Trident G-AVFI although a helicopter was hidden away a Gatwick just before this after a repaint. Officially called the "Flying Jack" livery it represented Britan and flying....the jack representing an aeroplane Speedjack is a more recent name wrongly given.1 point
-
Ok, some progress... Painted the bulk with my own mix of grey & blue: Not sure if it's 100% but it's close enough for me. And it will get well weathered before the end. I didn't like the piping that came with the kit (+ broke 1) so added my own: Tonight will be a wash for the panel lines.1 point
-
A lovely collection! Mac1 point
-
Great collection, like them all. gazza l1 point
-
very nice would be nice to see a typhoon in those colours Glenn.....1 point
-
A bit more work done on the big Mossie. It's been a hard slog so far! That's all for now. Graham1 point
-
Into the paint shop. I've decided that NZ4540 is the aircraft I'm going to depict. There are several reasons for this, firstly it is one of the aircraft that retained its fuselage art when on operations, secondly it has a couple of distinct patches and splotches on the rear fuselage and tail which IMHO add interest, and finally it was operated by No 2 Sqn, which I serviced in when I was in the RNZAF. There are a 3 photos of NZ4540 being broken up in the Ventura Publications "Pacific Twins" book, which allowed me to confirm the patches and that it was quite weathered when it was broken up in March 1944. The aircraft is in the 3 tone USN Scheme of Non-Specular Sea Blue (upper fuselages and wing leading edges), Semi gloss sea blue (upper wings and upper tail plane), Intermediate blue fuselage sides and tail surfaces and non spectacular white lower surfaces. My problem with USN schemes is that in 1/48 Sea Blue straight out of the bottle is almost black. The photos of NZ4540 show the sea blue darker than the intermediate blue, but the contrast is nowhere as dark as using Sea Blue direct from the bottle would appear on my model. So as usual I went with my eye and chose colours I could live with. I like the Mr Color Lacquer paints for spraying, although the lighter colours can be a bit tricky to apply. I also like the Tamiya AS spray cans. These spray beautifully and it's a cheap way to buy paint. Although the upper wings and fuselage are supposed to be the same colour but with different gloss levels, in all the images I viewed, they looked the same. I decided to try and do the same. The base colour for the upper surfaces was Tamiya AS8 "Navy Blue" decanted and mixed with a touch of Mr Color #311 FS36222 to lighten it. This was applied first. Using various blues and blacks I applied random marks and shading to this area. The leading edges are supposed to be the same as the upper fuselage. But again in the images I viewed the leading edges looked considerably lightly than the wings and upper fuselage. I used Mr Color H72 intermediate blue to simulate this. Next was Mr Color 366 Intermediate blue which was applied freehand with my Sparmax airbrush to the fuselage. This intermediate blue comes from Mr Colors USN Navy color set, and is quite different hue to H72, which is also intermediate blue. Again, using blues and greys, I applied some shading, mottling, and marks. Next were the lower surfaces. Rather than white I used a grey, Mr Color #311 FS36222. In my opinion white of this much would look to stark This is one the colours that is hard to apply and I was having trouble. So I switched to the Mr Hobby (Aqueous) version of this colour. I using some thinned darker greys to show weathering. Finally I applied the patches to the tail. The decal sheet and Pacific Twins show this a light grey and from the photos it impossible to tell so I went with their recommendation. I used Mr Color # 315 FS16440, again applied freehand1 point
-
Why would we want to invade Australia? It's full of Australians.1 point
-
I have the Revell of Germany Breguet Br. 1150 Atlantic kit in protective custody. The kit has a rather nicely detailed weapons bay that includes a pair of torpedo shapes and three cylinder shapes with a truncated cone at one end. Does anyone know what these things are supposed to represent? In the image below (model built by Ted Taylor) you can see the three cylindrical shapes mounted at the rear of the weapons bay. I am supposing they are life raft containers and not depth bombs as someone on another forum suggested. (Thank you Ted for providing the image!)1 point


.thumb.jpg.d17ff607fc7e89ed057e63fcb6f2a888.jpg)


This leaderboard is set to London/GMT+01:00