
Leaderboard


Popular Content
Showing content with the highest reputation on 25/02/13 in all areas
-
Just finished 3 1/48 scale B-17's. Still have 5 under construction. First completion is a Revell B-17F converted to a B-17E. Used the Paragon conversion set and marked it as "Swamp Ghost" before she went down. Enjoy.3 points
-
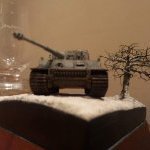
I dug this off the top back shelf and gave her a dusting down and a few repairs. I built her about ten years ago. The HL-10 (Made famous in her starring role in the opening title of "The Six Million Dollar Man")was an experimental lifting body flown in the late sixties, early seventies. After the first few flights she was found to be nearly uncontrolable and a redesign of her winglets was required, remember this was in the days before on board computers and fly by wire. Her power plant was the same rocket motor that powered the X-1 and she flew with three, and four chambered variants. It was the only lifting body that flew supersonic and in my humble opinion, the best looking one of the lot. Collect Aire's 1/48th HL-10 is a resin and white metal kit and is no longer in production. Its a fairly simple little kit with no major problems. Thanks for looking.2 points
-
Finished! Quick snap shot next to her little sister. Will try and find enough space over the next few days to get some proper photos.2 points
-
Third 1/48 scale B-17 completion. Monogram B-17G converted to late model B-17F. Hope you like. Only 5 more to go!1 point
-
I've been having a tidy up weekend trying to complete all those 'nearly finished' models lurking around the workbench, and there are about 8 of them. I had two 737's that were almost finished in the Christmas holidays, and have been waiting for the final bits. I have been working my way through building one of each of the New Generation Boeing 737's, which is a complete redesign of the classic Boeing 737 100, 200, 300, 400, and 500 series airliner. It features new engines, new wings, tail and undercarriage amongst other things, and has very little in common with the Classic. The NG starts with the shortest variant, the 600, and has a progressively larger fuselage through the 700, 800 and 900. Revell do a kit of the 800 which is not bad but requires mods to the engines and winglets, and the window line is too low so they need filling and repalcing with decals. To make a 700 and a 900 I used two kits cut up at the same time. Basically what you do is cut one fuselage into 3, making the cuts close to the leading and trailing edges of the wing. On the other fuselage you make the cuts as far from the wing as you can. Then by swapping the two centre sections, you have a long fuselage and a short fuselage. Obviously you do it by accurate measuring, I'm only trying to simplify the description here. (Edit - All 4 models here are built from the Revell 737-800 kit, with shortened/lengthened fuselages) Anyway, I ended up with a 700 and a 900 series fuselage. Both were built side by side. The 700 has Skyeurope decals by Boa Agency. That paint job involved a lot of fiddly masking, the blue, white, and red fuselage & engines are all masked & sprayed. For a while they featured famous Slovakian beauties, this one is Adriana Karembeu The 900 is in KLM coluurs using Draw decals, and very good they are. Here they are, for comparison I have included previuosly build 600 and 800 models. The 700; Biggest of the lot, the 900; An 800 in Kulula livery, Draw decals. The shortest of the lot, a 600 in SAS livery from Lima November decals Not easy to photograph in a line up, apologies for the poor pictures. Left to right 900, 800, 700, and 600. Thanks for looking, John1 point
-
Ok this is going to be my next build which will be starting shortly.....Cheers mark1 point
-
Hi all, I've made a start on my MK1 spitfire now.I made a hash of the control panel but other than that it seems to be going ok. I'll post more pics as i progress. Neil1 point
-
Hi All, some large scale work in progress at the moment. Brian.1 point
-
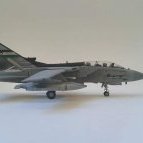
I got this at SMW 2012 from IanT (Heritage) and I believe it's the only game in town if you want to do a 1/48th version. I was quite pleased with the kit and it went together really easily not requiring much filling or trimming at all. If I have one axe to grind it's the canopy which the I cut into 3 pieces to display open. The front/middle sections are fine but the rear is very poor and I had to make do with what I had, luckily the open canopy does disguise it a bit but if you were wanting to have the canopy closed it would become an issue. Anyway lets focus on the good stuff, I'm quite pleased with the little jet and it sits quite nicely as I didn't obviously put enough weight in it so stretched some sprue and made a 4th leg. Paints are Appliance white and Humbrol aqua red and Metal cote for the jet pipe. I added the antennas and the anti-collision lights and the RBF tags to boot. It's modeled on a Linton bird from 1980.1 point
-
Just before Christmas 2012 Wingnut Wings released their long awaited Fokker D.VII kits in 1:32 scale in three versions. All three are beautiful kits reviewed here. I started one as soon as possible, deciding to go with the Fokker built version (Other boxings are for the OAW and Albatros built versions) mainly because it featured the Fokker 'streaky green' brush painted finish as decals, and I wanted to see how they would look. I chose Willi Gabriels machine on the basis that it was colourful, and because Gabriel was an interesting character. He rapidly started scoring kills when posted to Jasta 11, but his maverick lack of discipline style saw him infuriate his CO, Hermann Goering, who had him kicked off front line flying. Anyway, back to the kit. It was a total pleasure to build, but everything needs to be done carefully. Fit is of the highest standard and the instrctions very clear so you must follow them to the letter. There is a build log here. The model is fully rigged, the D.VII was designed to do away with rigging wires between the wings, so the only wires are between the undercarraiage, and on the control surfaces. Enough of the talk, on with the photos; Thanks for looking, John1 point
-
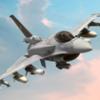
This is Hasegawa's 1:72 Su-27 Flanker, built OOB with the exception of the Quickboost nosecone. I had the kit in the stash for a few years and finally decided to build it last year. For some reason (I can't remember now) I put it to one side and it remained 95% finished until I decided to complete the last few details today. I'm glad I did now Paint is a combination of Gunze and Tamiya and decals are from the spares sheet. The Blue bort number was donated by a friend (thanks Julien).1 point
-
Latest effort, Airfix Canadair F-4, with Flightdecs decals for JG-71 Richtofen circa 1964, must admit I'm quite happy with the result, enough to put it in the model competition at the Fleet Air Arm Museum show a couple of weeks ago, of course I didn't get anywhere with a first attempt but it was the taking part that was fun, must remember a base or diorama next time as they were the winners, the decals were an effort though, they were a lot thicker than I thought, took a combination of Vallejo decal fix, decal soft, Humbrol decal soft and old trusty Tamiya 20A thinners and much coaxing around corners with a brush to get them to go with the flow. http://s1323.beta.photobucket.com/user/Bigusmickus/library/Canadair%20F-41 point
-
Totally OOB model. I added only rivets and some hydraulic pipes on the landing gears: And cockpit:1 point
-
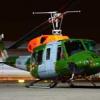
Hi all Have just got round to photographing this one. Not much to say about the kit that has not already been said. I really enjoyed this build seem to be developing a liking for 1/48 helicopters. Finished with humbrol enamels and oil paint washes, also first time I have used ez line. Thanks for looking Jon1 point
-
BRILLIANT.... THAT IS SO COOL!!1 point
-
Beautifully done as always, Regards, Steve1 point
-
very very nice on the look out for this one in 72nd well done Glenn.....1 point
-
Update on WIP1 point
-
FWIW there are actually four different types of zinc chromate pigments. Zinc chromate hydroxide was only patented in 1941 per Leisy (1941) and Kittel (1990). Earlier examples are likely to be zinc potassium chromate. Both forms are given as 'zinc yellow' by Kühn and Curran (1986) - in pigment terms CI Pigment Yellow 36:1 (77956). As a pigment it has also been known as 'citron yellow' and 'zinc chrome'. The colour index describes basic zinc yellow as a 'bright, greenish yellow' but I have also seen it described (by Myers) as 'dull, reddish yellow'! As an unadulterated pigment it has very low tinctorial strength. Indeed USAAF Dictionary of Aircraft Maintenance Terms, Section H Paint and Dope TO 30-1-2-H of Nov 1944 describes it as 'a semi-transparent, greenish yellow liquid of zinc chromate base, thinned with toluol'. This is difficult to reconcile against some colour images that appear to show a bright, opaque yellow of strong chroma so I suspect proprietary preparations referred to by generic descriptions come into play. . On the anodising question there has been lengthy discussion here before:- http://www.britmodeller.com/forums/index.php?/topic/80761-k5054/?hl=k5054 Nick1 point
-
Preparation I have given all the kit parts a wash in warm soapy water as that should remove any grease, fingerprints and mould release which causes me problems when painting. I also cleaned the PE parts by cleaning them in my Sonic Cleaner, purchased from Lidl a while ago. The canopy and other clear parts have had a coating of Klear and are sat on the 'decal drainer' drying Just thought I would add a view of the tools I typically use on a daily basis and will be using for this build And finally, a comparison of the old and new parts to show the extended fuselage length. Next phase should be the actual start of the build/conversion Thanks for looking Mike .1 point
-
Thanks, good luck with the touch ups! Nice to have the 2 different approaches on the same model in the GB!1 point
-
It's real, taken very close to Hatfield , the structure is a large greenhouse, of which the canopy went through the roof of, I think the airframe crashed a few hundred metres short of the runway.1 point
-
I tend to model 'real world' aircraft, but I do like to see some of the mad things you folks get up to. I'm not quite up to major hackage of multiple aircraft at present, but I do occasionally change colour schemes around. Here is a simple one that The Wooksta has probably already done. A SEAC Spit Mk XVI using the Heller kit oob plus the Hasegawa Mk VIII decals. Why? During a single kit GB on another forum, I thought I'd build 2 Mk XVIs: one oob and one slightly modded to try to enhance the already nice Heller kit. I knew the modded build would be a 2 ATAF machine, but I was stuck for the unmodded one. Then I came up with the SEAC Spit idea. Back story: I'm never usually creative enough to think one up, but in this case clearly, the Spit Mk IX was considered adequate for the near term, and with the Griffon engine doing well in testing in 1942 / 43, then there was no point in 'wasting' redesigned Spit airframes for 'Merlin' engined variants, so the Mk VIII was never put into service. To keep up with engine demand for the Mk IX in other theatres, the Packard Merlin variant was brought in and used extensively in the Far East, as the ETO took precedence for the Griffon variants. Hence: Having said I don't usually hack about aircraft, I do fancy trying a Bf109Z-10 variant using 2 Revell G-10s. I'm thinking night fighter / zerstorer markings. The only thing stopping me is: how do I make the constant chord wing centre-section . . . ? regards, Martin1 point
-
Thats coming after the Lincoln conversion set1 point
-
Thanks for the tips on tin bashing. Those cans look awesome, I just don't have the patience or skill to be able to attempt anything like that, I just assemble the kits! Duncan B1 point
-
Very cool, do the canopy mirrors come in the kit or were they an addition? Marcus1 point
-
I like the look of those tracks Mike1 point
-
Pictures not the best but an enjoyable build I would recommend to all to have a go at.1 point
-
Hello Juliet-Kilo-Tango, this is control (err may I call you Juliet?) according to refs I have, the Vampire fuselage Max dia is 54" thats NAD 28.6mm. connect the two red wires but don't touch the blue. Control out1 point
-
Hi John - its central - I wouldn't have thought to have to have even looked. Alley Cat's is set higher- say about 5/7ths up. However the Trumpeter fuselage is still fatter overall. Theres more fun when you look at the inner wing depth too. I wont go on, its depressing. But she sure will be a sweet lookin' thang boy. Jonners1 point
-
That is looking good! Finally got the camo done on mine this weekend so I'm slowly catching up!!1 point
-
Hello, the color part is done now. It's a fifty-fifty feeling for me. On one site its looking good with the white stripes on. On the other side there are some parts who must be repaired with the pencil and one bigger part under the front grill with sanding paper. It is still a lot of work to do before i can set the first decal on it. But it's ok for this masking marathon. kind regard Christian Christian1 point
-
Build #2 Scale: 1/48 Kit: Cyber Hobby.com (Dragon) Heinkel He 162A-2 Built as: Werk Nummer 120072, Yellow 3, 3./JG1, Leck AB, Schleswig-Holstein, 1945 Built using: Mainly Xtracrylix, Tamiya and Mr Colour (metallic) paints, kit decals, foil belts Build thread: http://www.britmodeller.com/forums/index.php?/topic/234935062-148-cyber-hobby-he-162-finished/1 point
-
Cheers all! @Arkady72...thanks Artur, its part of a bigger collection, I suppose you get addicted....Brian. @ Steve....the stunning looking female nudists wouldn't appreciate the lovely weather here yesterday...their bits would drop off!1 point
-
Very nice indeed John, welcome to the Wessex club, must get back to mine this next week after three weeks away from it! Thanks for sharing your pics. Colin PS Must get some Easy Line too.1 point
-
There is a compnay called Best Fong Decals which provides markings for ROCAF in 1/144 https://78462f86-a-6cb3c831-s-sites.googlegroups.com/a/bestfong.com/www/decal/144027F104-1s.jpg?attachauth=ANoY7co6I13mDhyuHEF4zF-936PW-j4rODNDrapiue2ONzcUrMcjF8wSS6wy6y4Dd4wg1FW4Oo1ge46cha-YC_NJcHFJQV0RsXTgYRxeRh7KrZA-ll44Yjeks8fE0MI8Gal4IhC8EpOCq7B9djOA3Xl8aeI2aGNYOpOalwworrvWL2zfTLHu5fdu-9ubalzP4pZbX7wM-D_UzSIZ7tmyvakHM-HYZL9Yaw==&attredirects=0 Main site: http://www.bestfong.com/decal Julien1 point
-
CanMilAir decals offer no less than 12 sheets for the CF-104 (Canada) & yes, you can use the Revell F-104G for this. http://www.canmilair.com/products.asp?cat=65 Scott1 point
-
Had a few more hours to build some more of the Spit today. Heres how far ive got. This is my 2nd go at scribbing (my hurricane didnt go as well as i hoped) This time i'm happy with the results. I have primmed it and now im going to have a go at pre shading. I attempted this on my last model but it didnt show through. Im going to try thinning the paint down a bit more. Any |advice is welcomed...... Neil1 point
-
A bit more progress on the Airfix Harrier...1 point
-
http://direct.hobbycraft.co.uk/products-Letraset-Safmat-Self-Adhesive-Printing-Film_262829.htm1 point
-
Update on WIP, Its not going to be the most accurate of Harriers (£19.99 Modelzone) but i'm hoping it turns out a reasonable representation. Brian.1 point
-
Well, dont know what happened, but suddenly wanted to do a bit more. So got the wings fitted, and rudder and tailplane1 point
-
Keep up the good work....1 point
-
Small update, more to follow over the next few days. Airframe primed and base layer of grey applied. Most ancillaries and role kit complete. Only major work required is airbrushing green camo and final assembly of skids, tail boom and other odds and sods. Ok, a couple of pics of a few things. Decided to make the right hand footstep with BriteStar IR lamp that is fitted to the front of the right hand skid. We generally didnt fit the standard left footstep as it was pointless. Made using 1mm round plastic and .4mm sheet. IRCM exhausts recast and finished with brass sheet cut and placed for the exhaust baffles. You may have seen my mesh intakes guard 'how to' thread here. I'll chuck some more progress up tomorrow night.1 point
-
on the newly restored Spitfire G-MKIA at Duxford, i noticed the tyres had the dunlop painted. I'm not sure wether to keep the painted tyres or not?1 point
-
Wow!!! I'm going to follow this with great interest. Remember seeing one of these at Leuchars with the engine covers open and thought it looked great. What you are doing here is truly inspirational, I wish I could manage my time better and donate more of it to model making. Keep up the great work and thanks for sharing.1 point
-
Another update. GPMG mount complete, Fast Rope Frame complete, modified left hand cabin door complete. The Mk88 kit has the sonar operator type left hand cabin door. The difference is the window hole is set to the rear of the door as opposed to the standard forward set. Looking at Spences progress on the HAS3, that kit has both the standard doors so once I get my mits on one of those, it should save me all this trouble of moving a hole! You can see on this picture how the window hole differs on each door. The one on the left is the stbd door with the window hole set forward and the one on the right, the port door with the window hole set aft. I carefully cut the hole out. Removed it Then rotated the cut out by 180 degrees. Finished port door filled and cleaned up. The one on the left is a resin cast of the door. Not perfect but has come out reasonably well. As I mentioned, I'll just wait til I get a HAS3 and use the correct door! An exercise in moving a hole if nothing else..... I decided to order a slightly more representative GPMG as opposed to using my converted M240B. This one is the M240G. Live resin do actually do an FN MAG which is spot on but I cant find them in stock anywhere. Only real difference is the flash eliminator. On this one its slightly shorter than the standard one on a GPMG that we use. I can live with that,,,, Gun mount parts. Brass case catcher, pintle and alloy mount. I've built it so it will function in movement correctly. Ammo box. I made it from two standard 200 round 7.62mm boxes and dressed it with random bits of PE. Mount base and link/brass drum. (I've just loosely attached the ammo box and my old GPMG to it for now) In situ. You can start to see on the upper forward part of the cabin roof, the NVG spot lights I've made and fitted. Cabin roof with pax drop leads and NVG spot lights with umbilicals. Fast Rope Frame that will be fitted on to the left hand NATO flange (the standard flange that TOW or any other role kit can be fitted) Started off by selecting suitable cross sections of tube, I beam and H beam plastruct. The NATO flange (dark grey item) is from the AA kit). Drilled appropriately and dressed with random bits of PE. To ensure its sturdy enough, I've drilled .5mm holes and pinned the major parts as well as doing this to attach it to the NATO Flange and how that attaches to the side of the aircraft. Just need to add a few Archer rivets to the base part of the gibbert. Need to make the block and tackle for the rope. I got hold of some scale tow rope and its perfect for the rope itself! Currently working on the nose. Its giving me a few headaches as I want the finished article to have opening avionics bay doors. Quite a task turning a solid resin cast nose in to several sections. It will require me recasting a whole nose several times, slicing the forward part of the nose off, slicing the bottom section off, making the top panel and then the doors. I'm going through silicone rubber mould solution quicker than the FX guys on the Star Wars set at present!1 point
-
Hi all...!! This is the nice Hasegawa kit built OOB, except for the leading edge slats, wich were repositioned in the extended position, as they used to be when the plane was on the ground. It was painted with Testors Metallizers to represent a Spanish Air Force (Ejército del Aire) plane attached to 201 squadron, during the mid sixties. There was a mixed lot of dash 25 to dash 40 Sabres in service in Spain, but as they were refurbished during the IRAN inspections, were all fitted with dash 40 wings. I hope you'll like it.1 point
-
A 9 or 9A will be great mate! Ok, update. Cabin complete. Just need to stick all the bits in. I used the 6 man seat from the AA Lynx as a template. I also sliced the kit seat mounting rails off the seats and modified them to accept my scratch built armoured seats. And yep, Revell have modelled the pedal position correctly (right pedal forward on each side). We place the pedal forward when we shut down so it off loads the spring bias unit in the tail so it doesnt smash an engineer in the face if he's working on it. Even though I have said I'll do it as a late 90's Lynx serving with 655 Sqn in NI, my scratch built SA80 Carbines aren't strictly accurate to period. We've only just started using those as personal weapons and the correct weapon should be the HK53. Also stowed on the seat but instead of fitting on the inner facings of the seats, were stowed inside the seat wings. Bloody uncomfortable to fly with as they would dig in to your left shoulder! (I used to chuck mine in the side map stowage....) Start of the GPMG mount base plate. I'll use the Airfix mount as a 3D guide. I'll be using the beautifully detailed Live Resin M240B converted to good old Air Role GPMG (removed lightweight barrel guard and various other yank-isms and redid the gas parts and return tube). Strictly speaking, its 1/35 scale but as you'll see from the scale plans I've drawn up, its pretty much bang on. I've just learned that they have now released the M240G GMPG which is more of an equivalent of our GPMG. Plus you can now get spare barrels, link and a few ammo boxes. May well have to invest in a set or three cos they are so nice. The GPMG mount base plate is ambidextrous on the real thing. The base plate can be fitted on either or both sides simply by flipping it upside down and redressing it with the fittings. In NI, we tended to have it on the right by default. The peculiarity of this was the aircraft commander would have to sit in the right hand seat as he has to have line of sight of any targets and clear the gunner to brass them up. Even though the commander usually sits in the left seat, we changed seats because the previous GPMG mount fitted could only be fitted on the right. A bit of a legacy keeping seating positions even when we fitted the newer ambidextrous mount Will prob start working on the Fast Rope Frame this weekend.1 point
-
Heres one I made earlier...... Very sad looking cab stripped out behind my old hangar. Shows the area of the rear skid post housing with panel removed1 point


This leaderboard is set to London/GMT+01:00