
Leaderboard


Popular Content
Showing content with the highest reputation on 05/02/13 in all areas
-
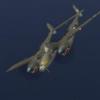
Hi folks, this is the ICM's little gem built as night bomber. A build report will appear in a future edition of MAI. Cheers Libor3 points
-
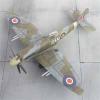
Hello people, after over two months of a break I am back and making models again. After the break I completed 3 models in the last couple of days, 1/72 Messerschmitt Me 262, 1/72 Fokker E.III and 1/144 A-10 Thunderbolt II and here is the second of them: I always hated ti rigging of aircrafts so didn't pay much attention to this one's, here it is:3 points
-
Hello all, now I would like to present to you our new project relating to the V2 programme. It is the A-Stoffänhanger, in 1/72 scale of course, and here you can find first pictures from the 3D software. It is quite possible that we will continue and make some other equipment for the V2 missiles. Regards Petr@MPM2 points
-
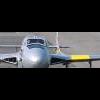
Hi guys! Well, after 80-odd hours spread over ten days, Great Wall Hobby's astonishing MiG-29, is finally complete. This has been one of the most enjoyable projects ever, made so because of the quality of the kit, the detail, precision and fit of the parts and because the '29 is so crammed with detail that you are constantly on your toes in terms of finish and final detail painting: a Raptor, it is not. After all of that work, I am now convinced that this is the best 1/48 aircraft kit ever - I can't wait to build the next one! Anyhoo, I hope you like it... A shot showcase on this model will appear in Tamiya magazine and then the full-blown build, including all of the production shots will appear in issue 2 my magazine 'Cold War Aircraft Modeller'. Spence2 points
-
Hello people, after over two months of a break I am back and making models again. After the break I completed 3 models in the last couple of days, 1/72 Messerschmitt Me 262, 1/72 Fokker E.III and 1/144 A-10 Thunderbolt II and here is the third of them: I didn't see many good reviews about this kit but I still enjoyed building it... Regards2 points
-
Hi guys Here is my last model, it is the F8E Crusader 1/72 Academy. This is a very nice model that mounts without Difficulty. Hoping you like it Docjojo2 points
-
a straight out the box diorama, used a small tile piece of fake turf i got from work, the base was given me, just mounted the tile piece onto it. the spitfire is the help for heroes edition kit Mk.Va as flown by Sir Douglas Bader with the 'D' and 'B' on the side of the spit, the figures are revells 48th scale WWII RAF pilots and a few ICM figures i had lying around from another kit, looked very effective for such a low cost diorama, not bad for something i managed to squeeze in between doing my GCSE's at school back when i was sixteen 5 years ago enjoy2 points
-
Cheers lads! Little update but no pics as I'm having trouble with internet connectivity at the moment! Everytime I try to upload the connection drops! I've started the work needed on the tail end and it seems to be going ok. I've cut the elevators from the tailplanes as I've noticed that they too hang down when the plane is parked. This extra work means that I have to make some hinge points but it'll be worth the extra work. I'm not able to put as much time in to the build as I'd like at the moment, but I am getting there so don't be thinking I've given up on it and letting you all hang! Soon as the internet is sorted there will be pics and something more substantial. John2 points
-
You'll be content to make just the one then, as lightning only strike once! That is unless you are a pilot and phone Met for a waether update. Colin2 points
-
A Lightning,.......good one Mike,.... .dude, what are you smoking.......?2 points
-
Its the English Electric HolymotherofGodthisthingssofastittoreaholeintime Mk3 I think it might be Welsh.2 points
-
2 points
-
Gentlemen, may I ask that you all start off by acting in a way that befits the term? This review has been left open for people to discuss the kit, not call each other names. Seldom do I see such hyperbole spouted in greeting of a new kit than with Airfix and/or a much loved British subject. Of course we all want every kit to be perfect, and we're getting closer as the years go by, but I've never seen anything so silly as a bunch of grown men bitching about a small sink mark as if it were the end of the world. Anyone caught inciting the use of modelling skills to remove this small blemish is branded as a "fan boy", and then the fur begins to fly. The laugh is that most of you haven't even got the kit in your hands yet. It seems that everyone's losing their sense of perspective this month, as predicted. Call it post Christmas malaise if you like, but it happens every year. Any more name calling will result in the thread getting closed. Discuss the kit in realistic terms by all means, without belittling each other or making mountains out of molehills. I know that's possible, and it seems perfectly reasonable to expect you to do so. You have been warned.2 points
-
Going through an old memory card and found these buried in it. Actually had one on Photobucket, but forgot about these other ones. Heller Typhoon with Airfix Refueler and Jeep and figures from the aircrew set. Pilots from the spares and one figure from a Matchbox armour set,( he's slightly bigger than the others). Diorama made about three years ago, and still have it on display. Brush painted with Humbrol and still my favourite build. I was just returning to modelling then and was pretty pleased with how this turned out. Sean1 point
-
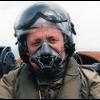
Hi to all. I propose to you the first shots of the Super Hornet F / A 18E Trumpeter kit 1:32 At the moment I'm focused on cockpit and ejector seat. All parties were detailed with Eduard photoetched purchased from. In the central panel I put a thin piece of film to create shiny glass clocks. For more info & pics http://www.adventurephotomodels.com George1 point
-
I was surprised to see this on a dealer's stand at a model railway and diecast swapmeet this afternoon - it would have been rude not to buy it! It even has the little decal sheet with protective greaseproof paper cover and the complaint slip. I haven't had one of these since it was originally issued. John1 point
-
I finished this 1/7 scale 25 cm high resin kit of Ignis yesterday. There were many parts to clean up and a bit of work to get some of them to fit as intended, but I'm very happy with the end result. She is usually seen wearing this outfit in white, but I wanted to try and give her a bit more serious look. She is the first figure I build in this size that I had to paint the eyes on, something I have feared a bit, but I think I came through and made her justice. Hope you like her.1 point
-
AD-6 Skyraider ‘VA-65 Tigers’ 1:72 Hasegawa The Douglas AD-1 Skyraider was a single seat, carrier-borne attack aircraft, designed as a successor to earlier naval torpedo/dive bombers such as the Grumman Avenger. It was designed by Ed Heinemann of the Douglas Aircraft Company, who also penned the A-20 Havoc and A-26 Invader and who later oversaw the development of the F-16 Fighting Falcon. Powered by the huge Cyclone R-3350 radial engine, the Skyraider was powerful enough to carry a whopping 8,000lb load on its 15 external hardpoints for up to 1,300 miles. Although the prototype Skyraider made its first flight in March 1945, front line US Navy squadrons did not start to equip with the type until late 1946. Although the piston engined Skyraider was something of an anachronism in a world in which the jet engine was beginning to dominate, it enjoyed an extraordinarily long service life. This was, in part, due to its ability to absorb a considerable amount of battle damage, a feature which made it the ideal platform for the close air support role. It’s swansong with the US Navy was the Vietnam War, during which it performed outstandingly well. It was eventually retired in 1972, to be replaced by the A-7 Corsair II. Hasegawa’s Skyraider isn’t new to the modelling scene, having been around since the mid-1990s. Since it was released however, it has earned a reputation as the best kit of the type available in 1:72 scale. In usual Hasegawa fashion, it has been re-released many times with different markings. This edition contains decals for an aircraft belonging to the US Navy attack Squadron VA-65, the ‘Fighting Tigers’, one of the last squadrons to use the type in combat. Inside the box are 92 parts moulded in grey and clear plastic. The sprues show all the hallmarks of a relatively modern Hasegawa kit. The mouldings are immaculately clean and details such as the panel lines are refined and pin-sharp. Initial impressions are therefore very favourable. In keeping with other Hasegawa kits of this vintage and scale, the cockpit is fairly spartan. The cockpit tub has side consoles moulded in place, to which the instrument panel, control column and seat have to be added. There are no moulded details to represent the instruments and controls. Decals are provided instead. The canopy is moulded in two pieces though, so it you want to display it in the open position then you may want to spruce up the cockpit with scratch building or photo etched parts, or even go for a resin replacement. A quick search of Hannants’ website indicates that a wealth of such items are available. Once the cockpit has been completed, the fuselage halves can be joined. The exhausts for the massive Wright engine are moulded in place, but separate cowling flaps are provided which will help to add a sense of realism. The lower wing is moulded in one piece, with the landing gear bays moulded in place. The main gear bays are nice and deep, and feature a respectable amount of detail. The flaps and ailerons are moulded in place, as are the elevators on the one-piece tail planes. The two rows of cylinders that make up the engine are moulded as a single piece, but virtually nothing will be seen behind the radiator and cowling anyway. The undercarriage is nicely detailed and the main gear wheels have separate outer hubs. The blades of the huge airscrew are nice and thin and a set of decals for it are included too. Hasegawa tend to be a bit hit-and-miss with their ordnance. Sadly this one is a miss. Three drop tanks are included, along with four sets of rockets. That still leaves eight pylons (which are included) that you’ll have to fill yourself. As mentioned above, the canopy is thin and clear and is moulded in two parts, so it can be finished in the open position. Two marking options are provided: • AE 406, VA-65 Tigers, USS Enterprise; and • AH 500, VA-165, USS Oriskany, 1962-3. The decals look pretty good. They seem to be thinner than the deals usually provided with Hasegawa kits, and are a little more matt too. The colours are nice and bold though and the details are sharp. Conclusion Hasegawa’s Skyraider has always been a nice kit, and it remains the best 1:72 scale Spad by some distance. The cockpit and the lack or ordnance are weak points, but the superb surface detail and the fit of parts help to make up for it. This edition of the kit is expensive though, so you may want to shop around or seek out an older boxing if you aren’t too hung up on the marking options. Review sample courtesy of UK distributors for1 point
-
See,I knew it,the little known "Bristol Bullshooter" as flown by Wing Commander Tony Hancock,Test Pilot(BBC TV/Radio and bar) ably assisted by Aircraftsman Kenneth Williams(BBC TV/Radio and bar)..... Everyone knows that evolved into the English Electric P1 Deltic locomotive and by a series of pre-production types,the Lightning as we all know it today. "I was right you know" "Yes,we know you were" "No one else guessed it correctly" "Yes,we know they didn't" "I knew it was a Bullshooter as soon as I saw it you see" "Yes,we know you did" "You don't see many of those you know" "Yes,we know you don't" Read of course with Tony Hancock/Kenneth Williams voices in mind............ Groan. I still think your having us on, DHC Beaver? Its the same colour inside. Rick. "Nice Beaver"1 point
-
I agree that the box art can suck people in to buy the kit if it is well done, but if the subject is interesting and the contents accurate and well executed, they can pack it in a brown paper bas as far as I'm concerned:) The only thing I expect is that the box art portrays the right version. What I find really hilarious though is that one BM reviewer so keenly critisises this least important aspect of a kit, yet, is so completely uncritical of the box contents of a kit - http://www.britmodeller.com/forums/index.php?/topic/234933424-f-16-ab-nsawc-adversary-kinetic-148/ - the conclusion is so non-descript, inoffensive and uninformative it is hard to believe it comes from the same person who claims a ship on the box art is not sinking the right way. If people on the internet - who have a fair knowledge of the subject has voiced concerns, then maybe they're on to something? Tell your audience what the issues are, or use the concerns to do your own research rather than offering an ill-informed opinion without even bothering to dryfit the kit together. To make things even more entertaining, said reviewer displays great indignation about these words Of course , reviewer will write lines and lines about all what we don't need ( the colour and quality of the plastic,the number of parts , the scale, the raised or recessed panel lines and, more important , the fact that we can look through the glazed parts or not , the shape of the box, the quality of the plastic bag in which the canopy is wrapped, the way the decals are printed and by who. One thing is sure , they won't tell you whether the model is right or not . There are no reviewers anymore , there is just a bunch of advertisers. It's high time they stop taking us for fools . by Madcop who hits the nail on the head even though they are not aimed at him, but reviewers in general. So...it's all right to savage a piece of box art - that for what we really want is insignificant, but not a kit? I can hardly wait for the Britmodeller review of the Trumpeter Vampire... Jens1 point
-
Ok. I've got the fuselage zipped up and been working on de-riveting [sic?]. An odd mix of heavy sanding (or the little b******s never go) and light sanding (so that the fuselage doesn't get sanded out of shape). It's been slow going but oddly relaxing. I had some issues with the nose joint - which needed filling - as you can see (bit cackhanded). For reason that are beyond me I scribed the engine panel lines too high up the fuselage sides - you can just see it in the photo below and so promptly had to fill them in again (not yet done it on this photo). Anyway. After that I scribed a few panel lines (using the Aeroclub Chipmunk as a guide) on the fuselage and as I type this the fuselage and wings are getting to know each other better. Bonding you might say! The scribing looks a little heavy in the photo but I think that a few coats of paint will help that a bit. You can see the filled and re-scribed engine panel line as well. The grey patches are residual areas of mister surfacer I used to help smooth things out. For the sharp eyed knowledgeable the air intakes on the engine panels either side of the nose went missing during rivet removal but I've crash moulded some replacements hopefully they will look better than the originals. Getting there. Time to watch some TV while the glue dries...... Thanks for looking (and the kind remarks) Steve1 point
-
Hello people, after over two months of a break I am back and making models again. After the break I completed 3 models in the last couple of days, 1/72 Messerschmitt Me 262, 1/72 Fokker E.III and 1/144 A-10 Thunderbolt II and here is the first of them: I started this model before the break but hated the build for no reason I can specifically tell. So two months later I said "what tjhe hell let's get this over with" and started building it again. As I brush paint the camo in the manual wasn't quite possible to achieve so I experimented and I gotta say it came out as awful as possible. Still here it is, one of the worst builds I've ever done:1 point
-
Three great looking models there. Well done!1 point
-
Nice work on all these.Excellent modelling. Can't go wrong with the 48th Hasegawa kits. I 've two built plus 72nd ones. But... wasn't Squirlbate an 'N'?? I done this one from the Aeromaster sheet to 72nd and is depicted as the long tail all clear canopy! I have serious doubts about the accuracy of some of the Superscale decals...especially the side view drawings. They can be very misleading. Am intersted in hearing from more knowledgable people here regarding 'Squirlbate'. MAybe AeroMaster was wrong??!!1 point
-
Dear me, we haven't even seen the plastic in detail and we are now ripping apart the box art. Its certainly far better than I can produce as the only ships I could paint would be with a 6 inch paint brush and a large 5L tin of Admiralty Grey. Smart arrse comments are fine, just remember that its different face to face, not pixel to pixel and we all read things differently. Perception is a difficult thing with the sterile nature of a discussion board. Now can we go back to discussing the kit, not its cardboard container......1 point
-
Heart breaking to think they have all gone , but a great reminder of the past....(even if there were no real Navy Harriers in it)........ Smudge1 point
-
Hi Steve. At least they are still flying, that's the main thing!1 point
-
What a great build. Love the Avenger, a real brute. So 1/32, 1/48, Trump, Acc Min?1 point
-
A little progress update, mostly parts clean up, filler for some panel lines and ejector pin marks taken care of. I build in sub assemblies with landing gear and ordnance being the start, with major airframe parts cleaned up and dry fitted, this seems to work for me because there are no surprises near the end of build that sideline a lot of modelers and stall progress, killing off enthusiasm and interest… Airframe parts cleaned up, assembled and primed… In most reference pics show these panel lines puttied over, but I have seen in some a very faint panel line. Having been up close and personal whit the F-15, I decided to fill mine… http://data3.primeportal.net/hangar/makarov_aleksey/f-15e/images/f-15e_06_of_39.jpg http://data.primeportal.net/hangar/mu_yeol_lee/rokaf_f-15k/images/rokaf_f-15k_03_of_72.jpg The kit intake parts have three ejector pin marks on each part that need sanding flush, but the area that requires attention when attaching are the thin round pivot points at the bottom. Too much Tamiya thin cement will melt them…trust me I’ve made the mistake for you!!! Intake trunks were a breeze needing only a small amount of filler and with in minutes you have seamless intakes…too easy!!! Engine exhaust nozzles have ejector pin marks that need to be addressed, to speed things along a tiny drop of super glue, some kicker and then a few swipes with a medium grit sanding stick. Each part needs the spru attachment nub cleaned up really well to obtain a gap free and round exhaust. After getting all the parts cleaned up and filled they were marked to ensure they went back together with best fit…sand, dry fit, sand, dry fit, sand, dry fit…ready for primer!!! “Drill Baby…Drill” I drilled out the missile exhaust…why? Cuz dats howz I roll!!! “Mo drillin” Drilled out the nose gear drag link/retraction strut…as on the real deal it has (7) lightening holes and the kit part has (6) of them for you rivet counters, they are closed so I drilled em out…why? Cuz dats howz I roll!!! http://data3.primeportal.net/hangar/makarov_aleksey/f-15e/images/f-15e_13_of_39.jpg Mock-up of major kit parts with only "eight pieces of tape" shows how well this kit gose together, and the parts fit after clean up and dry fitting…yes sir it’s a Revell kit too!!!1 point
-
I'm a bit sorry to see the rubber bands have gone awry (or astray) Joint lines a tad looseish too, but it looks as if it will polish up into a very nice wotsit b1 point
-
Latest pics from the news wires...1 point
-
I'm definitely going to finish it - I'm not allowing myself to start the next kit until its done!1 point
-
Arnold well done for a beautiful build, came out perfectly in my eyes. Thanks for the 'sludge wash' info, may have to give that ago myself sometime. Cheers...1 point
-
Mark, you have put it in the wrong place. Clearly its a Revell London Bus.1 point
-
Looking good. Having built several of these , i know what its like. Theres some serious work involved in building the kit even if you go out of box , adding detail just makes it take longer. Keep going though , the end results are worth it , thats why im building another one!1 point
-
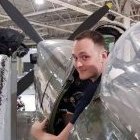
Semper aliquid novi...here are pictures of work on the kit cockpit and the resin replacement. I of course have been debating the correct painting. i.e. all green or do the framework silver. I then noticed while looking throgh my stash that a lot of Hurricanes have the Joystick at an angle. This is not always the case. Now the question is do I leave the resin joystick as is or do I try and angle it. This model is going to be August 1940 c. You will note that the PE sutton harness broke off, with too much fidling in trying to get it to fit. I have seen others who did a better Job than I with the PE supplied with the kit. I think it's too wide and hence the decison to go for a better aftermarket cockpit. It's just the joystick that has me concerned The resin replacement1 point
-
the panel lines look a little too deep, or is that just the pictures?1 point
-
Good to see you here.. Great model as always.1 point
-
Model kits are like a Chinese meal...........................3 hours later you want another one.........................1 point
-
That's a great job! Been looking at getting me one of these kits and am even more tempted now.1 point
-
A great model excellently presented.1 point
-
Neat build there....1 point
-
Very nice to see in Austrian markings!1 point
-
Very nicely done, mate!1 point
-
very tidy, makes a change to see a Tiffie from somewhere other than UK.1 point
-
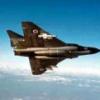
Yeap ! That's the good old Hasegawa mould!! Very interesting subject mate and really nice weathering. Did you use an airbrush to paint the SAE camouflage or a paint brush? I have also build it and it's a great kit. Keep up the good work. Cheers Sernak1 point
-
SA72003 camouflaged missile:1 point
-
Thanks for the compliments I originally put alot more of an explanation on the original post but my browser crashed so i had to redo the whole thing. incase anyone was curious the kit is pretty much out of the box bar the cockpit door glazing is made from clear acetate and the prop and spinner which where raided from the bits box and modified (i believe that they may be an early spitfires prop but they looked about right compaired to refernce photos) I did modify the kit prop to see if it was usable but the spit parts looked marginally better. the undercarriage has been carefully carved to provide a bit more detail aerial is stretched sprue. painted using tamiya acyrilics yeah the amount of filler on the wing roots is unbelievable i got round it with a small strip of plasticard fillered then sanded to shape. th kit requires so much filler in places my mate at work suggested id be better off carving an airacobra out of a block of wood rather than use the kit the kit does require work to get to a decent standard but overall its a decent kit when built. only downside the amount of filler cost more than the plane did haha. cheers for the comments1 point
-
4 and a bit months later I'm not much further on I'm afraid, I've kinda put the seats to one side, but I'm on version 2 of the paint job in the cockpit after getting carried away with the weathering on version 1 Hopefully I can take some Pictures soon for an update. Thanks for the comments. Mike1 point


.thumb.jpg.85b0bd1b23acb88e6a79720372668e78.jpg)


.thumb.JPG.3498f40362ff13ebfc4b2e45abbd545e.JPG)


This leaderboard is set to London/GMT+01:00