
Leaderboard


Popular Content
Showing content with the highest reputation on 27/01/13 in all areas
-
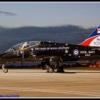
Good kit, not a great one, but done at last. Good looking machine. Build here if interested. http://www.britmodeller.com/forums/index.php?showtopic=69189&hl= Getting a case made, hence the routed edge of my base. Will add links to build thread etc later. Cheers all.2 points
-
Hiya Folks, For those who have been following the contents of my (very large) cabinet, here are some Second Line Fleet Air Arm types; Skua TT- 48th scale Special Hobby kit; Roc- 48th scale Special Hobby kit; Hurricane Mk.I & Sea Hurricane Mk.Ib- 48th scale Italeri kit; Maryland, 771 NAS`s famous Bismark Hunter- 48th scale Fonderie Miniatures kit; Fulmar NF.II- 48th Warrior Models kit; Chesapeake- Acc Min 48th scale kit; Seafire Mk.Ib- 72nd CMR kit; Harvard, Academy 72nd scale kit; Defiant TT.I- Pavla 72nd scale kit; Spitfire FR.XIII- Tamiya 48th scale conv; Corsair; 72nd Tamiya kit; 48th scale Tamiya motorised kit; Traveller- 48th scale AMT kit (heavily!) converted; Barracuda- 48th scale Sierra vacuform; Beaufighter Mk.II- High Planes 72nd scale kit; Seamew- 72nd scale Sword kit; Wildcat Mk.VI- Sword 48th scale kit; Vengeance TT.IV- 48th scale AZ Model kit; Martinet; 72nd scale Pavla kit; 48th scale Magna resin kit; Mosquito B.25- Revell 48th scale kit; Baltimore- 48th scale Classic Airframes kit; Expeditor- 48th scale Battle Axe kit; Dragon Rapide- Aeroclub 48th scale vacuform; Spitfire F.XVII- CMR 72nd scale kit; Gannet T.5- Trumpeter 72nd scale kit with A2Zee wing fold; Chipmunk T.10- Aeroclub 48th scale kit; Jets; Sea Vampire T.22- Aeroclub 48th scale vacform; Meteor T.7 & TT.11- Both Aeroclub vacuforms; Phantom- 48th scale Hasegawa kit; Hunter GA.11- Revell 72nd scale kit conv; Helicopters; Hoverfly, MPM 72nd kit; Whirlwind HAS.22- Italeri 72nd scale; Wasp- Airfix 72nd scale kit converted and Modelart decals; Whirlwind HAR.9, 72nd scale Italeri with ED Models resin nose & Modelart decals; Wessex HU.5- Italeri 72nd scale; Sea King HU.5- 72nd Revell kit; Dauphan- 72nd scale Matchbox kit; Hope you like em, All the best Tony O ps- Sorry but here are a few that I forgot to post; Magna 72nd Reliant; Magna 72nd Flamingo;2 points
-
- A few weeks ago I've shown you the two seater Dagger, now something more classic as this is the single seat more commonly seen. -Thanks for looking2 points
-
After lurking for quite awhile now, I think it's time to show off a bit. A lot of Eggs have been shown recently, so here's one of mine. F-4E kit modded to F-4J(UK). ALPS and spare decals. ENJOY!2 points
-
As an airframe & engine apprentice almost 40 years ago now, one of my instructors at the then Royal Navy Aircraft Repair Yard Fleetlands, was one Danny Parsons. He taught the airframes course to us 2nd year apprentices. On the subject of airframe finishes, he said that the German's [ Luftwaffe ] had an excellent standard of finish [ he was'nt one to give praise lightly ! ] and it was only more to the end of the war that the allies achieved something more comparable. After seeing some of the Liberators shown, I can understand what he meant ! The edge distance on some of those rivets is highly suspect ! But, in war time when the expected life of an airframe is not lengthy, the phrase ' fit for purpose ' covered a multitude of sins ! That said, after working on American built airframes this side of the pond, not much has changed. As I seem to be rambling on and getting off topic, personally, I think there is too much emphasis in the modelling world, maybe only by a few to replicate, or I should say exaggerate the rivet effect on model aiframes. Some of the attempts to emulate countersunk / flush rivets by means of the 'pounce' spelling ? wheel or a watch gear wheel, leave a lot to be desired ! Countersunk / flush rivets are solid items not perforations ! Even when you look at the Spitfire in the colour images, the only time the countersunk / flush rivets are noticeable is when they are shown in direct light. Personally, I'd like to see rivet depiction shown as being restrained or not at all.2 points
-
This is the old Revell kit of the HH3 Jolly Green Giant. I grafted on the engine unit from Revell's new Sea King and used the canopy and cockpit interior. Other parts borrowed from the new kit were the rotors, and undercarriage. The old kit's plastic was very hard and brittle which made engraving the panel lines difficult. I scratchbuilt the rest of the interior and I used Humbrol acrylics for the first time, to paint her and I wasn't too impressed by them. I found them difficult to thin to airbrush properly, and they left a gritty finish. Decals are a mixture of the kit's and ones from the spares box. Thanks for looking.1 point
-
This model is built from the Revell Sea King Mk.41. I added an etch set from Eduard and I also added a lot of detail using plastic card; stretched sprue; various diameters of wire; and items made from Milliput. I made a bit of a mistake when I opened up the engine hatches and didn't get the panel right. The model is of a Royal Navy Sea King of 771 Naval Air Squadron based at Culdrose on Air Sea Rescue duties. The decal are from Model Alliance. I painted the model with Humbrol enamels, inside and out. The model was weathered using Tamiya Smoke to darken the panel lines and Mig pigments to create the exhaust stains. Thanks for looking1 point
-
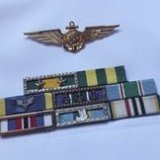
Hi all, Here at last is my Hobbyboss Tornado, started for the SIG build at Flory Models but it missed the deadline. Before the pics there are three people to thank for their help: Paul Guinan over at Flory Models for the gift of a Sky Shadow pod, SaintsPhil for the donation of two replacement fin badges after I screwed one up, and Al Harris (Wariss) for a superb set of photos and dimensions for the drogue basket. I'm very grateful chaps. If you think that's a ropey looking drogue basket then I'm inclined to agree with you! Unbelievably difficult to put together, and the air in the shed was blue whilst I was working on it, but it's (very) roughly to scale, and is at least recognisable as what it's supposed to be!. I might try and do a better one, but will probably just leave it at that. Life's too short! Thanks for looking! Gareth1 point
-
Hello one and all, This is my first GB, hope I don't cock it up! Anyhow while I wait clarification about "What-ifs", I post what I wanted to do and then what I will be doing if not. First one I wanted to do was a plane I used a lot when I had my old PS2 out. It's from the computer game Ace Combat Zero : The Belkan War (I know the two main aircraft in this game where F-15C's but I am not doing them... yet) its called the F-15 ACTIVE, as far as I am aware there was only one of these aircraft made and is now retired. It was used for lots of experiments and was also the first aircraft that I knew of that had thrust vectoring nozzles both 2D and 3D ones. Well here is the scheme I wanted to do, from the game. I must apologise for the crappy picture, but you get the point. Here is the actual "squadron" I will be doing and the aircraft. I do not own the artwork and I have no idea whom to ask either, but originally it belongs to Namco-Bandai. Not much in the way of stencils there, but I will see what I can source from my spares. Also I think that middle fuel tank should be a gun pod as the gun was removed for the canards. If anyone is looking at the canards and thinking "Hang on... they look familiar!!" It's because they have come from an F-18's horizitonal stabilizers. I had to check that one up on NASA's website, even I didn't believe it! The only thing I am going to have difficulty with is, the squadron badge, triangles/bars and the star. If you are wondering why the markings on this fictitious aircraft/country look like the ones used by America, its because in the game, Osea is based on America. I am planning on making my own decals for this one also. I need to learn a few things for this one before I can decal it. Now if this isn't allowed I will be making the proper version of this plane that NASA flew and will be building this one in the background for fun. I will be using the great Revell 1/144 F-15E Strike Eagle (what the original was made from), and also I will be using the Zactomods upgrade set as well as the Retrowings sets (once they arrive). In a stroke of pure planning greatness (or pure fluke you decide!) I already have the F-18 canards from when I made my F-18D, the Retrowings set for the control surfaces came with spare horizontal stabilizers but I never used them. So I will be using them on here. I will post up the bits as and when they arrive. I am hoping it will be soon. Kind Regards, Dazz1 point
-
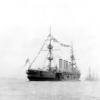
I am not a big boat modeller, but when Revell released their 72nd scale type VII, I had to build one. I opened up the flooding holes on the hull and added various other details using plastic card, wire, and stretched sprue. The paint scheme was given a battered finish, aided by the masking tape lifting paint to add to the peeled effect. I used Revell's own enamels to paint U-617 and the crew were from Revell as well. Thanks for looking.1 point
-
This is a little post for mark73 really, I will do this one as a little side project to the two ACTIVEs or S/MTD's havent decided yet. Well the first shots are of the box and the bits. Look at the flash on those buggers and the left intake is missing half of its roof!!! Might just scrap the F-15 and keep the missile... hhmm... Kind Regards, Dazz1 point
-
Ok then, in at the deep end. I am going to attempt to build the NASA F-15B #836 from the Dryden Flight Research Center, as it was during 2006’s Gulfstream Aerospace, Quiet Spike research project. Here's a photo of the real thing (hope it's ok to post this picture as believe it or not, I didn't take it). I will be using this 1:48 Hasegawa TF-15 Eagle Bicentennial Bird kit. I’ve not taken sprue shots as I expect that many of you are pretty familiar with Hasegawa’s Eagles. To go with the kit I have ordered a set of NASA decals via eBay but they’ve not arrived yet though. So still crossing my fingers that there’ll be some appropriate sized NASA logos on the sheet when it arrives. I’m in the process of getting hold of some further decals for the ‘836’ on the vertical stabilisers and the Gulfstream logo to go on the spike. And finally on the decal front I’ve just ordered some gold stripe decals by Microscale via Hannants. I’m hoping these will do for the gold edge to the blue sections as I really don’t fancy trying to mask and paint them. Then, arguably the most important feature of this aircraft is the spike and this I have 3D modelled and had printed at work. Just got it this afternoon and I’m quite happy with it but it’s definitely going to take some careful effort to get it nice and smooth. And as for fitting it – shudders! Finally, I will probably get some Aires exhausts (turkey feather type) to replace the kit ones. Not bothering with AM seats as I’ll be going closed canopy. This project is likely a bit much for a novice modeller so I do have plans B, C and D (which used to be plan A) for in the event of this going to pot. (Sorry if I've been a bit wordy)1 point
-
Hi Folks This is the first for this year and it´s the Wingnuts 32-scale Fokker EII built OOB except seatbelts from Radub.Used Tamiya, Testors,Humbrols and olis. Regards LarsaQ1 point
-
I cannot believe I've finished something!! On 1st January, I just went downstairs to the stash, picked up the first kit and said 'Right, I'm going to build this!' The initial idea was to be completely OOB, but there are a couple of enhancements, such as photo-etched belts, the Eduard FOD cover and after market decals. These are the SuperScale set, SS480883, and represents the North-American F-86D, 23667, of 324FIS flown by the unit's CO, Lt Col Fairbrother in Morocco 1958. The North American Aviation F-86D Sabre (sometimes called the "Sabre Dog" or "Dog Sabre") was a transonic jet all-weather interceptor. Based on North American's F-86 Sabre day fighter, the F-86D had only 25 percent commonality with other Sabre variants, with a larger fuselage, larger afterburning engine, and a distinctive nose radome. (© Wikipedia) This is the Revell boxing of the kit and is the later version with the rear drag parachute housing. Monogram also released the same kit, but of the earlier variant without the parachute housing. The kit is tremendous and is easily on a par with anything that I have made from Japan. Paints are Alclad II (what else?!) sprayed over Alclad gloss black primer, Gunze Sangyo acrylics and the radome (unpainted glass fibre on the real aircraft) was painted Tamiya XF-10 Flat Brown and then sprayed with Hannants' Xtracolour Satin Varnish. Some minor weathering and stains etc. were applied with a selection of washes and pastels. So, here she is, my first of 2013!1 point
-
Hi all, Revells 1/48 German Phantom built straight from the box. Brian1 point
-
Evening all My final and third entry for the 109 STGB... The awesome Tamiya 109E dressed up as J-346 of 8 Fl. Kp., Schweizerische Flugwaffe, Thun, 1944 I used the Eduard Zoom etch for the cockpit and LF decals. The decals give you only the white numerals and crosses and each has to be individually cut out. The red/white markings have to be masked! The decals were a little disappointing - they behave well over the RLM 70 but are translucent over the Red - I would have been better off using masks I think. She was painted using Tamiya Red, White and RLM 70 and Xtracrylix RLM 65 and 02. Other minor problems are that the carpet monster (or my cats) have 'mislaid' my aileron horn balances and pitot - they will be recovered and fixed later! The cockpit canopy cracked while cleaning up the sprue gate. Also I was a little heavy handed with my CA when attaching the secondary aerial. A great scheme and she looks great on the shelf. Thanks for looking and on to the pics... And finally - all three builds together1 point
-
Following on from a forum topic about Magna kits I thought I would post some pics of a couple of Magna kits that were finished about 28 months ago. Martin Baker MB2 One of the older Magna kits that used a harder slightly brittle resin. The MB2 was a private venture built to conform with Specification F5/34, that called for an eight gun fighter with a top speed of no less that 275 mph. Although built as a private venture it was bought by the Air Ministry and although some of its handling qualities were seen as less than desirable it received a lot of praise for its ease of maintenance. The kit itself was relatively straightfoward as it had few parts, e.g. one part wings . The surface detail was quite well done and the major compoments were put together using epoxy resin as they are quire heavy. The white metail detail parts had quite a bit of flash on them which is about par for Magna and one aspect that could be improved upon. The vacform canopy gave me some moments as I did not take enough off the base at first and I am still not too convinced about it now. From what I have read it is said the MB2 was finished in Green and so I used Xtracylrix Dark Green . The decals were from various Modeldecal/Xtradecal sheets. Gloster F5/34 A more recent kit that is cast in a white resin that is actually fairly easy to work with. The white metal was better too, but still not up to Aeroclub standard. Again fairly few major parts and this time some assitance is given with some location slots. The canopy went on better as I have found on a couple of kits recently with vacformed canopies, that if you do take off about the right amount of acetate (which seems to be a bit trial and error for me!) all of a sudden they fit reasonably well. The model depicts the first prototype that was apparently unarmed, at least at first. Looking at photos the aircraft appears to be in overall aluminum with a natural metal engine cowling (which is on the model, but does not show up too well on the photos. Iused Xtraclriyx Again some Modeldecal shhets were used as only recently have Magna provided decals with some of their newer kits. Hope you like them, off to decal a CMR Welkin. (P.S.sorry for any odd spellings etc, words on a computer still a bit of a struggle sometimes)1 point
-
Well, it's taken a while, but I've finally finished the Lancaster I started for the Lancaster Group Build. It's the Airfix 1/72 kit with some aftermarket goodies (decals, wheels, guns, tail, photoetch) and a little scratchbuilding. My attempts at exhaust staining with chalk pastels didn't quite work as planned; way too much white underneath and it's barely noticeable on top. Ah well, next time This is the BBMF Lanc, PA474 in her current guise as Phantom of the Ruhr. Thanks for looking, Dan1 point
-
Got a bit more done before bed time Main decals going on One side done And the other Thanks for looking1 point
-
will it lift off the cutting board dave or have you stupid glue it there.1 point
-
I think it's great, nice work!1 point
-
Great camo scheme! Very nice model indeed. Adrian1 point
-
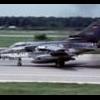
that's one very busy airfield, very nice diorama.1 point
-
I wish I still needed a comb.1 point
-
Hi All, this is my first kit of 2013. Last year I mentioned in Jenko's Bacon Slicer thread that I was putting off making the Phoenix 1/12 1940's Cooker. Well I have finally made the thing. It is nowhere near the standard of Jenko's work, but it is certainly good enough for SWMBO's Doll's House and will look just right in the kitchen. Phoenix kits are white metal, so the finished article is really quite heavy. Those of you with a doll's house maker in your life will know how cheap our plastic modelling can be by comparison. This was £35 and was bought to go with the Phoenix washing machine and fridge, both of which are about the same price. Even the 48th stuff she builds isn't significantly cheaper, but it does mean that I share my life with someone who 'gets' the modelling 'thing'. Lucky me. Anyway, the kit. The white is Halfords Appliance White (what else could I use!) and the blue is Xtracrylix RAF Azure Blue. The blacks and greys are a mix of Humbrol, Tamiya and Vallejo. Metallics are Citadel Chainmail or Humbrol Steel for the silver and Mr Colour Brass for the taps on the front. W&N Galleria Gloss acrylic varnish sealed the main body of the cooker. The inlet pipe and the shutoff tap at the back of the cooker are scratch built as there isn't one in the kit. The shutoff tap nuts are plastic tube filed to rough nut shapes and then cut, and I need more practice. Tamiya tape thickened the area between the nuts and the tap itself is bits of plastic card and tube. I have included a 1/72 Mustang in the first pic for size reference. Well, is it back to plastic or the Phoenix fridge next? Ah, decisions decisions... ...1 point
-
HL-10 SPLEDIFEROUS build.. The colors are very nicely painted..they looks FANTASTIC..1 point
-
Absolutely stunning Mike.1 point
-
Thanks, I used Xtracolor enamel RAF Blue Grey but you have to be careful as sometimes a particular tin can be a bit light. All the best Tony O1 point
-
Hello friends. It was going time without posting anything in this nice forum Today I show you my last model, an A-10 Thunderbolt from Academy in 1/72 scale. It is constructed directly from the box, and I only limited myself to looking for a decals in Hannant's. I hope that you like it. I liked much the scheme of painting. It seems to me to be different. Good. Regards from Spain Uploaded with ImageShack.us Uploaded with ImageShack.us Uploaded with ImageShack.us Uploaded with ImageShack.us Uploaded with ImageShack.us Uploaded with ImageShack.us Uploaded with ImageShack.us Uploaded with ImageShack.us Uploaded with ImageShack.us1 point
-
The main turrets at a stage ready for painting, the handrails and ladders etc. will go on after they are painted. Not too sure how I will have the gun angles yet! Hard to believe that there are 50 pieces, so far, in each of these, plus there are another 20 pieces I haven't used, 12 internal breach and rangefinder parts and 8 barbette parts for each turret that wouldn't be seen unless I was making cutaway sections. They have been fun to build, but there are still many bits still to attach. Jockster.1 point
-
Jeez... won't be long before we get photoetched hulls...1 point
-
That's a real beauty you have there Simon and I like the the look of your lightning in the background!1 point
-
I don't think those panels look as deep as we've seen on other recent Airfix products. They look fine to me. Hannants have the decals in stock now, btw. http://www.hannants.co.uk/product/X481181 point
-
What is the German for 'Scramble!'? Love that last picture, most evocative.1 point
-
Personally I think photo's of in service aircraft dont do squat for this kind of arguement. Half the shots have rivets that have a nice ring of dirt around them because all the lovely painting and finishing in the world isnt going to stop the paint cracking and falling off as soon as captain chaos in the cockpit tries to pull the wings off. Airframes flex an awful lot, it isnt as easy as squirting umbrol on it and leaving it on the shelf.1 point
-
Great build, have one myself, a hasegawa 1/72 handpainted decals and formation light strips cut from post it's.. as back in 83 there was little choice, no Internet and little money as a teenager.. Still cherish it1 point
-
I see a lakenheath F-4D in my future!1 point
-
Boy, do I feel old1 point
-
Everybody panned the Eduard MiG-21MF when they released the first photos. Anyone else remember that? It was the end of life as we knew it. When we got the actual plastic, it turned out that the über-macro super dooper close up photos had DRASTICALLY over emphasized the surface textures and rivet detail. It's happened with several other kits. Such super close up photography does nothing IMHO. The lighting is harsh and the camera sees things your naked eye doesn't see. Let's wait until we see the actual Eduard plastic..1 point
-
She's a keeper. Has she got a sister?1 point
-
At last, some positive progress with the old spike. Finally managed to get it primed and smooth without snapping it and it even looks more or less round still! So the spike goes on the back burner for a bit now as I actually take the sprues out of the box!! First they were all washed and dried and I've cut off the cockpit parts and primed with Halfords grey primer and even applied some Gunze Aircraft Grey with the airbrush. Despite still planning on a closed canopy, I've decided to have a go at the Aires resin bang seats (the photo-etch parts look truly frightening!) However, surprise surprise, I have a question. Anyone who has used these before, do you need to remove the blocks in the bottom of the kit office that the kit seats are mounted on/around? Still got decal issues. The NASA ones ordered from the States on ebay have still not arrived despite it being 14 working days since I bought them. I did contact the seller 2 days ago to ask about usual delivery times but got no response. Not promising. And on top of that potential show stopper, I did receive my made to order decals for the project today but one of the two markings I ordered look a bit rough. The size if fine but the numbers are a little thin (kind of not as bold as they should be) but more disappointing is that the outline of the numbers is notably rough (the other set might be the same but I can't see as they're white). I feel as though I should tell the supplier and ask them to try another set but I'm a bit of a wimp when it comes to complaining. Off to London for the weekend now so no building on this momentum.1 point
-
1 point
-
Superb rendition there. Weathering and worn/chipped paint work are excellent.1 point
-
Excellent modelling skills there - it looks so real, especially in shot #2. I love the subtle, but effective weathering.1 point
-
Thanks guys! I primed the capri body and put some putty on it. After the sanding i will use white primer,sand it again and than the first coat of white color. Still a long way to go. Thanks for watching! Christian1 point
-
Time for a progress update, or should that be lack of progress? Well, it’s not being going well since I started last weekend. The original spike was printed horizontally and it proved very difficult to fill and sand/smooth without losing shape. Plus, with hindsight, I was probably being a bit hasty. So I asked my colleague if he could print me another spike but this time printed vertically. This was better as it provided a more consistently round shape but, there was a trade-off. The final section of the spike is only barely 2mm in diameter and printed this way makes it very weak and I goes a bit deformed in the last 10 mil or so. With this second spike I was going quite well but was still making my way through various filling materials with mixed results and then, disaster! I dropped it and ended up with three sections. Super-glued it back together but after more filling & sanding work I was losing the shape anyway – plus I broke off the end a second time. So I had two more made and this time I’m taking it slowly and carefully. I hope I don’t have these problems when I come to use some AM resin as that will prove very expensive if I have to use 4 sets of a resin part to get it right! Some pics Not great focus but horizontal print with caked on dissolved putty Vertical print, more caked on putty and snapped! A naked vertical print spike showing the 'rings' that make it very fragile and the out of focus deformity at the end Better progress today; careful fine coats of Tamiya fine primer sanded gently with 1200 grit Tamiya finishing paper. Also, before that a almost paste like smear of fine Milliput in an attempt to add a little more strength to the fine end of the spike. In other news I have received my Aires exhausts, Microscale gold stripe decals (in 2 sizes) and a pair of Aires ACESII seats (which I’m not sure I have the bottle to try and use yet). My Gulfstream and 836 decals are in progress with Parkes682Decals but worryingly, the NASA decals I ordered from stateside haven’t appeared yet after a fortnight. Not looking good. Anyway, on with the quiet spike! Oh, PS. In the not unlikely event that I balls up the task of chopping the end off the nose of the F-15, I might need to get a replacement. I guess the only way I can do that is to buy another kit but, as the Hasegawa kits are expensive, especially D's and DJ's, is there another Hasegawa F-15 kit that has the same nose/cockpit molding as the D/DJ kits? I was hoping that the C's and E's might be the same as they occasionally crop up for less than crazy D/DJ kit prices.1 point
-
I based it on this photo I found in "NAM The Vietnam Experience 1965-75"1 point
-
So Saturday came and I was egar to start, like everyone else by the looks of it!!! I'll start with the sprue shots and then go on from there. Thought I would put a penny and 1 US Cent to give you an idea of the size. So first thing I done was to give the Retrowings bits a little clean, so that was 2 times each of the F-15E cockpit set and F15C cockpit set too. As you can see got some nice detail there, will look forward to bringing out that, or attempting it. I thought I would start on the cockpit area and the instructions tell you to cut some parts off, just took this picture to show you what I have taken off. Here is the cockpit all sanded and cleaned of flash and fitted in the nose bit. I got lots of room to put some weights in there which I am happy about, usually I struggle to find room. Just done this picture to give you a *rough* idea of what it will look like. I have made up the little stake things that the Canards will sit in. Decided to get the canards sorted out before I even stick the nose or fins down. I was going to do more than this when I noticed that my little "pot" of glue, I got one of those Revell needle glue things, had it's tip ripped off and all the glue has poured out... Christmas has been bad for my models, first I have 3 models "disappear" (we think stolen, long story) and now the glue has all dried up. The annoying bit about this was that I was in Hobbycraft 2 hours before I started this, could of gotten some glue then. Well this be where I am upto until I get some glue. Not much of a start I know... I do apologise. And here is my plan C, D, and E. Just thought I would post this here for the time being. Kind Regards, Dazz1 point
-
The final version of the exhaust shields, made with aluminium foil 0.15mm. I've used the Regini's techniques (a good friend) http://www.britmodel...ini#entry312623 They work perfectly!!! The paper template was made by Nick Greenall and you can find it on Harrier SIG website!!! Some color:1 point
-
Looks good! Welcome back to the fold. For some reason, when you're an adult kits seem to take longer to build than one afternoon. I don't get it... Regards, Adrian1 point


This leaderboard is set to London/GMT+01:00