
Leaderboard


Popular Content
Showing content with the highest reputation on 24/01/13 in all areas
-
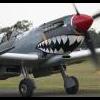
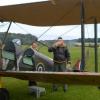
Just completed a double build of a couple of Tamiya 1/48 P-51's. For Lt. Francis W. Horne's mount, Snoot's Sniper, I used the kit (Cartograph) decals that came with the 'Blue Nose' special edition boxing. For The Millie G, flown by Major Edward Giller, I have used the Barracudacals decals for 44-14985, the first of the two Millie G's to appear in this colour scheme. Construction is OOB, the seat belts are the kit decals on lead foil, the wings have been filled as per the factory and exhausts drilled out. I used Modelmaster Buffable Aluminium applied with a brush for the bare aluminium, a mix of Alclad Aluminium/Dark Aluminium for the painted aluminium and Gunze H309 for the fuselage and empennage on The Millie G to match the nose checks. First here is Snoot's Sniper as she appeared in August 1944 by which time only the under fuselage D-Day stripes remained - previously they had been applied to both lower and upper wings, and also the original canopy had by this time been replaced with a Malcolm Hood. I have found a couple of colour photos on the net...I do not know who the original owner is as they have been copied many times:- all credit to whoever is deserving of it though. I have tried to replicate the same worn but not abused finish as seen in these pictures. And now The Millie G as she appeared in summer 1944 with only the under body invasion stripes remaining and before she had a rear view mirror added. Again, I have managed to find a couple of reference photos on t'interweb, and all credits to whoever is due them. And now onto the pictures, and as with the Snoot's Sniper build I have tried to replicate the worn but not worn out look of an aircraft in the middle of a hectic operational schedule. Two thoroughly enjoyable builds, hope you enjoy the pics.5 points
-
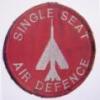
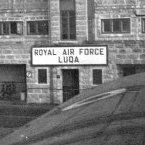
Straight form the box. 84 Squadron, Akrotiri, Cyprus 1987. XS518 made from old "scrap" decals hence the size is to big.3 points
-
Hello Got the first one of the year out of the way - albeit one I started mid-December. This is the Italeri Tornado IDS, modified to GR4 standard in Operation Telic markings. I have had this kit kicking around for a while, buying it when Paragon stopped trading and I bought a set of their AM goodies 'for the stash'. I have added a NeoMega cockit; Paragon Flaps/Slats, exhausts, fin correction, weighted tyres; Revell Storm Shadows and Paragon tanks tanks - I got these off a club mate without fins, so these were scratch built. Finally a scratch built sensor pod. Finished in Humbrol enamels and Model Alliance Decals. I enjoyed the build, surprised by how small the airframe actually turned out. Thanks for looking. Ian3 points
-
Hi Guys let me introduce you to “Escape from Stalingrad” its the Tamiya 1/35 scale 88mm with some alpine figures, and Resin figure Kit Flak Crew. The story is that the gun has jammed and whilst the crew attempt to fix it the 2 Russian tank crew are trying to escape the through the ruins, but have been heard by the SS patrol. Enjoy Mike2 points
-
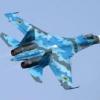
She is a big impressive looking beastie, but she's not really a dogfighter. More of an interceptor.2 points
-
Six feet equals 72 inches, which is why it was never known as the "Three foot scale" Phil2 points
-
Hi, You'll have to careful, if you don't remove all traces of the rivets at one sitting they will grow back! Colin @ the bottom of Africa2 points
-
Hi Britmodeller, This is my version, of the Severn Class Lifeboat 'Stornoway"at its base. The ship is moored to the jetty that is able to go up and down with the tide. Taking fresh water and electricity from the pontoon facility. Weather forecast is bright, sunny and windstill. Not much to do for the "Preiser"crew. The landing platform can take the RN/RAF Wessex or Sea King for joint ops. at sea. Wessex 1/72 is under construction. Regards, Dirk, The Netherlands1 point
-
Second model for the year completed. Again this one has been ~90 % complete for the last 18 months or so. Built straight out of the box with brush painted Tamiya acrylics. Not one of my best, but then again not one of my worst either . Thanks for looking.1 point
-
Hi , this is my first armour model , i normally build aircraft models. This kit was painted with Tamiya acrylics and lightly weathered with oil paint and drybrushing . Sorry about the tracks the paint has started to flake off the vinyl , will not use them in future. Hope you like it .1 point
-
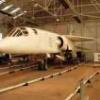
I cannot believe I've finished something!! On 1st January, I just went downstairs to the stash, picked up the first kit and said 'Right, I'm going to build this!' The initial idea was to be completely OOB, but there are a couple of enhancements, such as photo-etched belts, the Eduard FOD cover and after market decals. These are the SuperScale set, SS480883, and represents the North-American F-86D, 23667, of 324FIS flown by the unit's CO, Lt Col Fairbrother in Morocco 1958. The North American Aviation F-86D Sabre (sometimes called the "Sabre Dog" or "Dog Sabre") was a transonic jet all-weather interceptor. Based on North American's F-86 Sabre day fighter, the F-86D had only 25 percent commonality with other Sabre variants, with a larger fuselage, larger afterburning engine, and a distinctive nose radome. (© Wikipedia) This is the Revell boxing of the kit and is the later version with the rear drag parachute housing. Monogram also released the same kit, but of the earlier variant without the parachute housing. The kit is tremendous and is easily on a par with anything that I have made from Japan. Paints are Alclad II (what else?!) sprayed over Alclad gloss black primer, Gunze Sangyo acrylics and the radome (unpainted glass fibre on the real aircraft) was painted Tamiya XF-10 Flat Brown and then sprayed with Hannants' Xtracolour Satin Varnish. Some minor weathering and stains etc. were applied with a selection of washes and pastels. So, here she is, my first of 2013!1 point
-
Hello World. Here is my 1:48 Airfix Sea Vixen I just finished.. quite a bit of fiddling to get it finished, But I think you will agree it stands out well against the Dutch snow in the beck ground.. and there is some out of scale bird poo on the table thanks for looking1 point
-
Another model finished at the weekend after languishing almost complete for many months - just needed the pitot tube and a coat of matt varnish to finish. Photos not the best as I was in a bit of hurry this morning. I picked this kit up at the "Swap'n'Sell" at the WA Model Expo a few years ago for only a few dollars as I really like the pugnacious look of the Boomerang. It was, shall we say, a challenging build. As always finished with brush painted Tamiya acrylics. The markings are for an aircraft from No 4 Squadron RAAF based at Labuan, North Borneo in 1945. Thanks for looking.1 point
-
Thought I would post up my effort, which I finished yesterday. OOB except for Eduard etched Instrment panel and a few cabin bits. Lead wire for the red armament looms and brake lines, scratchbuilt engine blanks and Verlinden RBF flags. Gunze paint as usual. As for the kit itself, Airfix have definately advanced since my early days of the hobby. Negatives - the sprue gates are quite large which means a lot more work tidying up the small components, the decals for the MRB erosion strips on the leading edges are the wrong colour and were a pain to get right - I removed them, masked the area off and sprayed them gun metal, much more realistic. I did also have snags fitting the inner cabin module to the two fuselage halves, this seems to be a common problem with this kit, I ended up removing some plastic from inside each fuselage half with my Dremel, which seemed to help. Regards Andy1 point
-
Absolutely stunning work. Monty1 point
-
Cracking mate any help i can be on the hawk let me know i have a few ref photos of tiger hawks1 point
-
Very nice indeed1 point
-
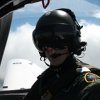
Very nice work! Can you imagine flying this 'big bird'?! The cockpit's windscreen and canopy look so small. Any info about it's maneuverability? Was it as difficult as the Phantom was? Cheers Sernak1 point
-
After failing to finish this in time for the deadline I sort lost my mojo for a while and didnt do any modelling for nearly 3 weeks. Anyhow after a coat of Klear the decals are now on and progress is being made, hopefully I can get this finished before the end of the month. Yep, its 63Sqn, look like its been zapped, but by who? Really like the way the Archer rivets come out. Some dangly bits to hang under the wings The mods may want to move this thread to the appropriate location. Cheers1 point
-
Great looking Fox Bat!1 point
-
I love this model------takes me back to my Wattisham days 1989-1990 (& Waddington 1999-2002, when there was an F4J was sat in our Movements Hangar, sadly it was eventually scrapped )1 point
-
A silk purse from a sows ear.1 point
-
1 point
-
Top notch, well done. RR1 point
-
HI Artie, I did try vinegar once before, but it didn't seem to soften anything and just made me want to get a bag of chips for my supper Chris1 point
-
They are a bit hit & miss with their aircraft releases, there was also a range of WW2 Battle of Briatain Aircraft listed for 2010 that never appeared along with F-16s and all F-35. I wonder if they are trying to find a decent kit to copy, their Sea Vixen certainly lloks to have been inspired by the MPM kit with a touch of the Airfix added for better details, the Sea King looks to have been created from scaling down the Hasegawa 1/48th kit - Badly !!!. Perhaps they are struggling to get the Airfix 1/48th Buccaneer together so they can copy its features or maybe the Czechmaster kit is a little too complex for them to recreate in CAD1 point
-
Cockpit detailing is something that I struggle with. Would Tamiya smoke work? Thinned down of course. If you are going over top of another acrylic, then I think that you need to gloss coat before using the wash.(basic, but never assume). then you would have to flat coat when done. the gloss coat should allow for a fairly easy clean up of the wash though. Edit - I just did some searching, annnnnd some folks have managed an acrylic pin wash over Tamiya base coat. they made sure that the base coat was well cured though. See this link: http://cs.finescale.com/fsm/tools_techniques_and_reference_materials/f/18/t/141198.aspx Post 6.1 point
-
Hi Albertz, This is my tip for you. Firstly pre-shade all shadow lines in your cockpit i.e. all corners, then lightly build up a nice and thin layer of paint to just let the pre-shade create a shadow effect that will look rather pleasing if done correctly! Then, use either artists oil paints (Raw umber or Paynes Grey work fine) thinned with spirits and use capillary action to run the oil into all the detail of the cockpit/sidewalls. As for the dials and gauges, try applying detail to buttons and switches using a cocktail stick with a very light grey Acrylic paint and gently touch each switch with that. Its important to look at reference photos to also add some yellow or red switches depending on which aircraft had them. Here's some examples. Adam1 point
-
Lovely looking plane. MB9T9016 by Rainbow 1984, on Flickr1 point
-
Coming along nicely Rob Cliff1 point
-
Try storing 1/32 nd scale models. I think I need a new house just to accomodate them and the train set which occupies a 10x10 foot L shape signature. Monty1 point
-
If there was ever any doubt about the RLM02 I think that has been dispelled now - that looks spot-on1 point
-
I'm building the revell one. but the re-scribing put me off! Here is something to feast your eyes on. hope it helps. its the best and only raw footage on the thud around :popcorn: :1 point
-
Hi Here is my Airfix 1/72 Hawk TMk2 bought in the recent Jadlam sale for £7. I built it from the box with the only additions being masking tape seat belts, a cut-down dress-maker's pin for the pitot and the very nice Xtradecal RAF Anniversary Update 2011/2012 I sprayed the model with Tamiya X-1, and following the decal application, I brushed on a coat of Klear (removing some of the minuscule stencil decals in the process!) I didn't use all the Airfix stencils, as I felt that they might ruin the look of the model. I'm sorry about the picture quality, but the winter overcast is not conducive to good photographs.1 point
-
Sorry for the late answer but there is some troubles with my account, Mike is sorting them. So, French Jags ordnance 92-94: At first, I think that 94 is maybe the year we introduced the GBU 12 in our ordnance (or maybe 95-96, I am not sure) Air to Air (the easy bit!): MAGIC II, generally a single one at the extreme right (because the jag weapon systems fires the missile from the right pylon first, it is the opther side for the bombs, don't ask why, I just remind you that we build this aicraft in a joint venture with the Brits... ). And that's all. Air to ground: French dumb bombs Low drag: 125 kg DFR, SAMP 250 kg and 400kg (Qualified for Mk82, M117, never saw them loaded) High drag: 250 kg BL EU2 Clusters: BLG 66 Belouga (Mk 20 Rockeye qualified but I never saw them loaded) Antirunway: BAP 100 (parachute+rocket to penetrate concrete, loaded by 18 rounds, centerline or inboard underwing) Tactical support bomb (a french speciality, similar to BAP 100, loaded by 18 rounds, centerline or inboard underwing), used again vehicles columns... AN52 nuke (up to 93, 7th wing only) Laser guide bombs: Matra BGL 400 kg Matra BGL 1000 kg A single bomb under inboard leftt wing GBU 12 is usually loaded by pair under centerline (but around 95 only) Rockets: LRF1 (36 rounds of 68mm), up to 4 pods (144 rockets!!!) LRF2 (6x68 mm, mainly for training) LRF3 (4 rounds of 100mm, usually inboard pylons but fitted outboard for training purpose as they tend to burn the horizontal tail plans...) Some US rocket launchers (mainly used for training purpose) LAU 3/A LAU 10/A LAU 32B/A LAU 51/A Missiles: AS30L (laser), single missile under inboard right, specific pylon with nose clipped (can be scratched from the pointy pylon of the box) AS37 Martel (antiradar): single missile, centerline, mainly used by 2/11 "Vosges" squadron in 92-94 ECM Self protection: LLP5020 Alkan (chaff and flare dispenser, under wing roots) from 90 (before we had Lacroix in place of the drag chute, only 18 flares) BARAX and BARRACUDA jammers, extreme left PHIMAT, chaff dispenser, extreme right, often replce by a MAGIC II when LLP5020 were loaded Offensive ECM, specific load of 2/11 "Vosges" fighter squadron BOZ 103 jammer (inboard pylons) CT51 Calamar (inboard pylons) Recce pod: RP36P made from a regular RP36 gas bag with fins deleted, centerline Laser pod: ATLIS II, centerline, aircraft's serial number from 130 to 160 I checked the types of ordnance in the excellent book (in French) by a former french Jaguar pilot: Le felin franco-anglais en action by Alain Vezin The squadrons were assigned a primary and a secondary role: 7th wing squadrons: 1/7: nuke/BAI/strike (no laser before 96) 2/7: OCU/assault 3/7: nuke/BAI/strike (no laser before 96) 4/7: nuke/BAI/strike (no laser, disbanded in 1988, became 3/4, Mirage 2000N) 11th wing squadrons 1/11: BAI/Strike/rapid deploiement, all type of weapons 2/11: electronic warfare/strike 3/11: BAI/Strike/rapid deploiement, all type of weapons 4/11: BAI/Strike/rapid deploiement, all type of weapons (disbanded 92) I should fill an excel form... These are only the more common weapons, the jag was qualified to carry some other from the US and also "bidons speciaux" (spacial tanks aka napalm) You can google the designation, you'll find a picture of most of these items. The best way to proceed is to tell me which load you are intersted in and I'll tell you if it is OK1 point
-
Not quite: It looks crap, probably is crap, but we don't know exactly how crap until we fondle plastic, and see how fixable its level of crapness is. Jonners1 point
-
This morning I was up before my student, managing to mask and paint the bare metal areas near the engines. As I vacated afterwards, there was an intruder alert over the snowy approaches to mygarden. The Eagle was scrambled for a Such a rush job I fogot to refit the elevators The intruder was identified as this Airfix Eagle testing readyness - both enjoying their . For this model I removed the burner cans and repainted the corresponding area.1 point
-
And now the detail decals are on! Bit further to go - but we can see what she's going to look like.1 point
-
And another photo. Moved all the decalling kit out of the model room - so son can work, whiIe I give this an identity.1 point
-
Here are my Eagles again. First an Airfix F-15A from about 1978. Next the Hasegawa F-15B Strike Eagle prototype in Lizard One Scheme. Same aircraft another Hasegawa F-15B which I built in 2000.1 point
-
And here it is in a neighbours carport The only daylight place out of the snow.1 point
-
I love Beaufighters and you have done a lovely job - worth the wait!1 point
-
Managed to get into the model room long enough to primer my Eagle with Humbrol 65. Artificial light photo - but looks a bit tooo green to me I'll try to get daylight photos sometime tomorrow. Oh and I mixed some blue into a tin of Humbrol 127 to blend my Air Superiority Blue.1 point
-
Just got the wings and fins fitted - starting to look the biz now1 point
-
Scramble all Eagles - immediate launch! Here's the pilot strapped into his seat and the cockpit in the upper fuselage This might be an interrupted build, my son is using the model room to revise for exams1 point
-
While we're waiting, here are my earlier 72nd Eagles. FIrst an Airfix F-15A from about 1978 - may well update the decals on this one. Next the Hasegawa F-15B Strike Eagle prototype in Lizard One Scheme. I saw this aircraft at Farnborough in 1980. All bombed up in the static park during the morning, they unloaded it to fly during the afternoon. Real Viking launch with lots of fire and noise - it suffered a birdstrike on liftoff. A very tame circuit, it landed immediately, and that was the end of that display. Same aircraft another Hasegawa F-15B which I built in 2000. I saw this one at Farnborough in 1976 Bicentennial year.1 point
-
I stlll think my suggestion was better ! detail, schmeetail Jonners1 point
-
Not as bad as me - just over 7 days since my cockpit was replaced!! That said, there's barely a difference between the USMC/RAF cockpits so I think I'm OK there, and will probably scratch-build the seat as the Wolfpack one doesn't quite look right to my eyes. I may well find myself investing in the update set though, depending on whether I pick a 100% LERX or not. Great to see them finally released and will certainly make GR5/7/9 modellers' lives easier Tim1 point
-
I'm very envious of all your attic spaces and sheds! I haven't got a picture of my modelling bench proper, but here's my "forward operating base" in Oxfordshire, where I sit now. This is also the place where I engage in artful, scientifically pioneering, beautifully constructed procrastination essay writing as befits a finalist in Biological Sciences at Britain's best university... Seriously though, I don't get much modelling done while here: I really do have quite a lot of work! Oh, and can you spot the artfully converted spray booth? Now I've finished spraying Appliance White and primer haphazardly in the direction of my latest Spitfire, it'll go back to being a place to put walking boots. At least I have a ready supply of free newspaper in the form of "The Cherwell", Britain's most vapid student publication.1 point
-
"If you can read this, you're too close"1 point


This leaderboard is set to London/GMT+01:00