
Leaderboard
.thumb.JPG.ca9d91d3c605f2ca36aeec8f5a1b648a.JPG)


.thumb.jpg.d17ff607fc7e89ed057e63fcb6f2a888.jpg)
Popular Content
Showing content with the highest reputation on 22/01/13 in all areas
-
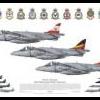
Straight form the box. 84 Squadron, Akrotiri, Cyprus 1987. XS518 made from old "scrap" decals hence the size is to big.4 points
-
I purchased the Freightdog conversion set for the Revell 1/32 Spitfire when it was first released but took some time to pluck up the courage to start it. The Revell base kit can be a bit challenging anyway as the parts breakdown for the wings is quite a strange design. Coupled with the 1970's moulding technology (this was originally produced by Matchbox) there is, shall we say, "room for improvement". Mods include, Freightdog resin conversion, Greymatters belly tank, Quickboost seat and Barracuda canopy handle from a set I bought for the Tamiya Spitfire XVI. Added detail to the wheel wells, replaced gear legs with brass tube, scratchbuilt details in the cockpit and built plasticard 'cameras' to prevent see through look in through the camera ports. WIP thread is here - http://www.britmodeller.com/forums/index.php?showtopic=234931641&hl= I really think the Matchbox Spitfire makes a lovely looking model but I love the 'ultimate' Seafire and am very pleased to have one in 32nd scale. Overall a very enjoyable build and I'm very pleased with the result. There were a couple of errors on this build. I forgot to re-scribe the larger flap fitted to the Seafire and the spinner should have been EDSG on this aircraft, things I have to live with now. Need to check refs and instructions more carefully in the future, but I have learned from this. Regards, Steve.3 points
-
Hi everyone, thought I could show you my attempt at making a recce version of the Voodoo from the old Monogram kit Used the Koster Conversion which has vac-form front end from behind the canopy vac-form ecm pods and resin exhausts the markings are bogus, made from bits and pieces from the stash as none come with the conversion but tried to get as near as possible This is my only success at anything Vac-form, which says more about the quality of the conversion than my modelling prowess hope you enjoy looking at.. Cheers Russ2 points
-
Hi all, Here at last is my Hobbyboss Tornado, started for the SIG build at Flory Models but it missed the deadline. Before the pics there are three people to thank for their help: Paul Guinan over at Flory Models for the gift of a Sky Shadow pod, SaintsPhil for the donation of two replacement fin badges after I screwed one up, and Al Harris (Wariss) for a superb set of photos and dimensions for the drogue basket. I'm very grateful chaps. If you think that's a ropey looking drogue basket then I'm inclined to agree with you! Unbelievably difficult to put together, and the air in the shed was blue whilst I was working on it, but it's (very) roughly to scale, and is at least recognisable as what it's supposed to be!. I might try and do a better one, but will probably just leave it at that. Life's too short! Thanks for looking! Gareth2 points
-
Hi Britmodeller, This is my version, of the Severn Class Lifeboat 'Stornoway"at its base. The ship is moored to the jetty that is able to go up and down with the tide. Taking fresh water and electricity from the pontoon facility. Weather forecast is bright, sunny and windstill. Not much to do for the "Preiser"crew. The landing platform can take the RN/RAF Wessex or Sea King for joint ops. at sea. Wessex 1/72 is under construction. Regards, Dirk, The Netherlands2 points
-
Looking forward to RIAT this year already !!2 points
-
A very bad model, very old, and very difficult .... one tough cookie not recommended for cardiac2 points
-
Went and had a sctratch in the stash earlier and found a bag with the Intruder, SR-71 and the Shuttle, plus bits of the Sabre. i'm going to have a bash at finishing the Intruder, just need to find the decals. I was going to pose it comming into land but I've lost the jockey, so I may do it parked up maybe even the tanker version. Enjoy and thanks for looking. Colin2 points
-
Are we ever to be satisfied I wonder? We complain about existing kits and plead with manufacturers to give us new toolings of our favourite subject Along comes the new kit and what do we all do? We moan like hell over rhe smallest detail and decide to put up with the old kit because we won't spend more than 3/6. Just my feelings you understand. Chris Thankful to all manufacturers everywhere for their efforts.2 points
-
As requested by TonyGol i will try do a WIP for this build .I am making this one up as i go so no idea what it will look like when finished so we will just have to see i start off with 2 of these,just because it is what I had the first time i built one but the are now making these with that line round the center so i dont know what i will do with that the 2 soldered together i will use banding to cover the join and the 2 center lines i make these out of 4mm wide brass and the made up one one on 2 to go all 3 on then to pre drill all the holes in the brass rings first all 3 drilled and ready for pinning next i cut and shaped the brass tube that will hold the USB plugs i have 2 soldered on and that is where i am atm more as i get it done1 point
-
Hi Everyone, This is my first model after having bought so many and not building them over the years, i have alays been hesitant to assemble and paint them and finally decided to give it a go, if you look closely enough you will see several mistakes, I learnt alot with this model and it took longer than I thought it would, I have never filled and sanded before and I learnt what puttys I like and which ones I dont. I didn't like the empty space behind the seat so I scratchbuilt several things based on 2 grainy pictures of that area something i thought i would surely stuff up. Masking was a disaster on several occasions the paint peeled off with the tape. I could talk for ages on it.1 point
-
Hi all, im new to the model world (only having built a few kits as a kid). I picked up this Airfix Mosquito kit from a local carboot last year and built it over christmas. I'm not overly happy with it but it was all good experience for my next models. i have started to build a MK1 Hurricane (Airfix 1/48h) and have an academy T33 in the cupboard..... Any tips on my next build will be gratefully recieved Neil1 point
-
I did this one a while ago, my last bit of Armour. Bit of a cliche really, but the Bronco car 'n Dragon figures came out together(ish), I just couldn't resist..... The car went together well, painted with Tamiya, and weathered with Mig powders. Figures are good, slightly modified from originals. I just wish I could paint figures...... Hope you like, Dave1 point
-
Inspired by this thread http://www.britmodel...owtopic=1704= I thought i'd have a go on the cheap first before i sourced the Fusion DB605 modification to the Tamiya Spit. Its the first time i have attempted ANY modifications to a model so this was more about seeing how comfortable i was with cutting, filling and a bit of cursing but i'm pleased with the results.1 point
-
Hi Here is my Airfix 1/72 Hawk TMk2 bought in the recent Jadlam sale for £7. I built it from the box with the only additions being masking tape seat belts, a cut-down dress-maker's pin for the pitot and the very nice Xtradecal RAF Anniversary Update 2011/2012 I sprayed the model with Tamiya X-1, and following the decal application, I brushed on a coat of Klear (removing some of the minuscule stencil decals in the process!) I didn't use all the Airfix stencils, as I felt that they might ruin the look of the model. I'm sorry about the picture quality, but the winter overcast is not conducive to good photographs.1 point
-
That Raptor is a cool looking plane! Nice pics!1 point
-
It's ok I suppose Who am I kidding, absolutely fantastic, thanks for sharing the moment with some fine pictures1 point
-
Very nice, gotta love a one-o-wonder1 point
-
Finished albeit not in quite the time frame i anticipated. Kit: Heller 1/72 Kit Decals AM: Pavla Cockpit, canopy & wheel set.1 point
-
Here is my almost completed Skyvern or Wyraider lol, all comments good or bad welcome1 point
-
P-51D Wheels (for Tamiya) 1:32 Eduard Brassin The big Tamiya Mustang has been with us a while now, and these replacement resin wheels should improve the detail of the kit parts, as well as removing those rubberised tyres, which are like marmite with modellers. You either love 'em or hate 'em. I'm in the latter camp, so am pleased to see this set reach the market. Arriving in the standard Brassin clamshell package, the set consists of two resin tyres, with four hubs, two for the front, and two for the rear of each wheel. The wheels are attached to their casting blocks at the bottom of a very slight "weight bulge", so removal will be quite easy. A pair of slim outriggers improve casting and channel bubbles away from the wheels, and should present little clean-up due to their small footprint across the diamond tread pattern. The hubs are similarly mounted and should be easy to remove and clean-up. The spokes and lightening holes will need clearing of a fine flash that is there to ease casting. Poke them out with a needle and clean up with a sharp knife and a little patience. Each pair of hubs then affix to the ridge in the centre of the tyre, giving the correct see-through look to each hub. The depression in the back of the hub should then allow it to slide straight onto the kit gear leg. The mask sheet (not pictured) provides four doughnut shaped masks to aid painting the hubs after the wheel itself has been painted. If you intend on spraying the hubs, you will need to extend the mask with a little extra tape to avoid overspray, as the masks don't cover the whole tyre. This is standard with wheel masks however, so will be familiar to most. Conclusion It's getting difficult not to run out of superlatives for these Brassin tyres, but rest assured that casting quality and detail is up there with the best. If you're a detail freak, you'll need to doctor the "GOOD YBAR" logo on each tyre, but as that's there to avoid copyright issues, that's not too much trouble. Very highly recommended. Review sample courtesy of1 point
-
Yes but that usually runs along the lines of 'how could Diddly Squatt produce such a truly awful movie full of sloppy plot holes and poor characterization, a crew that lack any empathy, intelligence or depth, woman running around post op seemingly immune to pain, not to mention the hilarious kamikaze jobbie at the end, coz they love the captain...who can't fly a damn anyway ???, way over the top soundtrack, illogical decision making, etc, etc, etc.......awful doesn't cover it'................kind of thing !1 point
-
Great. Another Ra'am. And a stunning start as well. /Bosse1 point
-
2mm is way too small... i have 3mm tho.... anyway keep at it....1 point
-
Well the second of my mojo builds hope you like her1 point
-
The cone has been described as a light sensor. I believe the ORB if you can get to it has some more description of the whole apparatus. Here's some of it on the net..... (8/44) A considerable amount of experimental work was carried out in connection with the photographic side of the Squadron’s work. W/C. F.O.S. Dobell took part in the majority of these and supervised the remainder. The first of these experiments was carried out over Stonehenge on August 8th with the object of ascertaining the opinion of A.A. experts as to the vulnerability of Wellington A/C whilst engaged in night photography. Photographs were taken at heights 800’, 1000’, 1200’ and 1400’., using one F61 and one F24 camera. The result of the photography confirmed previous work, which had shown the F61 to give the better picture. Subsequently flares were dropped over Larkhill Range so that the Gunnery experts could decide whether the Wellington was illuminated by its own flares. The experts gave their opinion that the vulnerability of the A/C was not seriously increased by the firing of photo-flash cartridges, as it was already plainly visible at the height at which it was flying. A later experiment was performed over base using a Wellington A/C with the TAF black and white stripes removed, to observe if the normal camouflage helped to make the A/C less conspicuous at its normal operational height. As a result of this experiment permission was obtained to remove the stripes from all A/C engaged in night reconnaissance. On August 16th, F/Sgt. Harris and crew, with F/Lt. S.A. Bergon (Electrical Officer) tested a new control setting for the pistol discharger. This setting is connected with the Type 34 Camera Control and permits varying time intervals to be used and allows the pistol discharger to be operated using, two, four or six cartridges instead of always firing six cartridges consecutively as is the usual procedure. The apparatus can be connected to any number of pistol dischargers and may obviate the necessity of reloading whilst in the air, Results of this particular test were not too satisfactory, but it was considered that the A/C flew too low. Further experiments with this apparatus will be carried out shortly. These experiment have their lighter side. The pistol discharger has caused much comment amongst the “localsâ€, who have heard its six consecutive “pops†during the nights when local tests have been in progress. One old lady of Harrow was heard to say, in a bus, “yes I’ve noticed it often before. There are six “pops†and then a little later there are six more, and we never get any “doodle-bugs†that night. So 69 Squadron charms away the doodle-bugs.1 point
-
You are far too kind Al. I did take inspiration from some novice who built this one at the following link. I think the chap did a superb job with the pilot and the huge load on it. Regards, Montgomery From Poona http://www.britmodeller.com/forums/index.php?showtopic=25581 point
-
Lovely work Terry. While it would be hard to make the Connie look ugly your skill has brought out the best in her. Very nice image.1 point
-
I don't envy you with all that PE, I'm toying with getting some but I don't know weather it's a good move!1 point
-
Another lovely build, quite a collection in S.A.E war cloths I wish i could keep up with the builds like you1 point
-
Thing is....................most models could probably be accurised by modifying, sanding etc, etc but we shouldn't have to be doing that with a new release in 2013 of one of the most famous British aircraft. I make no apologies for wanting these aircraft to be as accurate as possible from the box and many people haven't got the time (or inclination) to spend hours modifying them. I've done enough modifying in my time and want something that goes together fairly quickl especially as I was going to buy a few of these. I certainly won't be now though.1 point
-
That looks very tasty.1 point
-
EXCELLENT... Your Voodoo is HOT.1 point
-
Very nice! I like that mucho John1 point
-
Jeez Russ, you are cranking these things out pretty fast! Good job.1 point
-
Thanks very much everyone, I gave my office a massive clean up yesterday so should have space to work on Hermes now... @Major Eazy Broadsword's positioning is just right - she'll be replenishing fuel from Hermes - in fact I'll probably have them about to connect rather than being joined to make the composition a touch easier. Yarmouth is a little close - scale 90ft separation - but not unrealistically so, afterall the list of RN ships that have bumped into other RN ships is a very long one. Besides at around 800x450mm, the base fits into my display cabinet with under 5mm clearance so not a lot I could do there! A1 point
-
Very Nice !! Cool scheme too1 point
-
Thats one fantastic build, i built the Revell/monogram one a long time back still have it, but didnt know about Klear then so it has no decals, i brush painted this, and was fairly happy with the outcome at the time, it came with a full size cut out for masking, and was a wrapround, took some painting, but no where near as good as this1 point
-
So this bird looks like Messerschmitt for me from distance and low light Basic painting and fixing is done. Still to do: varnish, decaling, aerial, varnish again, washing, chipping, wethering, play with oil paint and restore all things i'll broken in process First time was using Vallejo paint...http://www.acrylicosvallejo.com/en_US/rlm-colors-ii/family/17/56 As I was found it's a bit better then Tamiya (IMHO) but RLM-74 and RLM-75 hade a very small difference. I thought that the difference between the colors a little more...1 point
-
Hello, thank you very much! Some more progress: More to come.1 point
-
I'm calling this finished. All comments welcome1 point
-
Well, this hasn't been much of a WIP has it . Here's a couple of photos with it's gloss coat and decals on. Panel lines have been highlighted with Promodeller Dark Dirt. .....and here's the fiddly bits Here are the etched metal door actuators which were a real pain to fit and pinged off just after the photo was taken...... And here it is all finished Should be in RFI later today. Thanks for looking and especially to those who have left comments. H1 point
-
Well I went sledging and changed some really stinky nappies, beat that! Great shots you lucky beggar.1 point
-
Cheers Robin1 point
-
I'd like to have a go... I've got an Airfix Spit XII looking at me going 'Ramrod missions' (yes, I do need to get out more when the models start talking). The old Airfix Hampden is also looking rather tempting - if I can summon up the courage needed for that kind of challenge!1 point
-
Pro Modeler/Revell’s 1:48th F-15E… For the moment it’s the best offering in 1:48th. Completed this two years ago and have one on the bench, just a super kit. I added the Black Box cockpit and to be honest it really is over kill, just add a couple of aftermarket bang seats. Decals are from Afterburner, Gunze paints throughout except for the exhaust and natural metal areas…used ALCLAD II, great stuff. http://www.casmodels.org/forum/read.php?28,42621 point
-
Thanks Jenko, was trying to post a few more but fell foul of the 127 second limit,1 point
-
Nope, but that would be a job to have, thanks for your kind words Hi Mish I appreciate you looking in on my on going project Thanks AjD Hi Paul just trying to build what I see, scale is a little off here and there, but I dont think someone will come and measure Hi Si, seen your work and I say the same thing about you, but I thank you very much for taking your time to look in. Well again it has been a few weeks without posting, seems life gets in the way?? I have added parts to the tail lever arm so that I could join the .35mm wire to it and then when I have make the elevators I can join the lever to them. Unglued the vertical stabillizer using CA de-bonder so that I can install the tail plane in one piece, then added the brackets to hold the tail plane to the frame work. So once I had done this, I got a bit side tracked and found a drawing which showed me how the steel work was inside the cock pit on the floor, because I want to try and make the elevators go up and down with the control stick, and found the kit was all wrong!! so I removed all that I had built previously built inside the cockpit and now working on making what I see close to scale as poss. Again used Nobbies idea to make brackets. This is how I made the brackets, made some wooden templates, used .010" plastic card, heated with heat gun and then cut the top off with a fine saw. Hope you enjoy, Regards Richard1 point
-
So now I have finished off the main structure of the tailplane, made all the brackets to mount to the main frame, added the holes so that the wire will go to elevators and elevator trim flaps, and then bent some .003" for the fairing strips which go on the main spares for elevator. Now I can start making the ribs etc etc. Hope you enjoy. Regards Richard1 point


.thumb.jpg.158e2e086d45b8f96b7d93b8bee8dc21.jpg)


This leaderboard is set to London/GMT+01:00