
Leaderboard


Popular Content
Showing content with the highest reputation on 01/01/13 in all areas
-
Happy new year to everyone! I felt I needed a bit of modeling therapy, so I started this as a quick, almost OOB build a few weeks ago to try to get my mojo back. It still needs a few fiddly bits like the landing gear and antenna, but I figure it'll be done in another week or so. It's a nice kit; not quite as refined as Tamiya/Hasegawa, but very good nonetheless. It required dry fitting and tweaking to get things just so, but very little filler was needed. Some folks have complained that the panel lines are a touch overdone, something with which I kinda agree. Before starting any assembly, I gave the fuselage and wings a heavy coat of Alclad "Black Primer and Microfiller" and then sanded everything back to the bare plastic, being careful not to obliterate any of the fine raised detail scattered about the model. This had the effect of smoothing the slightly rough surface texture and rendering the panel lines somewhat finer. The other thing I just had to address were the way-too-deep Dzus fasteners around the engine. I drilled them all out, plugged the holes with stretched sprue, sanded them all flush and redid them with a beading tool. This is the first time I've tried AK Interactive "Engine Oil" for the streaking on the belly. I'm quite pleased with how it turned out: The other must-do on this kit is to thin the wing trailing edges which were almost 1mm thick with the flaps raised. Elbow grease plus 400 grit wet & dry sandpaper sorted it out. Gunze Mr. Color 23 Dark Green and Tamiya XF82 Ocean Grey over Tamiya XF83 Med. Sea Grey. I used Montex Masks for the main markings and the kit decals for the stencils. Both products were excellent. Other minor tweaks included, sanding the propeller blades thinner, adding Master brass canon barrels, replacing the radiator outlet flap with 0.010" styrene, drilling out the exhaust stubs and fabricating the little scoop on the top of the engine cowl from sheet aluminum. Cheers, Tony Bell2 points
-
This is one I built 3 or 4 years ago, and posting it was prompted by my meeting for the first time member Chris 'Stringbag' earlier today who very kindly supplied me with some decals I needed. Anyway the point is that it turns out Chris has flown this very glider. And to add a twist to the tale, so have I!. I soloed on this machine and got my gliding wings on WT910 at White Waltham way back in the mid 70's. She was retired from the Air Cadets and some time in the late 90's /early 2000's was restored to airworthy condition, and met up with Chris. Anyway, this is how she looked when I knew her; Its a small world! John2 points
-
HAPPY NEW YEAR 2013 Avanti from Polish Medical Air Rescue - Lotnicze pogotowie ratunkowe LPR1 point
-
Here is the first assembly of this new year. Quite a lot of putty to be planned but the originality is often for this price(. Goodbye for the next ones1 point
-
Hi everyone, a happy new year to you all. I managed what seems to be my usual score for the year which is four completed builds. First up was a 1/72 Xtrakit Gloster Meteor F.8, sprayed with 'Mithrel silver' for the HSS finish and also used a Pavla seat. Fancied a nice Tamiya kit next so chose a 1/48 RAF Mustang III. 1/48 Hasegawa P-40e built as a Kittyhawk. Used Montex masks on this one. And Finally a 1/72 Airfix Spitfire Mk 1. Thanks for looking and may all your modelling wishes come true this year. Cheers...1 point
-
I'm a huge fan of Halfords primer - and their filler primer - anything that makes the job easier! It can give a beautifully thin/clean finish straight from the can (never had the same success with other brands/formulations). Will give it a quick micromeshing before next coat - silver Iain Note to any friendly mods out there - can this be moved from the GB to the 'in progress' section please?1 point
-
Poorer than expected - but a lot of other work done on various projects which will hopefully appear in time - Connie, Lightnings, UHU, Thunderbolt, P-26 and 1:350 Soya to name but a few. Here's what actually got 'completed' Revell 1:32 He 162: Hasegawa 1:32 Raiden - Military in Scale - October 2012: ZM 1:32 Skyraider: And finally - a project that provided the most FUN - HMS Fearnought from the Steampunk Group Build: So - a little less than planned - but some good fun to be had! Student Report 2012 - Ogilvie I. - must try harder! Yes Sir! Iain1 point
-
Output this year has dropped (tut !), but really enjoyed the builds I have done. Next year hoping to get more Bomber Command stuff done. CMR Venom NF.2a 1/72 Italeri Sunderland Mk.I CMR Bristol Sycamore Matchbox Stranraer CMR Mistral Tamiya 1/48 Beaufighter Airfix Short Stirling Revell / Matchbox Halifax Mk.II Have a great Christmas and productive new year, Cheers, Neil1 point
-
Well, Here it is, the final build of my 2012 build theme-aircraft of the Irish Air Corps. This is the Red Bear 1/48 resin King Air B200. Not an easy build, but looks sharp in the end. I drilled the windows and poured clear resin for all. Scratch built interior and custom decals. Cheers Pat1 point
-
The "vents under the engines"you boys speak of are the radiator shutters. On start-up,during engine warm up,mag and prop checks,the"automatic" position on the rad shutter control was ensured as selected . They were selected to "manual",i.e wide open for take off ,then to "automatic" for the flight once established on the climb out from base then back to "manual for landing. "Automatic" was then re-selected once the aircraft was parked and the engines shut down. In the film(the "proper" black and white one)Gibson(Richard Todd),shuts down the engines and then gives the command(to Pulford the F/E)"Radiator shutters automatic",Pulford moves the appropriate switch on the F/E's panel and repeats to confirm"Radiator shutters automatic". The last thing Gibson does before vacating his seat is to release the brake lever catch (on the control yoke)to release the parking brake and then shouts to the 'erks below "Brakes off"through his open sliding panel.1 point
-
Looking great, can't have too many of these iconic aircraft1 point
-
A nice collection of well built models. I never realised that so many people built so many various subject until I looked at their year books.1 point
-
Very nice.1 point
-
I hope it comes with Koroman missiles. I want to build a Marineflieger one. (just for starters of course ) /Bosse1 point
-
Blimey, you have been busy Mish. An excellent collection.1 point
-
very nice builds Mish1 point
-
I liked this GB a lot!!! I always thought that I hade a twisted mind, but there are more here in this GB than only me. Some of the models and plans behind them are just brilliant!!! Cheers,1 point
-
I must have this app! Mrs Oddball is going to love this, a new level of model geekery for her to laugh at. Odd.1 point
-
A couple more to squeeze in before the new year These are a couple of the old boxing Airfix Seafire’s, namely 46 and 47 with Aeroclub etch and Falcon canopies. First up is LA546 a Seafire 46 of RNAS Lossiemouth Station Flight, with decals from the Aviation workshops sheet Second is VP436, a Seafire 47 of 804 NOS aboard HMS Ocean in the Mediterranean in April 1949, decals from the spares box May be one more for 2012, but don’t hold your breath… Enjoy1 point
-
So is tinkering with model aeroplanes.. What's your point? (airsofter here..)1 point
-
I suppose that is a possibility but I would have thought a collector would want a fully painted replica. If Academy were to sell pre-painted versions, I would have thought moulding the plastic in a neutral colour would be more efficient option as you only need one plastic colour and you are going to paint the thing anyway. Personally I think it is a moot point, my plastic is multicoloured so I will just get on with it now. It will be interesting to see how they mould the remaining Phantom family variants though... G'day Wolfie, thanks. I will get onto them one day but not soon. I want to try and get this one done as a Chrissy build. Which brings us right onto today's update. I have been dealing with the intakes today and they suck (boom-tish!) The intake parts themselves have a few ejector pin marks that need to be dealt with as they will be visible if left unattended. I filled these with putty and sanded them smooth. Note also the three locating holes at the top. These are for the DECM antennas used by other variants (F-4N/J/S), and the antennas themselves are included in the box. In fact you can build an F-4N straight from the box as all the required bits are included if you know what bits you are looking for. Next up were the splitter plates. Good and bad news here. The good news is that unlike their Hasegawa counterparts, these have a backing plate. The Hasegawa equivalents are hollow and look terrible unless they are sheeted over. Top marks to Academy here. The bad news is that the splitter plates do not feature the splitter plate stand-offs or the prominent boundary layer spill ducts (neither do the Hasegawa items either) so I decided to make an attempt at improving them. I began by drilling holes into the corners of the splitter plates. I then used a sharp No.11 blade to open up the hole and neaten up the edges. Having completed one splitter plate I then did the same for the other. It was actually pretty easy and the whole process took no more than 15 minutes and I feel they are already a great improvement over the stock items. There is some internal structure inside these but I have not found many good pics of the upper spill duct area. If anybody can help here I would appreciate a pic or two... The AB liners have been added to the main wing assembly. I am not sure if I will be using the turbine faces as I am thinking of mounting the kit using acrylic rods mounted inside through the exhausts themselves. I would have preferred a simply pole arrangement through the fuselage underside but since the kit will be configured with a centreline tank, this may not be possible. I have also decided to animate the model slightly by having the jet performing a gentle right bank. Academy provides separate ailerons (and rudder) so that these can be depicted in the Phantom's characteristic 'drooping' position as was common when the jet had hydraulic power removed. Although this does simplify my task, the Phantom's flight control system was a little unconventional. Ailerons work differentially i.e when one moves up, the other moves down (duh!), well the F-4 differed here in that the ailerons only moved between neutral (or just slightly above neutral) and downwards. When one aileron was deflected down (on the up-going wing), the opposite aileron remained neutral and a spoiler on the opposite side(on the down-going wing) was deployed to decrease lift on that side. Here is the spot on the starboard side for the aileron. The spoiler unit is directly forward of it. I (very carefully!) used a scriber and razor saw to remove the spoiler doors. I just need to build a basic representation of the spoiler bay as the doors will only be cracked open a little. Once again, I anybody has any good pics of this area I would appreciate a pic of two, cheers, Pappy1 point
-
I'd be far more concerned flying a Vampire with that much flame emitting from the jet pipe. It would be about to get very quiet and some glider experience would be handy. SL1 point
-
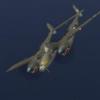
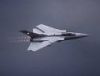
Cool 03987 Tornado IDS – new mold - release date: October 2013 But with seamless air intakes? That's the question. Otherwise it will look like all the others 1/48th Tornado kits... Source: http://www.britmodel...pic=41559&st=20 A recap of Revell 2013 (January- November) Sources: http://www.ipmsdeuts..._News_2013.html http://www.plastik-m...iten-2013/2013/ http://community.rev...bf97b7541f234ac http://www.plastik-m...ten-i2013/2012/ Aircraft & Helicopters 1/144 04843 Junkers Ju52/3m - reedition Eduard (February 2013) 04846 Tornado ECR Tigermeet 2011 - reedition (March 2013) 04928 P-51B Mustang - reedition (May 2013) 04929 P-47D Thunderbolt - reedition (May 2013) 04930 F4U-1 Corsair - reedition (May 2013) 04931 F6F-3 Hellcat - reedition (May 2013) 04932 P-40E Warhawk - reedition (May 2013) 04933 F4F-4 Wildcat - reedition (May 2013) 04934 SBD-5 Dauntless - reedition (May 2013) 04935 P-39Q Airacobra - reedition (May 2013) 04858 Sikorsky CH-53 G - reedition (June 2013) 03989 Airbus A 350-900 – new mold (October 2013) 04842 SpaceShip Two & White Knight Two – new mold (October 2013) Aircraft & Helicopters 1/72 04838 Hudson Mk. I/II Patrol Bomber - reedition MPM (February 2013) 04839 Mil Mi-24 Hind D/E - reedition Zvezda (February 2013) 04844 F-16 C "SOLO TÜRK" - reedition with new decals (February 2013) 04847 Tornado Lechfeld Tiger 2011 - reedition with new decals (March 2013) 04845 Fairey Gannet T5 - new variant (March 2013) 04848 Northrop F-89 D/J Scorpion - reedition (April 2013) 04854 F-101B Voodoo – reedition (May 2013) 04856 Junkers Ju 88C-6 Nachtjäger – new variant (May 2013) 03985 Hawker Sea Hurricane Mk.IIc – reedition (June 2013) 03984 P-47M Thunderbolt – reedition (August 2013) 04999 Saab JAS-39C Gripen – new mold (November 2013) 04833 MD 520 NOTAR - new mold (November 2013) Aircraft & Helicopters 1/48 04835 Supermarine Seafire F Mk XV - reedition MPM (January 2013) 05722 F4U Corsair ‘Flying Bull’ – reedition with new decals (April 2013) 05725 B-25H Mitchell ‘Flying Bull’ – reedition with new decals (April 2013) 05726 North American T-28 Trojan ‘Flying Bull’ – reedition with new decals (April 2013) 05723 AH-1F Cobra ‘Flying Bull’ – reedition with new decals (April 2013) 04857 Messerschmitt Bf 110 G-4 Nachtjäger – new variant (June 2013) 04834 Sikorsky CH-53GA (Deutsche Heeresflieger) – updated reedition (July 2013) 03987 Tornado IDS – new mold (October 2013) Aircraft & Helicopters 1/32 04836 Heinkel He.111H-6 - new variant (January 2013) 04837 Westland Lynx HAS Mk3 - new variant (January 2013) 04849 Bae Hawk T.1 RAF - reedition with new decals (April 2013) 05724 Eurocopter EC-135 ‘Flying Bull’ - new mold - (April 2013) 04659 Eurocopter EC135 - new mold (May 2013) 04656 Messerschmitt Bf 109 G-6 - new mold (May 2013) 03988 Junkers Ju 88 A-4 - new variant (July 2013) 03986 Supermarine Spitfire Mk.II - new mold (August 2013) 04855 Eurofighter Typhoon biplace - new variant (September 2013) V.P.1 point
-
Oh dear as a 1/72nd aircraft , and SF fan, this will be the first year in over a decade i wont buy anything from Revell on the SF front we get uninteresting done to death subjects from Star Wars ( another bloody x- wing )and it appears a new tool kit of the infamous fug-ugly"JJPRISE from the Star Trek reboot ( a kit previously announced a few years back by round 2 but then cancelled due to lack of orders and negative feedback from fans about its hideous design .....yuk ) hope this is a "gap year" for Revell under its new US masters and next year we get back to the old more adventurous style.....1 point
-
Currently I'm praying that either Mr Tamiya or Mr Eduard shrink their Spitfires down to 1/72 scale like they've done with their Zero's & Hellcats. Dear god, there will be many men changing their pants if that happens.1 point
-
Looks pretty good to me too! Perhaps, if you felt inclined, you could maybe tone down the contrast a little with a dusty overfinish,,,, but that's purely a personal thing. Regards Pete1 point
-
Well done. Sietse1 point
-
If you're only doing the odd panel and such then Mr Metal Color is worth a look. You can brush paint it on and when dry you buff it up and it comes up looking like Alclad. They're not acrylics though I don't think. MDC sell them. They come in Aluminium, Chrome, Stainless, Iron and Dark Iron, Bronze and Gold colours.1 point
-
Lovely job on that Mark They deserve to be built as they are great kits . Andy1 point
-
I don't think it's to weathered. These things must have got pretty beaten up over time.1 point
-
Lovely -- looks as if its been through a couple of sandstorms!1 point
-
A friend of mine bought 2 plastic kits of TB2 and assembled them, then cut one into 'lengthwise' strips around 10mm wide, and the other into 'across' sections using a bandsaw. Each 'section' was scanned 'face down' onto a PC, then enlarged and printed out at 3 x size. He's planning a 32" TB2.... Roy.1 point
-
Well, last day of this interesting group build. It is sad to see how few of the creative ideas at the outset have made it to a completed model. And, alas, I am one of them. So, how far did I get? Took this photo this evening:- Still on course for a Boeing C-97 version of the Lockheed EC-121K 'Batcat', she should look good in S.E. Asia camouflage. Going to be a big old gal as well. I am building her in sections so she can be stored when not on display. Love these old prop driven cargo birds! Have put together all the major parts, sanded down all the joins, sprayed her with while Halfords primer. Just a couple of areas which need some filler (I *detest* filling and sanding!!) then start pre-shading, something I have never done before. Also, I have learned something the last few days. I did not know that Humbrol Maskol can be diluted with water (well I can't read the instructions on the bottle!). It was posted here, I gave it a try and applied it to mask the windows, used a cocktail stick, hope it works. Looking good so far! Life in general and a nasty case of modellers block got in the way. However I am positive about my EC-97M 'Stratobat' and she is now my priority, I want to get her completed. So thanks to whoever originally suggested this group build And thanks to Mish who is a true group build angel And thanks to Col who took on a task which made herding cats look a doddle! You all inspired me. Michael1 point
-
Again I would not say the Dreamliner is ugly, but at the same time it's not pretty. It does look different though and that makes you look twice at it where you don't with a lot of airliners. I would like to see a Dreamliner for real to gauge exactly how it does look. Julien1 point
-
That Scimiter 'should' be over here in the UK! Nice photos though1 point
-
now airdoc have released that lovely book on british phantoms 1966/1978 with another to follow we may be lucky and have decal sheets to go with it. regards Glenn.....1 point
-
Thanks for that Mish. Makes me even more impressed with your efforts. Really love that Fortress1 point
-
A great year Mish, what scales though? Bruce1 point
-
I remember some of your early models posted here. They were OK, but not that special. Now your yearbook is full of cracking builds. "Been trying to up the game quality wise"? I'd say you succeeded. Sorry, no favourites - they're all great. Dave1 point
-
Lovely builds Mish, the Fortress stands out from the rest, for me anyway, Sean1 point
-
A great collection, the B-17 takes my vote!1 point
-
Lovely selection there Mish1 point
-
Lovely builds, the B-17's the one for me1 point
-
Love the Avenger. That looks like the Revell 1200th Titanic? I made that with my Daughter too this year, she's MAD for all things Titanic.1 point
-
Nice work Mish - you need a nudge though, you seem to be stuck (on mustangs / shermans and F-16's). You need a nudge :-)1 point
-
What is the finish on the P-51D- alcad , foil or something else? Looks great whatever it is. Great choice of paint schemes , all beautifully built.1 point
-
A good year by anyone's standards Mish1 point
-
Some lovely builds there, Mish. I still like that Fort.1 point
-
Nice work Mish. I think the Grumman has got to be my favorite1 point
-
Heinkel He 115 B/C Seaplane 1:72 Revell The handsome Heinkel He 115 was the largest twin-float sea plane used during the Second World War. Developed by Heinkel in the mid-1930s as a replacement for the He 59 seaplane, the He 115 was intended to fulfil the role of torpedo bomber, mine layer and reconnaissance aircraft. Although somewhat obsolete by the outbreak of war, the He 115 was able to remain in service throughout, due largely to the fact that it was able to undertake nocturnal mine laying duties while relatively unmolested by allied aircraft. The He 115 was a minor export success for the Warnemünde-based firm, with a small number of aircraft being sold to Sweden and Norway prior to the outbreak of war. Several Norwegian examples were acquired by the British and were used against the Germans in clandestine operations. During one notable incident, an He 115 landed in Tripoli harbour to pick up British agents, all the while completely untroubled by any German forces. September seems to be re-release month for Revell. Following on from their re-boxing of the Hasegawa Harrier Gr. Mk 7/9 is this re-issue of the classic Matchbox He 115, also known as PK-401. The kit was first released in 1977 and was part of Matchbox’s Red Series. It is made up of just 59 parts – surprisingly few for an aircraft of this size. Matchbox must have known a thing or two about tool making, as the sprues are in very good condition for their vintage. There is very little flash indeed and no other obvious signs of wear and tear. Surface detail is fairly basic and is comprised of a mixture of raised and recessed panel lines. The larger moveable components such as the flying surfaces and bomb bay doors are recessed, while panels that would have been riveted in place on the real thing are represented by fine, raised lines. The long cockpit is right at the basic end of the spectrum as it is comprised of just three parts; the cockpit floor and seats for the pilot and rear gunner/navigator. There are no instrument panels, control columns or any other gubbins, so if you want to add some detail to this area, then scratch building will be the way to go. By contrast, the three crew members are rather nice and feature plenty of detail. The observer/bomb aimer, moulded in the prone position, is particularly good. The wings and horizontal stabilisers are each made up of upper and lower halves and all of the control surfaces are moulded in place. The BMW 132K 9-cylinder radial engines look ok and should do the job under the one-piece cowlings. The kit is not without some finer details though. Rudder and aileron balance weights are provided, and the 7.92mm machine guns would probably pass muster if included in a kit released today. The floats, struts and ladders are all reasonably fine too. I would nevertheless recommend taking care when installing them just so you can be sure that everything lines up properly. I’d love to tell you that the extensive canopy and nose glazing is thin and clear, but I’m afraid it isn’t. It’s quite thick and rather opaque. I’m not sure whether dipping the parts in Klear would have much of an effect either, as the parts appear to have a rough texture. If you really want to improve these parts, you may want to sand them down and then polish them up to a shine yourself. Even worse, the nose glazing is split vertically, with the seam running right down the middle of a single piece of glazing. This will be almost impossible to disguise, so I would recommend that you either cheat and paint an extra canopy frame down the middle to hide the join, or cut the part out and replace it with a single piece of clear plastic cut to shape. Two options are provided for on the decal sheet: Heinkel He 115 C-1 of 1./Kusten-Fliegergruppe 106, Cherbourg, France 1941; and Heinkel He 115 B-1 of 1./Kusten-Fliegergruppe 406, Norway, October 1941. Both aircraft are finished in two-tone green splinter camouflage with light blue undersides. Unfortunately Revell haven’t included RLM reference numbers, just their own. The decals are nicely printed but are quite matt. I would recommend using a decal solution and applying them over a gloss surface. Conclusion This isn’t a modern kit by any means. It’s very basic in places and the part count is remarkably low for a kit of this size. There isn’t much in the way of fine detail and the clear parts are really quite poor. Nevertheless, I feel a certain fondness towards this kit. I’m not sure whether it’s the He 115 itself, dewy-eyed nostalgia or just a hankering for a nice, simple kit to build, but I’m actually looking forward to building this. Recommended (if you’re a sentimental old fool like me). Revell model kits are available from all good toy and model retailers. For further information visit1 point


This leaderboard is set to London/GMT+01:00