
Leaderboard


Popular Content
Showing content with the highest reputation on 13/12/12 in all areas
-
I got this at a bargain price at Telford and have been working on it ever since. It is almost completely out of the box just some extra plumbing and piping has been added. The flash on the camera has had an odd effect on the above. Thanks for looking2 points
-
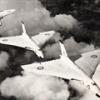
Another of my long term stalled builds finished. I like the Trumpeter Lightning, it may not be accurate, but its an easy build Built OOB, except for decals by Modeldecal and from the spares box.2 points
-
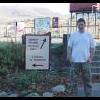
Airfix Launch Type 45 Destroyer on Royal Navy's HMS Dauntless 13 December 2012. Airfix, the UK's number one model kit brand, (owned by Hornby Hobbies Ltd) are this week releasing their new Royal Navy Type 45 HMS Daring model. The famous model kit brand has worked with the Royal Navy to design their new product, and will be launching it this week on board the sister ship, and one of the six in the class; HMS Dauntless whilst she's in Portsmouth. The Type 45 destroyers represent a significant increase in the air defence capability of the Royal Navy. All six magnificent warships will be in operation in 2013 and bring "stealth" technology to the Royal Navy. Image 1: Airfix's Ryan Maxwell presents their Type 45 destroyer to Commander Adrian Fryer, HMS Dauntless' Commanding Officer HMS Daring is the first of the Navy's six £1bn Type 45 destroyers and she was the first of class to deploy. In preparation, she conducted work-ups with an American Carrier battle Group back in 2010 and gone through a series of upgrade programmes to ensure she meets the high standards required for deploying RN units. Daring is designed to create a defensive shield around a task force - and troops ashore - protecting them from air attack. Image 2: (A50132) Airfix HMS Daring. RRP £59.99 Darrell Burge, Marketing Manager for Airfix said; "Working alongside the Royal Navy is always a great pleasure, and here with their co-operation we have created a fantastic model that will be desired by our many Airfix fans, and indeed those who are interested in anything the modern Royal Navy has in its fleet. Not only have we had the opportunity to develop a super accurate model, we've also worked closely with them to produce a superb booklet detailing the crew's duties whilst onboard." Commander Adrian Fryer, HMS Dauntless' Commanding Officer, said: "It's really nice to have been given one of these models for Dauntless. Hopefully the models will help spread the word about the capability of our Type 45 destroyers. As a kid I used to enjoy my Airfix models so this is great. I'm looking forward to when my son grows up and can make things like this himself." The new Airfix product is available to retailers this week, launching in stores next weekend (15/16th December). Airfix set will retail at £59.99, ages 8+ and includes 203 pieces, paints, glue and brushes. www.airfix.com.1 point
-
Hi all, Had a bit of a sebatical on the modelling front of late. Darn work getting in the way of modelling! Anyway, without further ado, my latest distraction - Airfix 1/144 VC10 finished in the later British United Airways livery. Decals were from Twosix and the aircraft was built straight from the box. I know it may not strictly be accurate (engines and wing fences) but I've built this for a friend of my mums who used to be a stewardess on VC10s with BUA in the late 60s. The only indulgence I allowed myself was to scratch build the windscreen posts using thin evergreen and fill them with Humbrol Clearfix. Happy with the result as its the first time I've tried it (and the first ailrliner I've done too!). I used Tamiya white primer and grey primer and didnt bother to varnish. I just buffed the finish using lots of micromesh very fine polishing paper and compound. The finish is like glass and am very happy with the effect.1 point
-
I built Tamiya’s SAS Jeep years ago, when it was first issued. It was a pretty rough job and became broken and then lost. I decided I wanted to build another one but this time using Tamiya’s new Jeep as a base. There are numerous resin conversion sets but I wanted to avoid using them. I dug through my spares and found nearly everything I needed, jerry cans, bags and rolls, weapons in the form of MP-40s, M1 Thompsons and a .50 Browning of the correct style. All I was missing were Vickers K guns. There are no aftermarket K guns available in 1/35th so to get these I bought Italeri’s Commando Jeep which had five of them. There is loads of reference on the net so I got to work converting the Jeep into an SAS one. I didn’t go for a specific vehicle, just a generic one. The conversion involved cutting away nearly all of the bars protecting the radiator and fitting a condenser for the radiator made by rolling thin metal foil around a plastic rod. The pipe is made from wire. The windscreen is not used and there is no need to fit the tilt cover under the front passenger seat. The rear seat is also left out. I got Eduard’s etched set for the original Tamiya SAS Jeep and this set provided various fixtures and fittings including the brackets for the twin spare wheels, Italeri’s kit provided the second wheel. The etch set also included the racks for the Jerry cans and the sand trays. The .50 Browning and its mount, ammo belt and ammo boxes came from the Academy set and the Vickers and their mounts were robbed out of the Italeri kit. I added bags and other personal kit from various pieces found in my spares boxes. I used Humbrol enamels to paint and weather the model. I was stuck for a crew and was about to buy an expensive resin set when I found that Master Box make a set of LRDG figures that have two soldiers dressed in typical clothing for the SAS in North Africa. Once I had assembled and painted the Jeep and figures, I decided to build a small base for them all. My local discount store sells artists’ canvasses in various sizes at a reasonable rate. I got a pack of four 8”x8” for £5 and built a base from polystyrene covered in exterior filler. The first two photos were taken outside against a clear sky. Thanks for looking1 point
-
I thought I would post a few images of my recently finished P-51D Mustang from Tamiya. I returned to modelling a year or so ago after a 20 odd year sabatical. The kit is enhanced using Barracuda resin items which are some of the best out there. I added some pipework in the undercarriage bays from lead wire just to enhance the effect. Decals are again BarracudaCals. My primary source of reference for this project was the Mushroom Model Publications P51 Mustang title, which is brilliant and excellent value for money. I also obtained a copy of Tamiya's How to build the P51 Mustang again a valuable source. Please feel free to post your critique1 point
-
Just finished this literally yesterday. Although this kit has been around a few years now, with a little enhancement it still builds into an impressive model. Paints are from Gunze, the sidewinder caps and flags are from Aerobonus. The decals are from Yellowhammer, which I couldnt get in the UK and had to order them from the US. I used the Aires cockpit and exhaust, the cockpit needed a little work to get it to fit. The colour scheme of the J model F4's in UK service is a highly discussed topic as they were painted in US colours prior to delivery. This particular aircraft - ZE356 - was re-painted shortly after delivery to standard RAF Lo Viz scheme. I chose to depict an aircraft that represents an "Alert" aircraft hence the live weapons fit of Skyflash, Sidewinder and a central SUU-23 gun pod.1 point
-
Hi all, Already posted this - but in the wrong forum hopefully right now................ Now my modelling has been curtailed, I'm keeping occupied by scanning in some old slides and negatives. The quality is a bit iffy, and some deterioration has occurred, but you can get the general impression. Taken at Boscombe, early '90s Hope you like.....................more to come as I scan more in.1 point
-
Hi guys first ready for inspection after a return to the hobby after 22 years. Dropped myself in it by buying a compressor and airbrush to restart aaahhhhh. I think the build went well and so did using the airbrush. Had some problems with bleeding but touched up with a brush. After removing the masking from the canopy discovered some paint spots tried to remove these with a cocktail stick, had some success removing it. Any sort of critique is grateful and pointers.1 point
-
Howdy again! Here's my last serious effort in 1:72 before I switched to 1:48. It's from the well known Italeri kit. Nothing fancy or commendable about it's quality, but so far it's the best Hs-129 in 1:72. I enhanced it with Eduard zoom PE and a bit of scratchbuilding, but that's nearly impossible to tell from the pictures. The main atraction of this model is the cammouflage squiggle effect which is brushpainted. I think that it's pretty impossible to achieve the desired effect in 1:72 with an airbrush, so I resorted to fine paintbrush and dilluted paint (Vallejo acrylics). No clogging or drying up and no time pressure. You're at liberty to better plan your lines and emulate the work of several ground crew painters which covered the aircraft in "spaghetti cammo" of various thickness and style. It represents the well known captured aircraft from Tunisia. Enjoy the sun Josip1 point
-
This is my just completed 1/72 Testors MiG-29 Fulcrum in Cuban markings. It was built for a Cold War themed group build on Facebook. The only aftermarket item I used aside from the decals was a Neomega resin seat. The finish is Model Masters enamels and metalizers. The decals came from Hi-Decal. In progress photos (not a lot, really) can be found here- MiG build on Facebook Thanks for looking, all comments/critiques welcomed as always. Cheers, Alby1 point
-
Hi everyone - here's the newest model off the workbench, Hasegawa's reworked F-15E. This kit at last deals with some of the irritating issues associated with the earlier releases (which were no more than a prototype dressed up as a Strike Eagle...) and as such builds up into a very fine model. This one has a superdetailed cockpit, Quickboost seats, an updated weapons fit that include new AMRAAM pylons and connectors, as well as Aires jet pipes. The full story of this model will appear in a future edition of Model Airplane Monthly. I hope that you like it! Spence1 point
-
Hello here is my only build for this year(!), completed this week. I haven't done a 1/144 build since I was a kid, but decided to go that route as I don't have anywhere specific to make or put my models at the moment due to being in a new house we're redecorating, so small was good! I used the Zactoman F-15 set which included new afterburner cans, CFT pylon and ejector seats, which are all superbly cast. Decals were printed from templates found at the planetspejic website, also including control panel decals. It was brush painted with citadel colours and vallejo before recieving a couple of coats of klear, then decals, another coat of klear then an oil wash of paynes grey. I then airbrushed xtracolour xdff but the oil was looked much worse after that unfortunately, I hadnt had that problem before. It is missing the code near the refuelling port as the numbers would be in white which can't be done with the printer, and I didnt have any that small anywhere. Anyway here's the pics- Cheers for looking!1 point
-
Hi This a WIF of a RSAF Silent Eagle built for the chap I repaired the PC9 for. With all those external bombs it's not very silent! Jim1 point
-
6 This is the second Stuka of my Ju 87 period, this time it is a Ju 87 B1 in 48 scale made from the Itlaeri B2 kit. the changes are around the engine with short individuals exhaust pipes, narrow blades metal propeller and modifie chin radiator1 point
-
Evening gents :grin: latest from my workbench is this Supermarine Seafire XV from Sword. The kit is straight from the box apart from tape belts in the cockpit. Brush painted with Humbrol enamels as usual with various acrylics used on the little bits. Hope you all like it. Seafire XV of No 883 Sqn, RCN, RCNAS Dartmouth, June 1948 Regards Tom1 point
-
Mikoyan-Gurevich MiG 17F (FAPV No. 3020) Model: Mig 17F Scale: 1/48 Kit: HOBBY BOSS Year: 2011 Crew: 1 Length: 11.26 m Wingspan: 9.63 m Height: 3.80 m Wing area: 22.6 m² Maximum takeoff weight: 6075 kg Wing loading: 234 k/m2 Powerplant: 1 X KLIMOW VK-1F 33.00 kN Maximum speed: 1145 km / hr Service ceiling: 16,000 m Weapons: Cannons 1x Nudelman N-37 37 mm with 40 rounds. guns 2 × Nudelman NR-23-Rikhter of 23 mm with 80 rounds each. Anchor Points: 2 underwing pylons with a capacity of 500 kg, to charge a combination of: 2 × pumps 100 or 250 kg 2 × rocket containers Other: 2 external fuel tanks Vulcan 7771 point
-
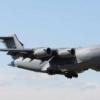
Built staright from the Pit-Road kit A great model only ruined by my impatience! Kit was sprayed twice, stripped twice and eventually hand painted with acrylics Decals are from the kit, not the best but at least stopped it from a strike mission to the bin! Got a few more to make, will be in recce role, raspberry ripple, possibly a foreign user( Swedish splinter.......) All comment welcome1 point
-
Not sure if you've spotted this or not, but the images for the advent calendar are still on the site.. Thought I'd make it a but easier to examine1 point
-
Hi all I've not built as many as usual this year for one reason or another, but here are the results. First is the Hasegawa 1/48 RF-4E JASDF anniversary special. I started this way back when the Phantom GB was in progress and it was just sat around collecting dust. I'm happy with it, even though the decals aren't accurate and the drop tanks dont have any on them as i couldn't get them to conform at all! Next was a Games Workshop Imperial Guard Valkyrie. This was painted using a USMC scheme as i just really like it. decals were from a variety of sources including a Tamiya Challenger tank and a Phantom sheet. Staying with the Warhammer 40000 theme, next up was a Fire Angels Space Marines Venerable Dreadnaught. Decals were home made from a link i found on the web. Next was the Heller 1/48 F-4F, painted in the German bright orange test aircraft special scheme. The decals are Two Bobs with intake blanks kindly donated by Julien. More to follow. Antony1 point
-
That's quite a collection of really obsolete kits ! The frog Gannet is probably the most obsolete, but apart from the pilot's heads moulded with the fuselage and the landing gear inserted directly in the wing undersufaces, it was IMHO a better build than the airfix kits listed....1 point
-
That´s a nice skyrider! well done Russ. Q1 point
-
Great bit of work there HL-10 matey. One of my relations was in the LRDG, he said in his letters that they carried thease people we know now as the SAS, to targets. Thats a very nice Dio you have there. later the SAS had there own transport and were lead to there targets by the LRDG who then went on to watch traffic and such.1 point
-
Where did this come from! That is a fantastic build mate. I keep looking and finding new things to it! Great stuff. Deacon1 point
-
John, Apart from the windy wipers and (I think) the nose wheel steering, everything else on the Valiant was electrically operated including the bomb doors. As for shutters over the ports. As far as I can remember, there weren't any. Pete Sharp's the man to ask. Dennis1 point
-
Cor... I disappear from my thread to get on with some modelling, and you're all having a reminisce about what's out there, what can & can't be built from this first kit, and all sorts One seam is good to go, the other needs a bit of filler. Bah humbug1 point
-
Bill, As usual your thread is both amusing and informative! And you appear to be beating the beast into submission, already looking forward to seeing the painting finished. Mark.1 point
-
Wash on the 101:1 point
-
It must be something about the Demon that makes it a long term project.....Mine still sits on the shelf unfinished after well over 25 years.... Maybe that's the origin of the expression "We all have our Demons"??1 point
-
Today I don't have very much to be shown. Only the sanded part of the cover. As you can see the opening for the wheel well is still a bit too much in front of the other. So I just extend the opening a bit to have a proper line-up with the other one. But this don't need to be shown. The next step will be the side walls of the wheel wells. Regards Siggy1 point
-
So glad you got some decals, it has always been a challenge to get the right ones some of the times, and a big disappointment if what you get is not to your liking, it's just not good enough that we have to go through this time after time.1 point
-
Hey everyone! Just finished my F-15. Alright set, though with loads of mistakes! I decided to make the trainer, and the results were ok. First time doing an oil wash, and not the last! Though I do need some practice doing it! Decals are from Daco Robin1 point
-
Nah. I want an Amy Pond.1 point
-
Sorry to be the bearer of bad news, but your rudder pedals are on upside-down....1 point
-
It's an Anti-shimmy tyre , the groove helps prevent the tyre sliding around on wet ground, Same priciple as the grooves in a tractor tyre. Andrew1 point
-
I find the meths taste nicer Seriously though, I use meths because I'm a cheapskate. To buy 1 litre of meths in a supermarket here in NZ costs me NZ$4 to NZ$5- about 2 quid. To buy 1 litre of Tamiya x20a acrylic thinners from a hobby shop here, I'd have to buy 4 x 250ml bottles. At NZ$17.50 each that works out to the equivalent of 36 quid. Now, I'm sure that the Tamiya thinners would absolutely be the best thing to thin your Tamiya acrylic paint with, it stands to reason & a lot of other folks here wouldn't want to risk their paintwork by using anything other than the recommended product. But I figured there wasn't any harm in trying the cheap option first, and it worked for me so I've stuck with it; I've never used the proper thinners, so I don't have anything to compare my experiences with. The purple dye doesn't tint the paint at all for the amount that I use, even when spraying white. It will dry quicker than if you use the proper thinner, as I understand the proper thinner has retardants in it to slow the drying process. Another option could be to use the proper thinners for thinning the paints, but use meths for cleanup. That way you get the finish you like, but without burning through litres of the expensive stuff. I did find a formula on another forum for what is in x20a, but as I'm not a chemist it doesn't mean much to me http://www.network54...nal formulation Chris1 point
-
Small update... I've been getting the guns ready for painting. I decided to use the barrels from the kit to speeed things along a bit, and rebuild the rest from plastic card and tube. The next step will be to get the rest of the parts built up around the guns, including the metal panels. I think I'll get some Alclad polished aluminium for that. Never used it before though, it sounds like it has quite a delicate finish?1 point
-
Finished, more pics in the Gallery. I didn't like the vac form props that came in the kit as the spinners were too big. I scratchbuilt some replacements which look much better. Cheers John1 point
-
1/72 scale Revell of Germany Junkers F.13 with J-Bot Decals to represent an Imerial Oil aircraft. Built OOB except for the decals. Love the other builds here, one of my favorite aviation eras! Cheers, Geoff1 point
-
K4 is a weathering and paint supplier that started providing paints this year, like in May, and had been underground for some time. He is a chilean fellow modeller that had enough of the difficulties for getting a decent weathering product at a decent price in Chile, so the started his own line of products. I personally use his acrilic paints, this is my firts work with them, but for some time have been using his pigments, decal fixer, and clear-paints. As a matter of fact, I bought ALL the RLM paints he has, so I can build any Luftwaffe plane from any theather of operations. I'm very found off his products, i get them at prices that kill any competition from tamiya, mr gunze and vallejo. Vallejo is easy to find in Chile but K4 are far better as they don't chip as easy as Vallejo (I painted 4 times a Luftwaffe pilot when I travelled to Viña del Mar, just because the paint didn't survive the trip!!). Some refference here: http://www.scalemodeladdict.com/index.php?topic=4833.0 http://www.armorama.com/modules.php?op=modload&name=News&file=article&sid=11674&mode=thread&order=0 http://modelerssocialclub.proboards.com/index.cgi?board=reviews&action=display&thread=889 http://www.aeroscale.co.uk/modules.php?op=modload&name=Sections&file=index&req=viewarticle&artid=4494&page=1 Sadly as a new company they only have a email and a facebook page to see that they have and for contact: http://www.facebook.com/K4weathering As for the 109... I very recenttly finish an ugly chapter of my life, an a**hole (I don't know who he or she is) started sending emails and text messeges saying that my daugther is beenig sexually abussed by her's mothers current husband. I know this accusations to be false, and legal actions where taken. On the 15 a psiquiatric and medical (hope I wrote that right) evaluation put the final word in the matter when the doctors concluded that she hasn't been abussed in any way. So hope you guys can imagine that i have not been in a modelling mood for the past week. I hope to ressume updates this week.1 point
-
I'll be entering all 37 kits for this one.... Why do I never finish what I started?1 point


This leaderboard is set to London/GMT+01:00