
Leaderboard


Popular Content
Showing content with the highest reputation on 11/12/12 in all areas
-
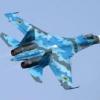
Hello F-104G's seem to be flavour of the month here at the moment and here is mine. I found it a great kit to go together, the undercarriage fit (polycaps) is very nice. Sadly the aftermarket decals I used to make a Marineflieger aircraft weren't the best; very prone to silvering and absolutely nothing seemed to get rid of the film, even Extra Thin Glue. But other than that very happy with how it turned out. A big thanks go to BrandX for supplying me with a spare rear canopy when I managed to drop it and then tread on it.... Thanks for looking! Ian3 points
-
Hi folks: Following kind permission of the deputy editor, I've been given the green light to publish a few photos of my inaugural build in the current edition (January 2013) of Airfix Model World - 'Yellow 10'...'that' Fw190D-13...Eduard's 48th scale Weekend kit. The mag also has a free 2013 calender, so's you can (if you are anything like me), tick off the months with the current project comment 'still not done', 'still not done', 'still not done'...lol. Please note - images are the copyright of Airfix Model World. Happy days Steve3 points
-
2 points
-
Well ,as promised heres the start of my first ever WIP thread. After ordering the ultracast spitfire seat i found online i've had to do some chopping and changing as it wouldnt fit in the model as is. as you can see ive removed the bulky bit from the back with a microsaw and also removed the flare cartridge holder from the front as i have been informed the later spits didnt have these.I also added a few holes around the back frame that the seat will attach too. I thought this looked a bit more authentic. Also i chopped down the bit the original seat was attached to, to fit the new one but also to reveal a bit more of behind it as my holes were covered up lol. Not sure if ive commited a sin but im happy with it. next stop , assembling it all but want to do some painting on it first.......1 point
-
Hi all, Had a bit of a sebatical on the modelling front of late. Darn work getting in the way of modelling! Anyway, without further ado, my latest distraction - Airfix 1/144 VC10 finished in the later British United Airways livery. Decals were from Twosix and the aircraft was built straight from the box. I know it may not strictly be accurate (engines and wing fences) but I've built this for a friend of my mums who used to be a stewardess on VC10s with BUA in the late 60s. The only indulgence I allowed myself was to scratch build the windscreen posts using thin evergreen and fill them with Humbrol Clearfix. Happy with the result as its the first time I've tried it (and the first ailrliner I've done too!). I used Tamiya white primer and grey primer and didnt bother to varnish. I just buffed the finish using lots of micromesh very fine polishing paper and compound. The finish is like glass and am very happy with the effect.1 point
-
I thought I would post a few images of my recently finished P-51D Mustang from Tamiya. I returned to modelling a year or so ago after a 20 odd year sabatical. The kit is enhanced using Barracuda resin items which are some of the best out there. I added some pipework in the undercarriage bays from lead wire just to enhance the effect. Decals are again BarracudaCals. My primary source of reference for this project was the Mushroom Model Publications P51 Mustang title, which is brilliant and excellent value for money. I also obtained a copy of Tamiya's How to build the P51 Mustang again a valuable source. Please feel free to post your critique1 point
-
Hi everyone, thought I`d take the opportunity, whilst it`s cold and miserable outside, to show you my 2nd maritime effort which I started soon after my attempt at the Hornet. Trumpeters 1/350 scale USS Essex, which I tried to depict after its refit when it got camouflaged Had to slightly modify the bridge area on the island and make new radar arrays and masts which I made out of copper wire from a electrical flex and super glue and walkways around the undeside if the forward flightdeck from plastic card. bought some generic etched railings and some extra aircraft Hope you enjoy..1 point
-
1 point
-
Hi all I'm calling this finished - this is my entry for the Airliner II GB and is the magnificent Revell Tante Ju in 1/48. It may not be the best in the GB but I have a sneaky feeling it will be the biggest The masking was a nightmare and the decals took (literally) weeks to deal with. Numerous re-visits with scalpel and Sol/Set to get them to bed down over those corrugations! She is finished as D-2527 of Lufthansa in 1937, named 'Manfred von Richthofen' and used by the RLM as a VIP transport. The build thread can be found here http://www.britmodel...topic=234926086 The cabin is detailed (although you need a torch to see it!) with Jammy Dog tape seat belts, the paint is Xtracrylix Red Arrows Red, Alclad Aluminium and Halfords Satin Black aerosol. RLM 02 interior and US Light Grey. Decals are the kit's except for the Swastikas, which are courtesy of Shar2 - thanks Dave, I really appreciate it Aerial wire was 2lb fishing line but I snapped it moving it for the photo's! I really enjoyed this...all comments welcome as ever!1 point
-
Finished this one last week and just now got around to taking some pics.Built OOB except for the seats and decals. Kit: Kinetic T-45 Goshawk Paints: Lifecolor/Tamiya Decals: Caracal extra's: seats are from Wolfpack1 point
-
As I'm not a pilot can someone who is tell me which side a pilot would sit if he was flying a side by side trainer by himself? Andy1 point
-
So, after my previous post this evening (10.12.12)showing three of my other CAF Hornets, here is my most recent completion. Hasegawa kit ( bought here from a fellow member, Parabat IIRC)) and finished with Leading Edge Decals. It depicts 188907 of the AETE at Cold Lake, Alta., Canada. And finally a group shot or two....... And notice, I added, a rarity for my models, both "Stick to Seat Interfaces"!!! I have plans for a few more using more LEM decals and the Academy kit. All for the new year. Hope you enjoyed these and thaks for looking.1 point
-
Hi everyone, Whilst I`m in the process of finishing my USAF Spad, I thought I`d show you my Revell-Monogram Skyraider that I finished this summer. done as an aircraft of VA-145, The Swordsmen aboard USS Intrepid Not quite OOB as I made a few `improvements` such as widening the circumference of the cowl with some plastic sheet and lots of filler opening the cowling shutter to display the engine and replacing the kits dodgy wing tanks with Zuni rocket launchers from a Hasegawa weapons set Kit decals and odd bits of wire here and there. hope you enjoy1 point
-
Ok, so my first Ready for Inspection post, hope I get this right . Just returned to the hobby after not making any models since I was about 13 which was [censored] years ago. This is my sixth model and the first I'm brave enough to post here. A shot of her as I built her up: and the finished model So my observations on the kit. This was the most complicated kit I've built. The pieces fit together nicely but I noticed a few errors in the instructions (such as incorrectly labelled decals) and diagrams that personally I found confusing. There were options, for example to have the wing flaps open or closed, the "?" told me there were options but gave no clues when I saw them what the choices were about. Other options referred to things like the cockpit canopy design. But there were no notes associating any given design with a specific build. I did discover that Revell helpfully provide an instruction pdf on their website for the kit which did provide more clues and help as to which parts went with which build option. Unfortunately though there were three build options shown on those instructions none of which was the "Nine O Nine" that I'd picked from the instructions and decals enclosed with the kit. Maybe some of these issues I had were because I'm new to the hobby and was figuring things out. Overall though I'm fairly happy with the result. Its far from perfect but I think I'm improving (you'll have to take my word on that not having seen my earlier kits). I look forward to hearing anyone's comments. Thanks.1 point
-
Hey everyone! Just finished my F-15. Alright set, though with loads of mistakes! I decided to make the trainer, and the results were ok. First time doing an oil wash, and not the last! Though I do need some practice doing it! Decals are from Daco Robin1 point
-
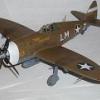
This is a bit off my usual open-cockpit, wind in the wires patch, but I have long been fond of the early B-17s, and have wanted for a while to do a bare metal example in foil. This is a machine of the 50th Reconnaissance Squadron at Hickham Field, in the late spring/early sumer of 1941. I had it pretty near done in July, but put it aside for other projects, with only few fiddly bits remaining to be done to finish it. This week I got it out to have it done for today.... I want to thank Mr. Aitken and Mr. Matsuoka for cuing me in to a genuine Pearl Harbor subject (the kit markings were spurious and only D-types were at Hickam in bare metal that spring and summer), and especially to thank HyperScaler Steve Nelson, who was kind enough to send me gilled cowlings for a D (my old 17C boxing had only the solid cowls included).1 point
-
Its done !!!1 point
-
I'm jealous, really miss seeing a Mossie at an airshow. Bring back the heady days of the early 90's when you could see a Mossie,P38,Bf109, Hurri, Spit and Lanc at a show......and it wasn't a warbird show either!1 point
-
Great work, Sir! If you do not mind a little advice on color. The yellows on the box art are sort of reversed. The wing color should have a distinct orange cast to it (indeed it was officially known, originally, as Orange-Yellow). The section markings (on the cowl front and the fuselage band, and any chevron on the upper surface of the wing) should be a pale yellow (the color was known as Lemon Yellow). The difference was sufficient that Lemon Yellow markings stand out quite clearly against the Orange Yellow wing. The wing color is just about the shade we use for school buses here in the U.S., and the yellow stripe at the top of the box-top you show is not a bad guide to what you want for the upper surface of the wing. I hope this is not all coals to Newcastle, but I am fond of these 'yellow wings' schemes, both Army and Navy, and of course, Marines, and build them fairly often..1 point
-
A productive afternoon on many fronts. Got an email from Mal saying he's cut the masks and they're about to go in the post. Super nice guy and great service. On the construction front I've got a few more bits stuck together. Here's the cat's cradle that is the landing gear bay directly forward of the cockpit along with the cockpit fixed in place in the tub that will form the forward underside of the fuselage... Next up was to paint and build the engine. I painted the cylinder banks in Tamiya Gunmetal with a black wash to highlight the gaps between fins and a dab of silver on the top of each cylinder. I'm not sure if that's strictly accurate but it adds a little interest. I don't think it will be seen once it's all in place, actually. Which is why I didn't go too mad on the landing gear area. The front of the engine had a coat of gloss grey and then a silver drybrush and some more dark wash to make the details pop a little. Next stage will be to zip up the fuselage. A dry fit indicates that there will be some minor putty work needed. The panel lines and surface detail are pretty shallow so I'll need to be careful when it comes to filling. One thing I've found is that some of the parts are pretty fragile and connections to the sprue are often a bit heavy handed so snipping them off consists of taking quite a chunk of sprue and then careful trimming on the cutting mat to be safe. Cheers all, Roger1 point
-
Seat is resin from Aires. Decals on, ready for wash: Some cockpits must be painted before assembly into the fuselage. Here is Tempest interior:1 point
-
I failed to meet the F-16 GB deadline, but finally the model is finished. The model is built from the Hasegawa YF-16 kit as a base, with extra parts from Hasegawa's F-16A. Wheel wells and jet nozzle are resin parts from Aires while the jet intake is CMK. Decals are by Vingtor Decals.... Here are photos of the finished model. I will finish off this build with a photo the YF-16 together with the YF-17, a model that I did some 20 years ago. It was converted from the ESCI F-18A kit. The model is finished in Canadian markings, as a promotion aircraft for the Northrop CF-18L that was offered to the Canadians. Maybe I should polish it down and repaint it in YF-17 prototype markings. Nils1 point
-
And the Javelin had twice as many engines as well!!1 point
-
Seeing as there has been some chat recently on modelling CAF Hornets, I thought a lot of members here might like to see my collection... and a very recent finish!! ( in a subsequent post tonight..[10.12.12]) Starting with..... Hasegawa kit and Leading Edge decals. 188711 of 425 Squadron. # 188719 of 410 sqdn. Revell/Italeri kit and kit decals. Right side.... .... and left. Hasegawa kit again in a very smart and popular scheme. Again Leading Edge decals depicting 188720 of 410 Sqdn. All the above were built quite some time ago over the last 10 or more years so show some aging and discrepancies that I know of but try to look at the overall subject. In the next post are photos of my latest.1 point
-
Very nice build there Russ. One slight recommendation would be on the fuel tank. There appears to be a bit too much wash there on the nose and any fuel residue would be of a pinkish hue. Other than that, good work.1 point
-
They are very good. The trouble begins with the fact that, whilst the models are very expensive, their update sets are hugely expensive for what you get. I've got both Nagatos, (one of which is actually for sale :wink:). They are easily as good as Fujimi, and Tamiya kits.1 point
-
Stands out above the crowd Russ, lovely piece of work!1 point
-
Okipokey! After a very long, tedious, masking affair to cover the decks (yeah, I don't know why I did those first either..), I've put on the under layers. After this: matt clear, salt and hairspray, followed by the actual colours. The dark area is a mixture of german grey, red brown and a dash of black. The rusted area is red brown, with some matt yellow stippled on with a sponge, with the occasional dab of red brown again if it got too carried away. All colours are Tamiya unless otherwise stated.1 point
-
Ha! You funny guy! Case X (ten) was the original wing design, and is depicted in the Meng kit. Case XX (twenty) was a modified wing that had a pronounced curling down of the leading edge, especially near the tip. I've always assumed that Case X and Case XX were named after different design studies, but I have no idea, like most subjects I try to sound knowledgeable about. Cheers, Bill1 point
-
Hi now im no rivet counter like some modelers but ive just built a Bf 109B and coloured it with 64 LIGHT GREY 150ml MATT Modellers Spray and i looks good to me, but you look at some of the completed builds online there are some with paint and some unpainted but at the end of the day its your model so go with your gut and what you think looks good. Thank you Richard1 point
-
Very nicely done Russ!1 point
-
That's a tricky one to answer fully. Yes, I think the Airfix kit will take a hit in its second-hand value, and deservedly so. It is an outdated kit with lots of issues that need work to fix. That said, there have been some stunning examples built over the years, and with work (and sometimes money for aftermarket) it can become a very creditable replica. I found the Airfix kit annoying personally, but your mileage might vary. The KH kit is by no means a kit for the novice - there are opportunities for problems if you don't test-fit and fettle parts. There's a lot of bits & bobs crammed into the fuselage, and lots of detail on the airframe, so care and attention to how things go together is the order of the day. Test fit, test fit and test fit... I promised pictures, and here they are - later than advertised though The first serious bit of filler was broken out today, to fill the slight depression that's evident under polished primer where the two wing parts join together. it's nothing too serious, but I'll need to put a couple of panel lines and rivets back. As you can see, the corrected fin is now installed, and sits nice and square if you're sensible and scrape off the mould seam. As said before, 2mm of the fin was "borrowed" to extend the rudder, and correct a rather squat look to it. Whether this will carry on into the RAF versions I don't know. I suspect that unless the tooling is able to be amended, it might well do? The coaming is also in place, but I've not yet put the HUD glass or all those little fiddly bits in place. The starboard side is going to be all closed up (with the exception of the air-brake), so the engine cowling was fettled for fitting around the unpainted starboard engine, as described above. I attached the centreline panel first, and at the time of taking the pictures, the side was still unattached, so you can see the gap caused by the "spring" of the part. That is now glued and clamped to try to get a flush finish, and initial estimates are that it should be good to go Once the filler on the wings is cured and can be sanded back, I'll start thinking about installing the wings. I've done a little fettling of those joints already, so that the parts sit perfectly level with the fuselage top. One was a hair's breadth low, while the other was equally high. nothing a shim and a scrape won't fix though When those are on & cured, the seam will need filling. That's an important aspect of the build because it is so prominent, and the seam is by necessity in the middle of a large panel that runs down the length of the wing. While Airfix's one-piece top wing made that a little easier in some ways, it also added some more horribly placed seams that needed filling, so all-in-all, I think the KH way is the better of the two.1 point
-
As you can see, my little foxes paw has been rectified.1 point
-
This is a project I just wrapped up for the Interwar GB. The Airfix 1/48 kit provides many parts needed to make a proper pre-war Spitfire, but not quite everything. I had to make some modifications in the cockpit (adding a ring and bead gunsight mainly) and do a few additional external modifications as well as this model represents one of the first 12 Spitfires off the production line. Overall, I am pretty happy with the results. The use of aftermarket parts was kept to a minimum as all I used were some old True Details photoetched belts and some .303 gun flash suppressors for the outer wing guns. Everything else was scrounged from my spares bin, scratch built or kitbashed. The serial number for this aircraft is a best guess. The rudder guard indicates it was one of the first 12 Spits off the production line and its camouflage pattern indicated it had an odd digit serial number. Checking the records, K9791 and 9793 were used for trials and never made it to 19 Squadron. And I figured it might not be K9789 either since that was the first airplane they received and likely got a WZ-A code if they ever painted it like that. So, I figured I had one chance in three as to which plane it was (either 95, 97 or 99). Decals are a combination of Airfix and Illiad's 1/48 Pre-War Spitfires sheet. It did have a few minor errors on it that I had to overcome though with some careful decal surgery.1 point
-
Very nice Sir!1 point
-
Really good build, wonderfully executed camoflage.1 point
-
Hi Chaps Finished this a couple of months ago as a stress release build. I started off by using the airbrush but the Xtracrylix paint didn't take to the Vallejo MA duck egg very well so I just carried on with a hairy brush instead. In hind site, it took longer to paint with a hairy brush, but I enjoyed doing it. I just need to put the antenna wire on it. Undercoat, Alclad II grey primer, Vallejo MA duck egg, Xtracrlyx camo and and MA Satin coat. Decals by Xtradecal. OOB apart from Tamiya tape seat belts. The Academy Wild Cat is a very cheap and basic kit and it falls together, but it does suffer from trench panel lines on the body and very little detail. It was only £4 though and cost more in decals and paint! Rick. Sorry about the picture quality, couldn't be bothered with studio kit! Also, too much dust again!1 point
-
Hi friends. Here is my recently finished Brewster F2A-3 Buffalo. It's the 1/72 scale Special Hobby kit. Represents an aircraft aboarded on USS Lexington in early 1.942. I hope you like it Regards Fernando1 point
-
Superb rendition of this Tropical warrior, outstanding finish, only quibble would be the overly thick antenna wire, but that is minor. Well done.1 point
-
Busy and dizzy. Nice!1 point
-
Very good work.1 point
-
Not much to show on this slow build but have completed the vertical tail section for the Vanguard, need to scribe some panel lines and trims, most of this had to be scratch built as I was not to happy with certain areas of the tail. Next job making the horizontal tail section.1 point
-
That is beautiful work.1 point
-
excellent work sir, very well done...... Dave1 point
-
Cheers for the encouragement guys. Stu, I use Tamiya acrylics, thinned with meths. Since I came back to the hobby they are all I have used, and they are the only paints that I've airbrushed with. I get on with them well, the main issue is that you have to be prepared to mix your own colours for a lot of shades. It's not that arduous though, I can usually mix something that looks about right to my eyes. They aren't the greatest for brush painting though! Chris1 point
-
Stu, WHOA!! What a MAGNIFICENT, SPECTACULAR, truly lovely weathered TA152 .. One looks at and thinks surely not a smaller scale because it looks so big. I love the way you have perfected your techniques for scuff marks and that subtle weathering on and around the wings JOLLY GOOD WORK.. KUDOS...1 point
-
I like that very much indeed! The black and white underside has always appealed to me, you've done a great job on this on!1 point
-
Hi I do custom decals i have a fair long list so far follow the link below and there are pictures on this post http://s362974870.onlinehome.us/forums/air/index.php?showtopic=241858&st=0 Richard1 point
-
Finished the engines, I created one engine and detailed this adding all the vents and panel and hinge details the spinner was also detailed I then created a frame using lego bricks I then created a silicone mould using the Polycraft general purpose RTV silicone catalyst GP-3481-F mixed with the RTV silicone rubber at a ratio of 10 ; 1 to get this After the mould has fully cured I was then able to mix the Polycraft SG2000 fast cast Polyurethane resin at a 50-50 ratio mix using my digital scales for accuracy and I was able to cast 4 of the engines and spinners, mind you it took me a couple attempts to get it right. Luckily I did not have to many air bubbles to contend with, but as this is my first resin casting I am quite pleased with it and it was easier to do than I thought, one thing you really do need though is good digital scales.1 point
-
Not much to show,but it does show that I have cut the windows and doors out plus the cargo doors. Just got back from Brooklands, Weybridge, taking loads more photos and measuring some stuff on the Vanguard, got to chat with a pilot who used to fly the Vanguard as well.1 point


.thumb.jpg.d17ff607fc7e89ed057e63fcb6f2a888.jpg)

.thumb.JPG.3498f40362ff13ebfc4b2e45abbd545e.JPG)


This leaderboard is set to London/GMT+01:00