
Leaderboard


Popular Content
Showing content with the highest reputation on 08/12/12 in all areas
-
This is a bit off my usual open-cockpit, wind in the wires patch, but I have long been fond of the early B-17s, and have wanted for a while to do a bare metal example in foil. This is a machine of the 50th Reconnaissance Squadron at Hickham Field, in the late spring/early sumer of 1941. I had it pretty near done in July, but put it aside for other projects, with only few fiddly bits remaining to be done to finish it. This week I got it out to have it done for today.... I want to thank Mr. Aitken and Mr. Matsuoka for cuing me in to a genuine Pearl Harbor subject (the kit markings were spurious and only D-types were at Hickam in bare metal that spring and summer), and especially to thank HyperScaler Steve Nelson, who was kind enough to send me gilled cowlings for a D (my old 17C boxing had only the solid cowls included).3 points
-
My latest project is finished.. This is my rendition of Lt. James Elms Swett Wildcat as flown on his famous Medal of Honor mission on 7 April 1943. This was his first combat mission and he became ace-in-a-day on that flight, shooting down 7 Japanese airplanes before being hit himself.. Not bad on your first day on the job.. He would end the war with 15,5 confirmed victories in 103 combat missions. He earned two Purple hearts, 8 DFC and of course the MoH.. The kit used is Tamiya. With Quickboost engine, Eduard Zoom set, CAM 48-111 decals, Ultracast wheels and seat (should have been with shoulder belts which I found out one day after I had the fuselage glued together..). Scratchbuild open cowl flaps, improved cockpit (no floor), gun sight, improved gun ports and metal tubes for guns. Paint used was predominantly Mr. Color and Gunze with clear lacquers by Future and ModelMaster. Eduard's color zoom set is wrong in color and so are the CAM insignias. The Tamiya insignia are of the wrong size as well.3 points
-
Resin kit2 points
-
I built this Corsair many moons ago, but I am pleased with the results. The kit is Tamiya, which simply falls together, and if my memory serves me well, it is painted using the old Aeromaster acrylics, which were brilliant but sadly are no longer available. The markings are for VF-17 aboard the U.S.S. Bunker Hill. Hope you like it.2 points
-
Any time, Checkers! I love writing about the Il-2 so much that I'm finishing up a book on it. It is one of the unsung (in the West) heroes of the Second World War. I my opinion it was the single-most important aeroplane in terms of defeating the Nazis. Best Regards, Jason2 points
-
Not RAF, but USN, a 35mm filmstrip (remember those?) with accompanying reel-to-reel audio tape. An Electronic Warfare training class on Fire Control RADARs played the audio for a Russian system with the narrator saying "An Electronic Warfare Operator seldom hears this sound twice..." (this was while the Vietnam war was just winding down so they had lots of great audio to use). The first time I heard this for real while overflying the Russian helo carrier Moskva, I about jumped out of my seat. Luckily enough an EW officer from a VQ squadron that was watching over this rookie's shoulder settled me down with, "Don't worry, those Russian ships do that all the time..."2 points
-
Hi Folks! The latest product of my sick leave - 1/32 Revell MiG-29UB with Zactomodels upgrade set (3x more than the kit cost) and Eduard exterior PE. Finished in Xtracrylix with Begemot's amazing decal sheet. For info on using the Zacto set, the build thread is HERE Usual high quality pics taken outdoors in the dying sunlight.... Happy to answer any questions, comments etc. Al1 point
-
Hi All, Here's my latest output and, overall, this kit was a joy to build. Please, Airfix, more of the new tooling! I chose the option to build the 1950 RNVR aircraft from RNAS Culham (HMS Hornbill.) There were a few tricky areas to deal with – the rear wing to fuse joint needed so filler, the propshaft needed trimming and if you choose a wheels-up model then ignore the instructions and glue wheels to undercarriage to fairing and install that sub-assembly. I hadn’t built an in-flight model since I was a kid and have really enjoyed this – I’ll be doing more as I think it shows off the machines we love in their most natural element. I wanted to show off the lines of this aircraft as well as the handsome RN colour scheme. After some research and help from fellow forum members I decided to ignore commercially available display stand options and build my own. It wasn’t hard and added immensely to the sense of achievement. I used 4mm brass tubing and 5mm clear acrylic. An aerial photo of Culham was inserted between the two layers of acrylic for some added interest. It’s a pretty modern shot but once converted to B&W with some extra grain I think it passes muster. I glued the model end of the tubing but not the base end. It’s a pretty snug fit in the base anyway so it’s secure enough without glue and leaving it like that allows me to spin the rod to change the display attitude of the model for a bit of variety. Overall I’m pretty happy with this method of building a display stand and will use it again. The model was finished with Tamiya and Revell acrylics. My plan was to keep weathering to a minimum – this was 1950 with a glut of National Servicemen to keep the aircraft clean after all, but research did show that exhaust staining was common so the Tamiya smoke came out and I also added a little to simulate oil stains underneath. I had planned to keep the pre-shading minimal but I was disappointed to find that my pre-decal coat of Klear seemed to soak through the Tamiya Sky – a little like water through paper to show what’s underneath – to make the pre-shading more apparent. I think I just about get away with it. Decal quality was excellent although I do use setting agents as a matter of course. Anyway, enough blathering and time to let the pictures speak for themselves. Comments and critique are always welcome, of course, and I hope you enjoy. Cheers all, Roger1 point
-
This month I have continued my 70th Anniversaries modelling theme with a small, but relevant diversion to finish the year with yet another Harrier to add to my collection! 70 years ago this month, in preparation for the anticipated Allied landings in Sicily the following year, 899 Sqn formed up at RNAS Hatston in the Orkney Islands on 15th December 1942, equipped with 12 Seafire IICs and a core complement of 6 pilots from 880 Sqn. Sword's marvellous 1/72 twin stick harrier kit includes colourful tail markings from 1992, when 899 celebrated their 50th Anniversary. The kit comes in two separate variants (thus far); an early AV.8/T.2 (in RAF and USMC markings) and this T.4 version in a choice of RN or RAF markings, the latter with the extended laser nose. Moulded in Sword's familiar soft blue-grey plastic, it looks very similar in breakdown to the ESCI Harrier kit, which augurs well. Better still it comes with a pre-coloured photo etch set and a single resin part, all for a remarkably reasonable price. Lightly engraved surface detail is good and the overall shape and accuracy seem to have attracted comparatively little criticism from the Harrier buffs, bar some concerns about the width of the upper wing "hump". Mine seemed to be well moulded throughout, although some other modellers have encountered a few short shot and distorted parts. As might be expected with a short run kit, building it requires a little patience and skill, but for the most part I found the fit of parts to be very good. Two areas gave me some grief: firstly the intakes, whose inner wall parts would not fit happily around the compressor blades and required a little trimming (which may just have been my misunderstanding of the build sequence). There was also a nasty sprue attachment point just inside the outer lip that required some fiddly removal. Secondly, the fuselage did not fit together nicely. Fit at the the back and forward was really quite good, but less so along the middle, leaving a nasty gap on the underside and above the rear cockpit that needed (and was easily resolved with) some Tippex filler. There were also a few minor niggles; the PE was very fiddly to apply (I really hate superglue!) and the attachment point of the nose-wheel leg was rather vague, leaving it a little lower than I would have preferred. There were also a few awkward ejector stubs, most noticeably in the wing halves, but these were easily trimmed and gave me no real problems. Decals are by Techmod, who always look good although I have had problems with them cracking before - however I am pleased to report that this was not a problem on this kit and they settled down very nicely with a little Klear to bed them in. Note that the instrucitons would have you fit the internal windscreen upside down and that the canopy may not fit that easily if you do put it the right way up, but not in exactly the right place! The canopies were nicely thin and clear, albeit rather disapointingly without the very prominent Harrier MDC either moulded in or supplied as a decal. Unfortunately something went slightly wrong when I applied Klear to them (dust I think) and one of them became a little cloudy looking; mea culpa. As is my usual practice with Harriers, I swopped the pitot for asteel pin in the interests of long term survival. Other than that though, this kit really is very nice, a quantum leap forward from the ancient Bobkit Harrier, definitely excellent value and thoroughly recommended to those with moderate building skills and a love of the Harrier! FredT1 point
-
Also built for the RNZAF theme build is this Italeri 1/48 Harvard using locally produced Ventura decals.1 point
-
Hi everyone, Whilst I`m in the process of finishing my USAF Spad, I thought I`d show you my Revell-Monogram Skyraider that I finished this summer. done as an aircraft of VA-145, The Swordsmen aboard USS Intrepid Not quite OOB as I made a few `improvements` such as widening the circumference of the cowl with some plastic sheet and lots of filler opening the cowling shutter to display the engine and replacing the kits dodgy wing tanks with Zuni rocket launchers from a Hasegawa weapons set Kit decals and odd bits of wire here and there. hope you enjoy1 point
-
I failed to meet the F-16 GB deadline, but finally the model is finished. The model is built from the Hasegawa YF-16 kit as a base, with extra parts from Hasegawa's F-16A. Wheel wells and jet nozzle are resin parts from Aires while the jet intake is CMK. Decals are by Vingtor Decals.... Here are photos of the finished model. I will finish off this build with a photo the YF-16 together with the YF-17, a model that I did some 20 years ago. It was converted from the ESCI F-18A kit. The model is finished in Canadian markings, as a promotion aircraft for the Northrop CF-18L that was offered to the Canadians. Maybe I should polish it down and repaint it in YF-17 prototype markings. Nils1 point
-
This is a project I just wrapped up for the Interwar GB. The Airfix 1/48 kit provides many parts needed to make a proper pre-war Spitfire, but not quite everything. I had to make some modifications in the cockpit (adding a ring and bead gunsight mainly) and do a few additional external modifications as well as this model represents one of the first 12 Spitfires off the production line. Overall, I am pretty happy with the results. The use of aftermarket parts was kept to a minimum as all I used were some old True Details photoetched belts and some .303 gun flash suppressors for the outer wing guns. Everything else was scrounged from my spares bin, scratch built or kitbashed. The serial number for this aircraft is a best guess. The rudder guard indicates it was one of the first 12 Spits off the production line and its camouflage pattern indicated it had an odd digit serial number. Checking the records, K9791 and 9793 were used for trials and never made it to 19 Squadron. And I figured it might not be K9789 either since that was the first airplane they received and likely got a WZ-A code if they ever painted it like that. So, I figured I had one chance in three as to which plane it was (either 95, 97 or 99). Decals are a combination of Airfix and Illiad's 1/48 Pre-War Spitfires sheet. It did have a few minor errors on it that I had to overcome though with some careful decal surgery.1 point
-
Kit manufacture: Frog Scale: 1/72 Type: DeHavilland Sea Venom Extras used: £0,25 worth of love and attention Paints and colours used: Vallejo model air 71053 Dark Seagreen and 71009 Duck Egg Green Been off from work last friday and decided to use the three-day weekend to finish off a few projects. This is one of them. An old Frog kit, with the £0,25 price tag still on it! Those where the days... If you show a kit that old some love (well, at least more then £0,25 worth...) you are rewarded with this. Even the 40 year old decals wanted to stick! Oh my, what a big nose you have... ...and what a nice tail... Loaded for bear! (Well, koala anyway...) Rob1 point
-
Yet another one of the bench. Not perfect but I'm calling it finished. A fellow BM'er Stu, inspired me with the one he did. So I thought I'd have a go. This is the old Ertle kit. Time has not been kind, as it fits where it touches. Decided to do something a little different. The pipes from the bomb bay are for laying a carpet of smoke during the landings of D-Day. Markings are from the scrap box. Hope it meets with approval. Comments and feed back are always welcome. Thanks for looking.1 point
-
I've been using them for a year or so now. as per the above prep is essential - Tamiya do a fine surface primer (in grey and in white) in a rattle can (but it decants OK) which is a help here as it does cover very fine scratches and if you then hit it with a gentle polish using micromesh or similar then its a really good base for the alclad (or the gloss black paint undercoat needed for the high shine alclad colours). Alclad also sell a primer that fills slight imperfections and whilst I have some I haven't got round to trying it yet - by all accounts it does a good job. Also remember that as the Alclad paints dry almost instantly then you can put multiple really thin layers of different shades of Alclad to get good effects - this is particularly useful on jet exhausts. You can also tint Alclad paints by adding touches of other lacquer based paints - again useful for getting really good effects. And finally: re: masking over the top of Alclad. I'd second the comment about being careful of masking over the top of Alclad directly, I've had the same issues with it pulling off with the tape sometimes. However, whilst the instructions say you don't need to put a varnish over the top before decaling or finishing - I tend to put a thin layer of Klear over any Alclad metal finish that I'm masking off to overpaint - the Klear hasn't any issues with pulling off with the masking tape and if you want you can add your masking tape and then give the tape edges a v light layer of Klear as well and you'll have no issues with paint creeping under the masks. Oh and lacquer thinners is OK to use to clean your airbrush as long as you don't have any teflon or other plastic seals in it as it will dissolve and eat through them if left to soak for more than a min or so! In the UK Lacquer thinners is called Cellulose thinners and Halfords sell cans of the stuff fairly cheaply. enjoy! TFB1 point
-
Cheers chaps...funnily enough, I thought the same about the Batmobile when I'd was spraying it! Anyway, here she is, fresh from March 1970: Cheers, it's been fun, Dean1 point
-
Like a dream from the 70s, Duncan. :-). A tiny bit of filler along the wingroot, and some superglue to attach the tails and blend them in. Easy peasy. Rob1 point
-
Hi mates, Reshaping of the front portions of the pinion tanks has been completed to my satisfaction. And since it's my satisfaction that I'm aiming for, I'm happy! The reshaping was accomplished through normal sanding, but I have to say that I broke through the plastic in several places and had to add some filler. Oh well. I think they look quite nice from the side view, so I tried to make sure that they were "pointed" enough in the top view so they would not have a perception of being blunt or bulbous. To be honest, what is really the problem with the kit tanks is their cross section, and that is not something that I care to tackle. By the time I finish the model, Airfix will release a nice scaled-down version of their quarter scale Vixen, and there you go! The reshaping has been worth it, I think it is better now, although what I've done would be subtle to those not looking for it. Here are some top views of the tanks after my efforts: Just for giggles, I added the tank vent on the starboard wing. I will now begin careful record-keeping to see how many times I will knock it off during the rest of the build! I had to scratch build this, as the one in the kit is quite a bit too large. Before we continue, I would like to announce that this model has now been placed in my category of GEM. Yes, that's right, the MPM/Xtrakit is a GEM!!! For the acronym impaired folks, that stands for Good Enough Model. Cheers, Bill1 point
-
Thanks. This year I decided to be a little "Eclectic", breaks the monotony of 48th aircraft. And some space... Although that's not strictly true of the RM, as it's bleedin' huge.1 point
-
Oh yeah! Looking great, have one of these and have pulled it out a few times thinking I will give it a go, but have been frightened by the size and complexity. Good to see someone having a shot at it.1 point
-
Finished at last is this 1/72 Airfix Islander, with S&M decals. The build thread is here. The S&M decals are great, but if you want to model VP-FAY as she was at the time of the invasion, then you'll need to cut off the bits of the fuselage cheat lines that wrap under the lower section of the nose cone (as I have done). This section must have been damaged at some time while in FIGAS service and replaced with a plain white part. As the model is to be shipped out to the Stanley museum for display, I decided not to fit antennae and other overtly delicate parts. Cheers Cliff1 point
-
Quick update, main paintjob finished - just touching bits up then time for decals!1 point
-
Thanks for your tolerance - most people would just say annoyingly persistent! Finally - a ray of hope! I knew it could be done - I think you've got it exactly right! John1 point
-
Rockets and bombs painted and weathered http://i201.photobucket.com/albums/aa287/caffloss/Shturmovik/Shturmovik001-6.jpg[/img]"]http:// All decalled up and nearly finished ! http://i201.photobucket.com/albums/aa287/caffloss/Shturmovik/Shturmovik002-4.jpg[/img]"]http:// http://i201.photobucket.com/albums/aa287/caffloss/Shturmovik/Shturmovik003-3.jpg[/img]"]http://1 point
-
Gorgeous box art, though... John1 point
-
Learstand - I may contact you in the future for some info if you don't mind ? I'm a fan of the Il-2 from the self-titled Xbox game, didn't know about it before then but what a plane.1 point
-
I certainly couldn't get my body into a Lightning intake nowadays! The intakes are still the same size but I'm not. Duncan B1 point
-
A nice collection Stephen. I particularly like the Wessex. Cliff1 point
-
Yummy!!! Know what you mean! With few exceptions, I have no qualms about building the original, old Airfix kits. I have no interest in looking for faults or accuracy issues. I'm content to build straight out of box & use my meagre skills to produce a decent model." Impossible" is NOT in my vocabulary!!I I like the old Sunderland - even though I would like to see a re-tool! With a modicum of scratchbuilding ( mostly interior) It builds up quite well. I've got their B-29, Catalina. HE-177, B-17 & B-24 , Halifax & Stirling. Have a notion to build BOTH Italeri & Airfix Sunderlands together. Using Italeri interior parts as guide for Airfix interior. Don't care if it's not right !! Once it's inside, who'll be any the wiser!! Allan1 point
-
Not an armour guy at all, but this is excellent! I especially like the idea of the photos on the base. Might steal that idea for an aircraft or two… ;-) Very nice work! Kind regards, Joachim1 point
-
EASY ! the clue is the Barnes Wallis pic which shows actor Michael RED-grave (Red being of course the well known soviet colour) in a YAK FUR Coat Mr Redgrave plays Barnes Wallis in the Dambusters film for a total screen time of 2 minutes 41 seconds which is .....(wait for it ) 1/72th of the films total Running time ! no..........? ..............any takers? seriously tho i am wondering if the Lanc Bii is a tooling window towards a LINCOLN (new nose section, fuselage insert, wingtip extensions, and different engine cowlings.....) if by chance the major hurdle of the radial nature of the Lincons cowlings is taken care of by the BIIs wing and nacelles? any experts know if this would make the conversion a lot easier?1 point
-
Plenty of scope for multiple boxings and markings schemes for that one.1 point
-
There is a short sequence in Britain at War in Colour that shows Malta Mk.Vs before the take off, they are in a blue and grey on the upper sides, I wonder why no one so far brought that up .... at least I've never seen it mentioned anywhere.1 point
-
Love it. Was just going through your build thread last night, the finished job looks great. Steve.1 point
-
Nice job on the early Spitfire , you have nailed all the early details spot on.1 point
-
Very well done, as a youngster I was once told " to make a good model you have to have patience, remember, a marvellous model in months, not a muddle in minutes", and as the first photo shows all done with two left arms, challenging at best I would think1 point
-
Cockpit ready and surfacer. Masks from the box need some corrections...1 point
-
Lovely clean build and spot on weathering Mike.1 point
-
Clean build. Really like the display, well done!1 point
-
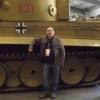
Great looking T 34 !! Very ,very nice presentation !!!1 point
-
Love the way you have displayed a great looking t-341 point
-
Bloody marvellous my friend. Exceptionally well displayed as well. Regards Pete1 point
-
Excellent finish and quite a different display method - very . regards, Jack1 point
-
Well presented and finished, lovely looking kit, very nice Tom1 point
-
Very nice indeed.1 point
-
Fantastic build and great way to present it as well Sean1 point
-
Excellent work mate! The base really sets it off too1 point
-
Well I've cracked on today. Here's some pics of the model in its primer coat. It neeeds some seam work doing still, but - nice evening, couldn't resist!! Hopefully you can see that the chin intake has been reduced in depth - gives a much sleeker profile to this area. Looks more protypical to me. Cheers Jjonners1 point


.thumb.jpg.d17ff607fc7e89ed057e63fcb6f2a888.jpg)


This leaderboard is set to London/GMT+01:00