
Leaderboard


Popular Content
Showing content with the highest reputation on 30/11/12 in all areas
-
My latest model 1:12 points
-
Evening gents :grin: latest from my workbench is this Supermarine Seafire XV from Sword. The kit is straight from the box apart from tape belts in the cockpit. Brush painted with Humbrol enamels as usual with various acrylics used on the little bits. Hope you all like it. Seafire XV of No 883 Sqn, RCN, RCNAS Dartmouth, June 1948 Regards Tom1 point
-
I finally finished my Harrier. I was trying to avoid any after market stuff but in the end I used Heritage Aviation's undercarrriage set, and a Neomega seat. My WIP thread is here: http://www.britmodeller.com/forums/index.php?showtopic=234929126 I used the decals from the new issue of the kit and Xtracolor enamels to paint her. Thanks for looking.1 point
-
Spent the last few weeks building this 1/48 beauty. Pretty happy with the end result and looking forward now to building my 74 Sqn version.1 point
-
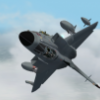
F-35A Lightning II 1:48 Kitty Hawk The Joint Strike Fighter (JSF) as the F-35 was originally known was a multi-national project to create a multi-role fighter for the new millennium and beyond, led by the US, with the UK and other nations taking a greater or lesser part, with a view to taking delivery of airframes once the project reaches fruition. The A model is the traditional forward flight only conventional take-off aircraft that is destined to operate from its operator's airbases, so has none of the trappings of the STOVL capable B model, leaving extra space within the airframe for fuel and weapons load. It is designed to replace much of the F-16's functionality whilst adding stealth, more correctly termed low-observability into the mix, although it will also replace some of the A-10's capacity whilst being much faster over the ground, so theoretically harder to shoot down. How much of the A-10's work-load will be taken up with cheaper, almost disposable drones by the time the F-35A comes into service is as yet unknown. The first flight of the F-35A was in early 2006, and continued test flying with various hold-ups putting it further behind schedule, which coupled with increasing costs has caused constant griping about its viability in the press. Following its flight testing at speeds of up to Mac 16, and subsequent grounding of the whole fleet due to the failure of a power unit, weapons testing began in October this year (2012) with the test firing of an AIM-120 BVR Air-to-Air missile, the replacement of the old Sparrow missile. The Kit This release follows hot on the heels of Kitty Hawk's recent F-35B, which was reviewed here in August. Although it may look very similar to the uninformed on quick glance, the two airframes are significantly different, and consequentially so are these two kits. The box is an overall white top-opening one with another nice painting of an F-35A airborne over broken cloud. Inside are six sprues of light grey styrene, the two large fuselage halves, a small clear sprue, a small but busy Photo-Etch (PE) sheet, two sheets of colourful decals, the instruction booklet with full colour cover, and an additional photo-instruction sheet for the PE parts. First impressions are good, and the fuselage parts are covered in fine detail of the same style as the B-model, although the styrene is a paler grey of the same type as that of the new Jaguar A kit, which should be good news for those that weren't keen on the darker more brittle plastic of the F-35B. The build begins conventionally with the cockpit, which is reasonably simple due to the fact that it's depicting a modern "glass" cockpit with Multi-Function Displays (MFDs). The ejector seat is made up of six parts, including a pull-handle at the front of the seat cushion and a control box attached to the left side. A set of PE seatbelt harnesses are included, plus a cover for the top of the head-box to hide the joint between two main parts. The instrument panel is a single piece with two side sections and one middle section having raised details, while the main section is flat, ready to receive the instrument panel decal that is included on the decal sheet. Some boxes affix to the rear deck, and throttle and control levers to the recessed side consoles. Unsurprisingly, the nose gear bay is attached to the underside of the cockpit, and this is made up from individual sides to maximise the detail. As seems to be the way with all recent Kitty Hawk kits, the gear leg is shown installed before the bay is placed in the fuselage, but with this kit, that's entirely optional, because all three legs fit into sockets in the roof of the bay, so can be installed at any time. The gear leg is nicely detailed however, and has a separate oleo-scissor and retraction jack that is made up from two parts. The main gear bays are built up from two parts each, with the larger side a separate part, and a similarly detailed gear leg. The main wheels are made from two halves, with the outer hub moulded into the tyre, while the rear hub is a separate part that installs into a recess. The nose-gear wheel is a single part, and none of the tyres have any weighting, although that's easy to remedy with a sanding stick if you feel the need. The twin intakes are next up, with the two trunks joining within the fuselage to feed the single engine with much-needed air. Each trunk is made from two halves, split diagonally at the corners, and there are a few shallow ejector pin marks that will need cleaning up near the open mouth. These mate at the conjoined end with a basic rendition of the engine, which makes up from two halves, and has fan faces front and rear, with additional stator vanes on the front face, and a PE burner ring at the rear. The exhaust trunk is a separate section, again made from two halves, with an internal ring added at the exhaust end. The exhaust petals themselves are supplied either as a one-piece styrene ring, which has some nice detail moulded in, or as a series of PE parts that are formed into a circle, and then joined together. The inner sleeve is formed into a simple cylinder, while the outer petals have a cylindrical base, but have an etched fold so that they can be bend inward to give the familiar conical shape to the outside. A narrow ring with serrated detail is formed into a cylinder, with the trailing serrations bent in slightly, and then placed at the base of the exhaust to conform to the shape. This is clearly the more complex option, and while it offers better and more in-scale detail, it also gives you the chance of disaster. The back-up styrene part will provide a very useful safety net if you're either phobic of PE, or are unlucky enough to make a mess of it. One of the key components of the F-35's low-observability is that it is capable of carrying some weapons in internal bays, reducing external clutter and the radar signature that the weapons would return. The main bays are on the underside of the aircraft, and these are portrayed in the kit as two "bathtubs" that have separate end-caps and plenty of moulded in detail. There is a minor mistake in the instructions of the initial batch at this point (stages 7 &8), which seems to revolve around the incorrect installation of a couple of boxes in the bays that aren't included in the kit. There are however a pair of thick cable trunks that run down each side of the bay, and these are supplied as separate parts to give them a proper 3D look. Each bay is supplied with a JDAM inertially guided smart bombs to give the bay some purpose, and to busy them up. The intake mounted Air-to-Air weapons bays are moulded closed on this kit, but their openings can be seen on the sides of the fuselage due to the raised detail around them. When all the bays are complete and painted, they are dropped into the lower fuselage, starting with the nose gear bay and the weapons bays, then the engine and its intake trunking, which also includes an additional part of the intake lip, and then the cockpit, which fits atop the nose gear bay, and the main gear bays outboard of the weapons bays. In the top fuselage half two parts are added to complete the bay for the cannon on the starboard side, and the refuelling receptacle on the spine of the aircraft. Once installed, the two fuselage halves are joined together, and the model will then start to look more like an aircraft. Three PE mesh grilles are added to the upper fuselage, two on the cannon fairing, and one on the prominent fairing on the port side. The F-35's blended wings are relatively small, and are made up from two halves, plus a two piece leading edge slat, and two piece flaperon, with a wingtip recognition light in clear (not numbered in the instructions) finishing off the job. The joint with the fuselage is stepped to add strength to the arrangement, and three sockets on the underside of the fuselage help hold it in place. The twin elevators build from two parts each and plug into the rear of the fuselage either side of the exhaust. A separate tip to the nose is added at this stage, presumably to remove the need to hide any seam going through the nose, which is a thoughtful touch. The raised sensor blister with two flat glazed panes is added to the underside, although this part isn't all that clear in places, suffering from a little distortion. An absolute profusion of bay doors are installed next, and this makes the two steps (15 & 16) look rather cluttered, because every door has a significant hinging system added to it within the diagram, so care is the order of the day here. The larger weapon bay doors and the outer main gear bay doors have two individual hinges each, which locate within their respective bays, and the inner weapons bay doors have four each, again adding to the detail. Inside each weapons bay is a flip-out pylon for the AIM-120 AMRAAM missiles, which have to be placed clear of the bays for firing. These sit close to the inner bay doors close to the ground, and each missile is made up from a pair of body halves with four winglets moulded into the seamline plane, and four additional winglets as separate parts perpendicular to those. The vertical(ish) stabilisers are added in the final stage, along with the refuelling bay doors, which can be posed open or close, and the beautifully clear canopy part. The canopy of the F-35 opens forwards as a single part, and this is possible by leaving the tab in place that fits into a slot in the front of the instrument coaming. There are a large number of PE parts to detail the latch mechanism for this area, including a lower-lip for the canopy itself, and a row of engagement teeth on its underside. The corresponding slots are already moulded into the cockpit sills, and additional X-shaped PE parts are added to detail this are further. A pair of canopy rams are also included to support the open canopy. All-in-all, quite an impressive feature. The decals are supplied on two sheets, and are split between the AF-01 Prototype with black stabilisers that have a large red lightning strike running diagonally across them, and AF-06 the first production airframe that made its maiden flight at Fort Worth before being transferred to Edwards Air Force Base. AF-06 has a full set of lo-viz decals, while AF-01 has a mixture of multi-national flags, full colour badges and lo-viz decals. In addition to the decals that are detailed in colour on the rear cover of the instruction booklet, there are also a host of national roundels in hi-viz and lo-viz for the modeller that wants to try their hand at building a speculative in-service machine from their chosen nation. Conclusion Another impressive release from Kitty Hawk that deserves to do well. It represents the most up-to-date F-35A model we have to hand at present, and although the in-service machines will change as time goes by, their main features should still be captured by this kit. The detail is good throughout, and although a decal for the main instrument panel might seem a little simplistic, the panel is fully glazed, and would be difficult to represent any other way in truth. Inclusion of a pilot figure is also a nice touch, and detail on this is also good, although he will need a little filler to deal with a sink mark in his lower abdomen, but this shouldn't ruin any detail due to where it is. Highly recommended. Available soon from Hannants Review sample courtesy of and available soon from major hobby shops1 point
-
That's as good a GR3 I have seen. Brill FF1 point
-
Love it1 point
-
Thanks, Martin. You weren't too far off when you used the word "bludgeon" earlier! Ah, T Rex. I'm old enough to remember that! (Or I'm so hopelessly out of touch that I don't know the new song you're referring to!) Yes, I think the worse is over. I've been dry fitting the wings, doing some sanding (mostly to get the very small dihedral right), and they will fit just fine. I've been thinking whether I should add some rods to make a stronger joint, but I may just use some Gorilla Glue or epoxy. So far, the only really difficult part has been fitting the tanks onto the booms. The kit is certainly not shake and bake, but for me it doesn't live up to its web persona of being unbuildable. If my back cooperates, I hope to have the wings on and at least get to the primer stage over the weekend. Cheers, Bill1 point
-
Very nice, looks the business in that scheme as well! Great job on the re-scribe. cheers Simon1 point
-
That's a nice paintjob there JM, the demarcation looks really good too.1 point
-
Supacat HMT400 Jackal and HMT600 Coyote 1:48 Airfix The Jackal was developed as a replacement to the Land Rover WMIK by Devon based Supacat, with improved load carriage, armament and range, as well as a very powerful engine to give it torque to crest difficult obstacles and a high top speed on roads as well as off-road. Conceived as a deep-penetration recce platform and convoy escort, it provides a better weapons platform with a long 500 mile range, whilst adding crew protection and maximum speed of almost 50mph on rough ground. In an effort improve upon the Snatch Land Rover's poor IED resilience, the Jackal is fitted with armoured panels beneath the crew compartment, and shock-absorbing seats to protect the crew further. Of course nothing is totally effective, and some fatalities have occurred on active duty in Afghanistan. The Coyote is an extended wheelbase variant of the Jackal, with an additional powered axle to give it better load carrying ability, whilst providing the same off-road traction, and the two vehicles will be used in support of eachother, in a mix-and-match variation to carry sufficient supplies and arms for particular assignments. The Coyote is also capable of acting as a light artillery tractor if the need arises. The Kits As you can probably tell from the twin boxtop pictures, these are separate kits, although they both arrive in identically sized boxes in Airfix's usual style, and they share three sprues, with the Jackal effectively containing a subset of the Coyote's parts. Initial impressions are surprising - there is plenty of detail in the parts, which are crisp and well moulded. There are also a lot of parts in these small vehicles, which should result in a good replica. The construction process between the two kits is also broadly similar, starting with the axles and their associated suspension and drive shafts. The Jackal has two to build up, while the Coyote has three. The front up-armoured crew section floor is the same in both kits, but of course the wheel count is different. The front of both vehicles builds up the same, with the crew floor sitting on top of the front axle and armour panels, a bulkhead behind the driver's compartment, and another behind that, both with built-in roll-over bars. The armoured sides of the cab are installed, as are the driver and co-pilot's seats with an armoured back protector. The Jackal has a short axle-protection panel under it, while the Coyote has a double axle panel with protection for the additional mechanics, and a proportionally longer flat-bed section placed on top with extra mud-guards for the additional wheels. The same blast deflection panels at the rear of the vehicle are fitted, as are the cut-down tail-gates. A pair of additional crew-seats are fixed to the central section of both vehicles, and diagonal supports for the aft roll-bar are installed. The covered spare wheel is mounted on the left-hand passenger door, and can be posed open or closed, as can the right door, which has internal stowage boxes on its inner face. The Coyote has four side panels on the flat-bed, compared to the Jackal's two, and these can be posed folded in, or flipped out for more external storage on both types. The front of both vehicles is the same, built up with large protectors around the headlight clusters and grenade/smoke launchers on the front quarters. A piece of PSP metal planking is attached to the front where the radiator would be for unditching the vehicle in the event of bogging down. To the rear of this section are attached the driver's controls and dashboard, which has decals for instrument dials, plus a full set of foot pedals. This whole section is installed on the open front, and tied in with a front protection bar and a pair of front door panels that can be posed open or closed. A gun-ring is placed on supports in front of the rear crew seats, and to this is mounted the .50cal machine gun, although a 40mm grenade machine-gun can be mounted, but isn't included with the kit, sadly. Another set of grenade/smoke launchers is fitted to the back of both vehicles, and a rear pintle-mounted GPMG "Gimpy" is attached to the rear right of the flat-bed. Flip-up running-boards are mounted between the front pairs of wheels on both vehicles, which can be modelled in the up or down position. As can be gleaned from reading this review, only a relatively small number of parts are required to turn a Jackal into a Coyote (at the model level at least), and these are contained on a half-length additional sprue in the Coyote's both. It contains an additional pair of wheels, suspension and drivetrain parts, plus the extended axle guards, longer flat-bed and additional side-stowage racks. A full-colour painting guide is printed on the back page of the instructions, with the dominant colour being desert tan, khaki for the seats and black for the anti-slip coating on the flat bed area. The decal sheets are identical, so take care which number plate you use if you are planning on getting both vehicles to display together. If you're getting more than two, I'd start planning on sorting out some more plates so you don't have any duplication. The decals are well printed, in good register, and have good colour density. A pair of short black stripes are included on the sheet as "spares", as well as a pair of V-shaped theatre markings that are sometimes worn. Conclusion Each of these kits will build up into a nicely detailed replica of these futuristic looking vehicles. Details such as wheels and cabin fittings are very nicely done, but the crew seats are a little Spartan, however, when looking at the covering of the real thing, they're not too far off the mark. You will need a set of crew seatbelts to give the vehicle a bit more detail, and as they are often seen festooned with equipment for the current mission, you'd also better start thinking about getting some stowage that will fit with this scale. Released individually, and as part of the Operation Herrick range of 1:48 vehicles, figures and buildings, these kits should look great in a desert diorama setting, especially in conjunction with the soon-to-be-released Merlin helicopter, or the existing Lynx AH-7. Highly recommended. Review sample courtesy of1 point
-
Have done some work on this a week or so back. Build started of relatively quick and simple after the 32nd scale A-10. But soon i realised how much more could be done to really make this example stand out. The interior: After dry brushing the metal frames and spraying the walkway, It was obvious more need to be done to bring the detail out more. Seat Belts..... Wings and main undercarriage are all complete also, along with the horizontal/vertical stabilizers and the 2 Merlins are complete, minus painting. I've devised a method so that the 2 Merlins will be visible along with placable and removable cowlings More to follow....1 point
-
Nice job, mate! Well done!1 point
-
Very nice mate.1 point
-
You have done a cracking job there, well done. Mac1 point
-
You`ve done a cracking job on this one, I presume you started off with the re released Airfix 1/48th kit? If so that makes it doubly impressive, what a rescribing job and I love the paintwork, All the best Tony O1 point
-
Now that looks gorgeous well done1 point
-
She's a real beauty.1 point
-
That is a cracking finish!1 point
-
Lovley workmanship--she looks worn, but well cared for. Did you mix anything into the sea grey/ RAF dark green to fade it, or is that just how the Xtracolour paints look out of the bottle? In either case, it's very convincing... A. C.1 point
-
they were beautiful harriers. and this is why i now have a tendency to put wheels up on everything leave off all small easily broken details and usualy probes if i can get away with it. if not i replace them with steel wire. this is because there are not many other people who give a toss or care for your items even family are ham fisted. its annoying ive had so many models destroyed by people in different ways and rather than saying sorry about that. the response is either "oh well its only a piece of plastic" or "oh well its only a toy you shouldnt be playing with toys at your age" no appology but self righteous confirmation that you are wrong and they are right. fitting models with steel wire for probes as i have done on my vulcans has the added advantage of people who are clumsy impaling themselves on it and being warned from touching these mini models of war. i also had an ex who seeked to destroy and did destroy all my models i had made since my childhood .. the result of that is a new girlfriend who likes me being me and making more models than ever. so i suggest you go out right now and buy yourself a nice big harrier kit make it s 1/48th or 1/24th fitted with a motion sensor that activates an alarm withing a 1 ft area of interference (cats are also a problem)1 point
-
As well as the nose, one other major external difference was in the intake area - the A-4E and subsequent models used the J52 engine in place of the original J65. This resulted in a separated intake to accommodate the increased airflow requirements. A splitter plate was added in front of the intake as well. The A-4G, being a customised version of the A-4F, has these. Definitely no avionics hump either . In short you can't build a totally accurate RAN Skyhawk from the Airfix kit without a lot of work; you'd be better off trying to find a Fujimi A-4E/F or an ESCI/Italeri A-4E without the hump. Also check the fit of the decals. The Modeldecal sheet was designed for the woefully inaccurate Hasegawa kit which has a too-long fuselage so the fin checks may be too large.1 point
-
...and gallons of Micro Set and Sol!1 point
-
I'm not a fan either...maybe I'll drop him a PM...1 point
-
Paints used. Brushed on and when dry added PVA watered down. Left to dry. Paint was then built up added watered down.1 point
-
Yes, you definitely should be happy and proud of her ...... a fine build and you fought off any difficulties resulting in quite a Fighting Falcon model ! Mike1 point
-
I notice Neomega have already got a version of their Mig-23 pit out for the Trumpy kit, based on their one for the ESCI kit, so let's hope they do the same for the Jag!1 point
-
Those camo rings are nice, Does that mean it's flown by the Mysterons? Nigel1 point
-
jekyll and hydetastic!1 point
-
Lovely! Forgive my ignorance, but whose kit is this?1 point
-
Well done Rick! Very good you haven't rushed this one towards the end of the GB!1 point
-
very cool scheme1 point
-
“…the shackle of the target cable being liberated through the medium of an electro-magnetic release unit.” Clearly the person who wrote this manual was brought up on Thomas Hardy. Surely "...being electro-magnetically released." would have sufficed! bob1 point
-
Stunning example !! Love the bi-color scheme, it looks very realistic. Congrats. Karen1 point
-
Yep, we just have to settle with Apaches. Oooo, wish we had buses to play with..............1 point
-
That is a lovely piece of work1 point
-
Don't feel bad. I too missed the F-104 STGB deadline. Your effort would have been worthy of my vote in the final tally. An excellent job!1 point
-
In addition to the Cosford B.1 there was another XA903 that flew into Boscombe Down for fire training. What was particularly galling was that this was modded for engine trials with the RR Pegasus (complete with Harrier lower fuselage grafted into the bomb bay). Later it was the RB.199 test bed. THIS should have been preserved in Cosford as it would have fitted into the collection of experimental types. Trevor1 point
-
Hello, I like this one, I saw the real one in the 80s whan I was at 51st wing. I know the pilot and the artist who made that cat, he made a lot of drawings and caricatures for the Wing and the Air Force too. His nick name was Brugar, he sadly left us few years ago. I'm proud to have a funny portrait he made to me. I built the same plane too, take a look at my collection here http://www.flickr.com/photos/angelomoneta/collections/72157601963027397/1 point
-
It's well worth to miss a GB deadline if the final result is so good ! Great job, the painting is very good and you're right, that seat is now really impressive !1 point
-
Holy Crap! That is indeed a masking job from hell! Excellent results though as the demarcation between the camo side and the high vis side looks so crisp! Very nicely done!1 point
-
Magnificent, and to do it twice, insane! Sean1 point
-
Really nice stuff and that colour scheme must have been bloody hard to do so well.1 point
-
Very nice.1 point
-
Very nice indeed1 point
-
Great work1 point
-
Nice Zipper Rick !!1 point
-
'nummy, a very challenging scheme that you have successfully accomplished...... -I have taken notes on your 's' mods.1 point
-
Thanks again for the positive comments, I really appreciate them. Here' a photo just to prove that I've added the aerial mast and undercarriage door to the model...1 point
-
I find it quite scary that I am scheduling builds for over a year ahead!1 point


This leaderboard is set to London/GMT+01:00